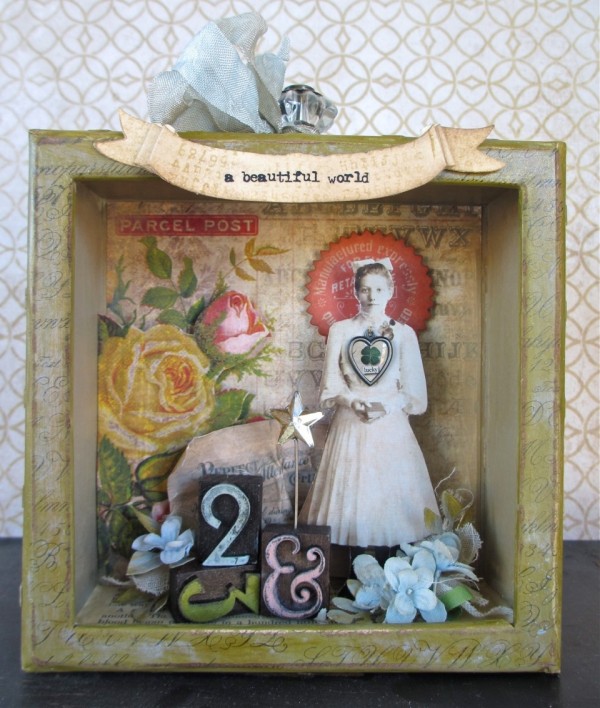
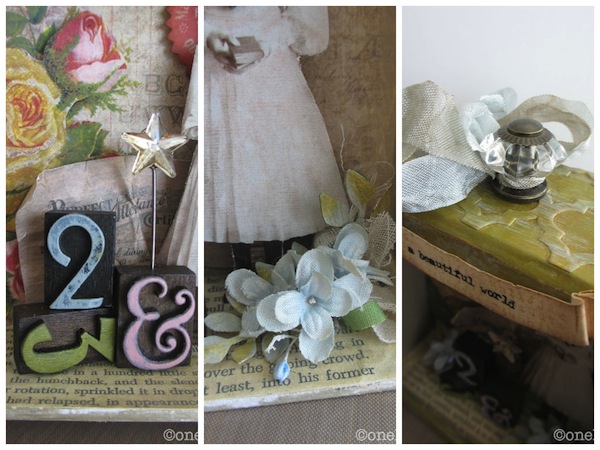
A Beautiful World
Hi readers! TGIF! Also, it’s the last day of February! How did THAT happen? I’m pleased to be returning with a fun shadowbox feature made by Paula Cheney! She has kindly included step by step instructions and photos to help assisting you in making your own version of this project!
Enjoy!
-
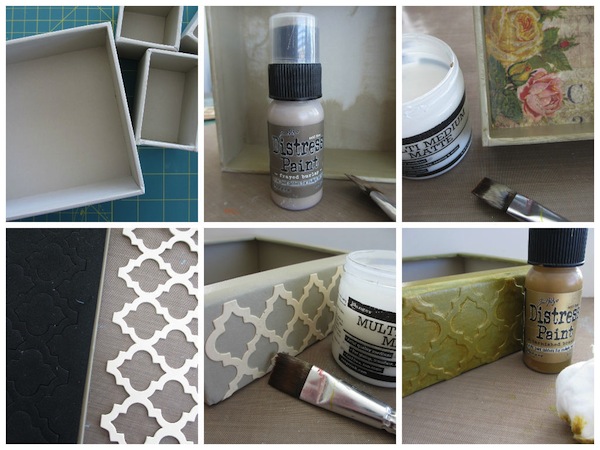
Remove small boxes from a 5.5 x 5.5” Configurations box.
-
Paint inside of main box with Distress Paint Frayed Burlap.
-
Adhere 6 x 6” Wallflower paper to back of box with Multi Medium.
-
Use Frameworks- trellis die to cut 3 strips from Ranger Manila cardstock.
-
Add Frameworks to 3 sides of the box with Multi Medium. Make sure to add a layer of Multi Medium over the the top.
-
Paint out the entire box frame with Forest Moss Distress Paint, let dry.
-
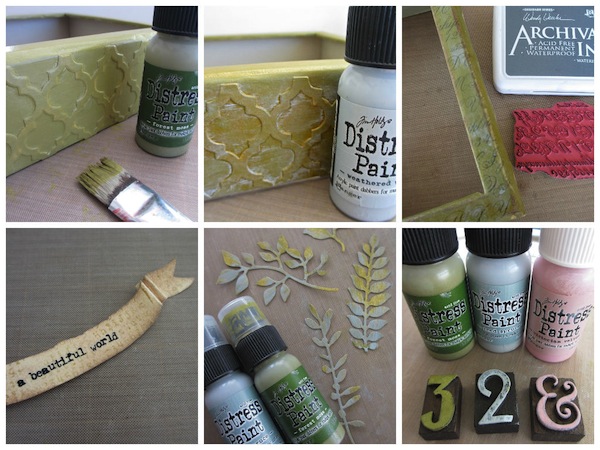
Use Tarnished Brass as a highlight over the Forest Moss Layer. Wipe away excess paint with wet wipe to let the bottom layer color come through. Let dry.
-
Use the same technique to add a bit of Weathered Wood Distress Paint.
-
Stamp the front of the box frame with script stamp and Watering Can Archival ink.
-
Use Curvy Banners Decorative Strip to cut manila cardstock banner. Add words from the Remnant Rub – Botanical. Add to the top center of the box.
-
Use Spring Greenery Decorative Strip to cut leaves from Manila cardstock. Paint with forest moss and iced spruce. Set aside to dry.
-
Use the dapper top to paint 3 letterpress numbers.
-
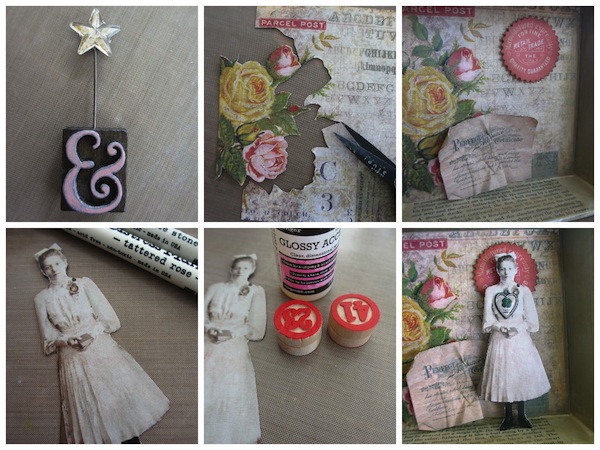
Add Mirrored star to Memo Pin. Push into the top of one of the Letterpress numbers.
-
Cut roses from a matching sheet of 6 x 6” Wallflower paper.
-
Add roses and a few pieces of Ephemera to back of box with foam tape.
-
Cut out Found Relative. Optional: color dress with Distress Markers.
-
Glue 2 game pieces together with glossy accents. Once dry, glue to the back of the Found Relative.
-
Stitch a Custom Heart onto Found Relative.
-
Add Found Relative box (the game pieces on her back make the piece stand away from the back of the box).
-
Add Letterpress pieces to box with Glossy Accents.
-
Add new or vintage flowers, cheesecloth and the painted leaves to the bottom of the box.
-
Punch a hole in the top of the box with a Crop-a-dile for Curio Knob. Add knob and Crinkle ribbon bow.
SUPPLIES:
 |
 |
 |
 |
 |
 |
 |
 |
 |
 |
 |
 |
 |
 |
|
|
 |
 |
|
 |
 |
|
 |
 |
 |
 |
 |

Blog Candy Alert!! Follow our blog via email and comment on this post for a chance to win a special blog candy!
Congrats! Blog Candy Winners!
From: Simple Stories Cardmaking with Shari: Paulette!
From: Hello There – One Stamp, 3 Ways!: Devy Collins!
From: In Good Taste to use Paste: Janis in ID!
Please email me ([email protected]) with your mailing address and the name of the blog you won from!


Wonderful project.
Looks like fun to make.
Carla from Utah
Wonderful projects love them and thanks for the tutorial.
Love this little scene, so much attention to detail!
Yes it is very beautiful!
Love this!
This is awesome!
Beautiful project :)
Amazing project!
This is so intricately stunning! Wow. Love the way you have used distress paints. Thanks for sharing!
OMG… what a wonderfull Little Scene – I love to see how you made it, maybe I´m abele to make one someday so I´ll remeber your “tricks”
TFS and have a creative Weekend
CU hellerlittle
Love this box! Feels like st paddys and spring all wrapped up together.
Love it!
Love the card.
What a fantastic project!
What a lovely shadow box. Paula brought everything together so nicely. I love the background.
great project today
I love the shadow box!
I am such a fan of Paula Cheney, I love everything she makes! She is truly an artist.
What a clever idea and I can see doing this with an old family photo! Love the idea and thanks for the step by step tutorial!
Thanks Paula for a wonderful art piece! Your directions are concise and clear. I’m ready to make a shadow box! You are one of my favorite designers – I check your blog daily (missed you when you were AWOL).
Stunning project and a great step by step!!
Amazing project – I love it
lovely! looks like a lot of fun.
Sandra ltb
I love your job, is amazing, you’re amazing!!!
Amazing work of art.
What a gorgeous project! Would make a lovely gift :-)
Wonderful project! Love the wood blocks. And what you did with the sides of the box is really neat. Great ideas. Thanks for sharing.
Katie B.
Would be a wonderful project to work on with my daughter – using photos, mementos, etc., of her grandfather. Thanks for the inspiration.
My wife does a lot of this stuff so I thought I’d enter to see if I could win something for her. I think you worked hard on your shadowbox and my wife probably loves it. Guess this means we’re going shopping this weekend…
I love your shardow box that you shared with us today. I wish I could create something as pretty as this one is.
Your shadow box project is awesome. The details are amazing.
Really like how the distressing turned out on the frame!
This is gorgeous – like making doll house but for big girls!
Gorgeous shadow box.
Fab project . Love allthe little details included inside x trace x
A great project, thanks so much for sharing :D
Very nice project. Thanks for sharing.
This is soo beautiful. Such an amazing job done on this one, and it looks fantastic.
Lovely and detailed
oh, that is a very pretty project!
Love this project – very “outside the box” that I wouldn’t have thought of. Thanks for sharing!
I will try this, it looks so need! Thank you for sharing!
I’ve had one of those boxes forever and haven’t even opened the package! Now I have some inspiration to dig in – thanks!
Awesome project. Love all the little details.
I just love your altered box. Very creative!
I’m always glad to see people who enjoy doing these kinds of projects. I just like to look at them, not create them. :)
So beautiful! Thanks for sharing :)
Gorgeous! I am inspired to try this myself.
Beautiful decor project. I really like the way Paula does her tutorials, with still photos of each step. Makes for easy reference, when you want to take the plunge and try to re-create the project.
Pretty shadow box! Love all the details!
Love all the great texture and vintage feel.