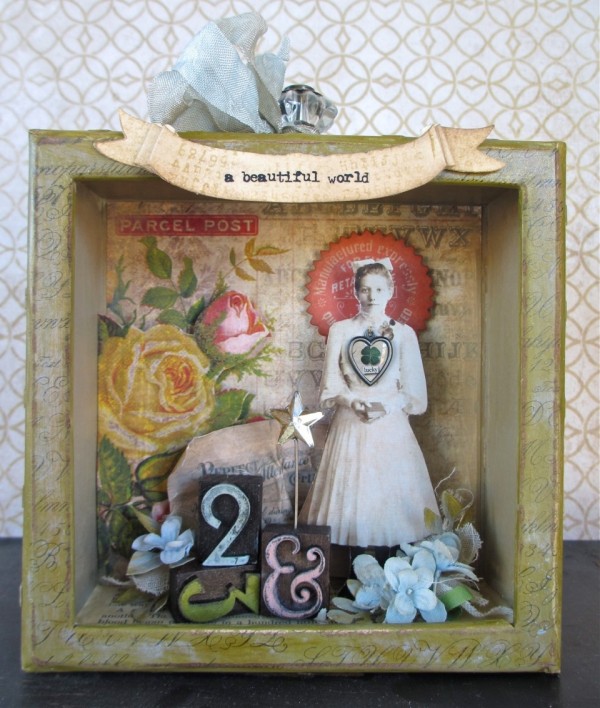
A Beautiful World
Hi readers! TGIF! Also, it’s the last day of February! How did THAT happen? I’m pleased to be returning with a fun shadowbox feature made by Paula Cheney! She has kindly included step by step instructions and photos to help assisting you in making your own version of this project!
Enjoy!
-
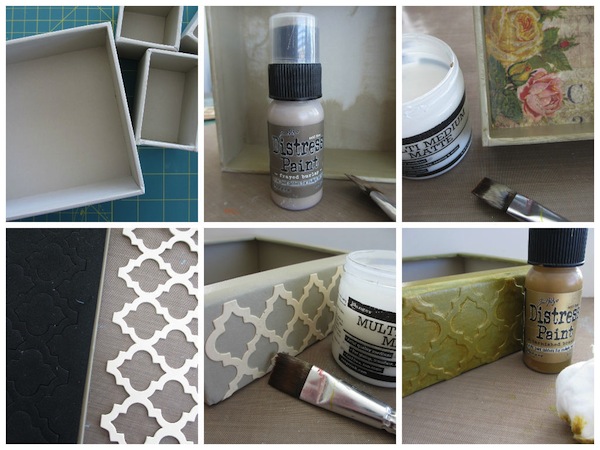
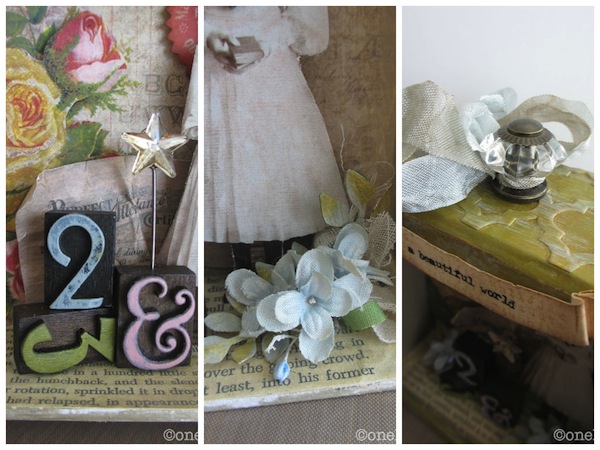
Remove small boxes from a 5.5 x 5.5” Configurations box.
-
Paint inside of main box with Distress Paint Frayed Burlap.
-
Adhere 6 x 6” Wallflower paper to back of box with Multi Medium.
-
Use Frameworks- trellis die to cut 3 strips from Ranger Manila cardstock.
-
Add Frameworks to 3 sides of the box with Multi Medium. Make sure to add a layer of Multi Medium over the the top.
-
Paint out the entire box frame with Forest Moss Distress Paint, let dry.
-
Use Tarnished Brass as a highlight over the Forest Moss Layer. Wipe away excess paint with wet wipe to let the bottom layer color come through. Let dry.
-
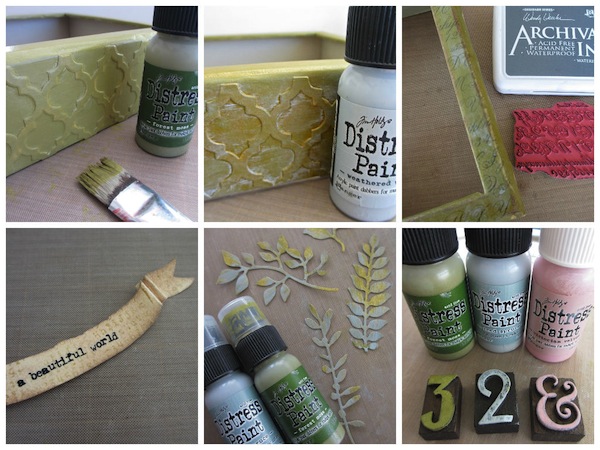
Use the same technique to add a bit of Weathered Wood Distress Paint.
-
Stamp the front of the box frame with script stamp and Watering Can Archival ink.
-
Use Curvy Banners Decorative Strip to cut manila cardstock banner. Add words from the Remnant Rub – Botanical. Add to the top center of the box.
-
Use Spring Greenery Decorative Strip to cut leaves from Manila cardstock. Paint with forest moss and iced spruce. Set aside to dry.
-
Use the dapper top to paint 3 letterpress numbers.
-
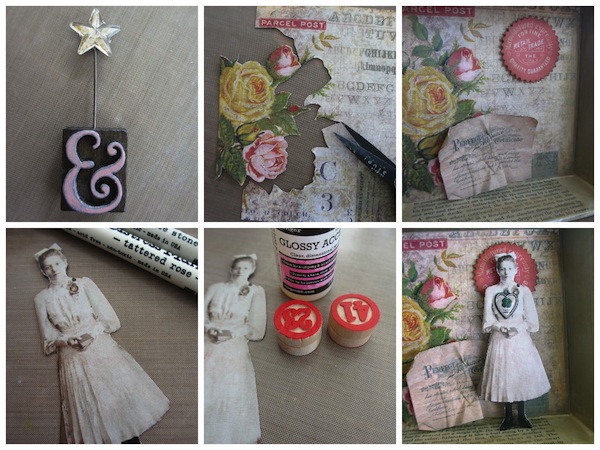
Add Mirrored star to Memo Pin. Push into the top of one of the Letterpress numbers.
-
Cut roses from a matching sheet of 6 x 6” Wallflower paper.
-
Add roses and a few pieces of Ephemera to back of box with foam tape.
-
Cut out Found Relative. Optional: color dress with Distress Markers.
-
Glue 2 game pieces together with glossy accents. Once dry, glue to the back of the Found Relative.
-
Stitch a Custom Heart onto Found Relative.
-
Add Found Relative box (the game pieces on her back make the piece stand away from the back of the box).
-
Add Letterpress pieces to box with Glossy Accents.
-
Add new or vintage flowers, cheesecloth and the painted leaves to the bottom of the box.
-
Punch a hole in the top of the box with a Crop-a-dile for Curio Knob. Add knob and Crinkle ribbon bow.
SUPPLIES:
 |
 |
 |
 |
 |
 |
 |
 |
 |
 |
 |
 |
 |
 |
|
|
 |
 |
|
 |
 |
|
 |
 |
 |
 |
 |

Blog Candy Alert!! Follow our blog via email and comment on this post for a chance to win a special blog candy!
Congrats! Blog Candy Winners!
From: Simple Stories Cardmaking with Shari: Paulette!
From: Hello There – One Stamp, 3 Ways!: Devy Collins!
From: In Good Taste to use Paste: Janis in ID!
Please email me ([email protected]) with your mailing address and the name of the blog you won from!


Oh wow !!! I love love live this project !!!!
Hugs from France
Lunea
Gorgeous shadow box Paula. Thanks for the step by step. Theresa x
Wow gorgeous!! I love all the details!!
Thank you for all the explanations to make that beautiful box!
So very pretty Paula!! I love your choice of colors!! TFS
Very pretty shadow box. Has a vintage feel about it. thanks for sharing the directions.
wonderful detail in this post…thanks.
Lovely!
Love it! I love the new Tim holtz letterpress letters/numbers. So many things you can use them for
Beautiful shadow box!!!
Lovely project. I really like the stacked numbers and the banner.
I love the shadow box, gorgeous!!
Paula always does such AMAZING things! Thanks for sharing!
The details in these gorgeous projects never cease to amaze me!
As always, Paula creates a beautiful work of art!
I’ve never made a shadow box before, but have always wanted to try. Thank you for sharing your art with us.
Stunning!
What a unique shadow book!!! Pretty!!
fantastic project idea here… thanks!
Love the trellis on the outside. Looks great!
Amazing! Such details in your Shadow box…love it!
Very pretty! I love the blue flowers the most. They bring a touch of freshness to the project.
Thanks for sharing! :)
Unbelievable! Fabulous project. Love the way you managed to use so many different products. I’ve never seen the Found Relatives before.
Amazing project! I love all the attention to detail.
What a beautiful project, I just love the vintage look!
Love the old-time look – great project – we still got some winter left to get some serious crafting done!
Wow….so gorgeous! Thanks for the awesome tutorial :)
Beautiful shadowbox, love the design! x
Love your shadow box and thanks for a wonderful tutorial!!
Very pretty shadow box!
Your shadow box looks amazing.Great tutorial x
Wow what detailed work
Such a gorgeous project. Love all the beautiful eye candy in the shadow box. Thanks for sharing!!
oooh wie toll.
wunderbar siehts aus
It is a beautiful and sweet box!
Very beautiful!
WOW!! LOVE this tutorial for today!! So BEAUTIFUL!! LOVE all of the layers and the Vintage feel!! THANKS SO MUCH for sharing and have a Fabulous Week!! =)
Thanks for the great instructions and lovely project! This is so cool!
Wow, so creative and gorgeous!!
Wow, what a fabulous project!
Cool project! Thanks for sharing.
What an incredible project! I need to use my Distress Paints–thanks for the inspiration!
This is a beautiful work of art thanks for the tutorial
It is a beautiful world! Thanks for sharing Paula!
What a fabulous creation! This is a great way for me to add some nice touches to my guest room, thanks for sharing.
Wonderful project!
Just gorgeous!!
That’s GREAT.
Great details, so pretty. I love each part of them
Lovely project! Thanks for sharing with us.