3 CAS Card Making Tips: Yippee For Yana

Hi friends! Happy Monday! Please join me in welcoming back special bi-monthly guest Yana Smakula! I just love tips and tricks to hone my card making skills; don’t you? Read on to learn some cool tips from Yana and enjoy! (Please note; our dear friend Yana is Ukrainian, to show support to our brothers and sisters in Ukraine, please see Yana’s post HERE.)
Hello, crafters, this is Yana Smakula for Simon Says stamp! Welcome back for another Yippee For Yana video! In this video, I’m stamping CAS birthday cards and sharing some tips along the way!
Tip #1 Stamp Vertically!
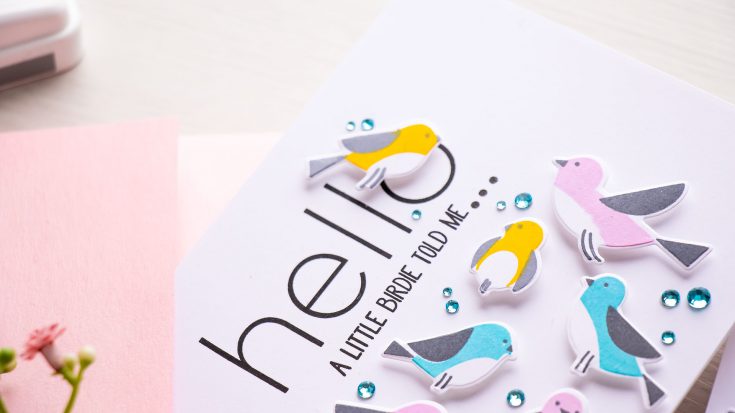
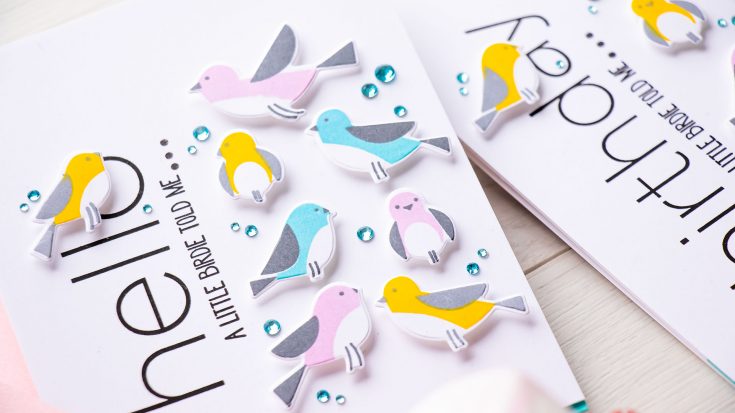
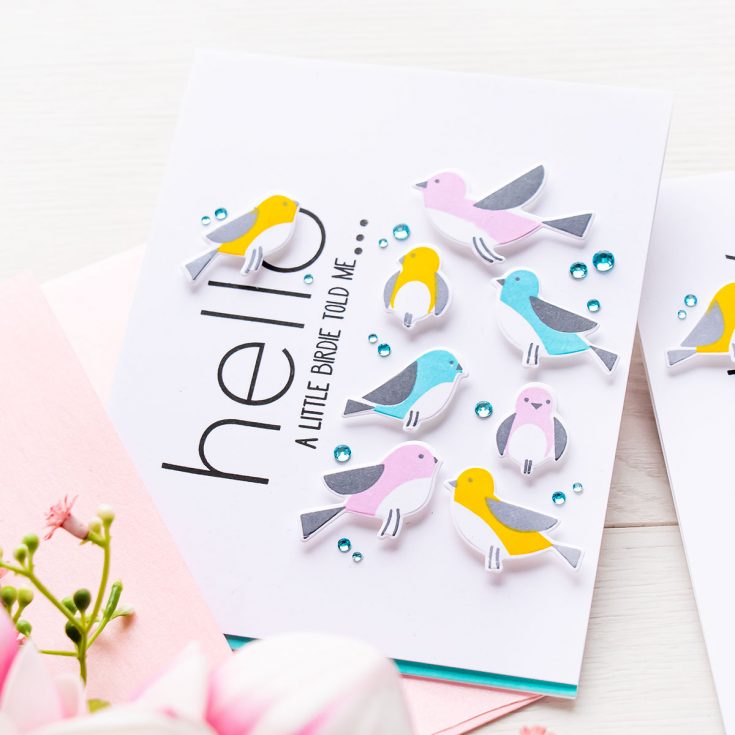
Have you ever stamped your horizontal sentiments vertically? Try it. I used the “Hello” from the Clean Line XL stamp set by CZ, also “a little birdie told me” from the Printmaking Birds set to create a sentiment for my card. Instead of stamping it the usual way, horizontally, I rotated it and stamped vertically.
Changing the orientation of the image is a great way to draw attention to it and make an impact. Stamp the same image as intended, in this case, stamp this same sentiment horizontally on your card and it won’t have nearly as impactful of a result as if you stamp it vertically.
Of course, not every image or design can be rotated like this, to draw attention, but many images can. Next time you plan to stamp a sentiment on your card, think about how you can position it vertically like this, or diagonally. Or maybe you can even stamp it as intended and add a mirror impression using the mirror stamping technique.
Tip #2 “Stamptorectomy” or Cut Your Stamps Apart
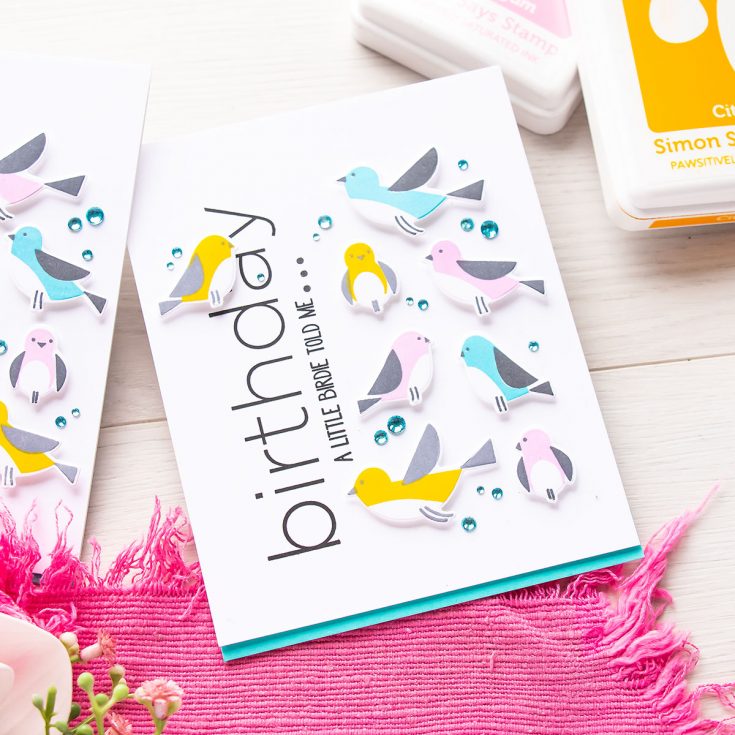
Don’t be afraid to perform stamptorectomy, I just made that up btw. Cut your stamps apart to use just the part of the stamp. I cut the “Happy Birthday” to separate the words Happy and Birthday to be able to stamp just the Birthday part.
If you are new to stamp cutting, don’t be alarmed! Just cut your stamp so that you aren’t cutting the actual stamping part of the sentiment, just the polymer in the background. This way you’ll always be able to piece it back together later if you want to stamp it as intended.

Tip #3 Size Matters (and so does the font)
I combined different fonts and dramatically different font sizes, and this worked well, particularly because of that difference in size. Look through your stash (or go shopping!) to find a sentiment set that uses a very large font size. The Clean Line XL is a great example. There are other oversized sentiment sets on the market, too.
Had my 2 sentiment stamps been similar in size, they would have made a much less dramatic impact on the card.
Card Process
I used the Printmaking Birds stamp set to stamp several birds for my card. I love this set for all the different ways one can use it. The birds have 4 layers. There is an outline layer that can be used alone or together with the other layers. If you use it alone, you can color the birds in using markers or pencils. As for the various layers, I love to use just 2 of them – the one to add color to the body of the birds and one to stamp the wing, face, and feet. There is a layer to stamp the belly, but I usually skip it and keep the belly white.
I used Simon’s Pawsitively Saturated inks in Bubblegum, Citrine, and Surf to stamp the bird bodies. Next, I used Charcoal to stamp the feet, face, and wing on some birds and a lighter gray, Earl, to stamp the same image onto the yellow birds.
You can also use black for this layer, and it does work well, but sometimes it looks too stark and too dramatic. So gray is a good alternative.
With this type of stamping the birds do look a bit incomplete or unfinished, but I think this is the beauty of this look. I like it. I like to skip the outline and skip adding the belly layer. There are coordinating dies available that will cut every single bird out.
The plan for this card design was to add several colorful birds on the right-hand side of the panel, to the right of the sentiment. I also want to add one bird directly onto the large “Hello”. I wanted to ground the birds and give them something to sit on, an illusion of a branch. And the letter “o” gave me just that. The bird sits on the “O” with the little feet touching the letter “L”.
I also stamped 3 dots as if to continue the sentiment to the inside of the card. And it does continue, the inside says: “It’s your birthday”.
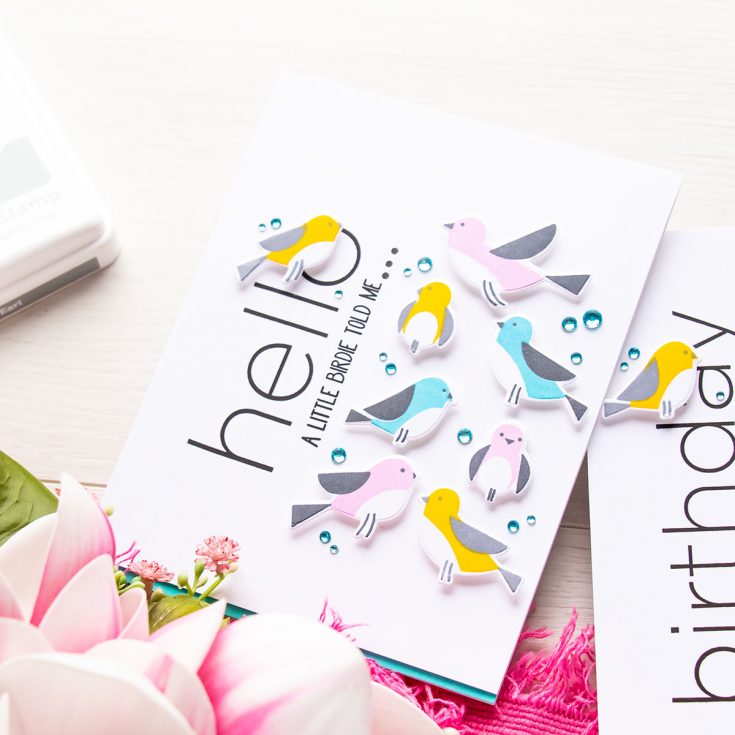
Next, I trimmed about 1/8” off each panel. Why did I do this? I wanted to bring a little bit of colored cardstock into this design. I didn’t want to cover the entire card front with colored cardstock, that would have been too much. I adhered a strip of blue cardstock to the base of my card base and next, I adhered my bird panel on top revealing a bit of that blue at the bottom. I love this pop of color.
Finally, I embellished my cards using a couple of teal gems – I added them mostly in between the large bird gaps. I often tend to go overboard with the number of embellishments I add to my cards, so feel free to stop after you’ve added just 3 or 5 gems or go crazy like I do and add a bunch!
Have fun stamping!
WATCH THE VIDEO:
SUPPLIES:
|


Ways to support Ukraine:
If you are looking for ways to support Ukraine, we encourage you to visit this page on Yana’s blog:

Thanks so much for stopping by, and thanks to Yana for being our guest!


This is a tweet – I mean SWEET – card. Thanks for the tips, Yana!!
Lori S in PA
These are really cute!
Really Beautiful cards Yana!!!! I love the colors!!!
Cute cards and clever design. I would never have thought to turn a sentiment on it’s side like this but it’s a fun look and one worth trying. Thanks for the inspiration!
So so cute!!
Beautiful work!
This was such an inspiring post. I really liked how Yana explained each tip clearly, especially stamping sentiments vertically. It gives the card a new and creative look. The stamptorectomy idea was fun and smart too.
I also liked the mix of fonts and sizes to make the design stand out. It reminded me how much layout and text style matter, just like when using a unicode converter to play with creative fonts. Yana’s tips always make crafting more exciting and fresh.