Coffee Monster!
Hi friends! Happy Tuesday! Please join me in welcoming special guest blogger Ashlee McGregor representing the adorable Gerda Steiner Designs on the blog today! How cute are these Coffee Monsters?! For tips and tricks on recreating this card, read on and enjoy!
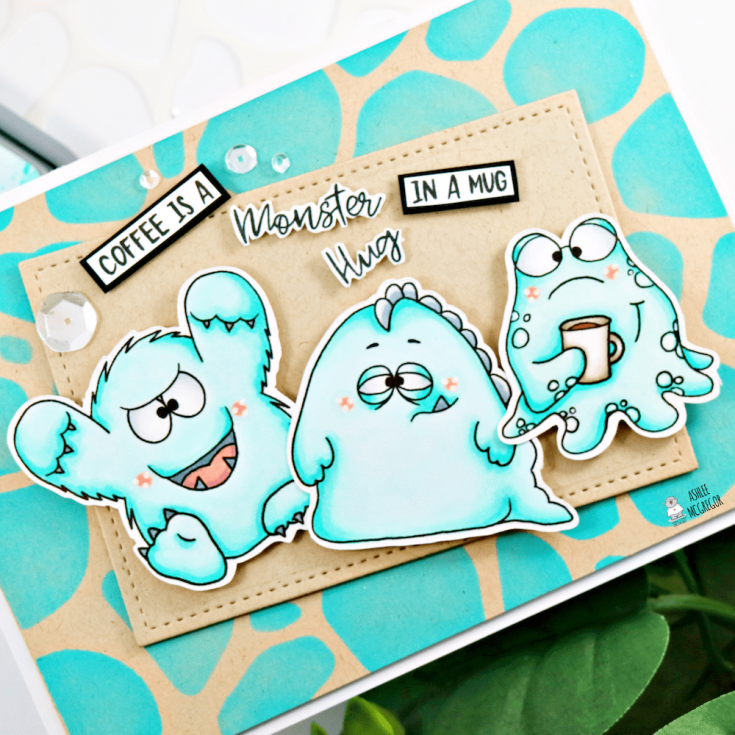
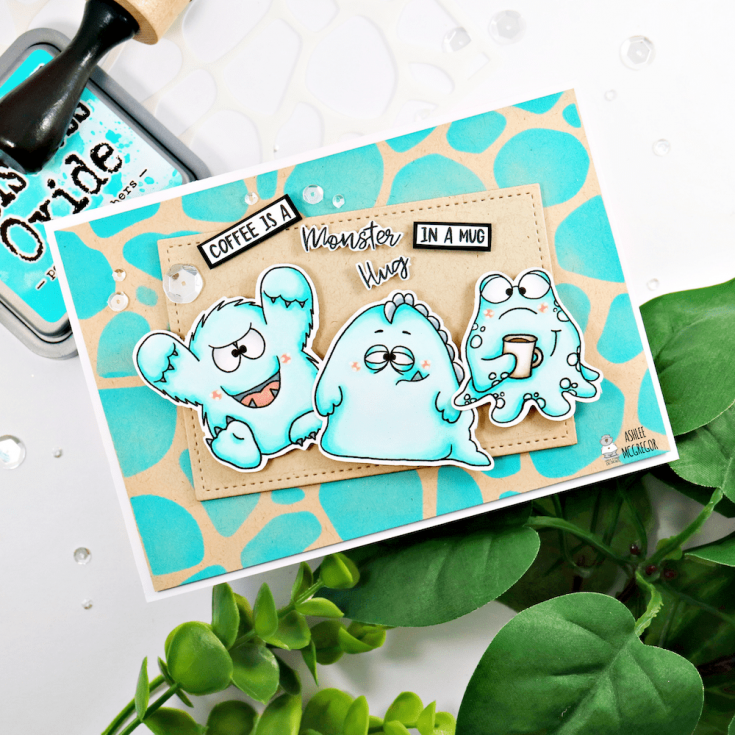
To start off the card I cut a base piece from Neenah desert storm cardstock and using the Stoney Maloney stencil from Heffy Doodle I inked the full background using Peacock feather distress oxide ink with a blending tool. I then cut another piece of desert storm cardstock using the stitched rectangle die by Lawn Fawn and added this to the card base using some foam tape.
I colored up three of the monsters from the Gerda Steiner Coffee Monster set and colored them up with Copics. Once they were all colored I added a couple of layers of foam tape and added them to the die cut rectangle piece. Using one of the sentiments from the stamp set I cut it into sections and mounted on some black cardstock. To finish off the card I added some Simon says Moonshine sequins for a bit of bling!!
SUPPLIES:
|


Thanks so much for stopping by and thanks to Ashlee for being our guest today!

Blog Candy Alert!! Follow our blog via email and comment on this post for a chance to win special blog candy!
Studio Monday with Nina-Marie: Distress Oxide Watercoloring

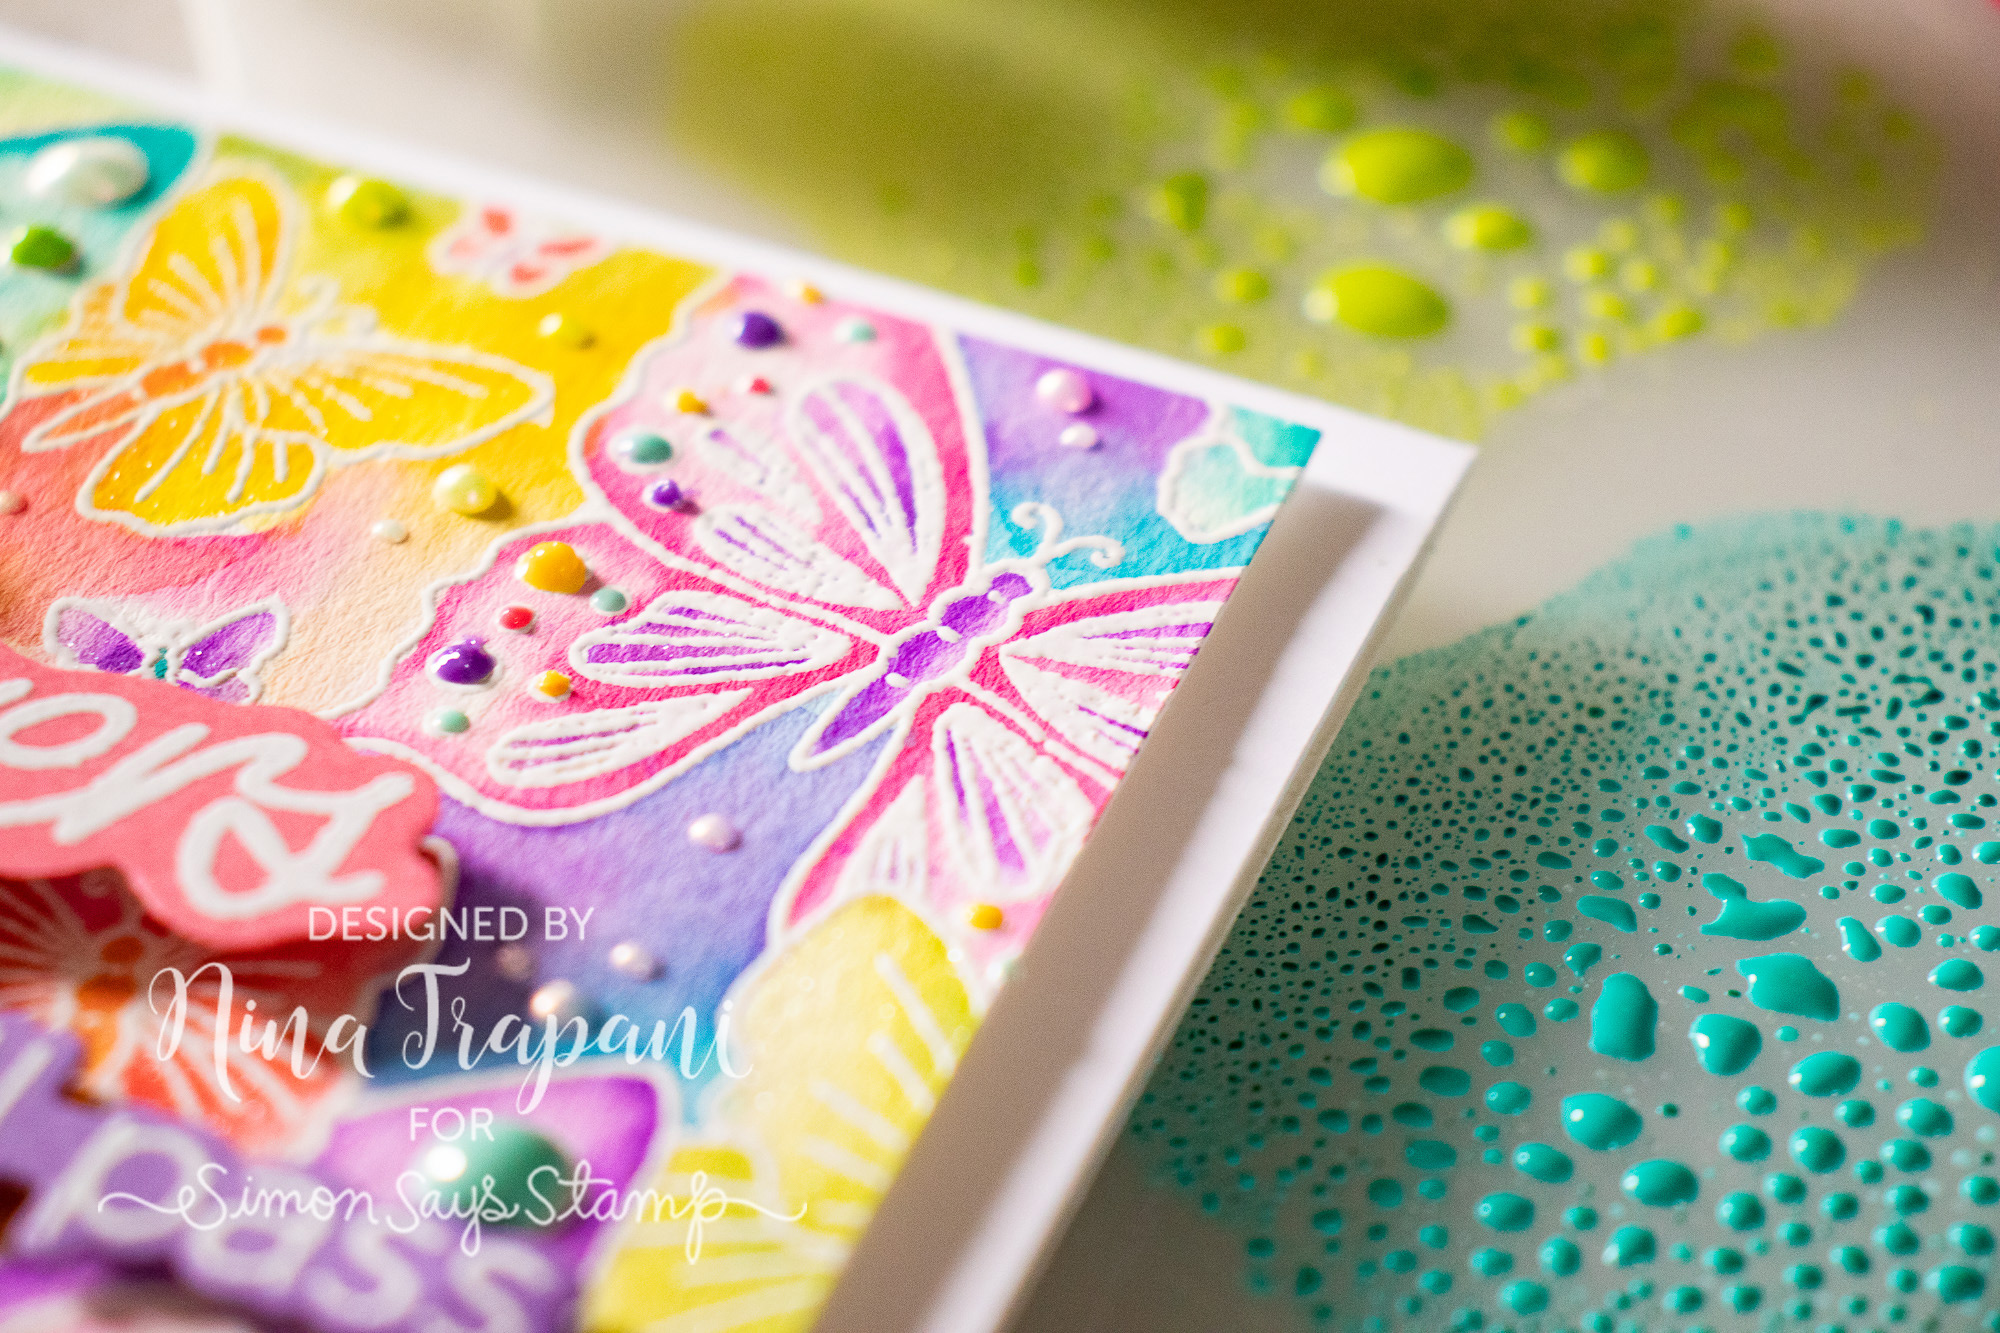
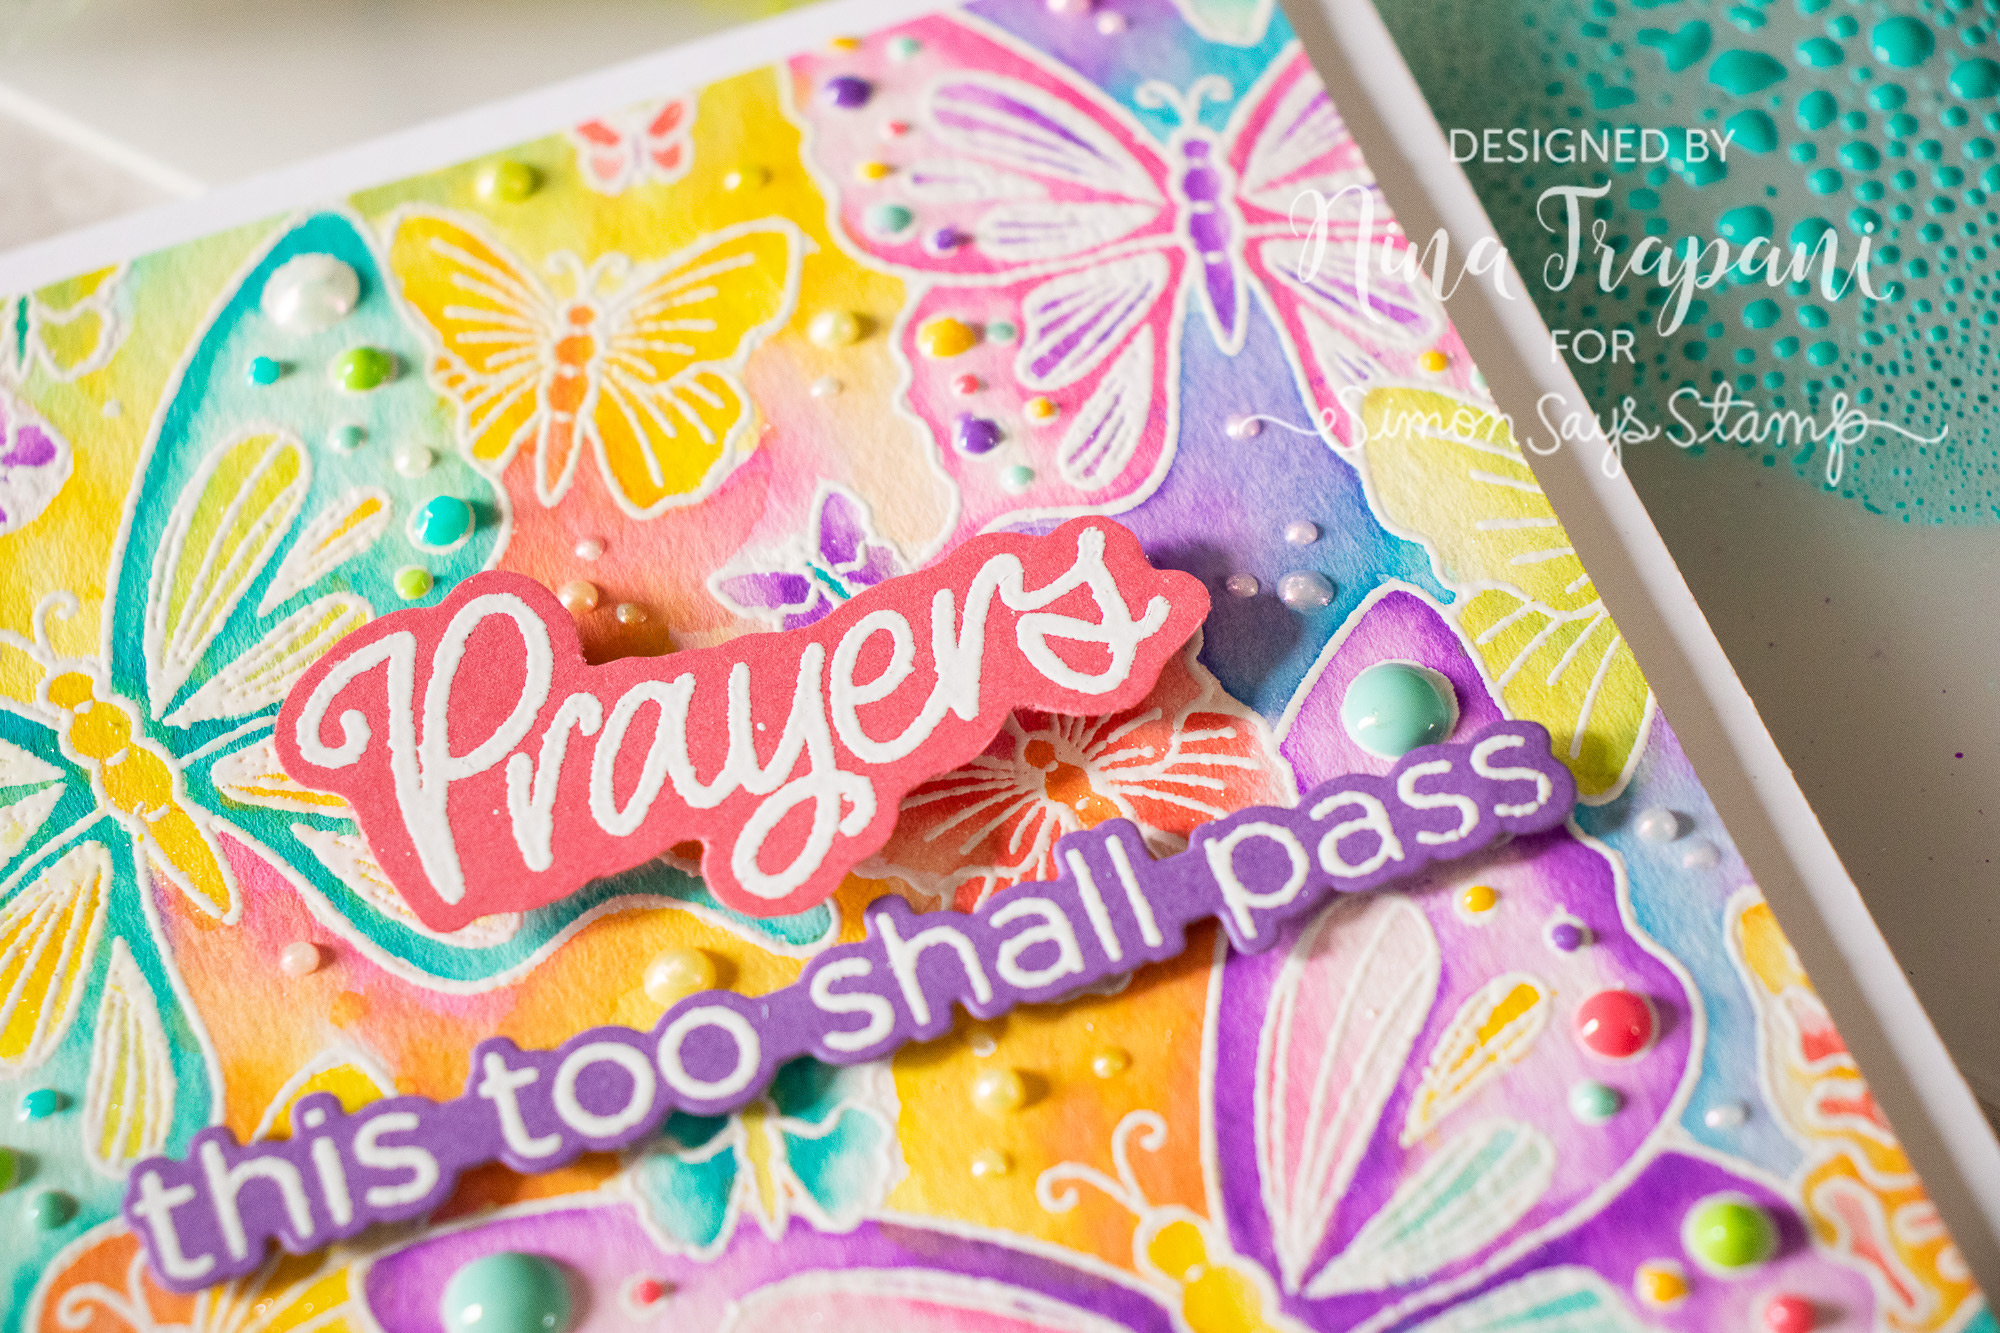
Hello friends, its Nina-Marie here with you today sharing inspiration using our Simon exclusive Outline Butterflies background, along with some additional exclusives that we released in our new Blossoms and Butterflies collection!
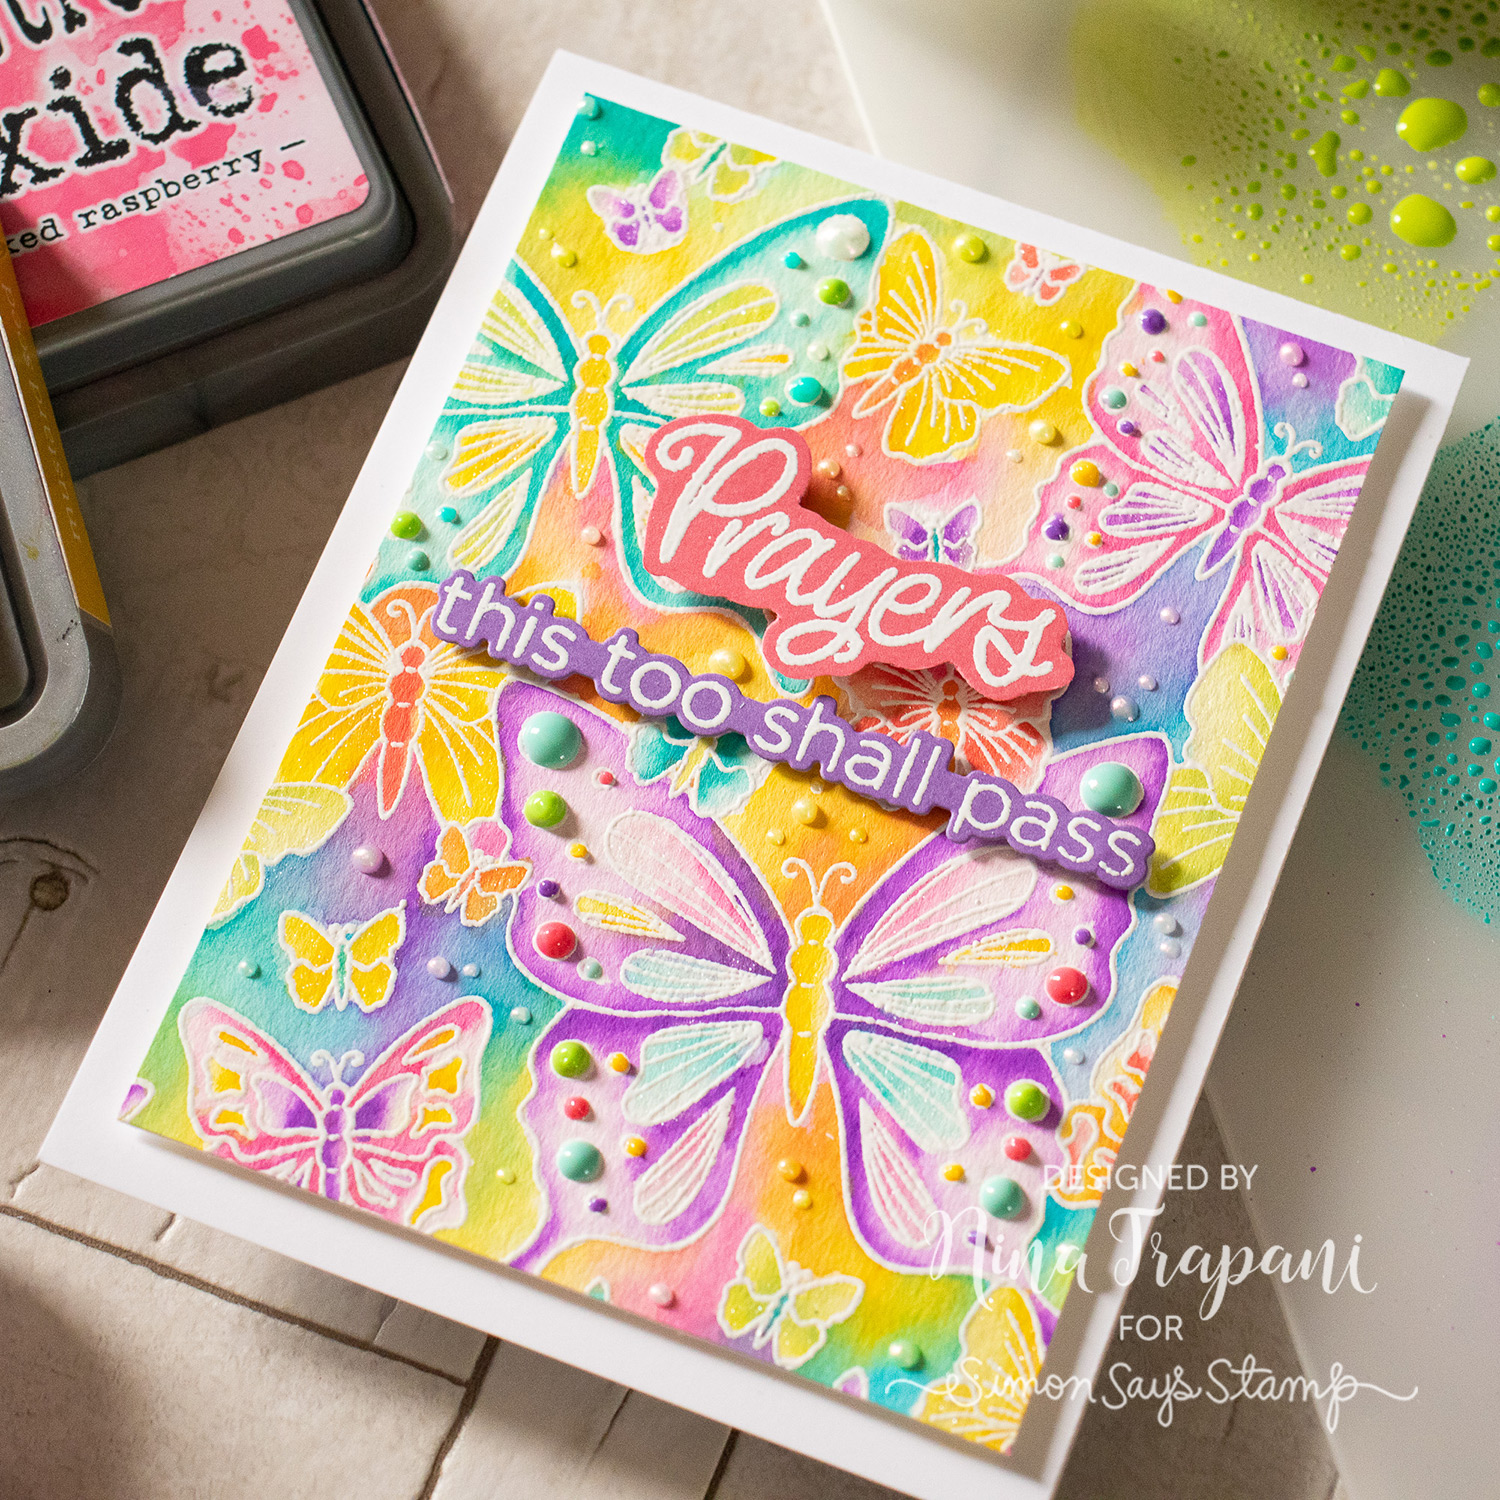
The card is watercolored with Distress Oxides; not only are these inks amazing to ink blend with, but the rich colors also make for gorgeous watercoloring.
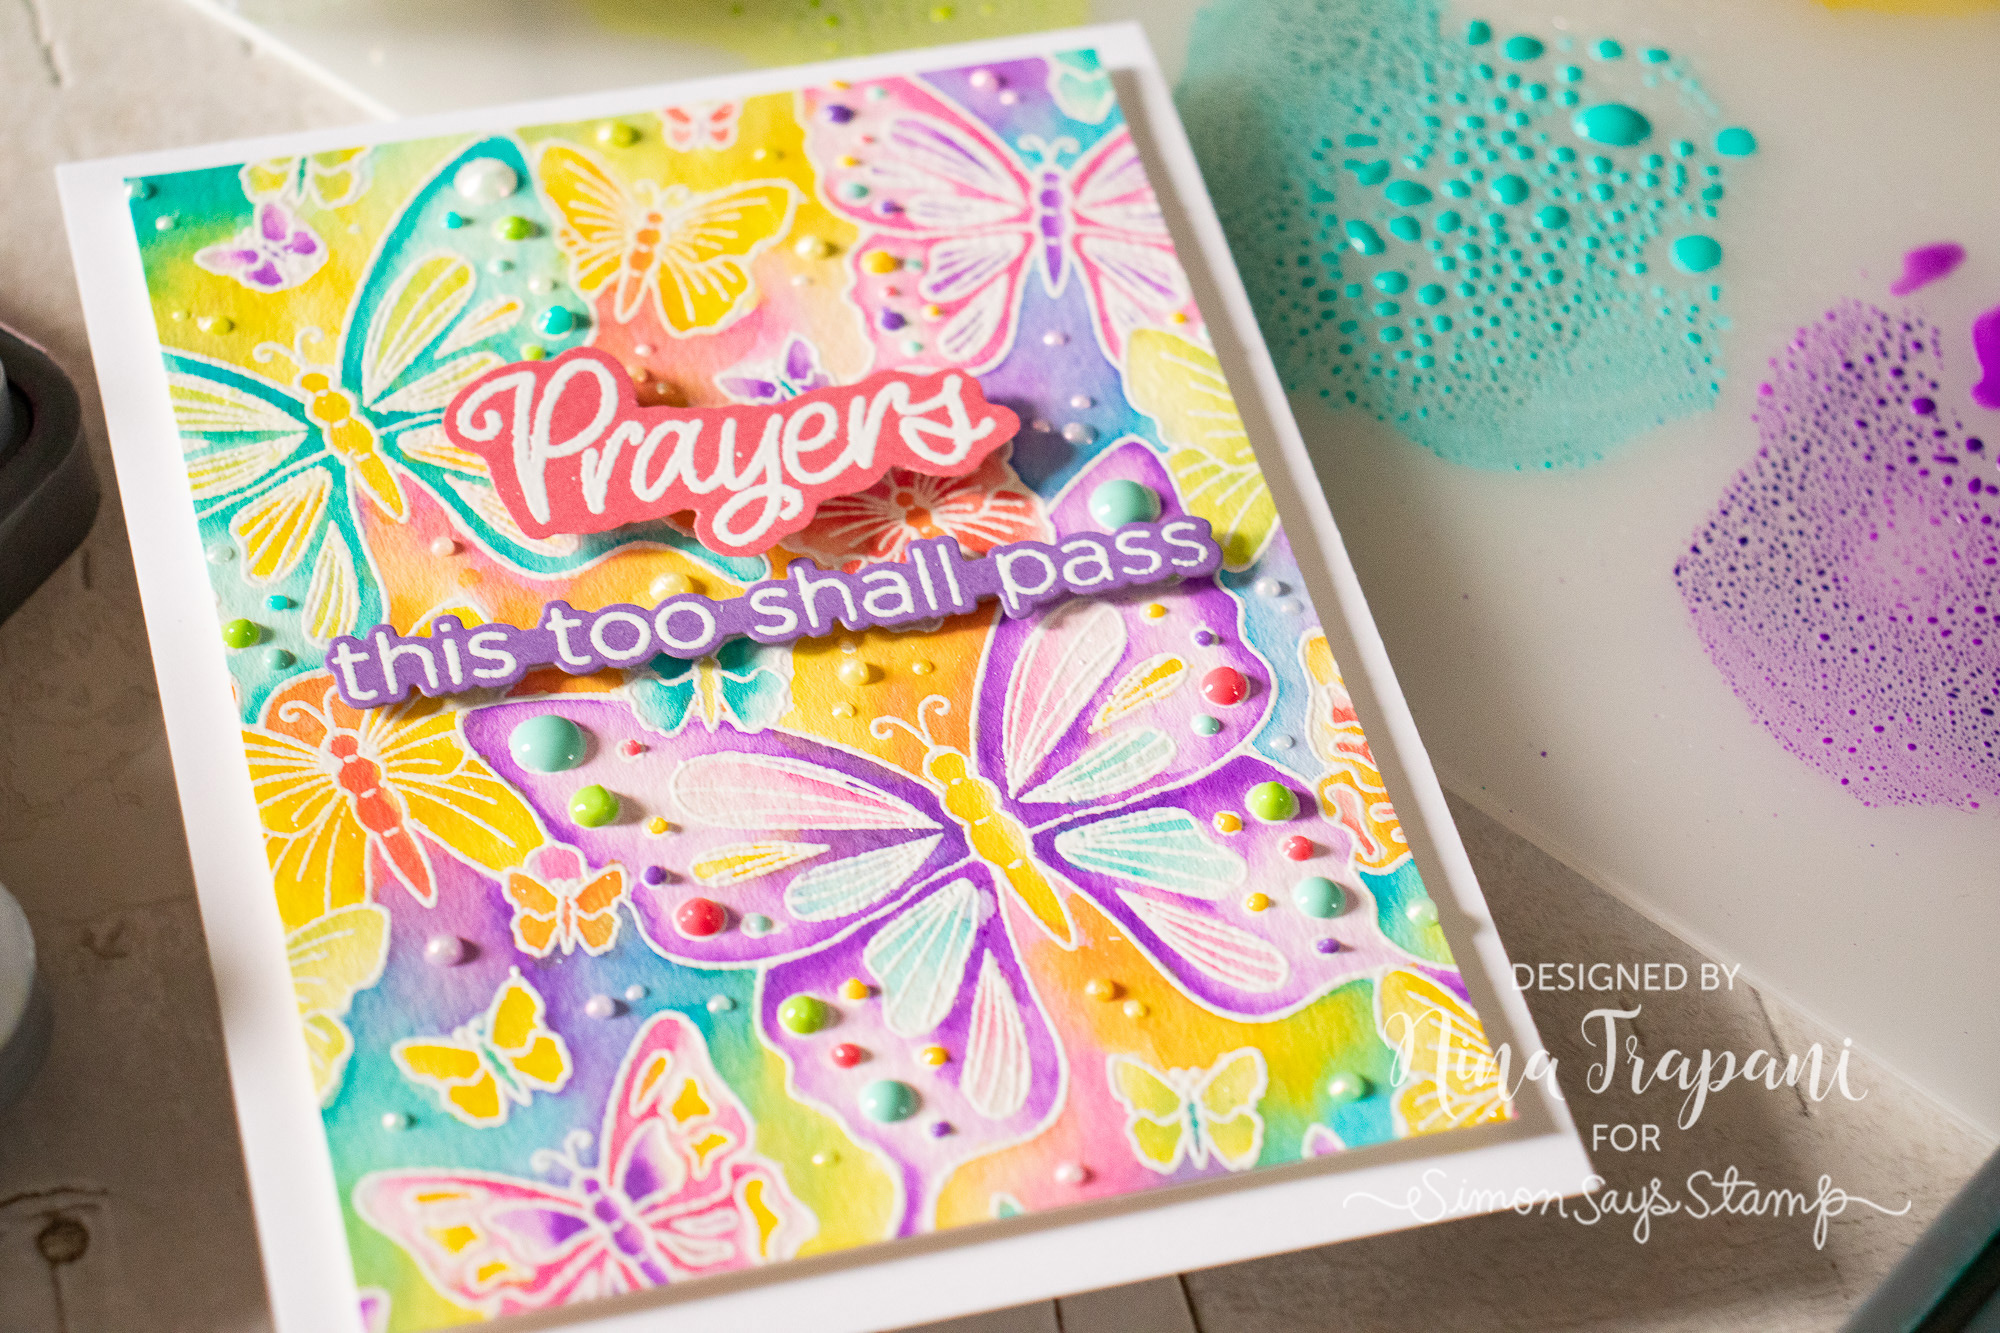
I was going for an ethereal style with this card, so not only did I use a myriad of colors for the butterflies, but also in the background of the card itself. Mixing Oxide inks is extremely easy, so even if you are a beginner at watercoloring, I think you’ll find this Oxide ink watercolor technique super easy and also fun!

To enhance the colors of the butterflies, I used a rainbow of Nuvo Gloss Drops on their wings, and also in the background. For sentiments, I used greetings in both the You Got This CZ Design and our Comfort and Prayers set.
Want to see how I created this colorful encouragement card? Be sure to watch the video below!
WATCH THE VIDEO
SUPPLIES
|


Blog Candy Alert!! Follow our blog via email and comment on this post for a chance to win special blog candy!
Blog Candy Winners!
NEW Waffle Flower: Cardstock Backed Vellum: Janis in ID!
Funny Friday with Art Impressions: AI Hamster Wheel Cubbies: Cheryl Rigney!
Quick Tip: Glue Sponge!: Kate Treasure!
One stamp, five ways: Outline Butterflies: Linda Duensing!
Yippee for Yana: Watercolor Clematis Card for Mom: Birgit A Norton!
Color Coordinates With Shari Carroll: Helen!
Amore LauraFadora: Grid Play Rainbow: Debbie P!
Funny Friday with Art Impressions: Holographic Rainbow Shaker!: Denise Bryant
Work It Wednesday April 2019: Pet Project!: Retta Lutte!
Doodling with Debby: Messy Watercolored Background: TracyM #6773!
Studio Monday with Nina-Marie: ThermoWeb Flocking Sheets!: Steffi H.!
Please email [email protected] with the name of the blog you won from, your prize(s), and your address if applicable!
NEW Waffle Flower: Cardstock Backed Vellum
Hi friends! Happy Sunday! Please join me in welcoming back special guest Rebecca Keppel sharing some beautiful inspiration from the brand new May 2019 Waffle Flower release! Be sure to watch the video for more information and enjoy!
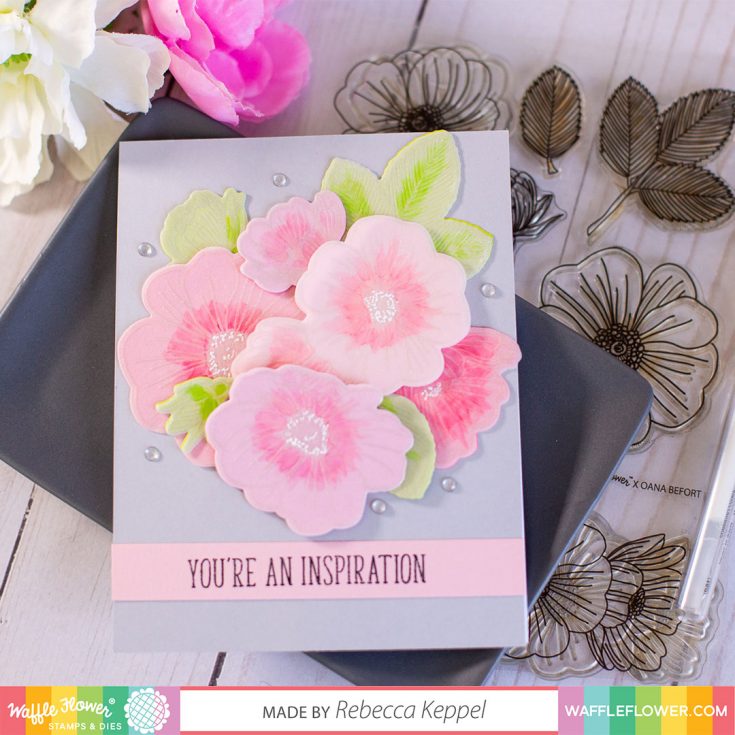
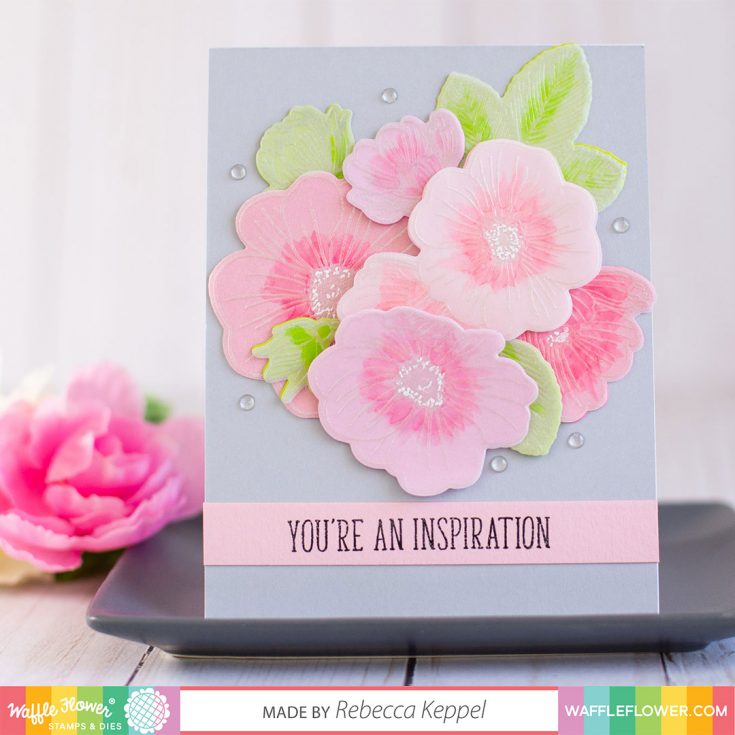
Hi everybody! I’m Rebecca with Waffle Flower Crafts and I’m super excited to be here Simon Says Stamp today sharing a card video featuring some new stamps and dies from Waffle Flower’s May Release. In this video, I am sharing a quick and easy way to add color to floral stamps.
The Wild Roses Stamp Set is a beautiful 5×7 stamp set featuring detailed flowers, leaves, and rosebuds. It would be fun to stamp and color with Copics, watercolors or pencils. For today’s card, I decided to try a quick and easy way to add color to the beautiful blooms.
I started by stamping the flowers with Versamark ink on Simon Says Stamp Vellum. After adding White Satin Pearl embossing powder and heat setting them, I cut them out with the Matching Dies. I also cut several colors of cardstock with the same dies (even though I had not stamped on the colorful cardstock.
I added some details to the stamped, embossed and die cut flowers with Copic markers, but you could totally skip this step if you want to keep it super simple! I adhered the vellum flowers to the cardstock die cuts and then used them to create a bouquet on my card front.
I created a sentiment strip using a stamp from the Waffle Flower Be Her Sentiments stamp set. Finally, I added a few details to the flower centers with a white gel pen and added a few Waffle Flower Enamel Dots for embellishment!
And that’s it! This is such an easy way to add color floral stamps. If you don’t always have time to color, it’s a great way to get more use out of your floral stamps.
Thank you so much for stopping by! – Rebecca
SUPPLIES:
|


Thanks so much for stopping by and thanks to Rebecca for being our guest!

Blog Candy Alert!! Follow our blog via email and comment on this post for a chance to win special blog candy!


