Whoops! One die, three cards
Hi friends! Happy Tuesday! Please join me in a warm welcome back as a special guest on our blog to Lesley Oman of Heffy Doodle! She’s creatively made 3 cards with one die! Read on to learn more details and enjoy!
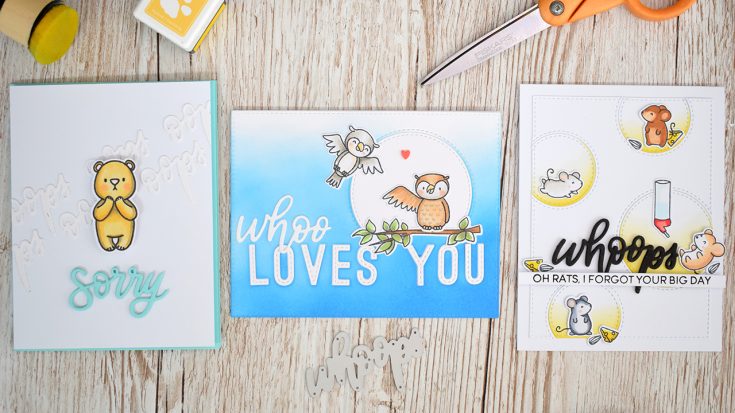
Hello everyone, It’s Lesley here from Heffy Doodle and today I am taking one Heffy Cuts die, and using this to make three different cards. I love to stretch my stash, and I hope to inspire you to take a closer look at your craft supplies and think of fun new ways to use them.
The die I am using is the ‘Whoops’ Heffy Cuts die. I am definitely one of those people who makes the cards but forgets to post them, so this die is perfect for me!
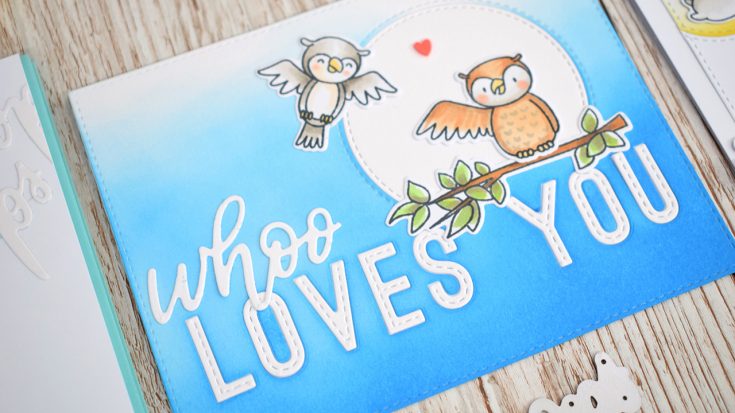
For my first card, I am taking the ‘whoops’ die and snipping away a few letters to create the word ‘whoo’. One day I was tidying my desk and a piece of paper was hiding half of the die cut ‘whoops’ so only the first four letters were showing. I immediately thought of our Hootiful stamp set which has a load of sweet owl images!
I started with a piece of cardstock measuring 5.5” x 4.25”, and used some Heffy Memo Tape to secure down the Stitched Alphabetter Dies to spell out ‘LOVES YOU’. After running this through my die cutting machine, I then did some partial die cutting with a Stitched Circle die. For this, I only placed the top cutting plate ¾ of the way over the die, which means I have a circular cut line, but it is still attached to the card panel. I wanted to add some color to the background, but not the circle, so I placed a strip of memo tape over the circle and then used some Salty Ocean distress oxide with a foam blending tool to add a gorgeous blue tone. To create an ombre effect, blending with intent near the bottom and simply have a lighter touch near the top. This will give you a nice blend into the white at the top of the card panel.
I stuck this panel onto a folded card base and used a glue pen to adhere down the letters that I had previously cut out. The inlaid effect looks really elegant and the stitched effect on the letters gives it a touch of whimsy! To finish the sentiment, we need our ‘whoops’ die, but I took my scissors and carefully trimmed away the last two letters. I tried to follow the curve of the letters so it looked natural. I added a stamped and colored tree branch and two owl images from our Hootiful set, and finished my card with a little heart to add a pop of color to the final project!
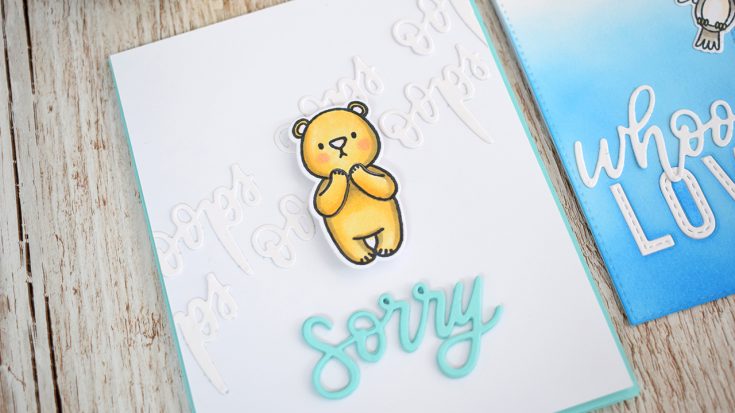
For the next card, I am also going to be snipping away letters from the ‘whoops’ die cut but this time to create the word ‘oops’. Instead of making this the focal element of the card, I am creating a fun background using a white on white technique. First I trimmed down a piece of white card to be 5.25” x 4” and then die cut 7-8 ‘whoops’ die cuts which I trimmed down say they said ‘oops’. I stuck these to the card panel at an angle, using the descender on the P to be the space between the two words on the line below. I added some foam behind this panel and stuck it to a teal colored card base, and using the same teal card I cut out five ‘Sorry’ die cuts. I wanted this to be the focal point, so to make this sentiment stand out, not only did I use a bright color, but stuck all five die cuts one on top of the other using multi matt medium. This almost makes it look like a chipboard word! For the finishing touch, let’s not forget to add mister bear from the Unbearable Without You stamp set, popped up on some foam to make him stand out!
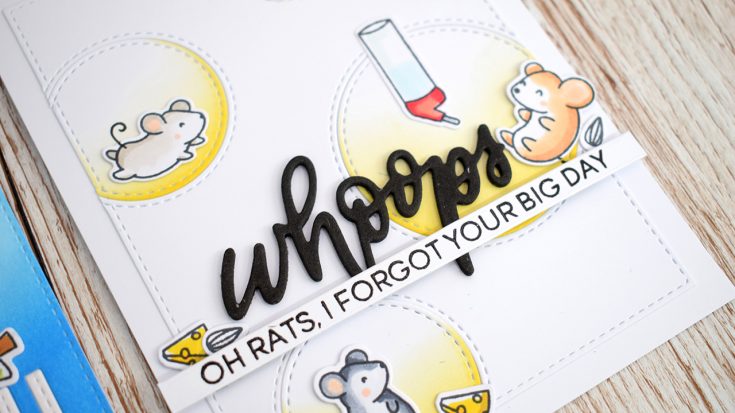
For card number three, I WILL be using the full ‘whoops’ word, but instead of reaching for a white card this time, I want to create a different texture for the sentiment on this card. In my stash, I had some black adhesive craft foam that was perfect for this. If you don’t have adhesive foam, you could use some double sided adhesive sheets such as the Stick It adhesive. Add it to the back of the foam before die cutting – this also prevents the foam from stretching and losing its shape when you remove it from the die. For the card I cut a rectangle from the Imperial stitched rectangle dies (second biggest size) and then used the stitched circle dies to cut out a number of circles overhanging the edges. I adhered the panel to a card blank and before sticking down the circle inlays, I added a little pop of color using the SSS Duckling ink pad. I love the bright yellow of this ink -it was a perfect choice, and I love how it gives the illusion of holey cheese- and what would be better for a card full of cute mice! I embossed a sub sentiment from the ‘Hello Squeakheart’ stamp set and cut it into a sentiment strip using the ‘Strips of Ease’ dies. I used some leftover black foam to pop this up on the front of the card. To finish, I adhered on some sweet mice and their accessories from the ‘Hello Squeakheart’ set.
Three cards with one die, all with very different looks! Have you ever used a die in a way that was different from its original intent? I hope that you have enjoyed the video and are inspired to find new ways to create using your word dies.
Until next time, Happy Crafting! -Lesley
SUPPLIES:
|


Thanks so much for stopping by and thanks to Lesley for being our guest!

Blog Candy Alert!! Follow our blog via email and comment on this post for a chance to win special blog candy!
Blog Candy Winners!
Studio Monday with Nina-Marie: Glitz Glitter Gel Inspiration 3 Ways!: susie sonnier!
Mixed Medium with Shari Carroll: Jane Davenport Making Faces: Teri Spracklin!
Interactive Cards by Jess: Beaded Rainfall Card: Teresa Doyle!
Amore LauraFadora: Thankful for America: Chris Eder!
Outside the Box by Gina K Designs: andrea murdock!
Yippee for Yana: Flip Up Birthday Card: Sue D!
Color Coordinates: Bold and Beautiful!: Bonnie Eng!
Prehistoric Home Decor Vignette Box: Betty Neville!
Doodling with Debby: Stencil with Watercolor: Vicki Kroll!
Amore LauraFadora: So Very Grateful for Mom: Anne Mitchell!
Crafty Quintet: Favorite Embellishments: Subhashini!
Did You Know? Fun Facts and Crafty Tips! May 2019 Edition: Suzi Metcalfe!
Yippee for Yana: Messy Watercolor Mother’s Day Card: Cheriese H!
Coffee Monster!: La Rae Prentice!
Studio Monday with Nina-Marie: Distress Oxide Watercoloring: Kate Treasure
Please email [email protected] with the name of the blog you won from, your prize(s), and your address if applicable!
Studio Monday with Nina-Marie: Glitz Glitter Gel Inspiration 3 Ways!

Hello friends and Happy Memorial Day!
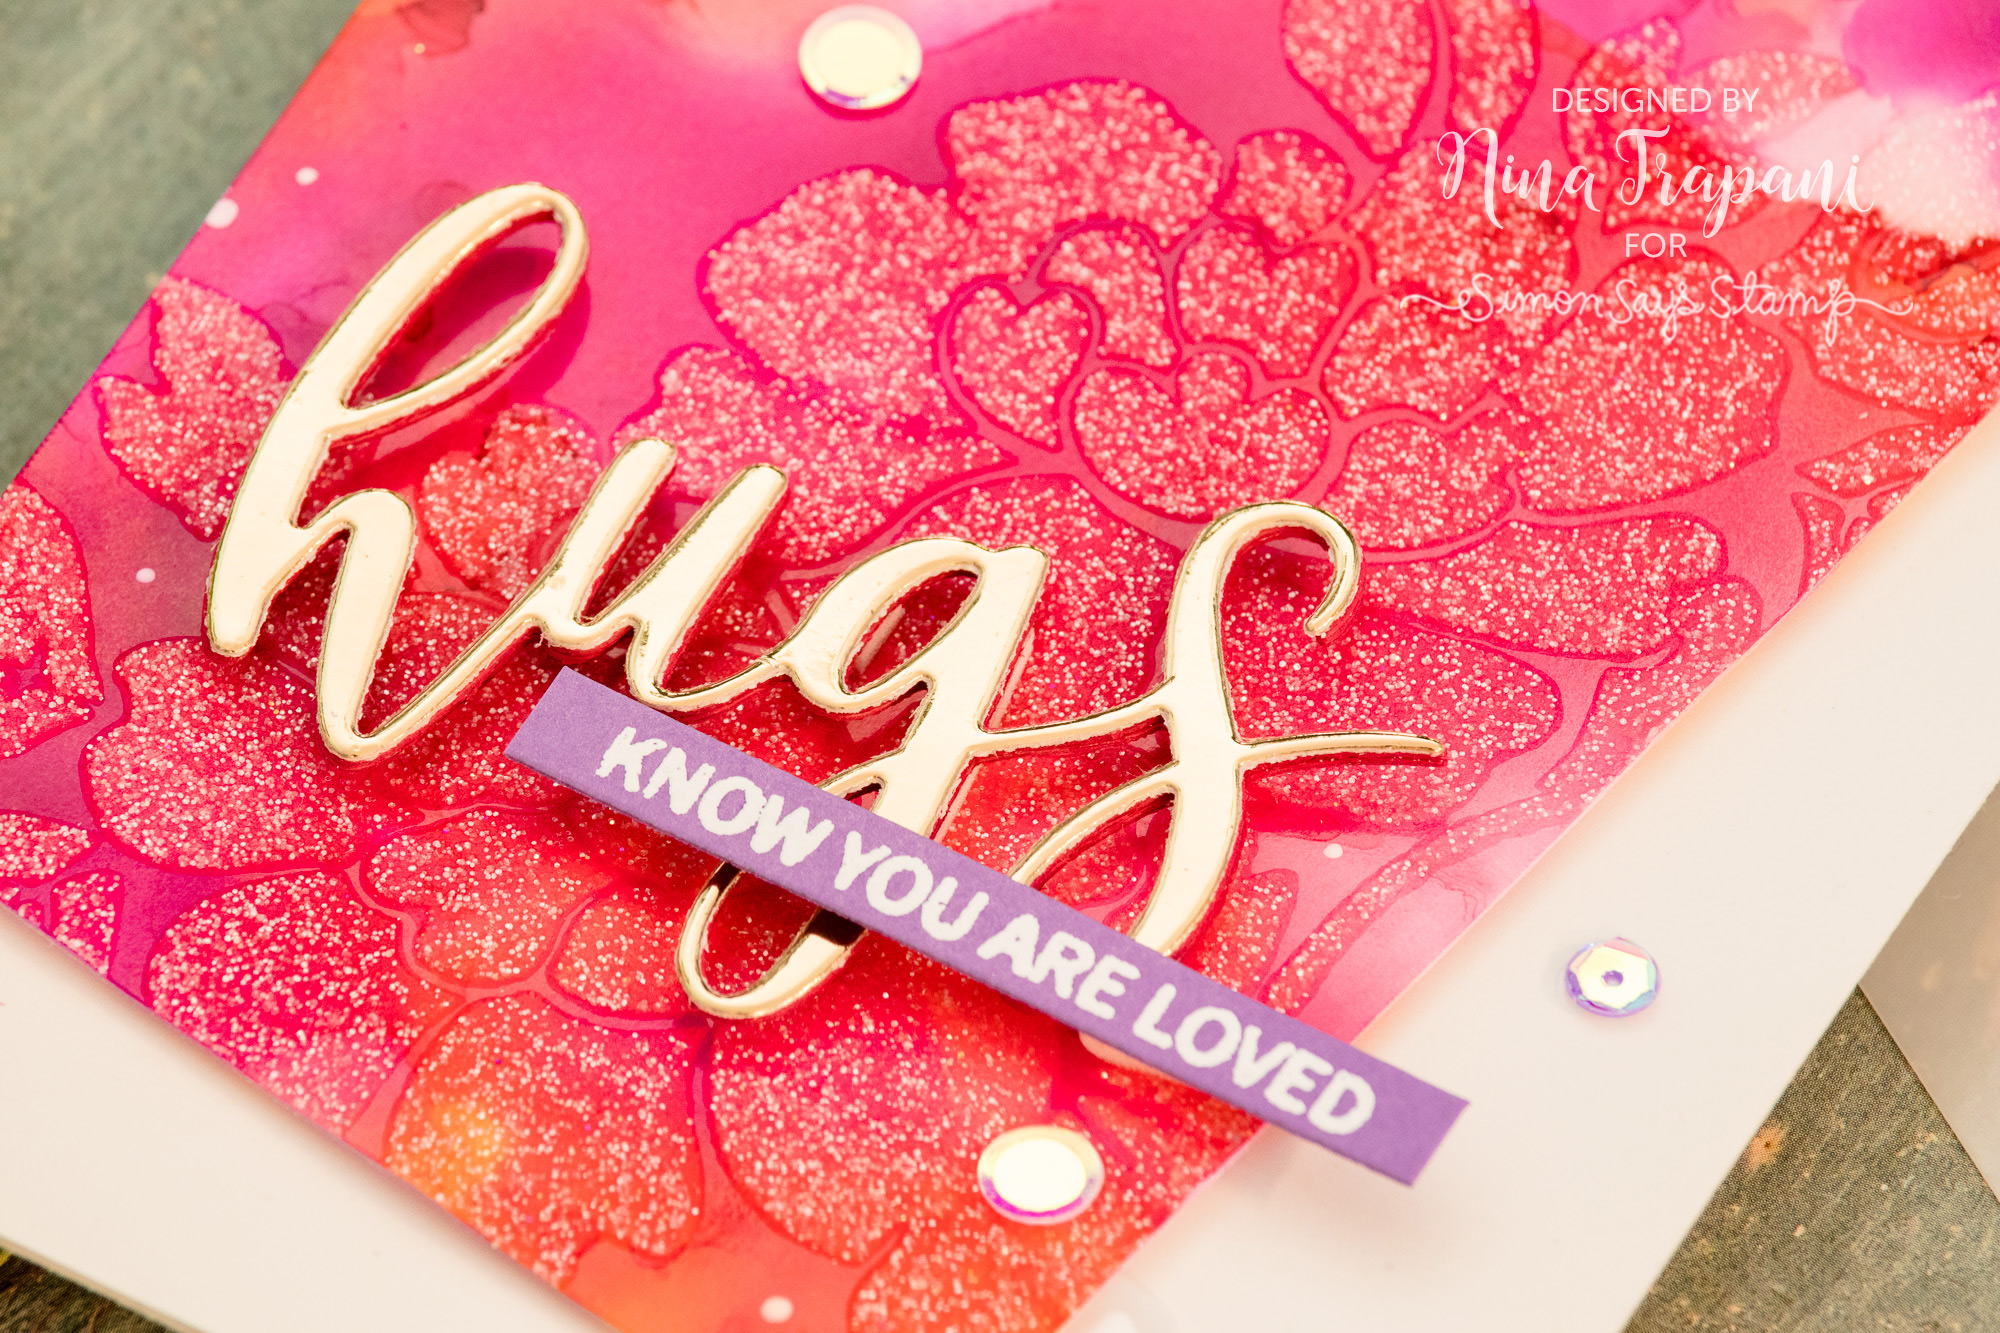
Have you tried out the gorgeous new Glitz Glitter Gels from Gina K. Designs and ThermoWeb? I adore them; so much so, that I have 3 different techniques using the gels to share with you today. All of the cards I am making today also feature Gina’s Floral stencil.
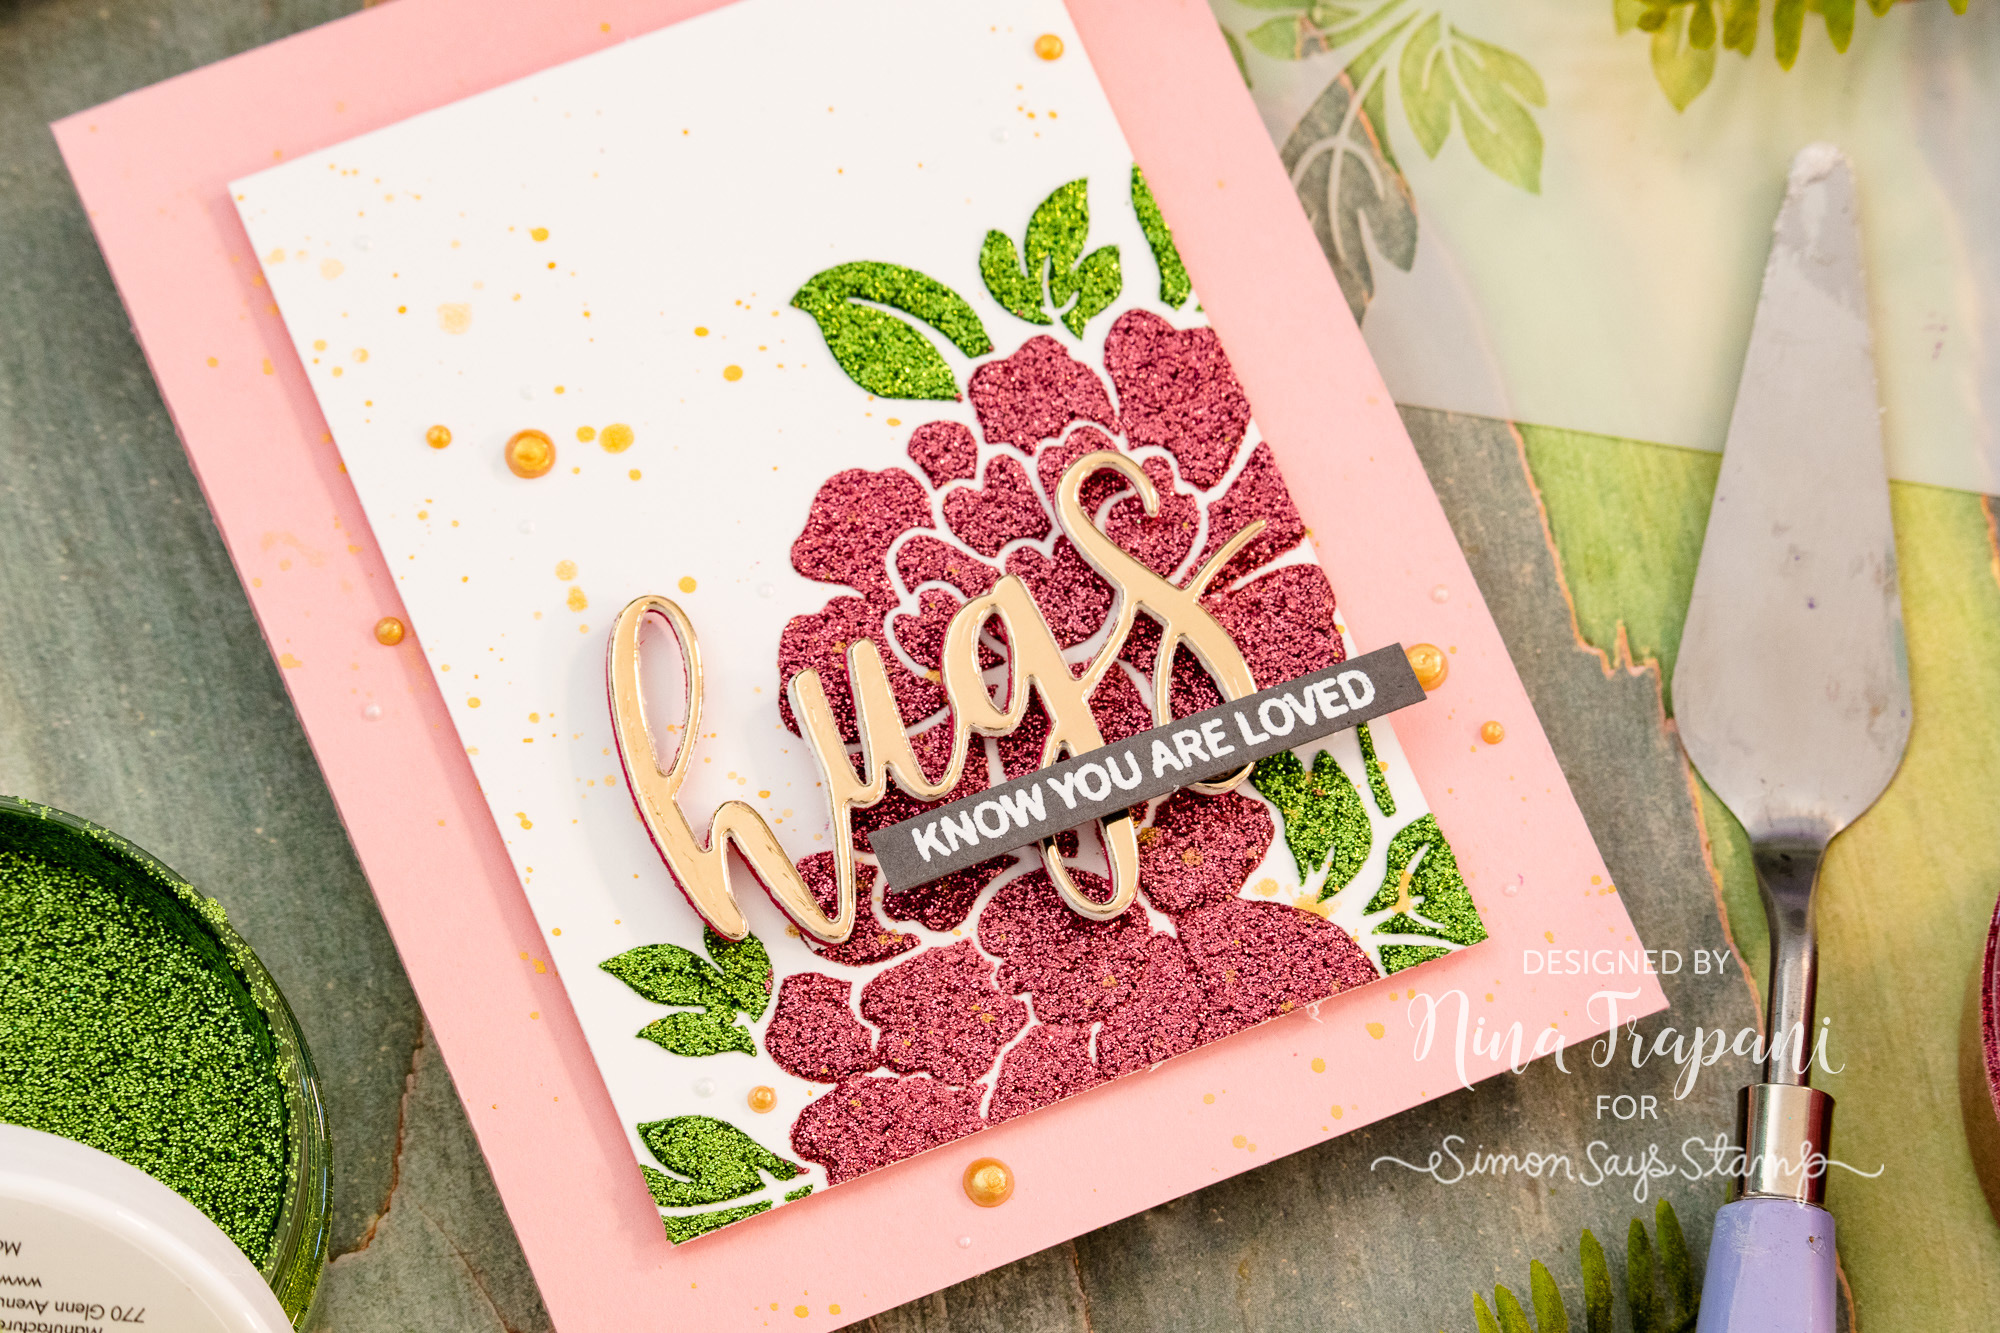
The first technique I’ll be featuring in today’s video is using two colors of Glitz Glitter Gel with some masking over a stencil. With a bit of Purple Tape and some patience, you can create a gorgeous duo-tone stenciled design in no time at all.
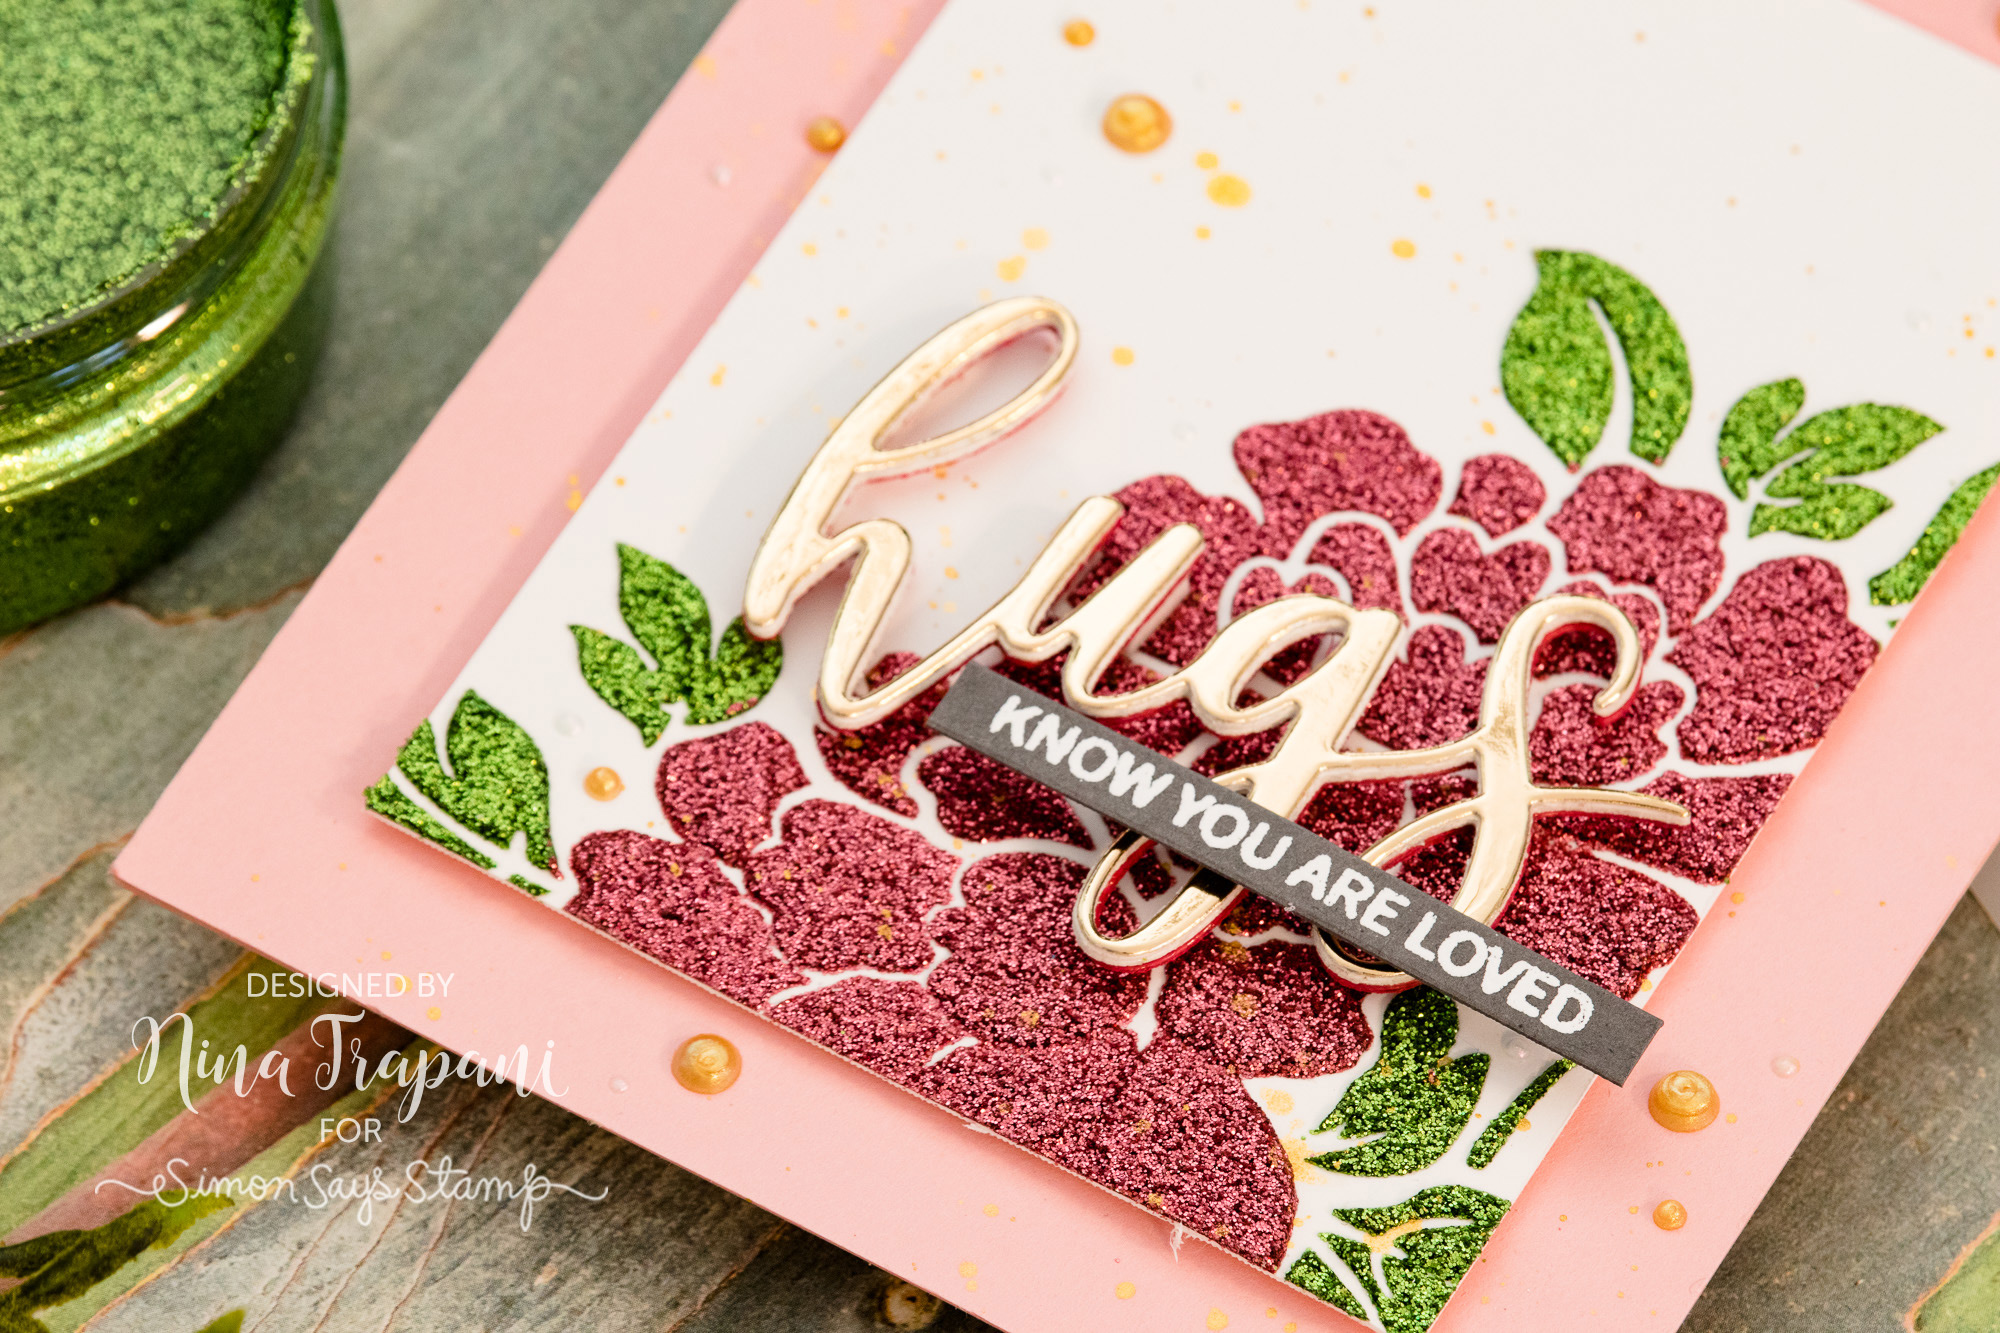
Gina K. Designs has lots of beautiful paste colors, which means you could change the color combos up to create a floral arrangement you love most! I was particularly drawn to the Bubblegum pink gel… so pretty!
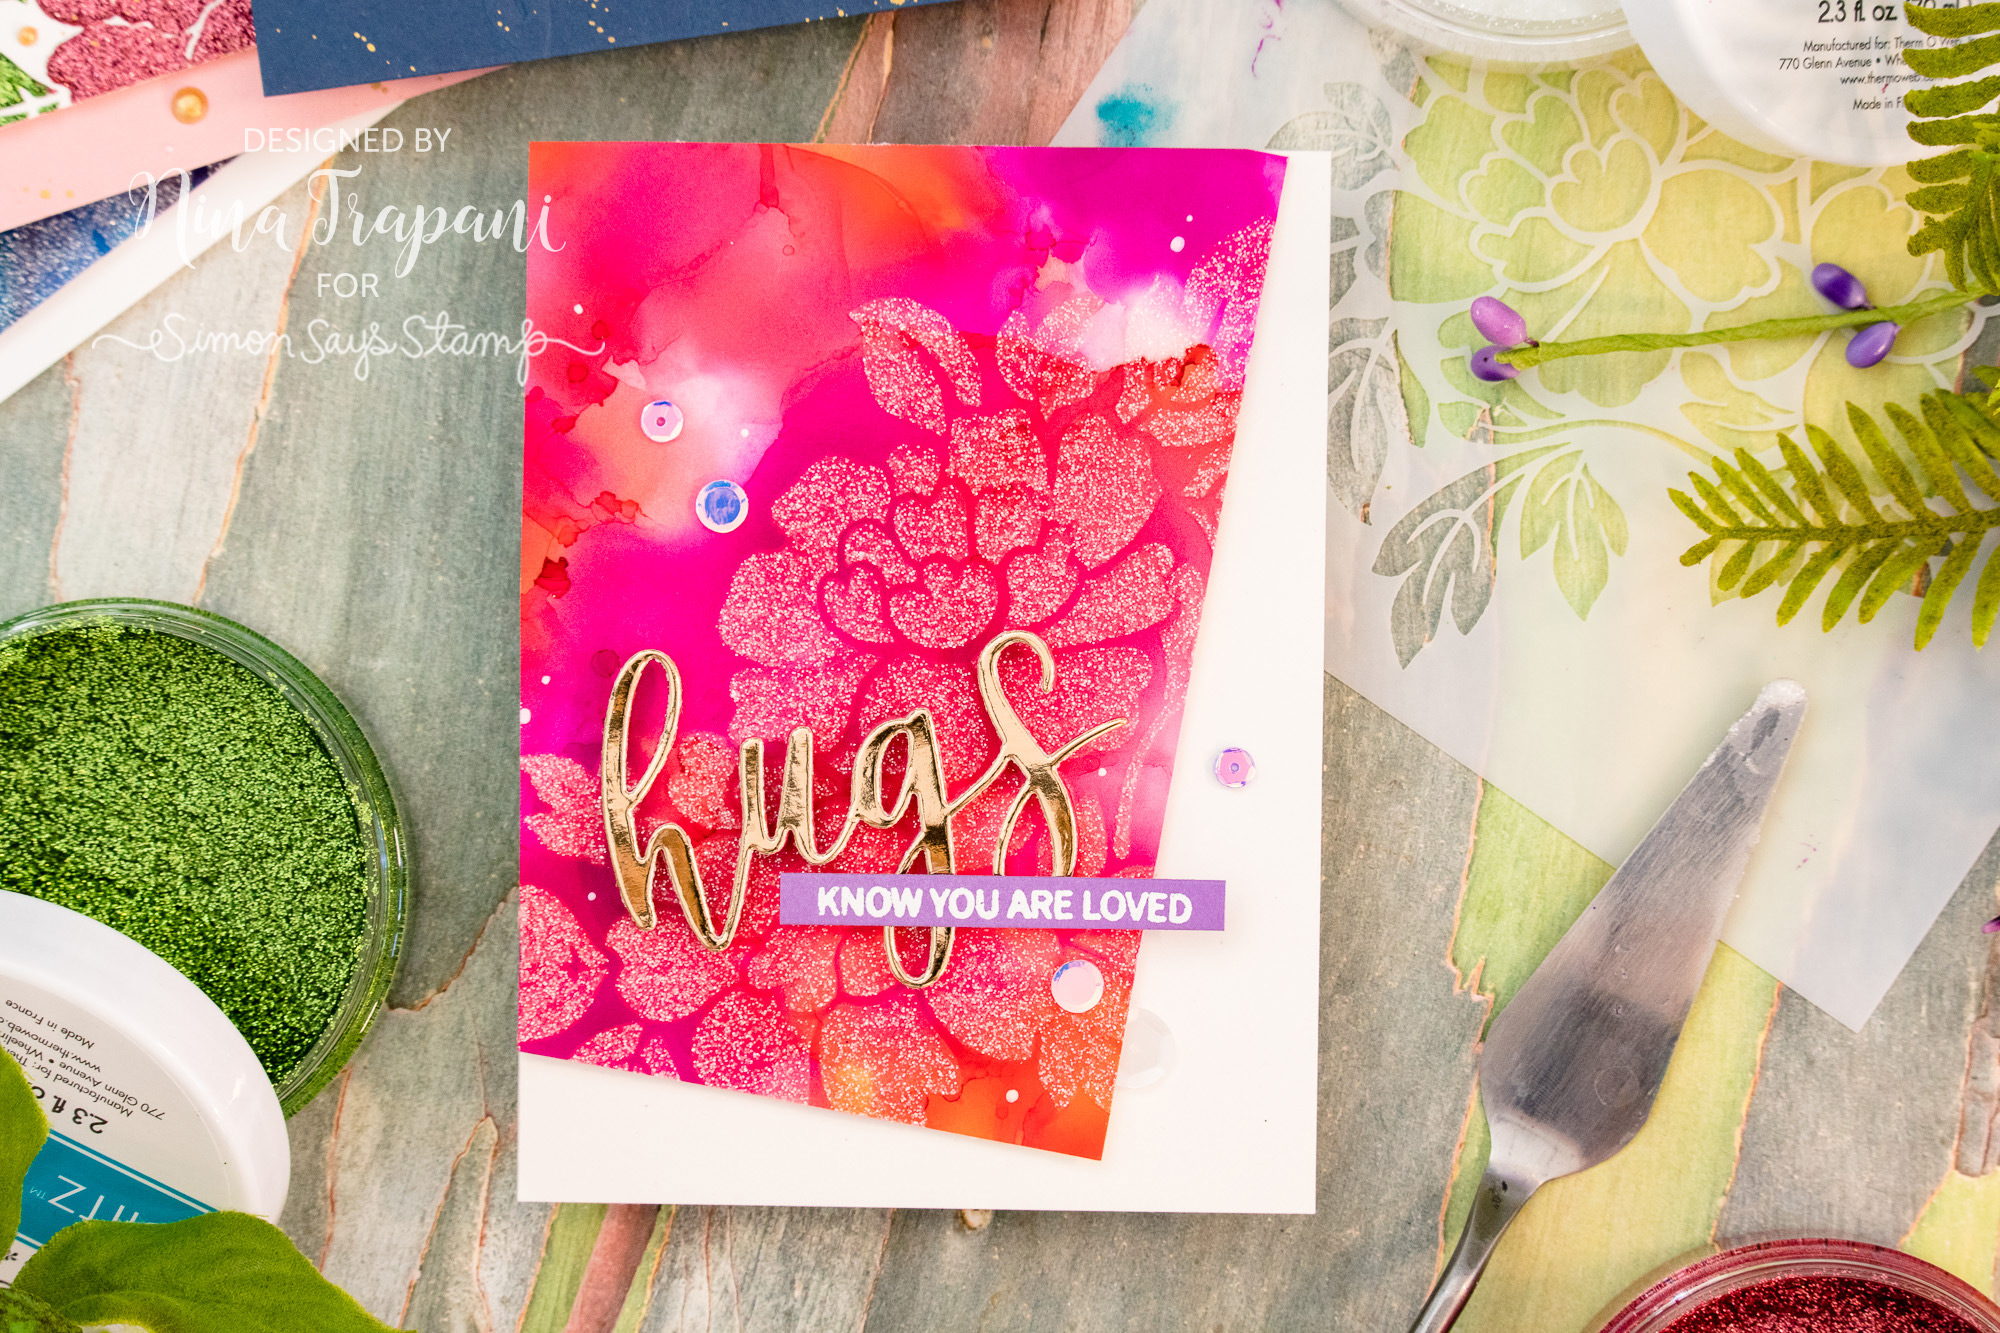
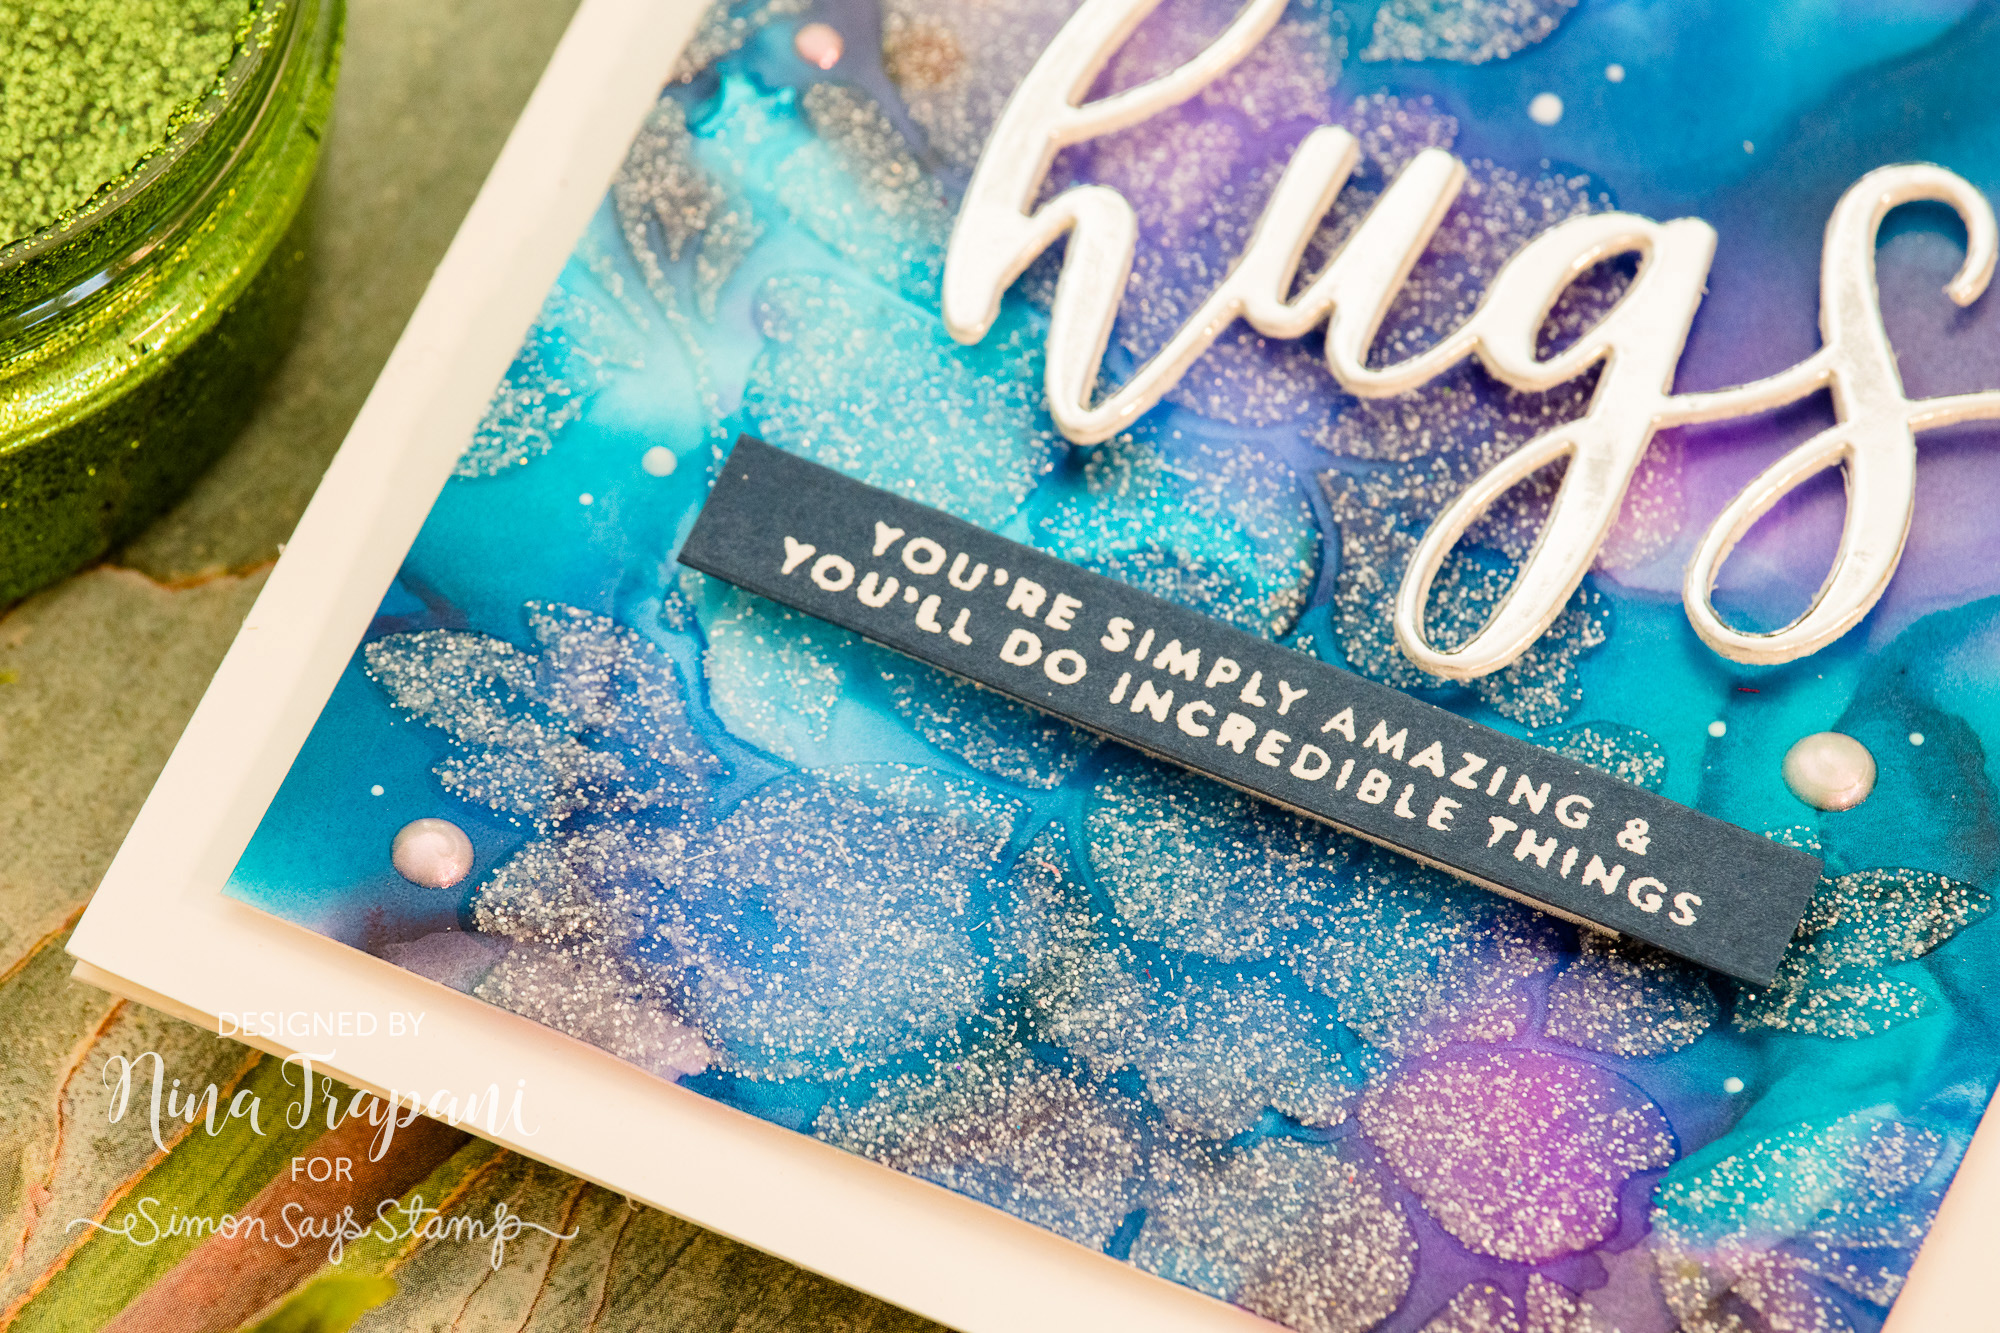
Next up, I wanted to share a more tone-on-tone effect. The Glitter Glitz Gels from Gina K. Designs are semi-opaque. This looks amazing as you can see from the first card I created, but I wanted to try using these glitter pastes in a more translucent appearance.
To do this, I mixed a dollop of White Glitz Glitter Gel with another dollop of Ranger Transparent Texture Paste (I used the matte version) on my craft sheet before applying it through the Floral stencil.

I had leftover of this DIY paste that I created, so I ended up making a second card using this same technique; each of the background on these two cards were made with Alcohol Inks on Ranger Alcohol Ink cardstock.
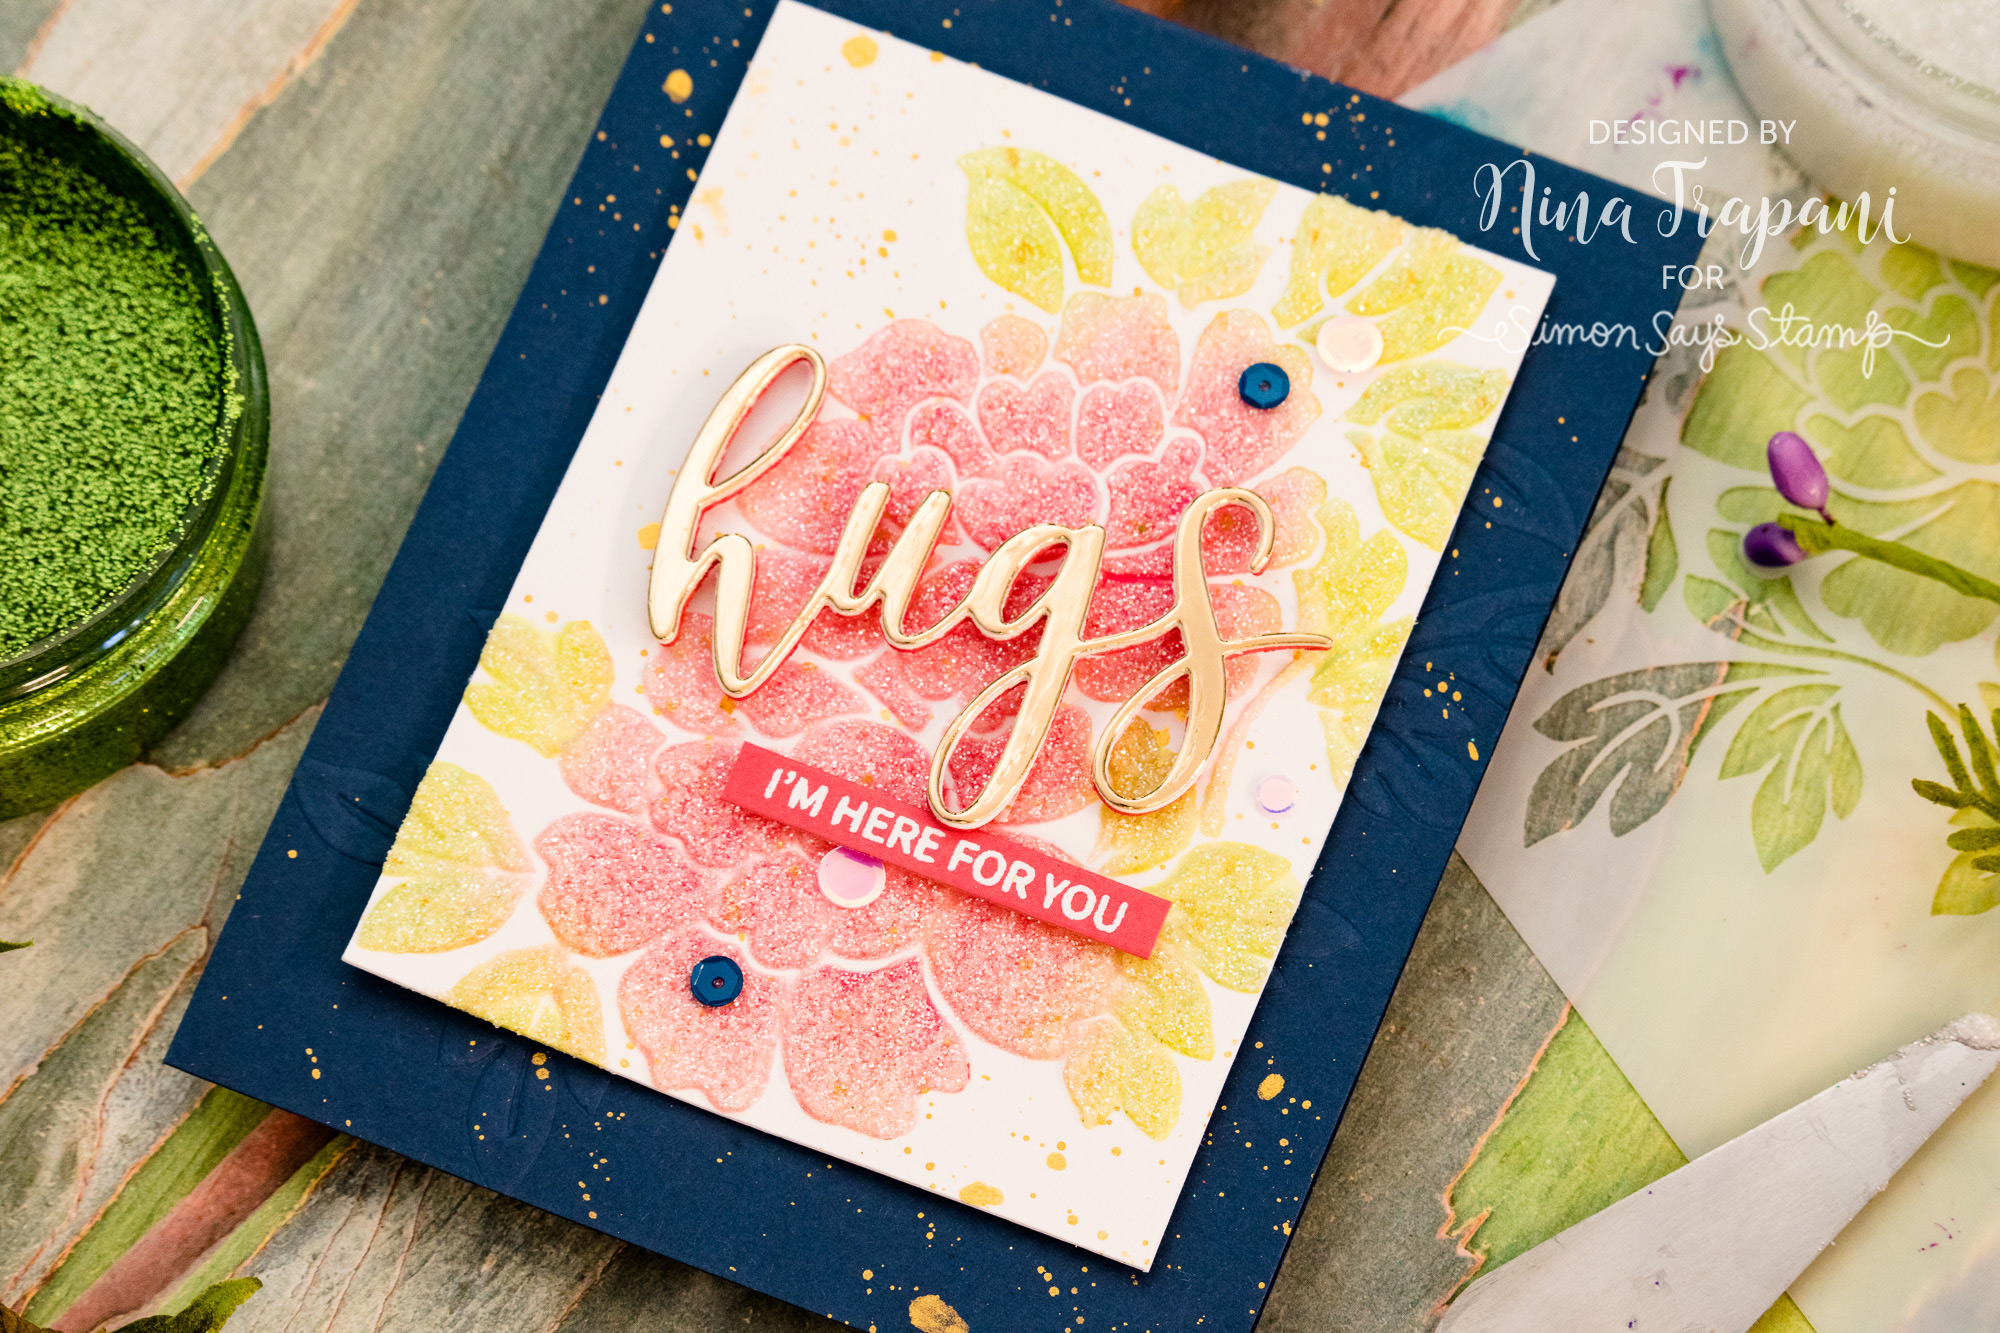
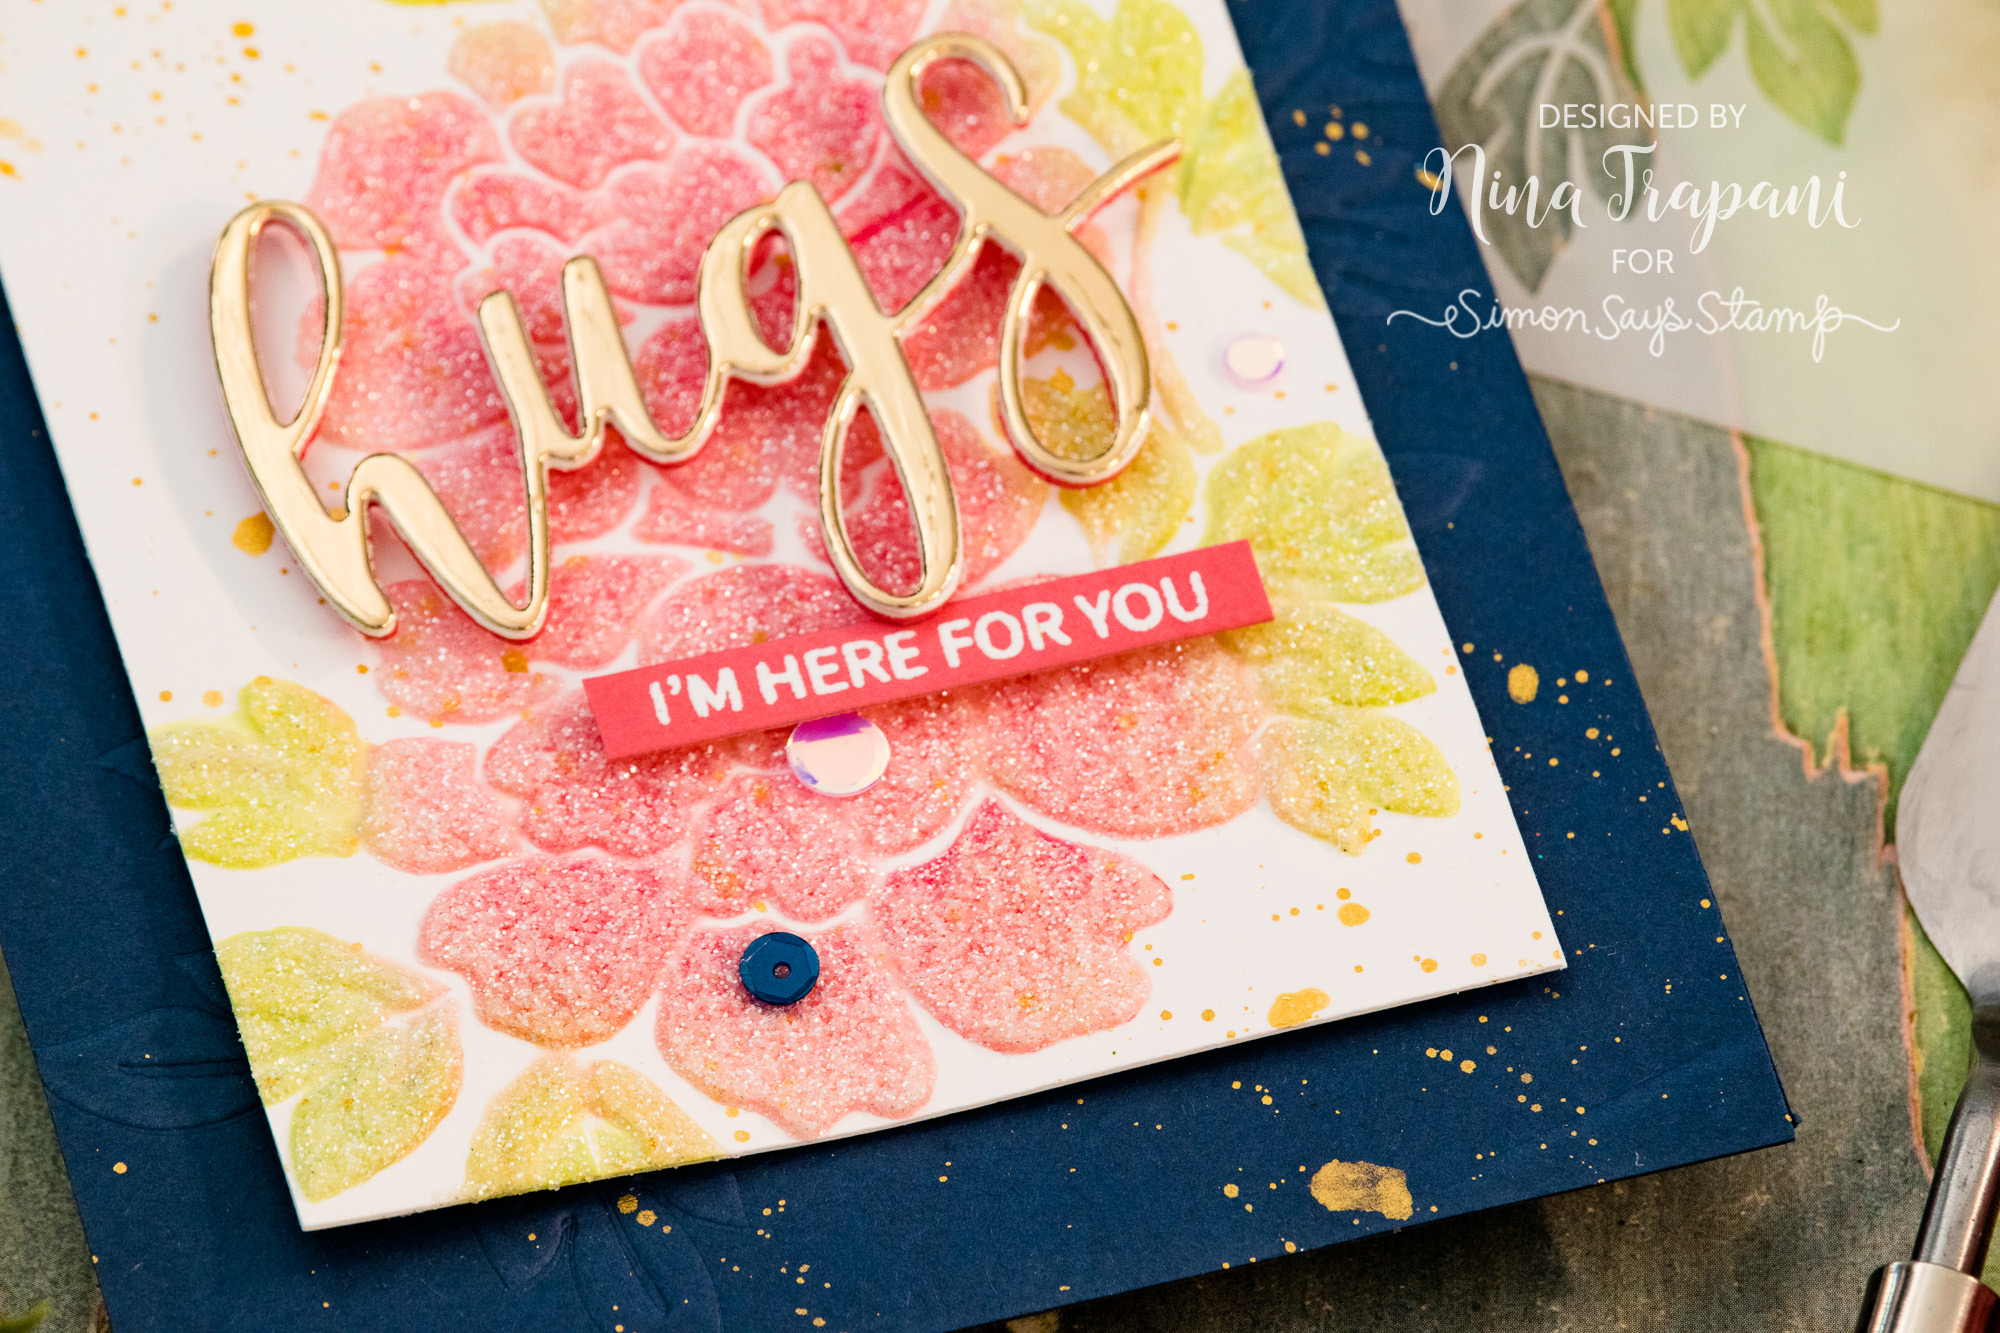
My final technique for today is using the gel over an ink blended stencil design. This look is very unique for a few reasons…
- Distress Oxide Inks – which I used for the ink blending – react with moisture and these Glitz Glitter Gels are quite moist.
- The Glitz Glitter Gels are semi-opaque, which means everything underneath will be altered in appearance.
What I was really excited about was the way the properties of the Oxides and the Glitz Glitter Gels combined together. The bright colors of the Oxides are muted under the semi-opaque paste, creating a soft and elegant floral arrangement.
I hope you will watch the video below to see all these techniques in action! Thanks so much for stopping by and visiting me today; I will be back again soon with more to share!
WATCH THE VIDEO
SUPPLIES
|


Blog Candy Alert!! Follow our blog via email and comment on this post for a chance to win special blog candy!
Mixed Medium with Shari Carroll: Jane Davenport Making Faces

Welcome everyone!!! I’ve had a playdate with Jane Davenports Making Faces products. Wow, are they fun!!
I will admit that I felt a bit out of my wheelhouse when I sat down to start this project (I’m not much of a make-up wearer), but with the guides that Jane Davenport offered in the front cover of the Contoured Face Paper Pad, I was able to jump in and go to town.
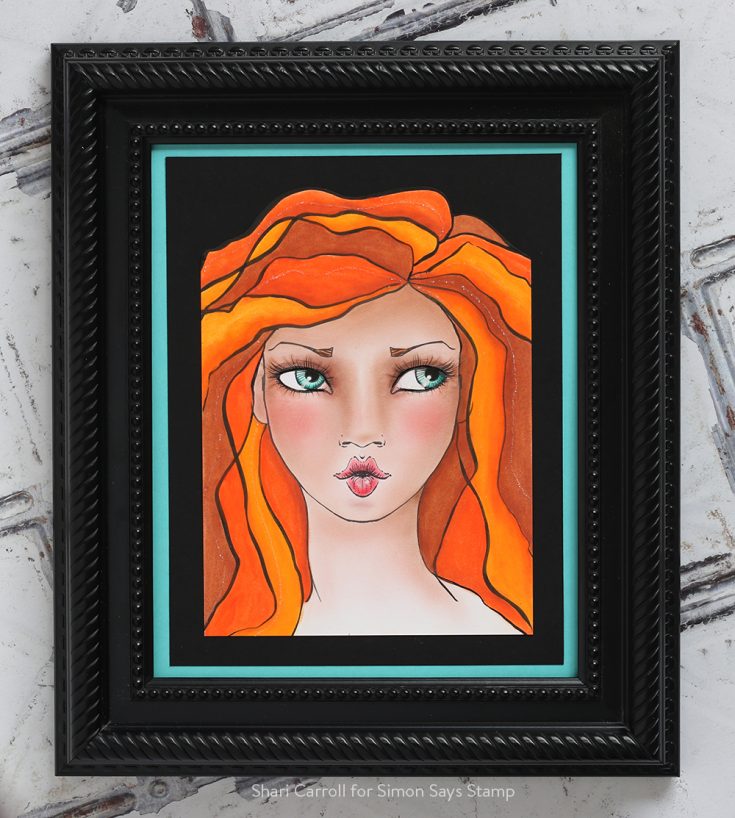
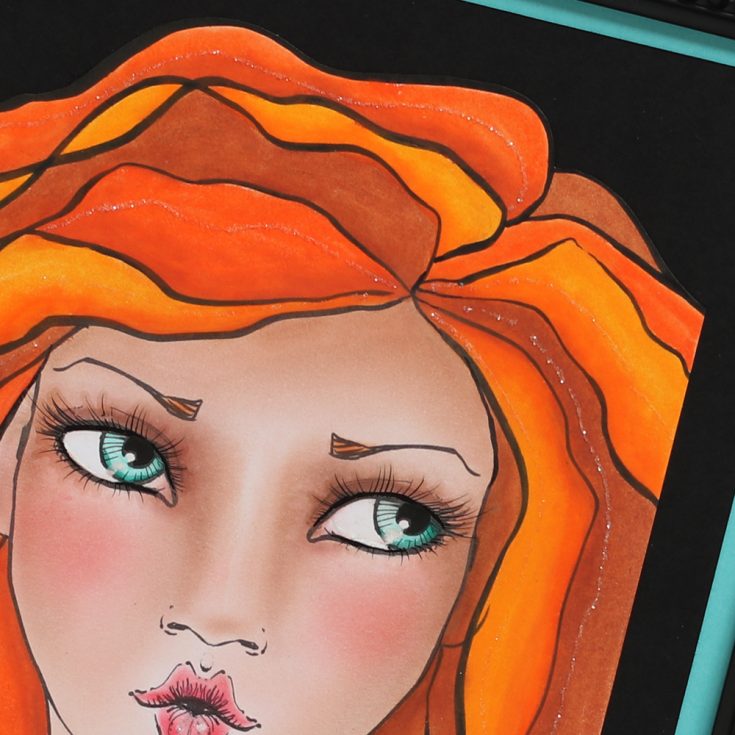
I used the Birthday Suit pastel set to apply the facial colors then added deeper colors for contouring using blender sponges and foam batons. I’ve used the Colorstick Gel Crayons to add bright colors to her hair, blending with my finger and batons.
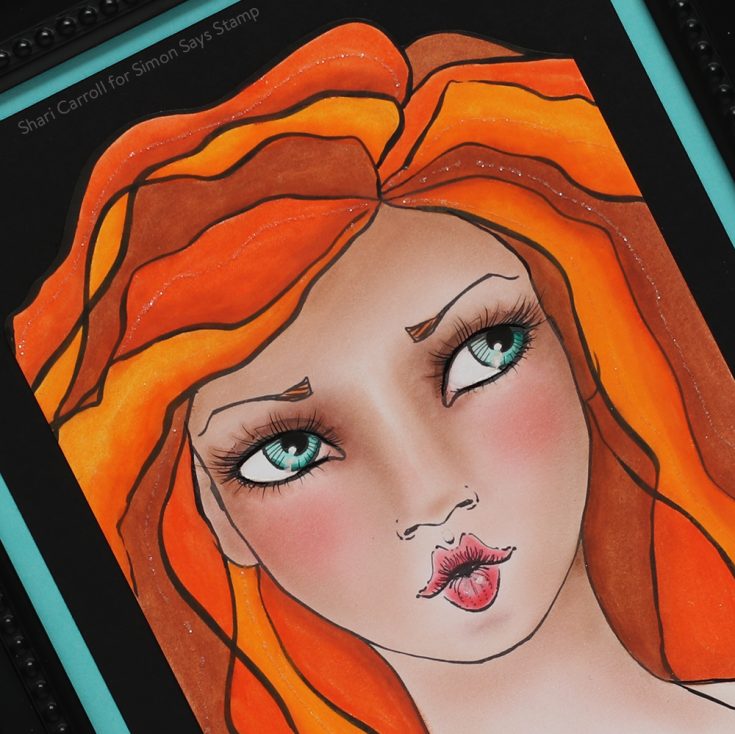
I ended up trimming around her hair at the top and mounted the piece onto black cardstock followed by Audrey Blue cardstock to match her eye color. As a finishing touch, I added a thin bead of glue and glitter streaks to her hair.
I’ll break down some of these primary products for this project so you’ll have a better idea of how they are used.
- Pastel Sets: Powder pastels, apply with a baton or blender sponge
- Baton Blenders: Dual tip foam applicators
- Blender Sponges: Sponges of different density and shapes
- Ultimate Waterproof Brush Pen: Permanent colored brush tip pens, can be blended out with a water brush or paintbrush before they dry.
- Licensed to Quill Brush Nib: Permanent Black ink with a brush tip
- Colorstick Gel Crayons: Silky smooth color stick that you apply to projects like lipstick
- Contoured Face Paper Pad: Your starting point for fabulous faces!
Thanks for stopping by today, I hope you’re as excited as I am about this line of products!! I can’t wait to create another one.
Blog Candy Alert!! Follow our blog via email and comment on this post for a chance to win special blog candy!
|


