Did You Know: Fun Facts and Crafty Tips! July 2020 Edition
Hello crafters, it’s Shari Carroll here with you! Today I have a new edition of our popular Did You Know series!
If it’s your first time seeing this feature, each month we bring you fun facts, creative tips, and even crafty hacks about your favorite supplies and brands; you can then use these awesome tips that you learn in your next crafting projects! Are you ready to learn some fun tricks? Keep on reading!
Today, my focus is on the little things that can make your crafting so much easier.
STUDIO KATIA EMBELLISHMENT WAND
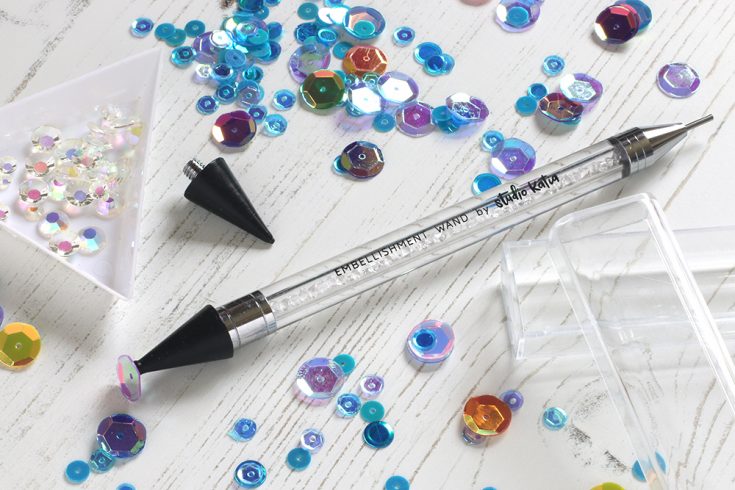
Ever have trouble with static and sequins? I’m always fumbling around trying to get them in place or off my fingers. Worry no more!! This gorgeous embellishment tool will not only look great on your desk, but it’s handy to help with the placement of your gems and sequins.
It has two tips. The main tip has a waxy feel to pick up your embellishments. The other end is for pushing them down once in place. The wand has a gorgeous channel of gemstones and comes in a clear case for storage.
There are colorful refill tips too!!
TIM HOLTZ NON-SLIP INK PAD MATS
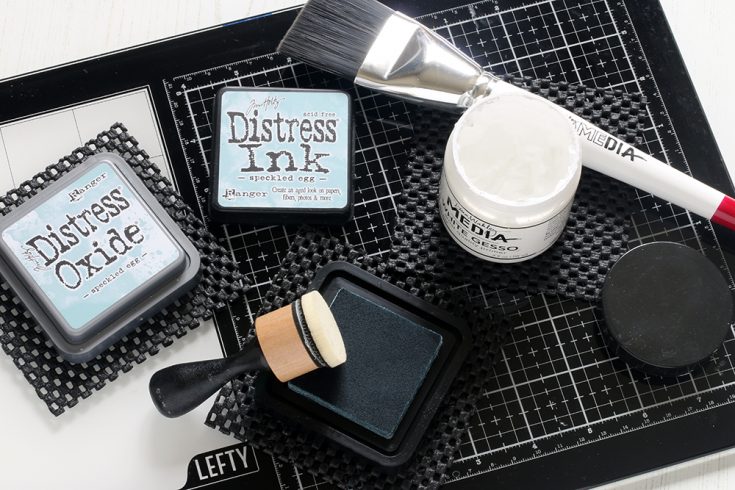
Let’s talk third hand! These handy little pads hold your ink pads, jars of mediums and paints in place so you can hold onto your project while working. They even keep your pens and brushes from rolling around on your work surface.
Having the non-slip pad in place also helps me from getting my containers grungy from grabbing them with messy fingers.
They come in a pack of 3 and are sized perfectly for full-size Distress ink pads but can also be used with other brands. Ink blending through a stencil is so much easier now!
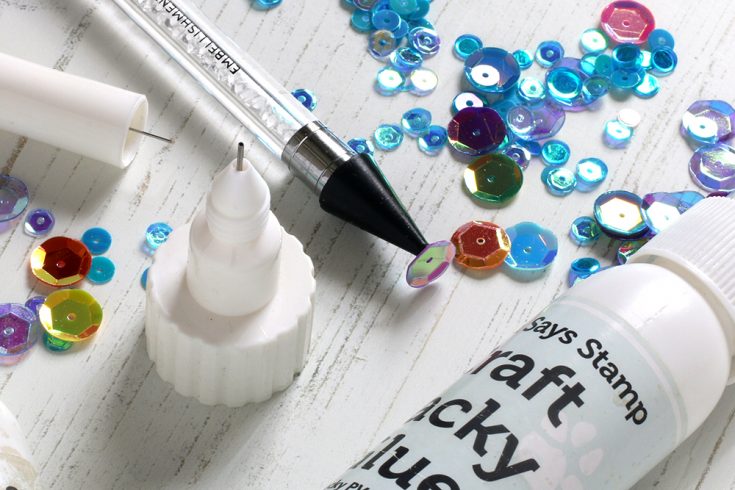
I use this all the time. This Fineline Applicator tip fits the Simon Says Stamp Tacky Glue bottle. It delivers a small amount of glue which is perfect for gluing down sequins, gems, fine detailed die cuts, and anything that only needs a small amount of glue.
There is a pin in the lid that keeps the channel clear. No clogging and ready to use anytime.
TIM HOLTZ SIDEKICK and STICKY GRID SHEETS
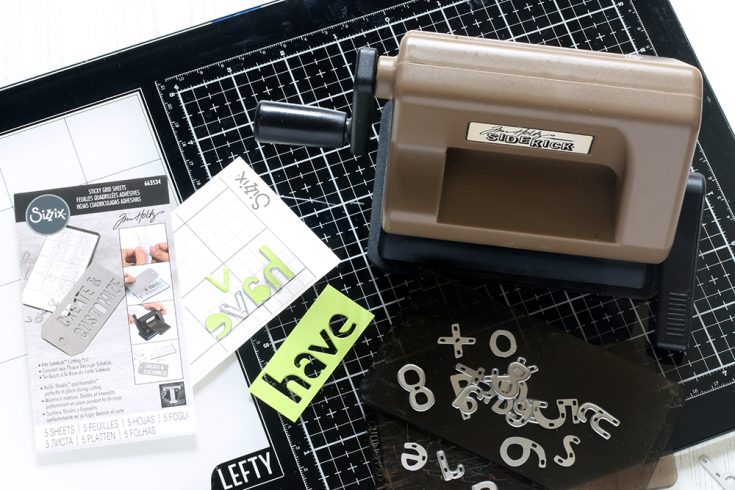
I have a small craft space with little elbow room and sometimes it’s just easier to have my Tim Holtz Sidekick out for small die-cutting. This little guy has the strongest suction base which holds in place on a smooth work surface. It’s lightweight yet heavy-duty.
I use it mostly for small dies, especially letters. Also shown in the photo is the Sticky Grid sheets. These are double-stick grid sheets which are the same size as the Sidekick platforms. The grid helps you line up your dies and stick them to your cardstock before cutting. Such a brilliant idea!!
I hope these tips have helped you learn a few tricks for your upcoming crafting projects and how to find them. Thanks for joining me today!!
SUPPLIES
|


Yippee for Yana: Vacation Time

Hi friends! Happy Tuesday! Please join me in welcoming Yana Smakula back as our special Yippee for Yana bi-monthly blog series! Read on and watch the video for more information! Enjoy!
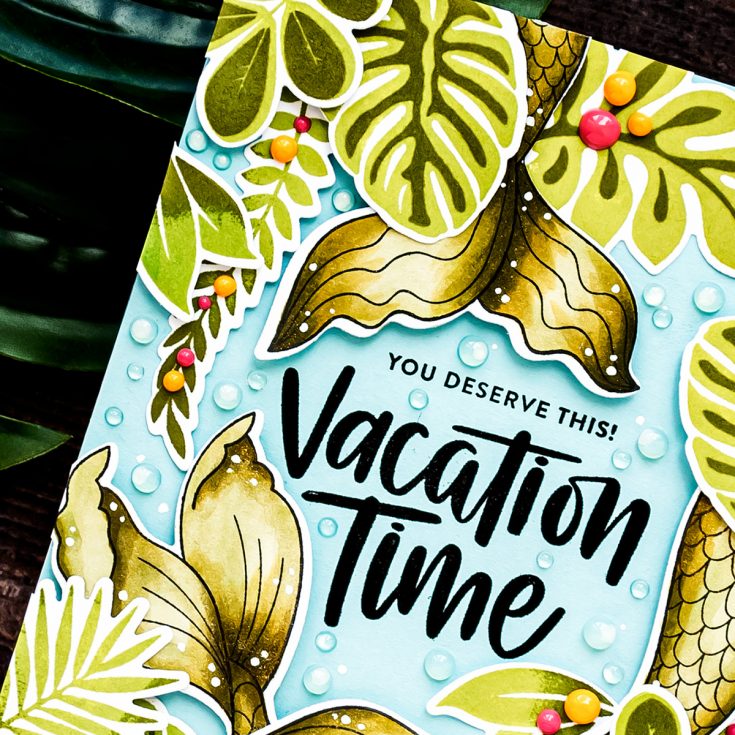
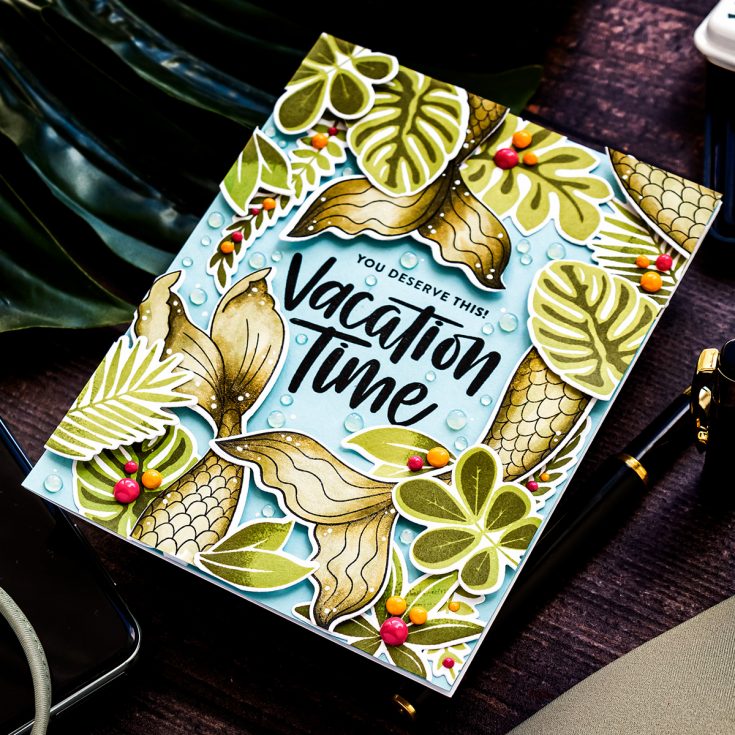
Hi everyone, this is Yana Smakula, welcome back for another Yippee For Yana video! I love to combine my new stamp sets with my all-time favorite old sets and so in today’s episode, I am sharing a Vacation Time card featuring Simon’s new Be a Mermaid stamp set, I did feature it in my last video, but I really adore this set and I have so many ideas for using it, I can’t put it down just yet. And I am also using my older stamp sets from Simon – the Vacation Time set for the sentiment and also the Tropical Leaves stamp set to help me set the scene.
I started working on my card by stamping the leaves from the Tropical Leaves stamp set using a mini MISTI stamping tool onto Neenah Solar White 80lb cardstock. I love the Tropical Leaves stamp set because it is a very simple set, yet it is a layering set and I love myself a well-designed layering stamp set. I’ve picked 2 colors of ink – a light green and a dark green to stamp these leaves. The light green I am using is Willow from Simon.
Having stamped the leaves using the Willow ink I removed the stamps that have a second layering layer to them. I kept just those stamps that have one layer. I did this because I wanted to partially ink these up using a dark green color, in my case, Forever Green from Hero Arts. Next, I used the 2nd layer stamps for the layering leaves, I positioned those and stamped them in that same dark green, Forever Green ink from Hero Arts.
I used coordinating dies and cut all of these leaves out in my die cutting machine. Next, I used the mermaid tail images from the new Be a Mermaid stamp set and stamped 4 in Simon’s Intense Black ink on the same white cardstock.
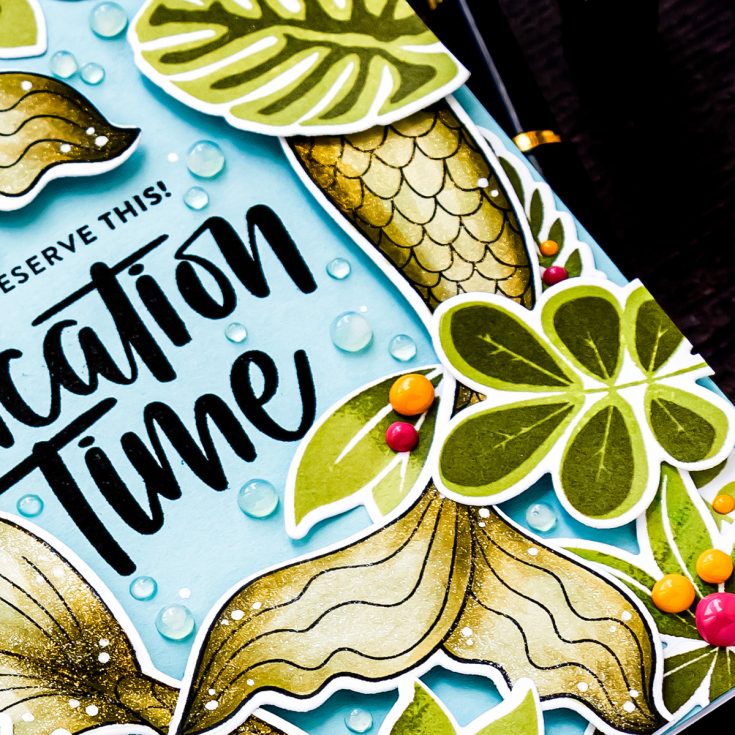
My plan was to use a light blue cardstock panel, Mist from Hero Arts, and create a scene using the mermaid tails and tropical leaves. The mermaid tails, of course, had to be colored. I used YG93, YG95, and YG99 Copic markers to color them.
To add interest and detail to mermaid tail I used 2 pens from Tonic Studios, a Glitter Gloss, and Midas Touch shimmer pens. I first applied the Midas Touch pen to the shadow areas and then blended the gold shimmer out using the Glimmer Gloss pen giving my mermaid tails a gold and silver shimmer.
Next, I stamped the sentiment that reads You Deserve This – Vacation Time in black ink on Hero Arts MIST cardstock. I used foam adhesive squares and foam mounted the mermaid tails in place, framing the sentiment in a way.
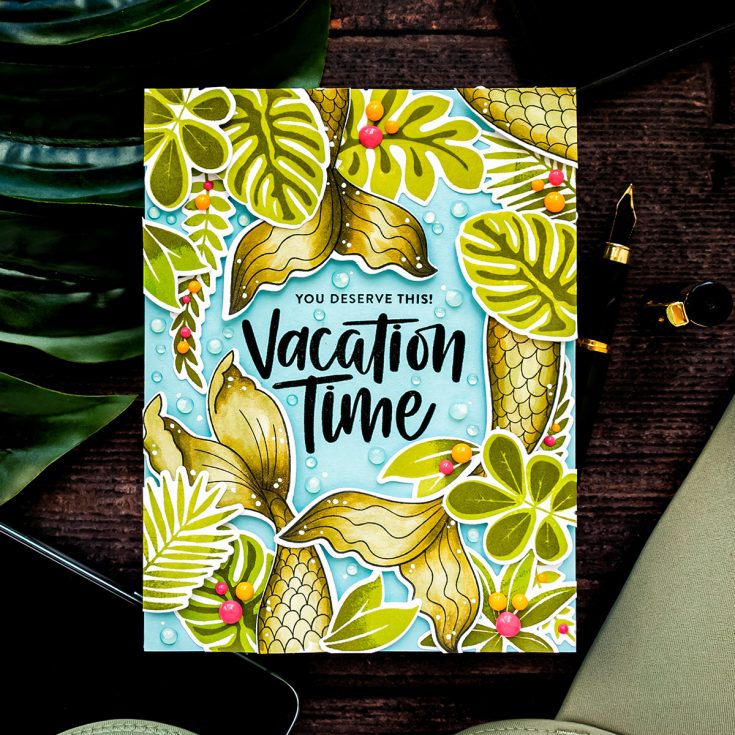
Next, I added leaves building my scene. I used both liquid glue, I like to use Simon’s Craft Tacky Glue and foam adhesive squares to keep building that dimension on the scene. I overlapped the leaves and mermaid tails quite a bit to create a cohesive scene. Any excess that was hanging off the panel was cut off.
Next, to embellish this card I once again used my white pen and added dots onto the blue background. I coated most of the dots with Nuvo Drops in Sea Breeze and also added a bunch of various size bubbles onto the blue background mimicking water.
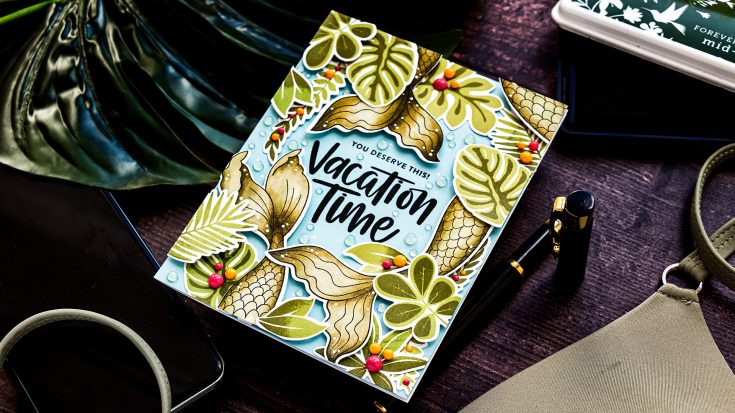
I wanted to create flowers and add pops of color to this scene, and to do that I used Nuvo Drops in pink and yellow, I used colors Carnation Pink and English Mustard and added various size dots, in groups of 3 for the most part, onto my card. You can stamp and add actual flower images to this scene, but I felt like using Nuvo Drops was easier and it looked really fun too. Have fun stamping!
WATCH THE VIDEO:
SUPPLIES:
|


Thanks so much for stopping by, and thanks to Yana for being our guest!
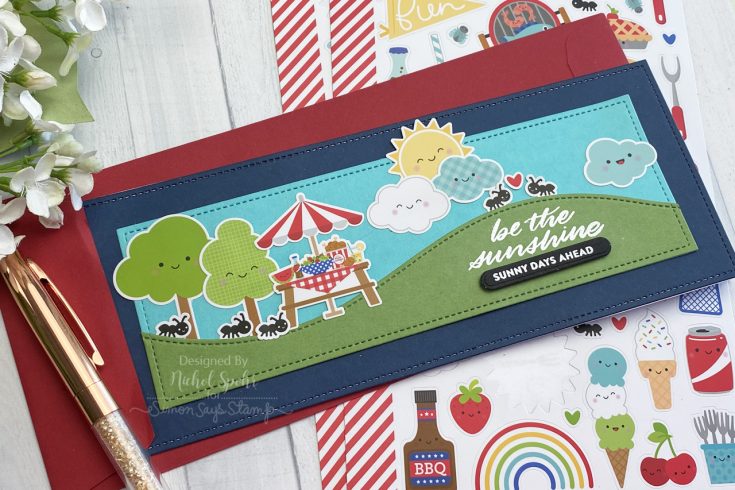
Slimline Picnic Parade Cards
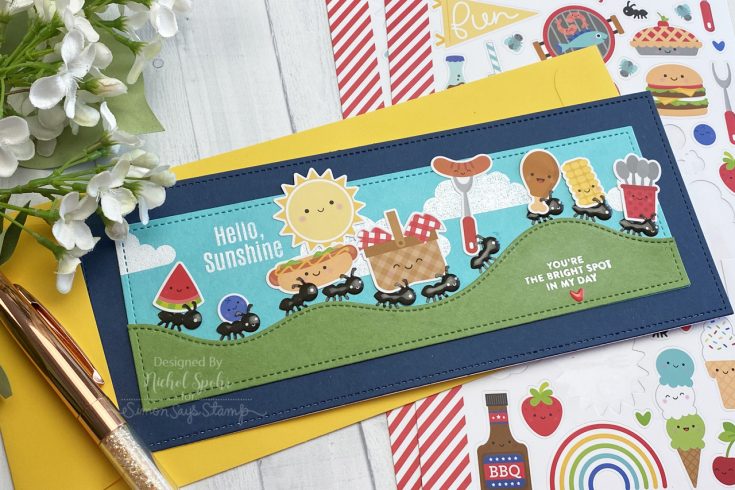
Hi friends! Happy Monday! Please join me in welcoming special guest Nichol Spohr with these darling ( & trendy!!) Slimline cards showcasing components of our August 2020 card kit, Picnic Parade! Be sure to watch the video for more information and enjoy!

WATCH THE VIDEO:
SUPPLIES:
|


Thanks so much for stopping by, and thanks to Nichol for being our guest!


