Easter is On Its Way!
Hi friends! Happy Friday! I’m delighted to share this DARLING card design by Audrey Tokach showcasing some brand new cute sets from Lawn Fawn! Read on to learn more and enjoy!
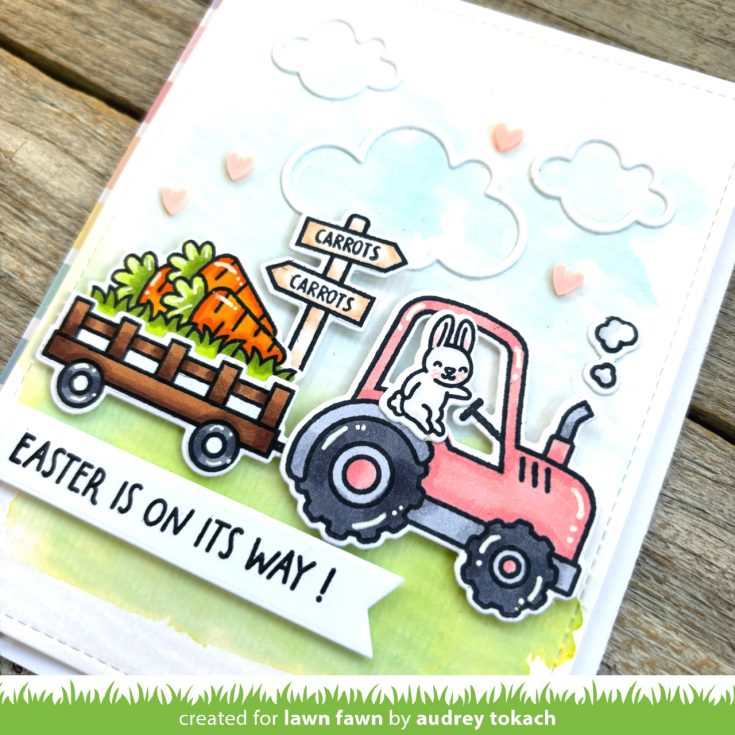
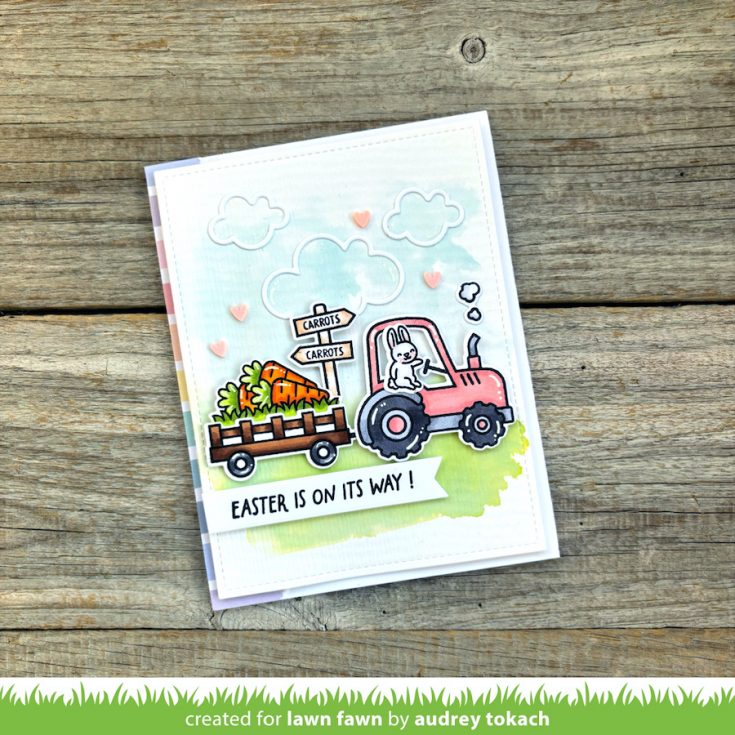
Hello friends! Audrey here with a fun Easter themed card to share with you using products from the new Lawn Fawn Spring release! To create this card, I started by water coloring a background using watercolor paper and Ranger Distress Inks in Tumbled Glass and Twisted Citron. When it was dry, I die cut it with the largest die in the Lawn Fawn Outside In Stitched Rectangles die set. I stamped and colored images from the Lawn Fawn Hay There, Hayrides! and Hay There, Hayrides Bunny Add on using Copic Markers and die cut the images with the coordinating dies.
To further set the scene, I added a trio of diecut clouds using the Lawn Fawn Simple Puffy Clouds dies. I popped the images up with foam tape, and stamped a sentiment from the Lawn Fawn Carrot ‘Bout You stamp set onto an Everyday Sentiment Banners die cut, and popped that up underneath the scene. Before adding the panel to an A2 card base, I added a strip of pretty striped paper from the new Rainbow Ever After 6×6 petite paper pad to the left edge of card base, then adhered the panel with foam tape for added dimension. To finish off the card, I added some white gel pen accents and a scattering of tiny clay hearts from Pretty Pink Posh.
SUPPLIES:
|


Thanks so much for stopping by, and thanks to Audrey for being our guest!
Clean & Simple Stenciled Card with Kristina Werner

Hi all! Kristina here! Today I have a clean and simple stenciled card for you! I used some postage stamps as color inspiration for the inks and used four colors from Simon’s Pawsitively Saturated Ink line: Cheeky, Guava, Amethyst, and Violet. All the stenciling was done with the Rainbow Splash Flip-Flop Shapes stencil set.

As I stenciled the hearts, I used multiple colors on each one, and made sure to overlap them.


To finish off the card, I stacked four layers of the Sending Love & Hugs diecut to create dimension.
Thanks for stopping by! This simple card is a lot of fun!
Supplies
|


Stamp Layering Tutorial: Send Smiles Across the Miles with this On-Trend Village Set – Yippee for Yana

Hi friends! Please join me in welcoming back the oh-so-talented and amazing Yana Smakula! (Please note: our dear friend Yana is Ukrainian. To show support to our brothers and sisters in Ukraine, please see Yana’s post HERE.)
Hello, crafters, this is Yana Smakula for Simon Says Stamp! Welcome back for another Yippee For Yana video!
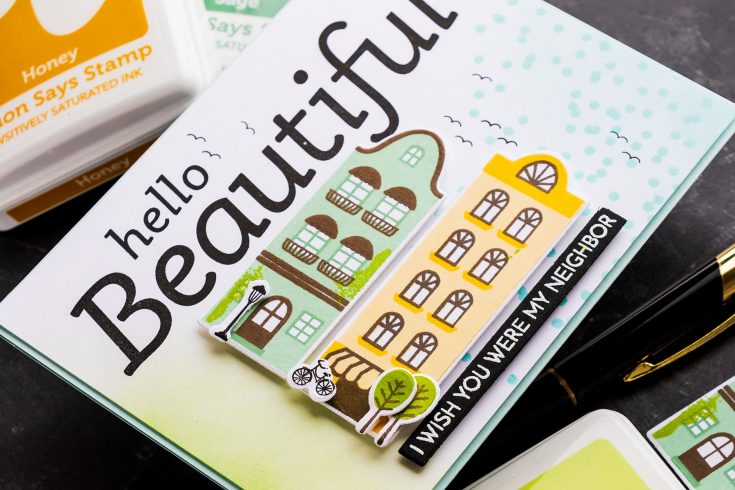
Have you seen the European Street stamp set? Oh.Em.Gee. Being from Europe I could not wait to use these darling houses on a card! Today I’m sharing a card for a crafty bestie. We all have friends, crafty friends, who live not close enough and I think this kind of card is perfect for that kind of friend – a crafty bestie who lives miles (or kilometers, as we say in Europe) away.
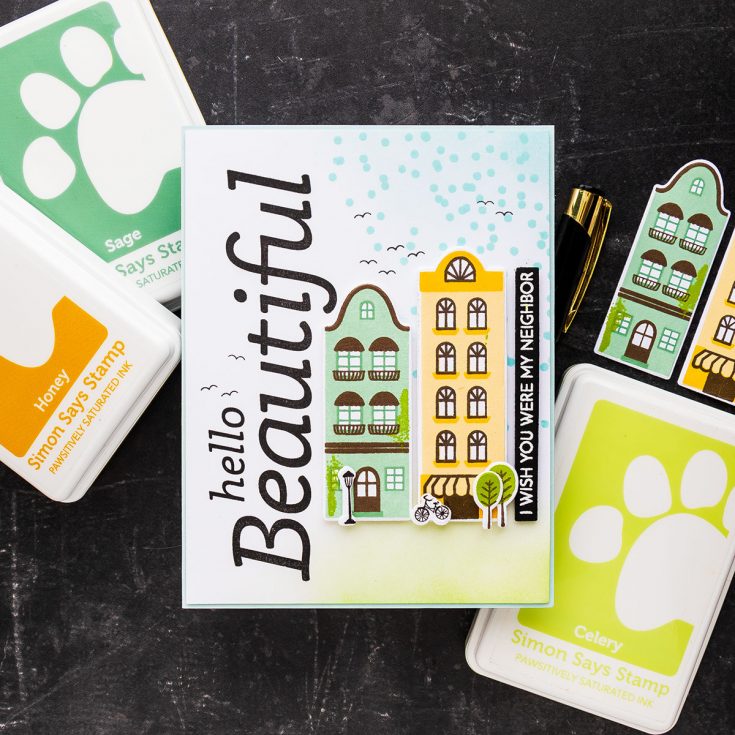
I stamped 2 out of the 3 houses from this stamp set on Neenah Solar White 80lb cardstock using Butter, Honey, and Woodsy for the yellow house and Aspen, Sage, and Mocha for the green house. The add-on stamp set is a must, as it allows you to add charm and character to your houses – you can use it to stamp wild grape plants spanning the house (we had a huge one growing at the base of the apartment house I used to live in when I was little), or ivy reaching all the way to the second floor or draping down from the balcony above. I stamped greenery onto the green house using Pearfection ink. Don’t forget to pick up the coordinating dies for these as they make cutting the houses an easy and enjoyable task.
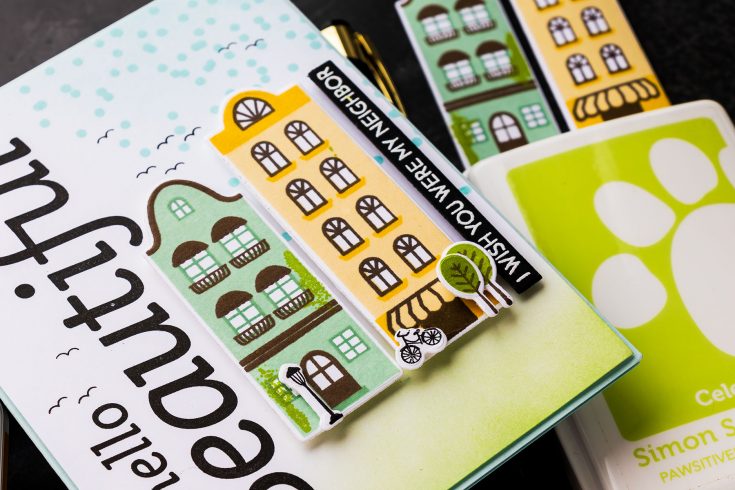
The idea I had for this card featured 2 houses and a vertical sentiment. I used the Hello Beautiful one from the Slimline Beautiful You stamp set. I did some ink blending to add color to the background and blended Seafoam ink in the top right and Celery in the bottom right corners to create the notion of sky and grass. The two colors do not meet on my card, there is still plenty of white space.
I also added basic stamping using the European Cities Background stamp, the one with the confetti – I stamped that using the same Seafoam ink to emphasize the sky.
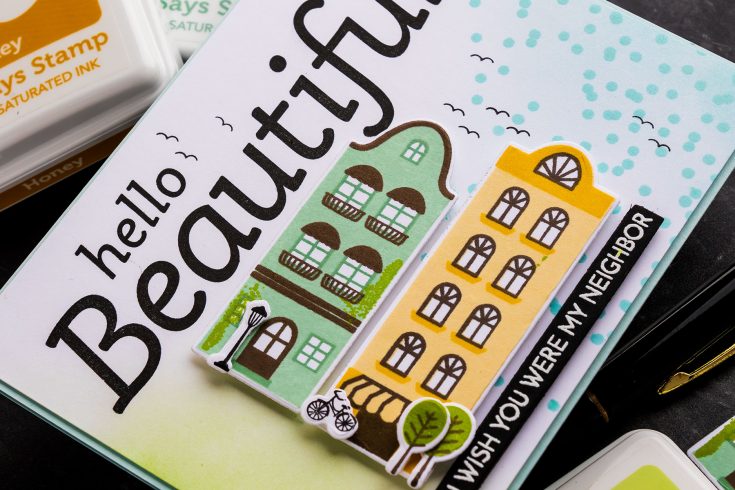
I also used the tiny add-on set to create little trees, bicycle, and streetlight to help set the scene on my card. Everything was adhered to the background using foam adhesive. I also used the Seaglass cardstock to create A2 card base to have a tiny bit of this beautiful color show on the front of my card behind the ink-blended panel (which I trimmed down to be a bit smaller than 4 ¼ x 5 ½”).
I bet you already have a friend in mind to send this kind of card to! I know I do! Have fun stamping! -Yana
WATCH THE VIDEO:
SUPPLIES:
|


Thanks so much for stopping by, and thanks again to Yana for being our guest!
New to layering stamps? Check out this Quick Tip!
Ways to support Ukraine:
If you are looking for ways to support Ukraine, we encourage you to visit this page on Yana’s blog:


