Die Stenciling with Yana Smakula
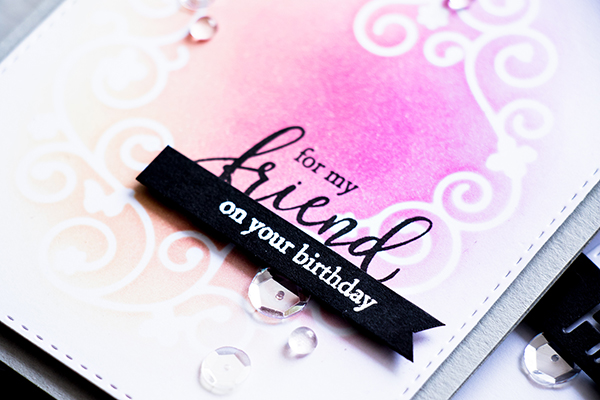
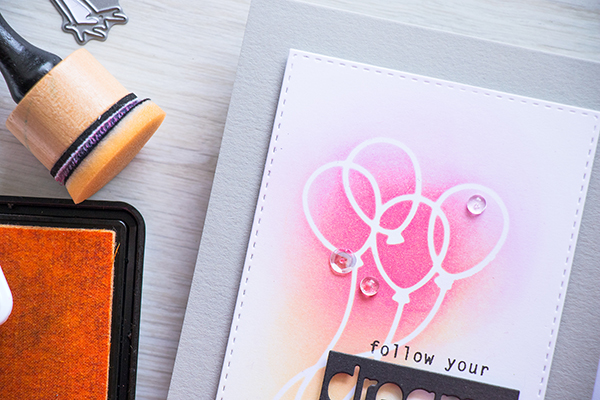
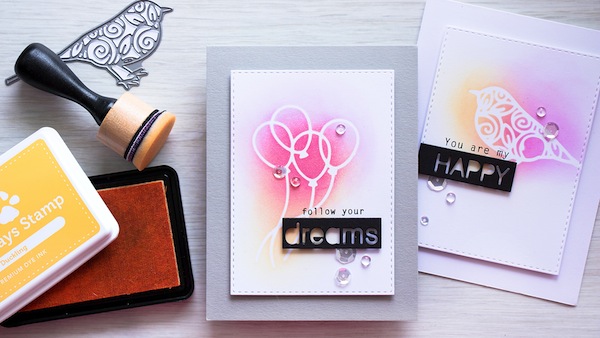
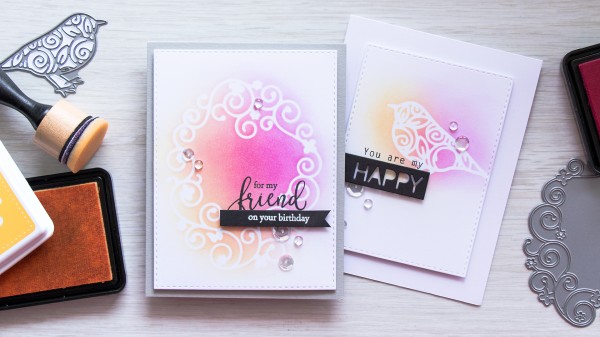
Hi friends! Happy Monday! Please join me in welcoming back the fantastic Yana Smakula to our blog as a guest today! She has used three of our exclusive dies (Balloon Bouquet, Floret Frame, & Bird of Roses) as stencils or masks to be the focal point of her trio of cards! You really could use any of your favorite die cut outs for this technique! I’m really loving her Doll Pink and Duckling color combination! It’s so fresh and springy!
Be sure to watch the video, and enjoy!
Watch the video:
Supplies:
 |
 |
 |
 |
 |
 |
 |
 |
 |
 |
 |
 |
 |
 |
 |
 |
 |
 |
 |
 |
 |

Blog Candy Alert!! Follow our blog via email and comment on this post for a chance to win a special blog candy!
Congrats! Blog Candy Winners!
From: Unicorns & Rainbows!: Barbara Lassiter!
From: Weekender with Wanda – Tim Holtz Product Spotlight!: Suzi Metcalfe!
From: Mini Cards with Paper Artsy!: Donna Phelan!
From: Plush Petal Pouches: Debbie Siddle!
From: New Wednesday Challenge This Week: Cute and Cuddly: Gail Scott!
From: DIY Watercolored Post Cards!: Jean Bullock!
From: Penny Slider Lawn Fawn Spring Card!: Heather Loughlin!
From: Weekender with Wanda – More Spring Plush!: Wahnita Hammond!
From: BeYOUtiful Card Making Ideas with Concord & 9th!: Sabrina Radican!
From: Simon Says Stamp White Pigment Inking Techniques: Migdalia Rodriguez!
From: Make Your Own Background: Janet Mack!
From: Using Die Cuts for Foam Stamping & Stamp Kissing: Monika Reeck!
Please email [email protected] with your mailing address (if applicable), the name of the blog you won from, and the prize you won to claim your prize!
Unicorns & Rainbows!
Hi everybody! Wanda here! Hope your weekend is going great. I have a super fun and happy card to share today; made with the adorable Unicorns and Rainbows stamp set from Mama Elephant. EEEP! Unicorns and Rainbows are everywhere – they are trending and so hot right now. Who doesn’t love a unicorn? They remind me of the fun toys of my younger days and just generally make me smile.
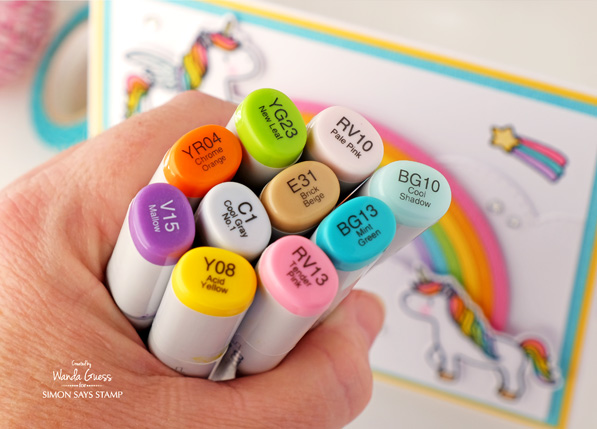
I colored up the cute unicorns and then die cut pretty, puffy clouds and a colorful rainbow. What a scene! I used my Copic Markers to match my cardstock and had loads of fun coloring rainbow unicorn hair!
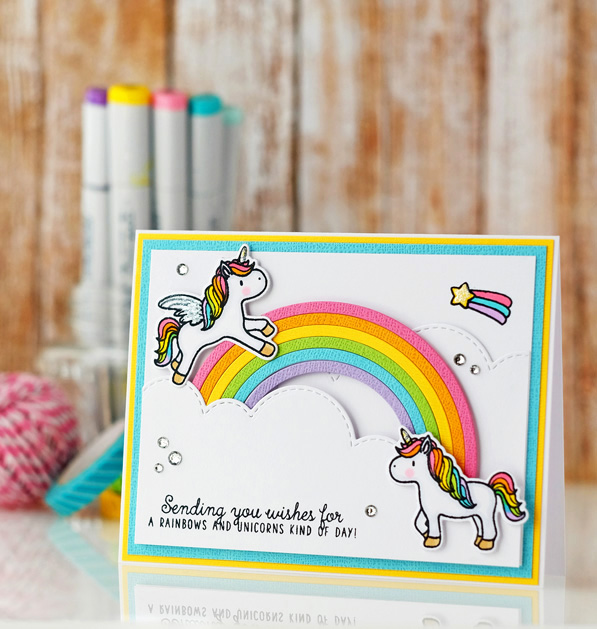
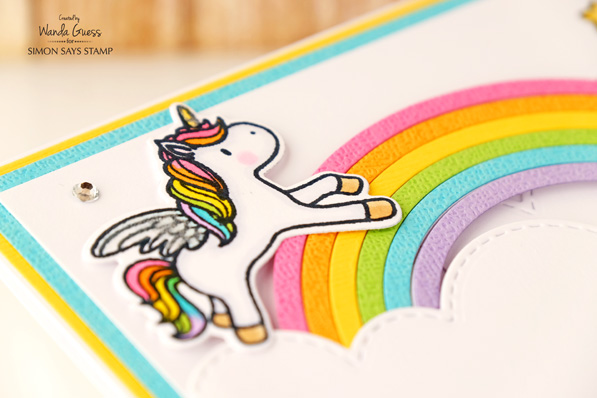
I chose pink instead of red for my top rainbow color, because, well….because it’s so fresh! I stamped the two unicorn images in the Simon Says Stamp Intense Black Ink and die cut them out with the matching dies. The Clouds dies cut like a dream. I cut two pieces and layered the top one with foam tape.
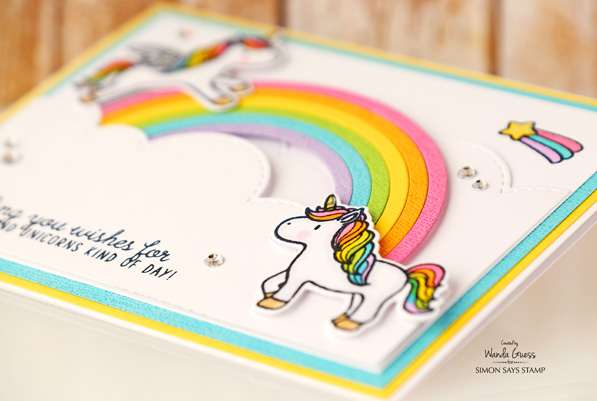
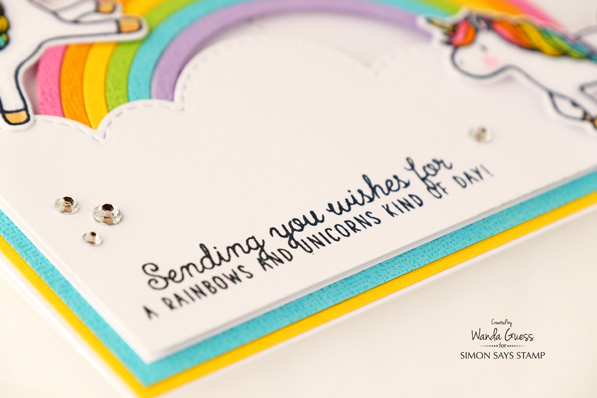
This sentiment is the best! Here you can see my cardstock layers and how I tucked the rainbow into the cloud layers.
It’s hard to photograph, but the unicorn wings, the star, and the horns were all coated with a layer of clear glitter Wink of Stella pen for a touch of shimmer.
Here are my Copic choices for today’s card.
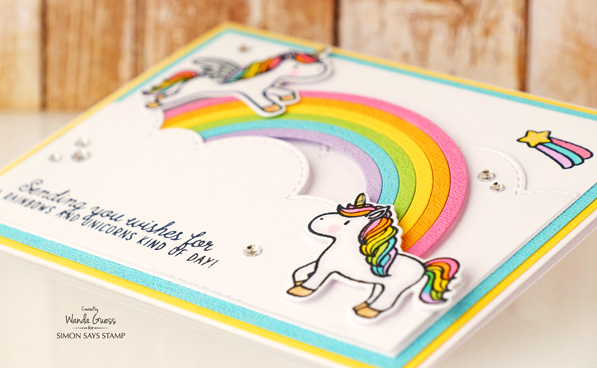
I added a few clear gems at the end for a bit more sparkle. The unicorns and rainbow are mounted onto the card with foam squares.

What is your favorite crafting trend right now? I am DEFINITELY on the unicorn bandwagon! Tell me what you’re loving right now! Have a happy, sunshiney, unicorn day friends. Thank you for stopping by the Simon Says Stamp blog. We appreciate you! Supply links are below, and remember that Copic Markers are 25% off right now – until April 1st. Use the code: COPIC.
SUPPLIES:
 |
 |
 |
 |
 |
 |
 |
 |
|
 |
 |
 |
 |
 |
 |
 |
 |
 |
 |
 |
 |

Weekender with Wanda – Tim Holtz Product Spotlight!
Happy Saturday! It’s time for the latest edition of “Weekender with Wanda” here on the Simon Says Stamp blog! I’m happy to see you today! It’s one week until Easter and Spring has sprung. It’s nice to create with vivid, happy colors right now and get in the mood. Today I’m sharing a card I made with loads of new Tim Holtz products. The Simon Says Store is stocked to the brim with everything new from CHA that Tim created for Sizzix and Ranger. It’s all fun! I finally got my hands on the Distress Crayons and wanted to make something to share here with you, and talk about them a little bit.
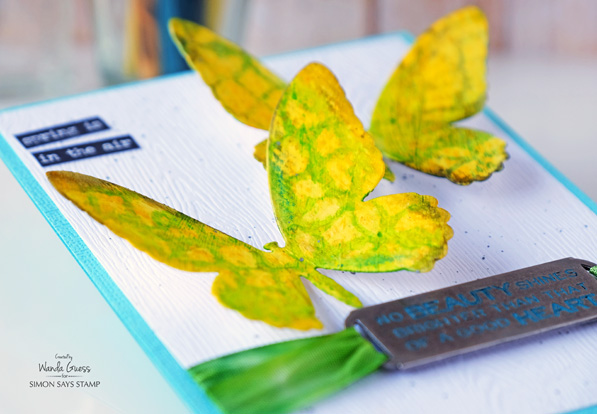
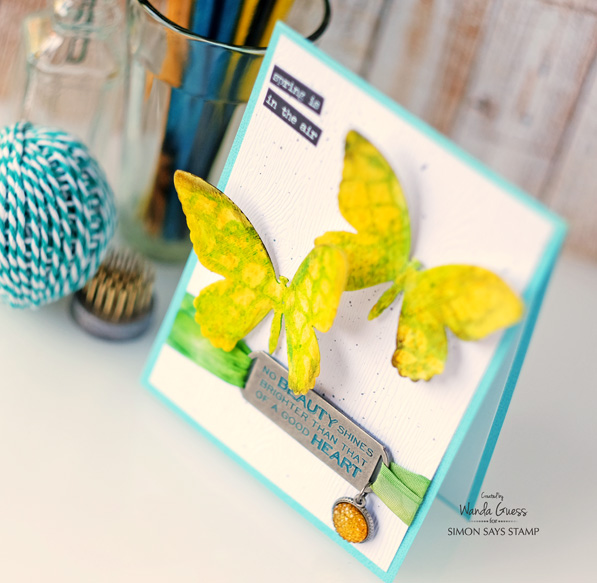
My card is a really bright color scheme that just kind of happened when I mixed some of the crayons together….and I thought butterflies would be nice for this time of year.
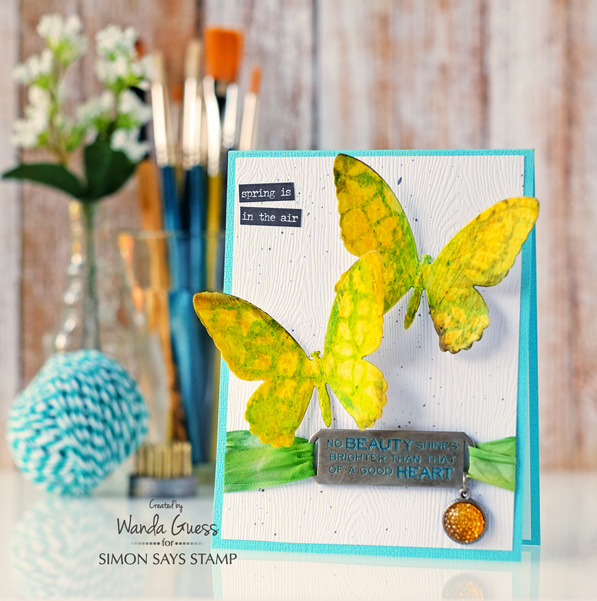
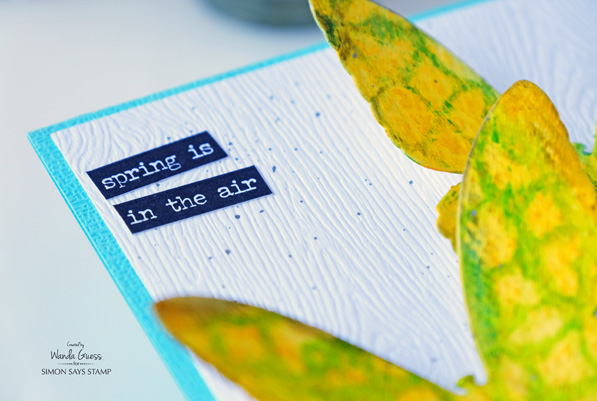
The Detailed Butterflies dies are the perfect size and scale for cards. I die cut two butterflies out of watercolor paper to use as my focal point. The background layer is the new Woodgrain cardstock! It’s pretty awesome. Great for adding some texture and great for ‘nature’ theme cards.
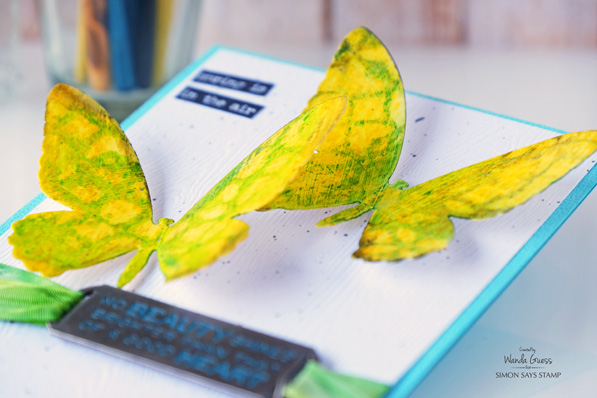
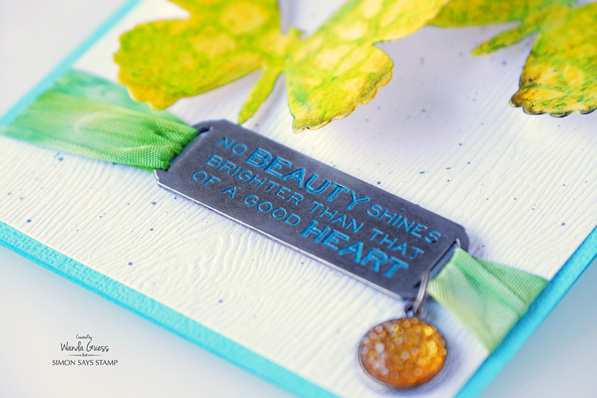
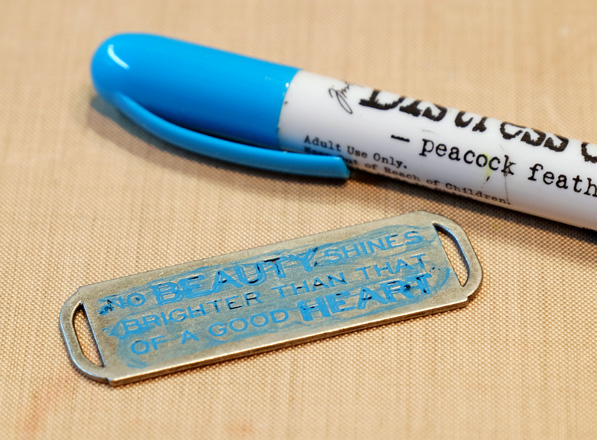
The newest addition to the metal word bands are these big quotes. LOVE this for the front of a card. I used the Distress Crayons to color in the words to make them match my project. The Crinkle ribbon was hand dyed using Distress Spray Stains.
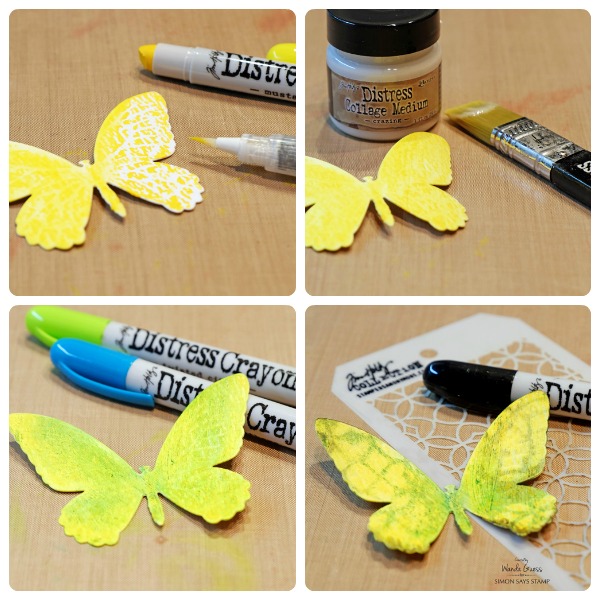
The new Distress Crayons are so unique and fantastic to work with. There are so many techniques you can try. I used a few different techniques for the butterflies. The crayons are almost the exact texture and consistency of a lipstick. They are super smooth and glide over the paper. They are loaded with pigment! For my butterflies I first rubbed the crayons over the watercolor paper and then moved it around with a water brush. Next I applied a thin layer of Distress Collage Medium (Crazing) and let that dry. The collage medium sealed the yellow color for me so I could use that as my base. Next I applied some blue and green Distress Crayons over the yellow and smudged it with my fingers to meld the colors together. The next technique is something that Tim demo’d at CHA and I loved it! I laid a Mini Stencil over the butterfly and then gently wiped with a baby wipe to remove the color in the shape of the stencil. Finally I used a bit of the black Distress Crayon on my fingers to edge the butterflies.
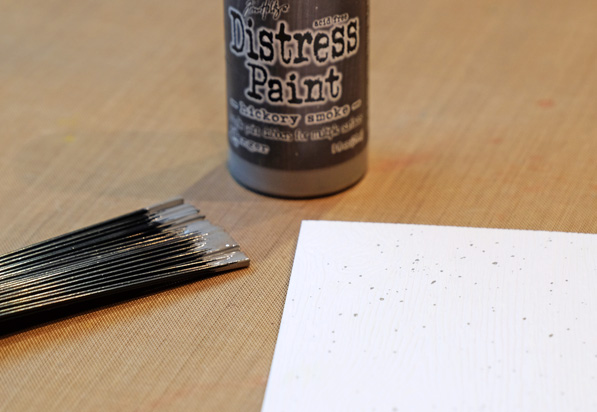
For the white background layer I used Hickory Smoke Distress Paint and the Splatter brush to make speckles. The Splatter brush makes it really easy. Just apply some paint onto your craft sheet and then tap or pull the bristles to make the special effect you desire.
Since the Crayons have body to them it makes it simple to get into the grooves and letters of the quote band/word band. Here you can see how I applied it to the metal. Then I simply wiped the excess away with a dry towel.
Some word stickers are always nice!
The butterflies are attached to the card with foam squares. Then I gently lifted their wings up to add dimension and movement. The card will lay flat for mailing still, though.
Thanks so very much for spending part of your weekend here with me!
SUPPLIES:
 |
 |
 |
 |
 |
 |
 |
 |
 |
 |
 |
 |
 |
 |
 |
 |
 |
 |
 |
 |
 |
 |
 |
|
 |


