Studio Monday with Nina-Marie: Stitched Watercolor Embellishments using Plush Dies
Hey friends, it’s Nina-Marie back again today with a brand new Studio Monday video! Today I will be featuring some of our very own Simon exclusive dies and how to create some fun embellishments for your cards!
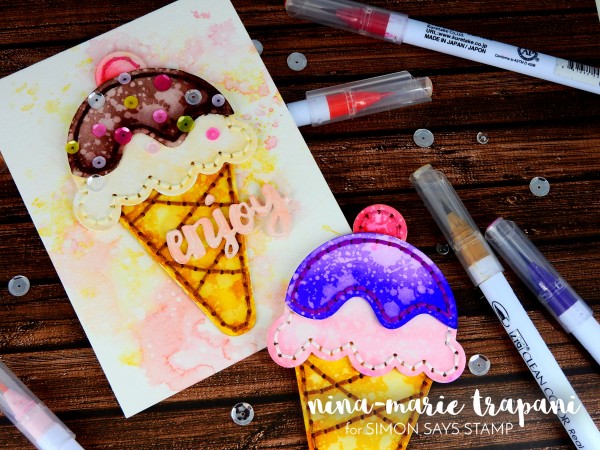
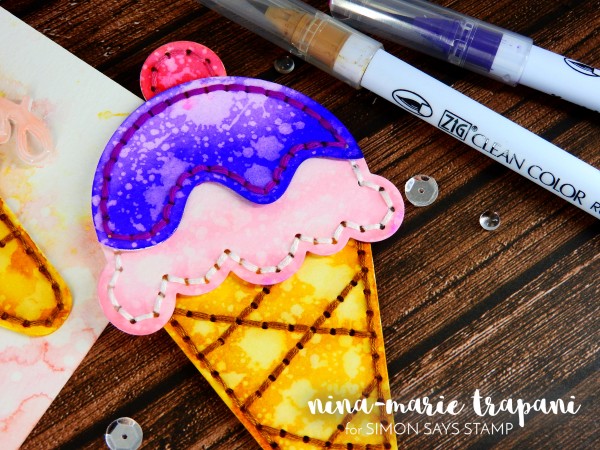
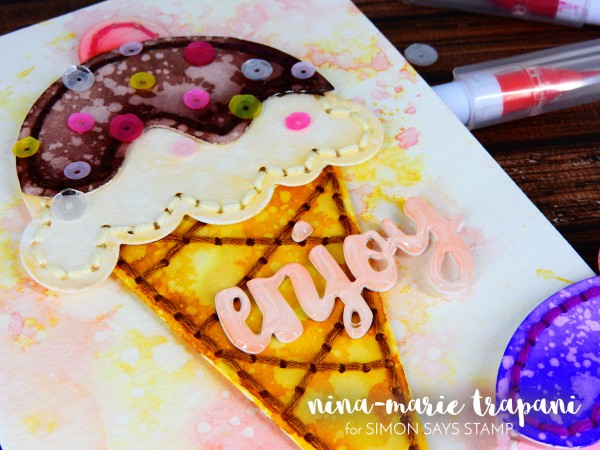
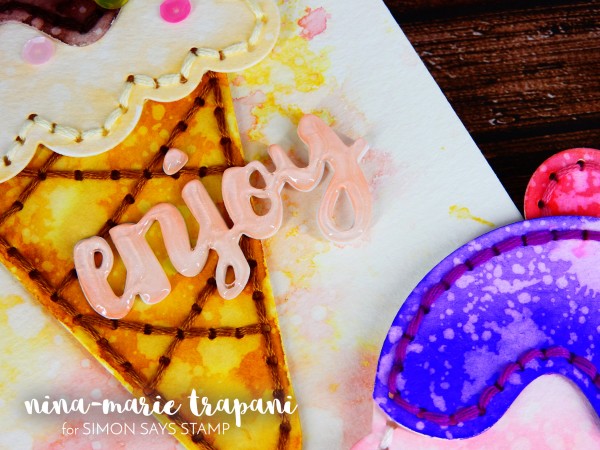
As many of you may know, here at Simon Says Stamp, we love “felties”; cute little critters and happy shapes, die cut from felt and stitched together with love! Our dies designed to help you make cute felt embellishments are called Plush Dies and they really are so much fun to make (click here to see all the inspiration we have on our blog featuring the Plush Dies). But what if you don’t have felt? Or what if you don’t like to use felt in your crafting? Well I’ll be sharing with you how to create these fun little ice cream cones using our newest exclusive Plush Die: Plush Ice Cream Cone!
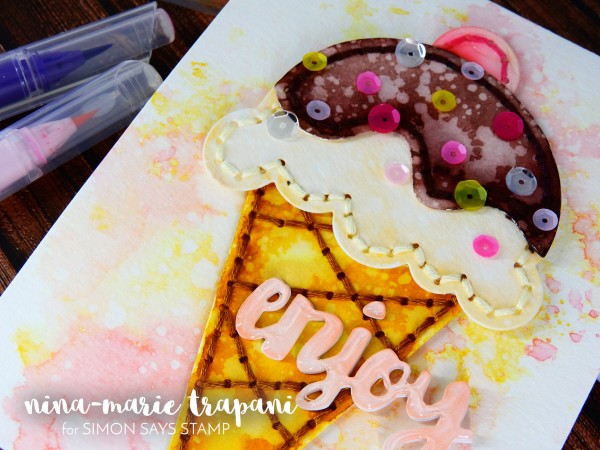
This is a great project for kids too! You could die cut the pieces for them from watercolor paper (or cardstock, depending on the medium they will use to color the ice cream cones) and then let them go to town coloring! If you want to go with adding the stitching details as I have on this card, you can find dull-point needles for the kids to use too; our Plush Dies all create the stitching holes for you when you run the dies through your die cutting machines, which make these super easy to sew together! And don’t feel like you have to add the stitching details; these look super cute too without the sewing as well!
I used Zig Clean Color markers to do my watercoloring today; if you are interested in the color combinations I used, I’ll have them listed for you below and also in the video. I’ve named my ice cream cones with their very own “flavors” because you just HAVE to (there’s got to be a rule that says that somewhere)!
Vanilla Ice Cream Cone with Chocolate Fudge Icing: Flesh Colour 071, Light Brown 061, Beige 072, Light Pink 026, Wine Red 024, Dark Brown 062
Strawberry Ice Cream Cone with Berry Icing: Light Brown 061, Beige 072, Red 020, Wine Red 024, Light Pink 026, Deep Violet 084
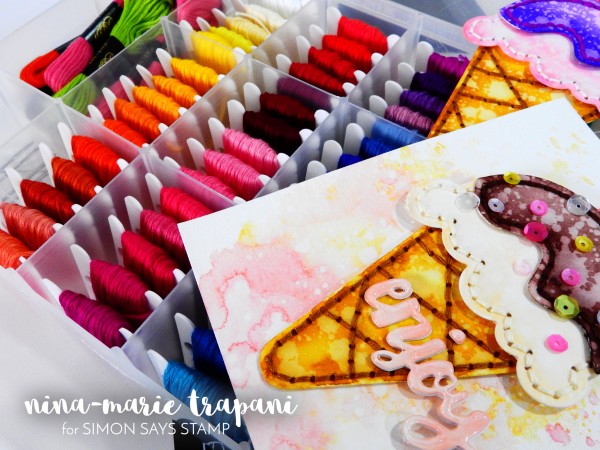
I also show in the video my FABULOUSLY pretty, rainbow assortment of embroidery floss; I use the Janlynn Cotton floss and I store it all in my Darice Floss and Needle organizer (which I LOVE because it’s so handy in keeping everything nice and tidy!). I don’t know about you, but I often times used to have trouble keeping my floss from getting tangled. When I found the Darice organizer, I bought a bunch of plastic floss cards as well and wound all my floss colors around the cards. This not only keeps the floss from getting tangled, but I also have it neatly stored in a portable storage case! I wanted to make sure I shared this with you in case it was any help in finding a storage solution for your own embroidery floss!
To see how I created these ice cream cone embellishments, be sure to check out the video below or on our YouTube channel! And be sure to subscribe to both our blog and YouTube channel for more weekly inspiration!
WATCH THE VIDEO
SUPPLIES:
 |
 |
 |
 |
 |
 |
 |
 |
 |
 |
 |
 |
 |
 |
 |
 |
 |
 |
 |
 |
 |
Blog Candy Alert!! Follow our blog via email and comment on this post for a chance to win a special blog candy!

Creative Uses with Debby Hughes; Spooky Eyes Halloween Edition!
Hi friends! Happy Sunday! I hope you’re having a fun weekend! We’re back this month with a cool creative uses post from our dear friend, Debby Hughes! Can you believe she turned the Sketch Ranunculus flowers into spooky eyeballs? Read on and be sure to watch the video for more details! Enjoy!
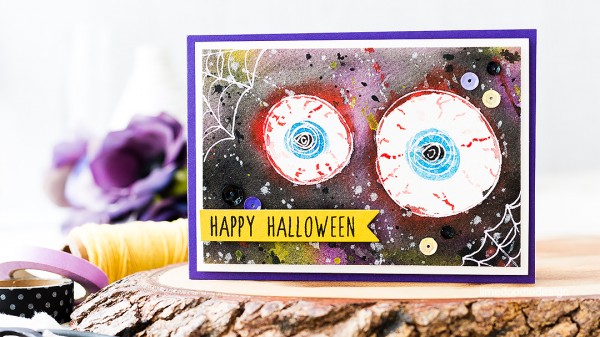
Hello, Debby here. The new fall and holiday supplies are starting to be released and so for my creative uses post this month I thought I’d have a look at my current stash and see what I could use for upcoming card making events. It’s always a good idea to see what sets can be utilized further and where you might want to purchase something to fill a gap.
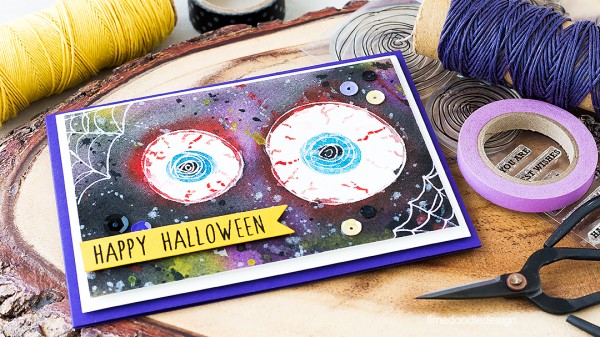
I thought the beautiful flowers from the Sketch Ranunculus set could be worked in to some spooky Halloween eyes! I stamped them in Versamark ink on Arches watercolor card and white heat embossed then watercolored with the Gansai Tambi palette. I trimmed the panel down and mounted on an Ivory mat then on to a purple card base.
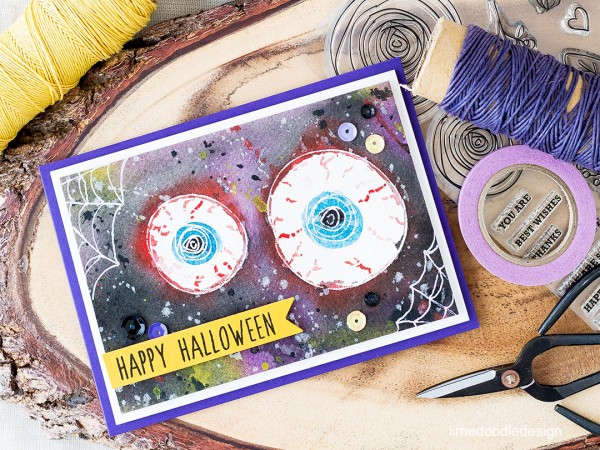
I used a sentiment from the Not So Spooky set stamped in Versafine Onyx Black ink on Sunshine card and die cut with a Basic Banner. However, if you don’t have a Halloween set then you could use letter stickers or stamps. I foam mounted the sentiment on the panel and then finished with some sequins. I then decided the corners were looking a little bare so used a white gel pen to draw simple spiders webs.
Watch the VIDEO:
Thanks for joining me today and I hope you check out your supplies to see if you can stretch their use to the end of the year :D
SUPPLIES:
 |
 |
 |
 |
 |
 |
 |
 |
 |
 |
 |
 |
 |
 |
 |
 |
 |
 |
 |
 |
 |
 |
 |
 |

Weekender with Wanda – New Doodlebug Collection – Fun in the Sun!

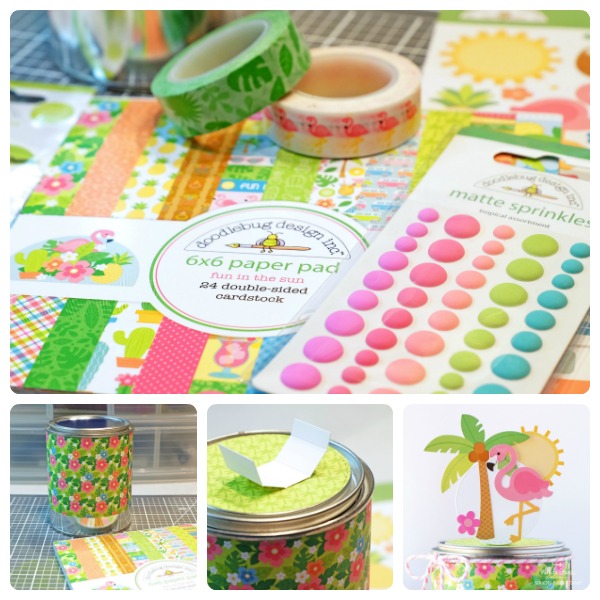
Hi everyone! Happy Crafturday – I mean Saturday! Hope you had a great week and I’m happy to have you here with me for just a bit of your weekend! It’s time for the latest edition of Weekender with Wanda on the Simon Says Stamp Blog! Today I’m going to give you some ideas for cool and fun gift card holders. I love to give gift cards (let’s face it all my friends love Starbucks!) and I like to make the gift card more of a present by making the holder fancy! My projects today are featuring adorable papers and embellishments from Doodlebug – one of our favorite companies here at SSS. Doodlebug recently launched three new totally adorable collections! They are called Kitten Smitten, Pupply Love and Fun in the Sun! I love how Doodlebug always gives us enamel dots, washi tape, and stickers to match the paper collections, too. SUCH extreme cuteness! I chose to use the Fun in the Sun collection today, but my projects would work with any of them! (I’m also thinking ahead that this might be a good Christmas project)
I started with a silver paint can that I bought at my local craft store. These are super inexpensive, and I usually have a few laying around for different things and to wrap gifts, candy and/or gift cards. It’s very easy to make a little old can look fantastic!
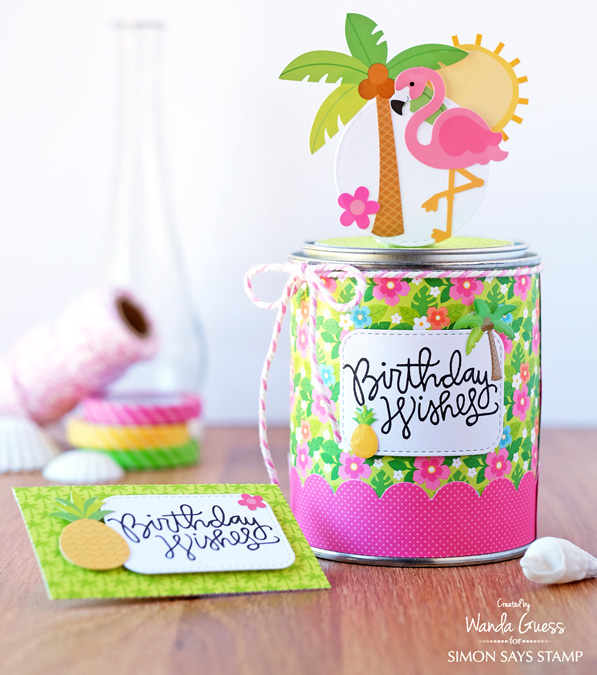
I started by cutting a sheet of the tropical floral paper in half and then glued it onto the can using tape runner. No fancy supplies needed! Then I used a Scallop border punch to make a pretty scallop for the bottom of the can and used one of the other coordinating papers from the package. I used a Simon Says Stamp Stitched Circle die to cut the top cover out of palm tree paper. A gift card and a few chocolates fit inside just perfectly. The envelope was made out of the matching palm tree paper using the Mama Elephant Venice Die. You could give these as a set or use each one individually for a gift card.
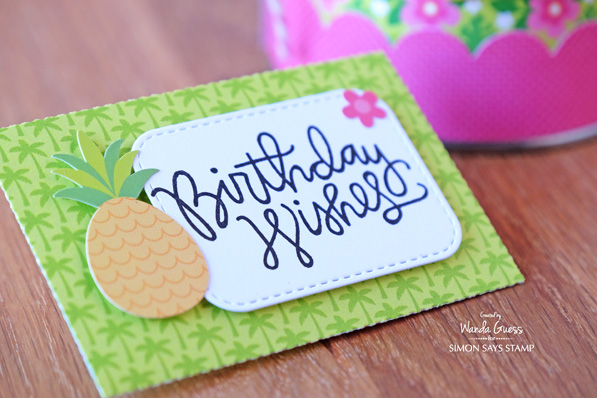
I die cut crisp white labels using the Rounded Rectangle Stax dies from My Favorite Things. I used the Simon Says Stamp Exclusive stamp set called Birthday Flowers for my pretty sentiments. Then I embellished with stickers! A bit of Doodlebug Cupcake Twine around the top adds a pretty touch! I’ll talk about how I made the top in a minute.
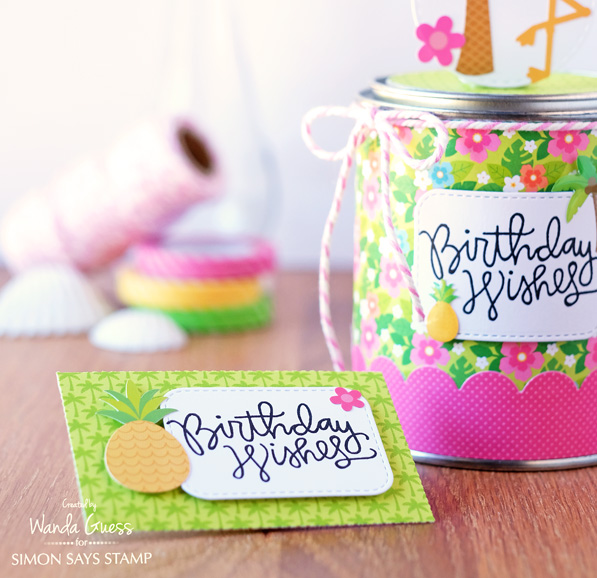
I attached the white label with foam squares to make it pop off the can just a little bit.
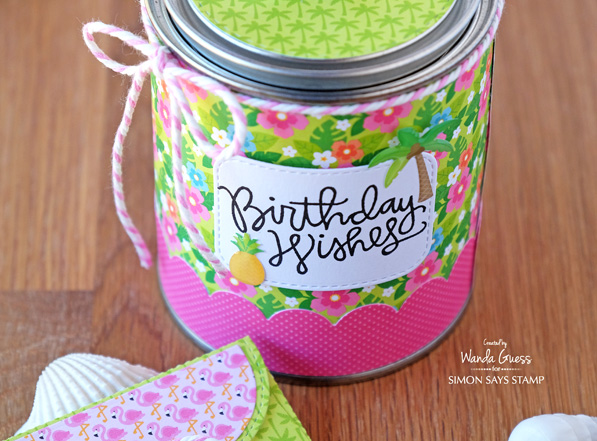
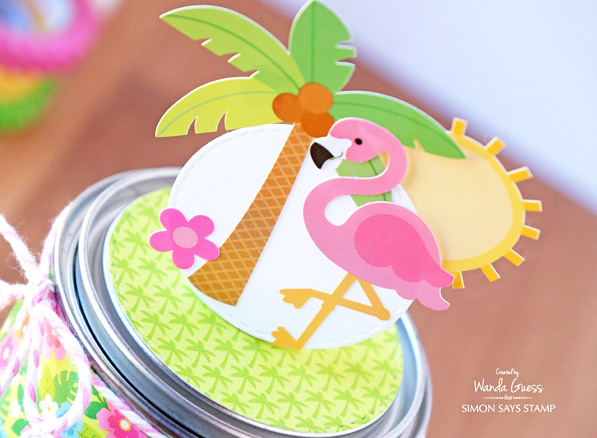
Here is the pretty collection! Flamingo washi tape? Yes please! In the bottom center photo you can see a strange looking strip of paper. That is my home made mechanism for attaching my topper! I cut a strip of cardstock to .75″ x 2.25″ and then scored it at each 1/2 inch. Then I glued the remaining tab to form this piece into a square. I mounted that piece to the top of the can and then attached my focal point white circle to it! Voila – topper! Then I used the adorable stickers to make a little scene with a palm tree, a flamingo, and a sun peeking out from behind.
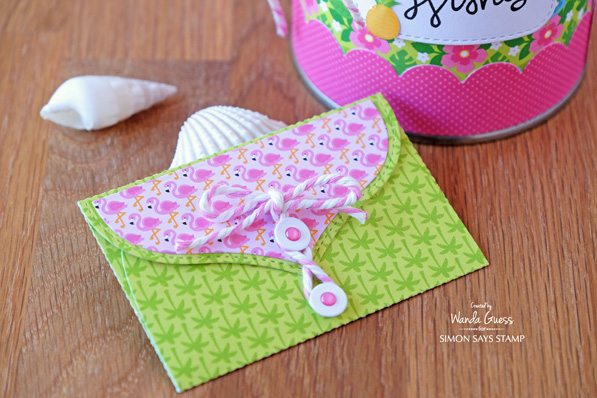
Here is a close up of the small envelope. This die is so nice – see how crisp the folds are? Love it! I use this one all the time.
This is the back of my little envelope. The Die set comes with another die that cuts a layering piece for the flap. Here I used some flamingo paper to layer. Then I tied it with cord!
Here is a close up of the base of my can topper piece. Do you remember way back when Mrs. Grossmans stickers were all the rage? I used to have books about making entire projects from stickers, and I still love that! I guess we are all still little girls at heart right? I will freely admit to my sticker stash!

That’s your tropical project for today my friends! I hope I’ve given you some ideas on how to make fun and cool gift card holders! I’ll sign off with an Aloha! See you soon, and have a great day!
SUPPLIES:
 |
 |
 |
 |
 |
 |
 |
 |
 |
 |
 |
 |
 |
 |
 |
 |
 |


