Doodling with Debby Stencil + Embossing Paste Wedding Card
Hi friends! Thanks for stopping by today, and welcome to the latest edition of Doodling with Debby! Today Debby is making an absolutely gorgeous embossing paste stenciled card! Be sure to watch the video and enjoy!
 Hi it’s Debby here today and I’m delighted to be joining you with this month’s Doodling With Debby feature. I have a video below creating a quick and easy wedding card using the gorgeous Circular Lace stencil and my favourite embossing paste.
A card I created way back in 2013 inspired this card. I’d seen embossing paste used in mixed media and wanted to try it for card making. At the time there weren’t many stencils and I created a DIY stencil by die cutting card. Now 4 years later we have a wonderful array of stencils available and I’m still very much in love with swiping embossing paste through a stencil as I was then. My favourite embossing paste is the one by Wendy Vecchi. I started using it four years ago and really haven’t felt the need to search for alternatives, as I love this one so much.
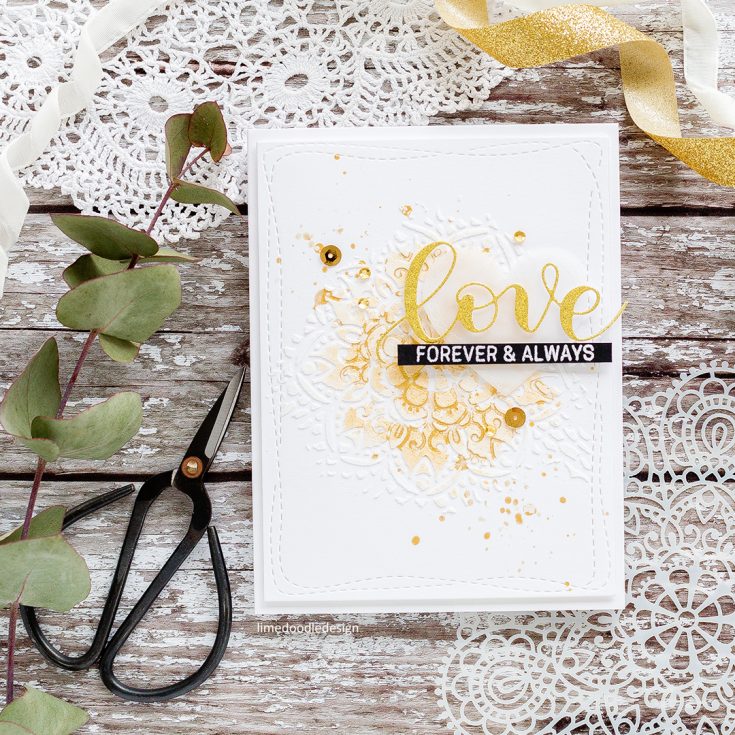 To start my card I cut a piece of Bazzill Marshmallow card (I like this one as the white of the card is very similar to the white of the embossing paste) and laid the Circular Lace stencil on top. I used a palette knife to sweep embossing paste over the centre of the stencil, lifted the stencil and then dried the paste lightly with a heat tool. With the embossing paste now touch-dry I dabbed on Heidi Swapp Color Shine in gold.
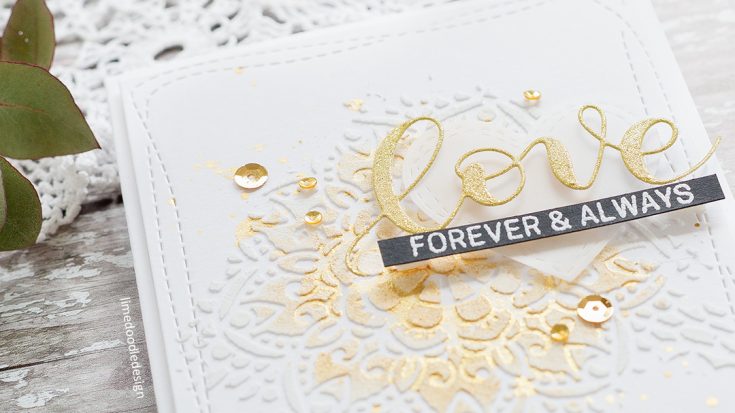 While the panel dried I cut a Wonky Heart from Vellum and a Love die from DCWV gold glitter card. I also cut the embossing paste panel with a Wonky Rectangle. Note – learn from my mistakes and ensure the spray is dry before doing so!
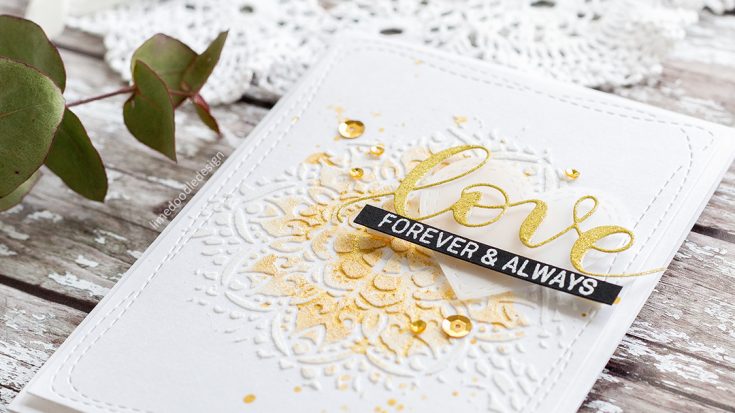 To complete the sentiment I stamped the ‘Forever & Always’ from the Floral Bliss set in clear embossing ink on Black card and white heat embossed. I trimmed the sentiment to a skinny strip (see the video for how I like to do this) and then added all the elements with foam adhesive. I mounted the panel to a Marshmallow card base and then accented with gold sequins.
Thanks for joining me today and I’ll see you for next month Doodling With Debby feature.
VIDEO:
Watch below or in HD at YouTube
SUPPLIES:
 |
 |
 |
 |
 |
 |
 |
 |
 |
 |
 |
 |
 |
 |
 |
 |
 |
 |
 |
 |
 |
 |
 |
 |
Thanks for reading today, and thanks to Debby for being our guest!!

Blog Candy Alert!! Follow our blog via email and comment on this post for a chance to win a special blog candy!
Congrats Blog Candy Winners!
From: Belated Birthday Cards: 3 Ways: Susan Pezza!
From: Art Journal: Be Original with Shari Carroll: Terri Burson!
From: Studio Monday with Nina-Marie: 10 Crafty Must-Haves!: Colleen Howell!
From: Learning to Fly Home Decor Panel: Diane Brubaker!
From: No-Line Watercoloring with Gelatos: Loly Borda!
From: Amore Laura Fadora: Sending You Love: Holly Klingensmith!
From: What Would Kelly Make: 8th in the series!: Renee VanEpps!
From: Tim Holtz Spring Vignette House: Kirsty Vittetoe!
From: Studio Monday with Nina-Marie: Sequins 3 Ways: Karen Gerek!
Please email [email protected] with your mailing address (if applicable), the name of the blog you won from, and the prize you won to claim prize!
Belated Birthday Cards: 3 Ways
Hi friends! Thanks for stopping by today! Welcome to the latest edition of Yana Smakula‘s bi-monthly feature: Yippee for Yana! This time, Yana is giving three slightly different belated birthday card ideas for you! Please be sure to watch the video and enjoy!

Hi everyone, this is Yana Smakula and I’m excited to bring you another episode from my by-monthly “Yippee For Yana” video series! In today’s video I’m showing how to stamp a belated Birthday card. I am sharing one card 3 ways – from a very simple one layer mail friendly project to a slightly more layered dimensional card.

The stamp sets I picked for these cards are Enjoy The Journey from Hero Arts and Big Perfect Shapes from Simon. As for the colors of ink I went with Lake Shores, Winter Sky, Cloudy Sky, Audrey Blue and High Dive.
I started working on my cards by creating a background. I used circle stamp and stamped a random looking pattern using all 5 ink colors. Each color was stamped 3 times. You’ll notice my images overlap a lot – this is the look I was going for.
After my backgrounds were done I used my mini MISTI and stamped the ship as well as the “Oh Ship!” message in Versafine Onyx Black ink. I also added an additional “We Forgot Your Birthday” sentiment at the bottom and I curved it for a more interesting look.
From here I finished each card slightly different. The one layer stamped card front was left almost as is – I used a white Prismacolor pencil and whitened the sails of my ship.


To complete my 2 and 3 cards I trimmed my panels down to 4 by 5 1/4 inches and adhere them onto A2 top folding card bases. I also stamped 2 more ship images and an anchor onto a separate piece of cardstock. I used my Simon’s Intense black ink this time as I knew I’d be coloring these images later.
Using coordinating dies I cut out one of the ships and also an anchor and I set those aside to use for the 3rd card.
To complete my 2nd card I cut out the individual sail sections with scissors and adhered them onto the stamped sails on my panel. That took a bit of time, but the sail images aren’t detailed, so they weren’t difficult to cut out at all.
I used my Crystal Katana tool to pick up and move the cut out pieces and my Tonic Deluxe adhesive to add glue. I really loved the way this ship turned out – the white sails added a lot to the overall look and made the image pop off the colorful background. Because they were cut out and adhered they also added a little bit of dimension to this card without actually adding any physical dimension to the project.
I also used a C3 and C1 copic markers along with a colorless blender and added a bit of shading to each white piece to make it appear a bit more realistic.
To complete my 3rd card I colored my die cut ship using Copic markers. The colors I picked were dictated by the colors I used for my background stamping, I wanted my ship to match in color as much as possible. I used BG18, BG15 and BG32 markers to color the sails. For the hull of the ship I picked cool grays. You’d expect it to be brown since the hull of that kind of ship would be made out of wood, but I didn’t want to introduce additional color to these monochromatic cards, so I went with gray instead and I think that turned out rather nice. I used C9, C7 and C5 colors.
Using foam adhesive I adhered the ship and the anchor onto my last panel.
Watch the video:
So here are 3 completed variations of one card – the one layer pencil colored one, the one with the white cut out sails and the 3rd card with the colored, cut out and foam mounted ship and anchor.
I am curious to hear which one you like best. My favorite is the 2nd one, but I do love that added dimension on the 3rd one as well.
Have fun stamping!
SUPPLIES:
 |
 |
 |
 |
 |
 |
 |
 |
 |
 |
 |
 |
 |
 |
 |
 |
 |
 |
 |
 |
 |
 |
 |
 |
 |
 |
 |
 |
|
|
 |
 |
 |
Blog Candy Alert!! Follow our blog via email and comment on this post for a chance to win a special blog candy!
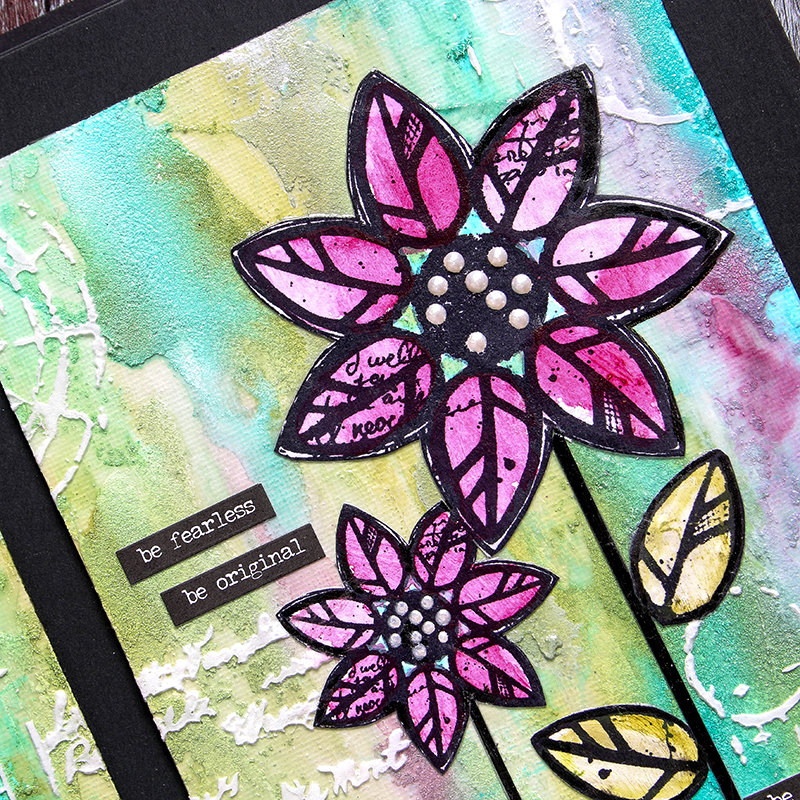
Art Journal: Be Original with Shari Carroll
Happy Tuesday everyone!
I’m sharing an art journal page I created using the Dina Wakley Media Boards. To start off, I used Tim Holtz Grit Paste to add some texture then played with acrylic paints to get a watercolor effect. By using paints as your base you can use other mediums on top without fear of your colors running or moving.
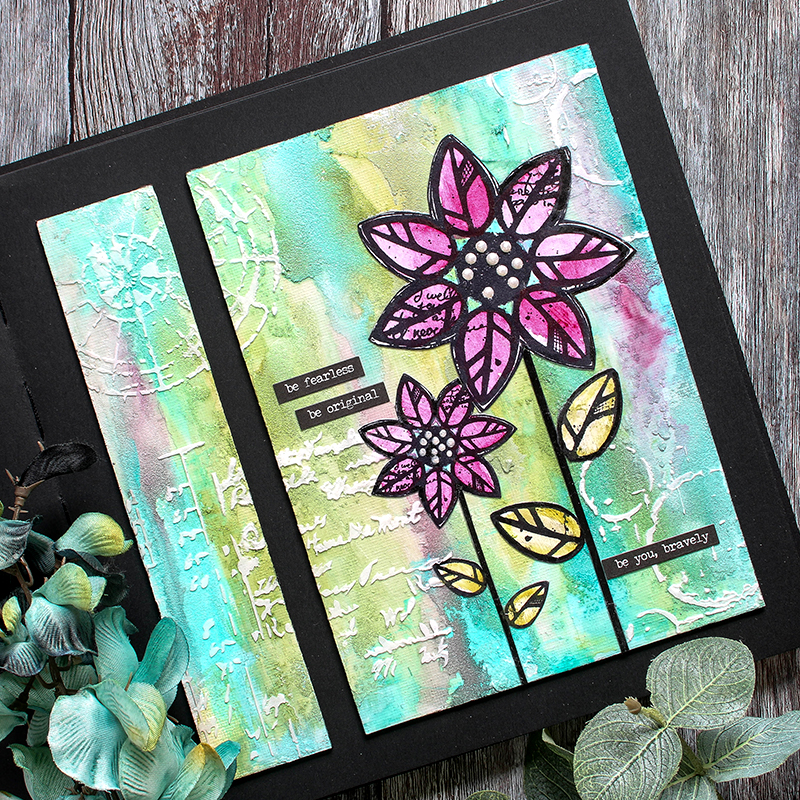
Once I had my background texture and color in place, I used some paste through a stencil to add more dimension. The stenciled image breaks up the background with the addition of white and additional texture.
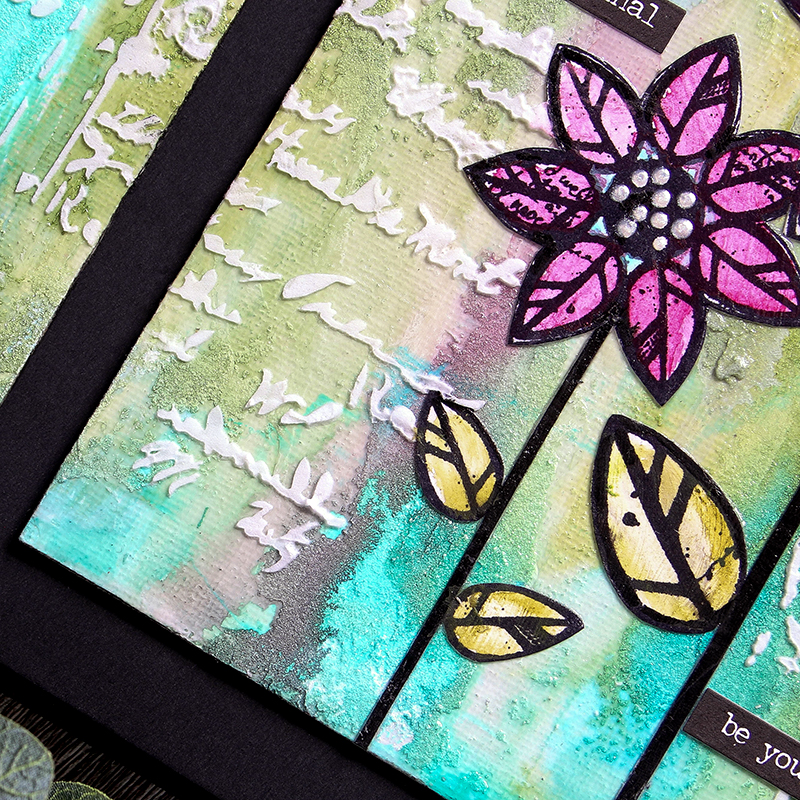
I finished off my design by stamping a couple of flowers which I painted with diluted acrylic paint and then I added a few Small Talk message strips. I love the overall look of this entry with it’s vibrant watercolor effect which flows in and around the texture.
I have filmed a full process video that you can view below or on our YouTube channel HERE.
Blog Candy Alert!! Follow our blog via email and comment on this post for a chance to win grab bags and blog candy! Remember to tag your projects with #simonsaysstamp on social media so we can see what you are creating!
Thanks for stopping by today! Happy Journaling!
 |
 |
 |
 |
 |
 |
 |
 |
 |
 |
 |
 |
 |
 |
 |
 |
 |
 |
 |
 |
|
 |
 |
 |
 |
|


