Studio Monday with Nina-Marie: 5 Ways to Foil with Thermoweb
Hello crafters and welcome back to a brand new Studio Monday video! Do you like to foil? I have always been fascinated with foil. Ever since foiling techniques became popular a couple years ago, I’ve enjoyed incorporating foil into my cards.

First – for all of our new crafters – let me quickly explain what foiling is: It is a technique where foil material is transferred onto a toner-printed image. Toner is a type of printing ink; most often found in larger sized printers and copies. Foil material is transferred onto toner ink by way of heat. Laminators and specialty foiling machines are used to heat-press the foil into the ink. Foiling can alternatively be done with strong adhesives and gels.
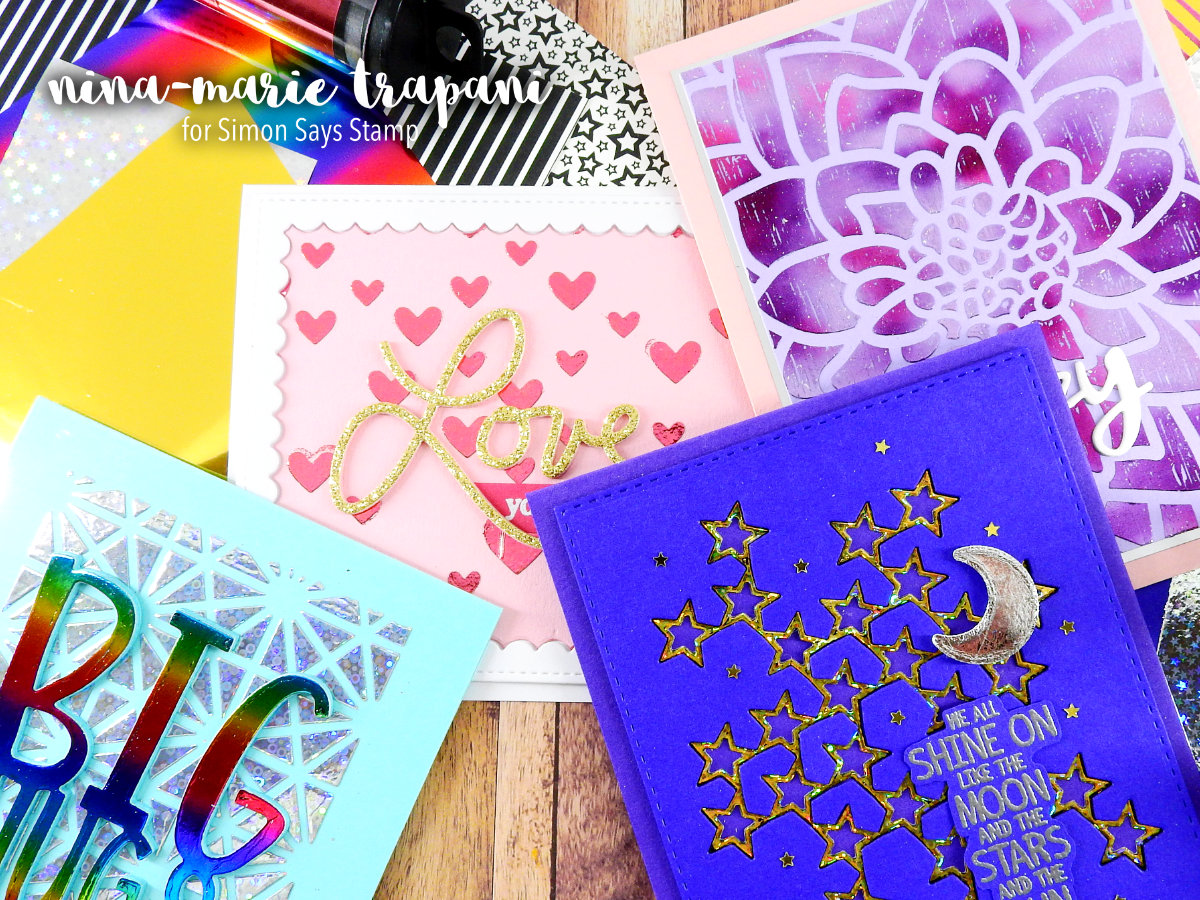
ThermoWeb is one of the companies that is leading the way with innovative and fun foiling products. Today I will be showcasing many of their products, including their gorgeous foils, Transfer Gel medium, Foil Mates sheets and Peel ‘n Stick Toner sheets. These products can be used in a variety of ways to foil. For example:
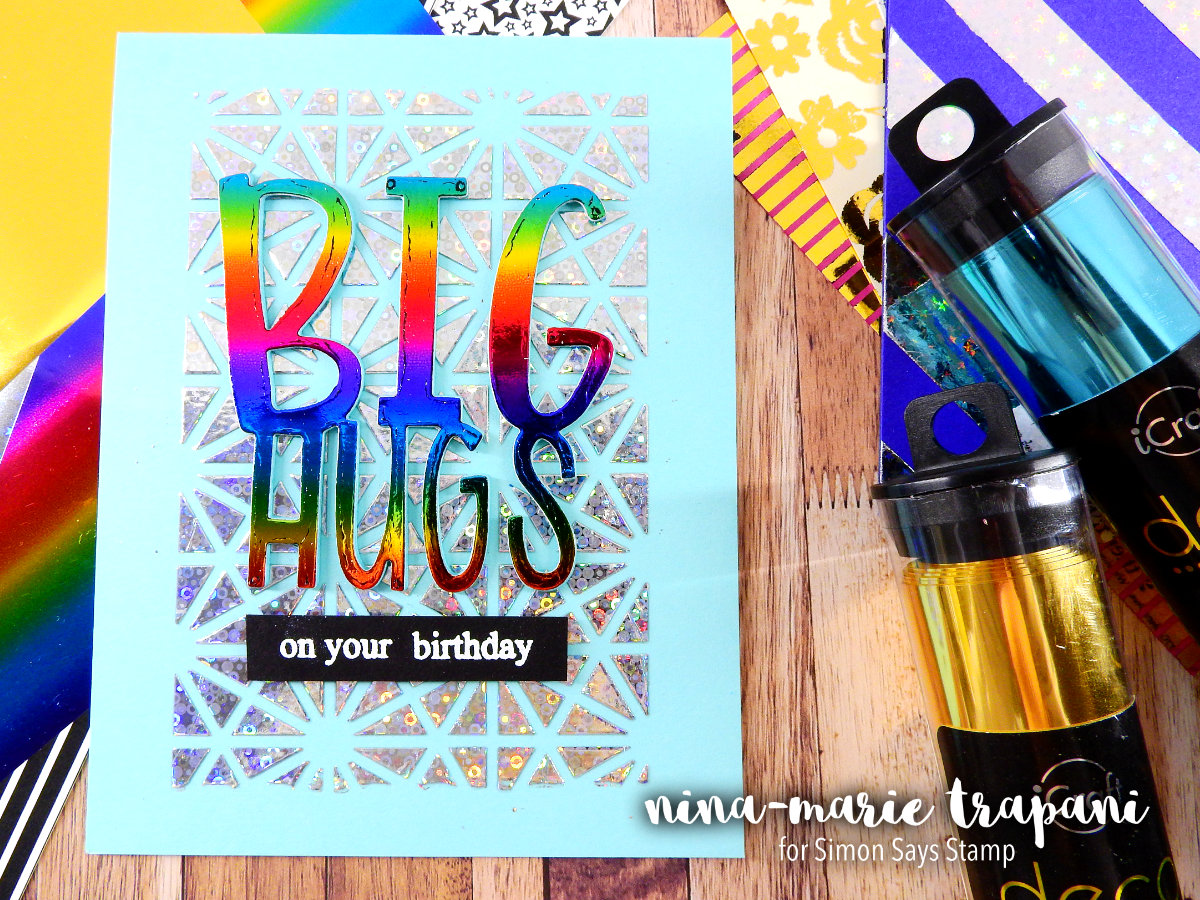
You can use Toner Sheets to create foil covered die cuts… Look at the GORGEOUS rainbow of color on the “big hugs” sentiment! The rainbow foil is SO pretty, especially paired against the iridescent foiled background!
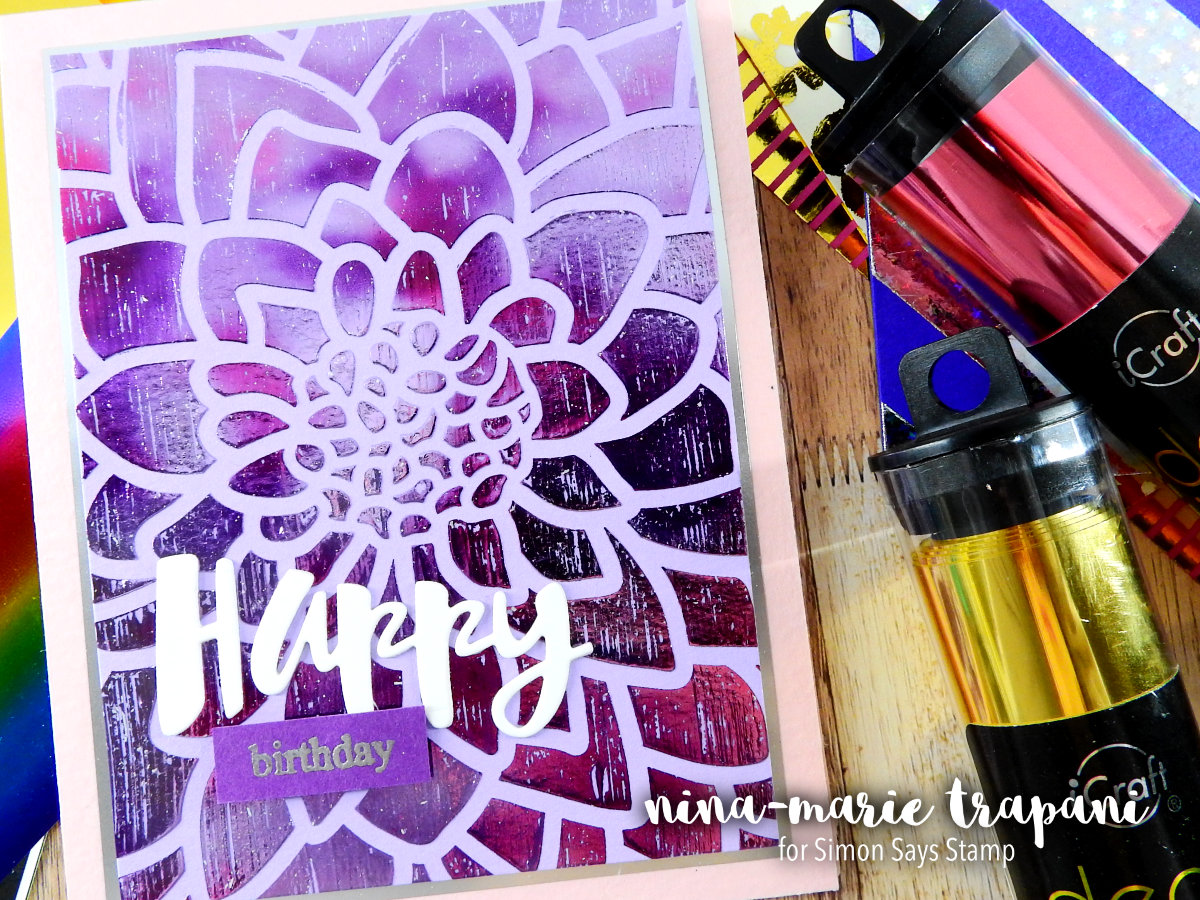
You can also use Transfer Gel to make stunning stenciled designs…
Who loves stencils? I sure do! Which was why I was really excited when ThermoWeb released their Transfer Gel medium and I couldn’t wait to start using it for foiling techniques on my cards. The Transfer Gel is one of my two most-favorite ways to add foil! Keep on reading and I’ll share the other favorite in a moment! :)
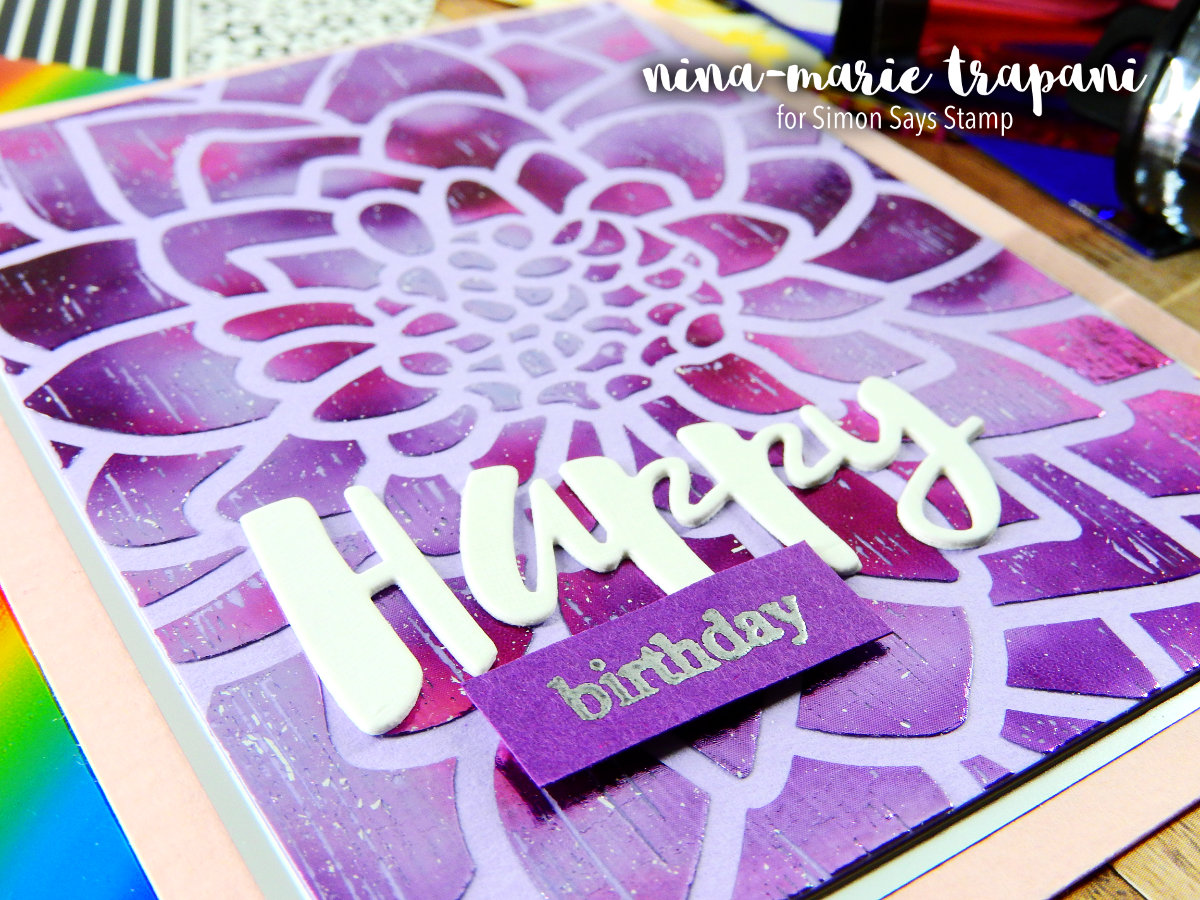
You can also add texture to Transfer Gel which leaves an amazing distressed effect on foil! Check out how I used a sponge brush to create an almost “painted” effect to this stenciled flower!
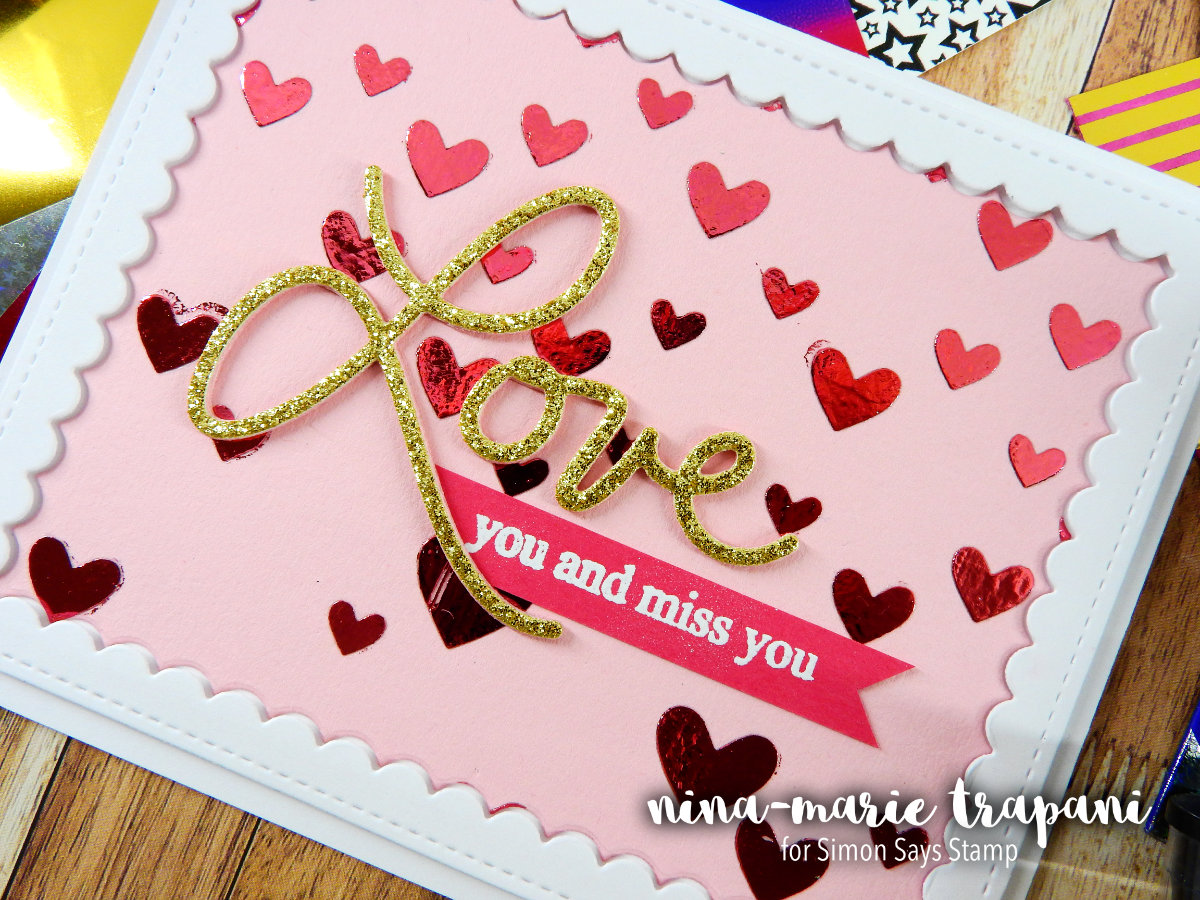
My other favorite way to foil is to use double sided adhesive sheets or strips (my preferred brand of these adhesives are Scor-Tape). This is perfect for fast foiling AND for those of you that want to try foiling but don’t have a laminator or foiling machine (YES you can foil without one!).
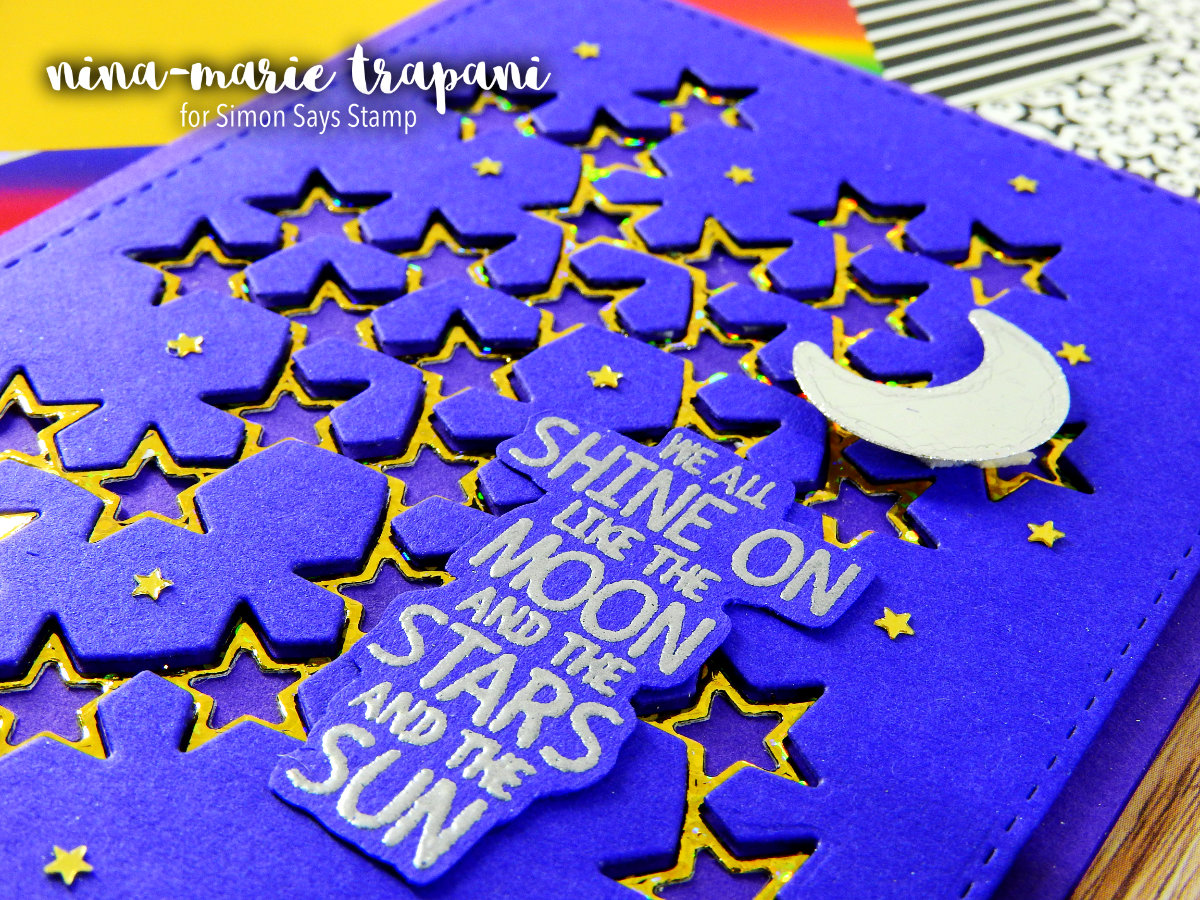
Check out the moon on this card… this is SO awesome and you get amazing foiled die cuts easy-peasy! I hope you’ll watch the video to see this technique in action because I KNOW you are going to love it!
Here are some other examples of foiling I will be sharing in today’s video…
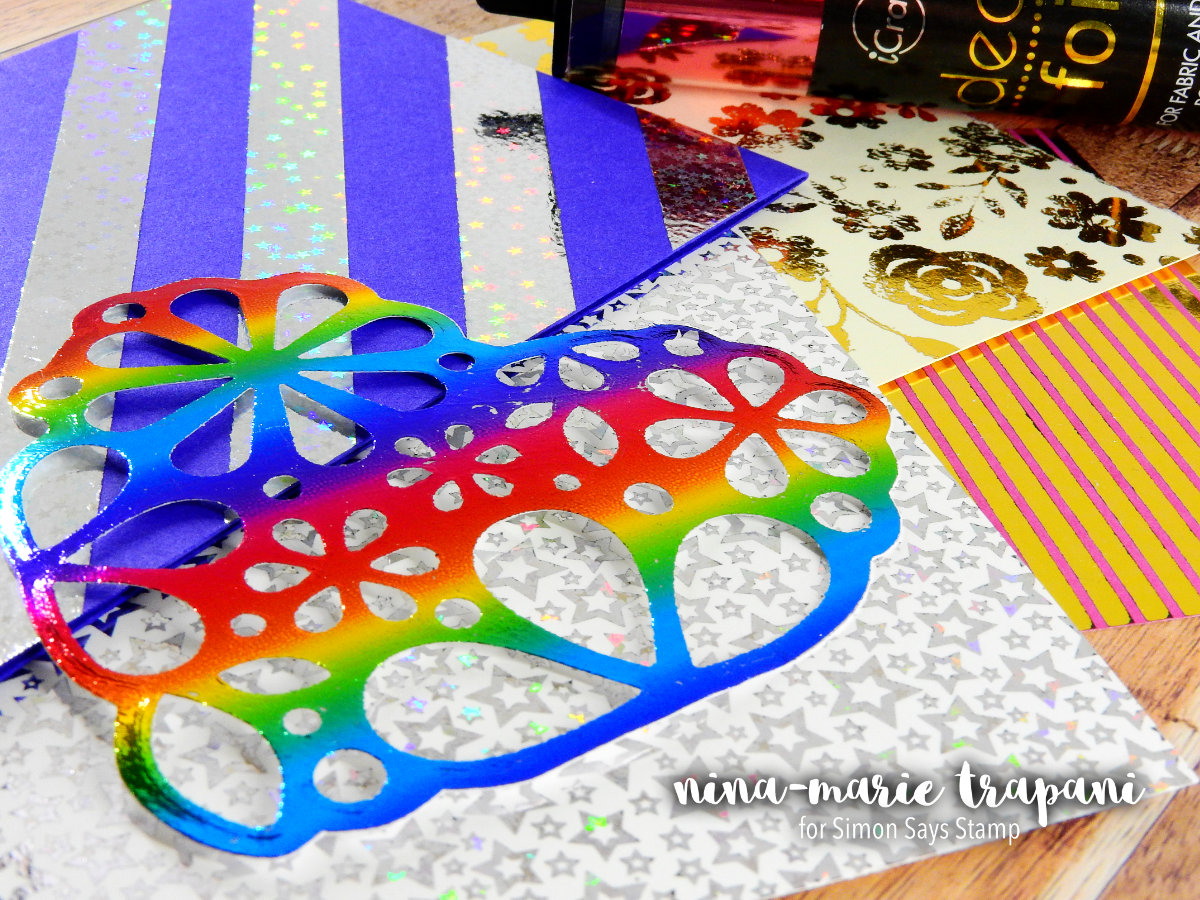
The rainbow heart also features the double-sided adhesive foiling technique. I have to say it again… I just LOVE that rainbow foil!
The pretty silver stars with the iridescent hints of color makes use of the fun Foil Mates toner sheets from ThermoWeb. The pink and gold paper is also made with the Foil Mates sheets. Normally this paper is white and black; white being the area of the paper that will not get foiled and the black being the toner print that WILL be foiled. As you can see with the silver star paper, the stars have foil because they were originally the black toner and the white of the paper is still showing. I could have done the same thing with the stripes and would have been left with a foiled and white stripe paper. But I took it one step further and before foiling, I added pink ink to the paper. The white became pink and when I ran the paper through the laminator with the foil, I then had a pink paper with gold foiled stripes. Pretty cool, huh??
The blue and iridescent star stripe paper again features double-sided adhesive foiling but this time with adhesive strip tape instead of adhesive sheets. Imagine all the designs you could create with tape like this!
Finally, the gold flowers is an example of how you can use Transfer Gel to get a textured STAMPED impression with a rubber cling stamp. I’ll explain this process in detail in the video, as well as tips for stamp care after using Transfer Gel.
I hope you enjoy watching the foiling techniques and seeing everything in action as much as I enjoyed creating these examples! It is so much fun to foil and I hope that you will give it a try if you haven’t already. Seeing a foiled design on a card is mesmerizing… I could tip a foiled card back and forth to watch it shine all day long! And for those of you that have tried foiling, I hope that these ideas are helpful to you and spark your imagination to try some experimenting with foil too!
Thanks for stopping by and visiting me today… I’ll see you again next week!
WATCH THE VIDEO
SUPPLIES


Blog Candy Alert!! Follow our blog via email and comment on this post for a chance to win grab bags and blog candy! Remember to tag your awesome projects with #simonsaysstamp on social media so we can see what you are creating!

BLOG CANDY WINNERS!
Congrats everyone! Please email [email protected] with your mailing address (if applicable), the name of the blog you won from, and the prize you won to claim your prize!
From: Waffle Flower Crafts BBQ Star: Roxana!
From: Yippee for Yana: Watercolor Galaxy: Melissa SunshineHoneyBee!
From: Avery Elle Summer Release: Tara Prince!
From: Doodling with Debby: Stamped & Die Cut Wreath: merryf!
From: Striped Floral Bouquet with Copic Coloring: Linda K!
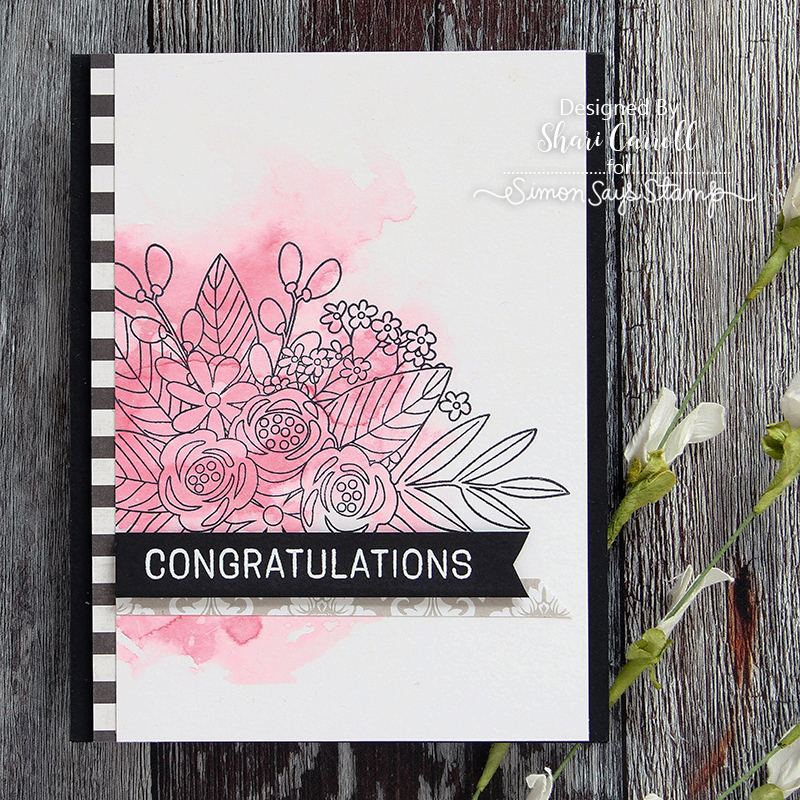
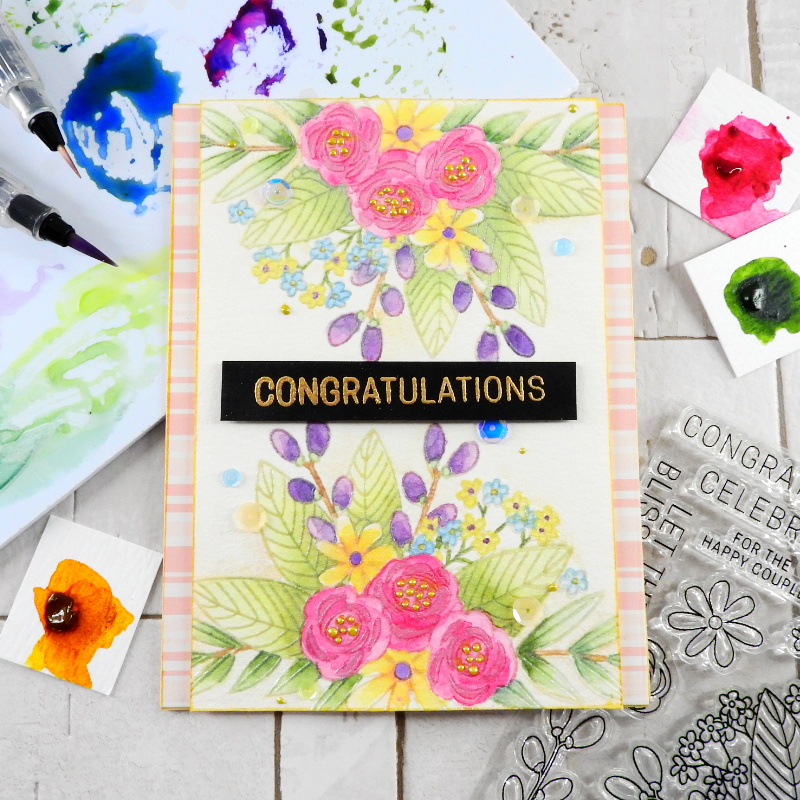
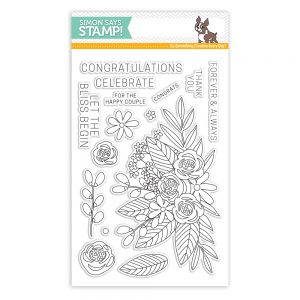
Blissful: June Card Kit Reveal and Inspiration!
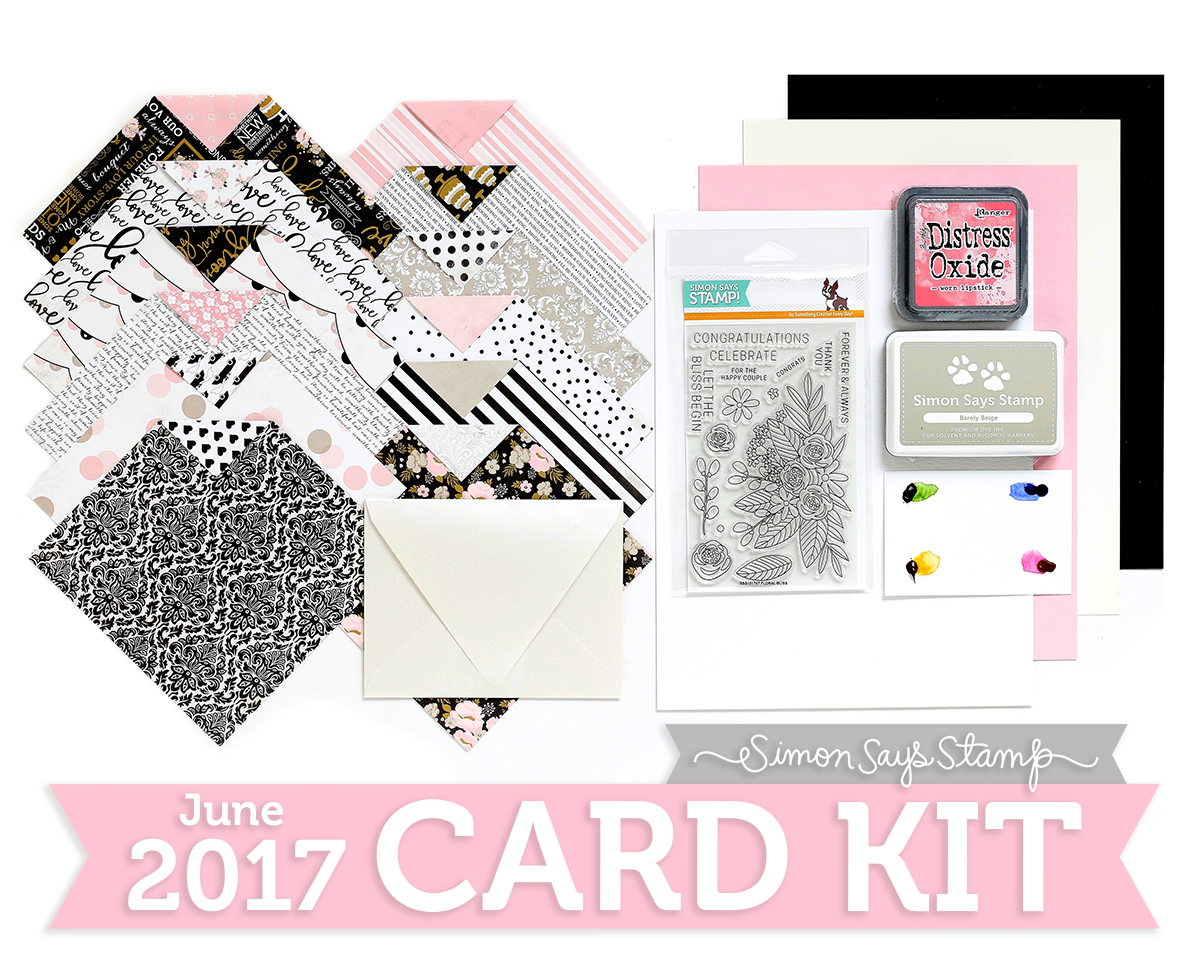
Welcome Everyone! Happy Sunday and also a very Happy Mother’s day to all the moms! It’s the 14th which means it’s also time to reveal our June Card kit which we’ve titled Blissful! This is a gorgeous combination of papers, inks, paints and an amazing stamp set perfect for making wedding and feminine cards.
The Blissful card kit Includes the exclusive Simon Says Stamp “Floral Bliss” clear stamp set, a Daniel Smith sampler watercolor palette with Sap Green, Ultramarine Blue, Quinacridone Gold, Quinacridone Rose paint dots. Tim Holtz Distress Oxide Worn Lipstick ink pad, Simon Says Stamp Barely Beige ink pad, 12 double sided 6×6 designer papers from Echo Park Wedding Bliss collection, 1 sheet each; Tim Holtz watercolor cardstock, Simon Says Stamp Black, Cotton Candy and Ivory cardstocks. 1 Simon Says Stamp Metallic Ivory envelope with fancy flap.
I created a card which can be used for a female graduation. These flowers are very versatile for all occasions. I started by pressing the Distress Oxide Worn Lipstick ink onto an acrylic block. Next, I spritzed with water and smooshed the watercolor paper on top. Once I had my background, I went about stamping and assembling the card.
Nina Marie used the Daniel Smith paints to watercolor on her card. It’s amazing all the colors you can create from a basic palette of four colors.She started out by stamping her flowers using the Barely Beige ink. This ink is designed for use with Copic markers and watercoloring. It leaves you with a faint impression of your image so you can see to color.
I’ve filmed a walkthrough of the kit which you can view below or on our YouTUbe channel HERE.
The Floral Bliss clear stamp set is available for individual purchase in our store!
Remember, you can SUBSCRIBE to our no obligation kits and receive them monthly for $ 24.95, or purchase them each month for $ 29.99 (while supplies last).
If you are a subscriber who used Paypal to purchase your subscription, please be sure to pay the invoice that we send you within 3 business days. We have a limited number of this card kit in stock and don’t want you to miss out. For easier and quicker monthly processing, please contact us via email or telephone and we will put your credit card on file as a courtesy for you. Card kits bill and ship between the 17th and 27th days of every month.
Be sure to check out our card kit galleries for additional inspiration using our kits. Thanks for reading today!
I hope you are enjoying your day!
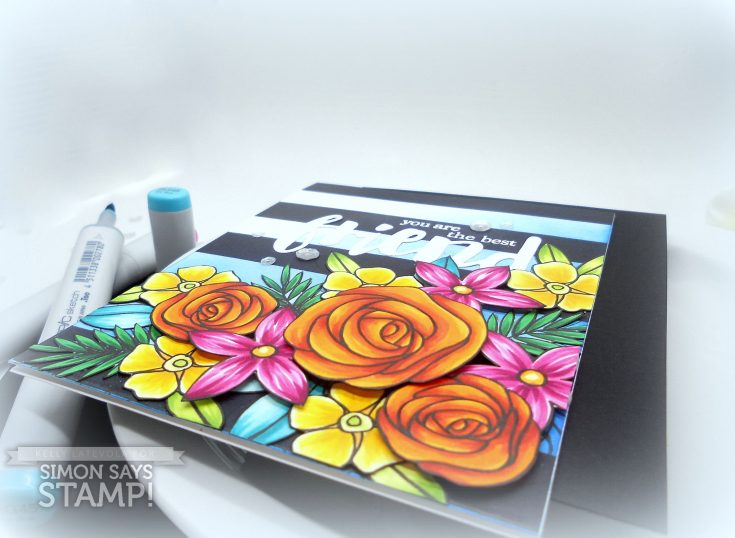
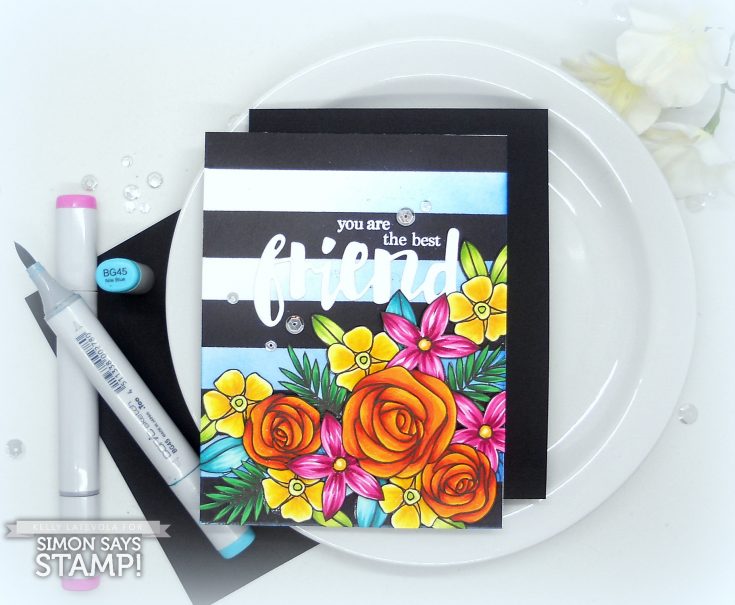
Striped Floral Bouquet with Copic Coloring

Hi friends! Thanks for stopping by today! We’re back with our monthly Copic Coloring feature with Kelly Latevola! This gorgeous floral bouquet by combining three Simon Says Stamp Exclusive stamp sets: Best Mom Ever, Hope Blooms, and Friends of Life! That super cool background was made with our Wide Stripes background stamp. Please be sure to watch the video for more info! Enjoy!
Watch the video:
SUPPLIES:
 |
 |
 |
 |
 |
 |
 |
 |
 |
 |
 |
 |
 |
 |
 |
 |
 |
 |
 |
 |
 |
 |
 |
 |
 |
 |
 |
 |
 |
 |
 |
 |
 |
 |
 |
 |
 |
 |
 |
 |
 |
 |
 |
 |
 |
 |
 |
 |
 |
 |
 |
Blog Candy Alert!! Follow our blog via email and comment on this post for a chance to win a special blog candy!


