Belated Birthday Cards: 3 Ways
Hi friends! Thanks for stopping by today! Welcome to the latest edition of Yana Smakula‘s bi-monthly feature: Yippee for Yana! This time, Yana is giving three slightly different belated birthday card ideas for you! Please be sure to watch the video and enjoy!

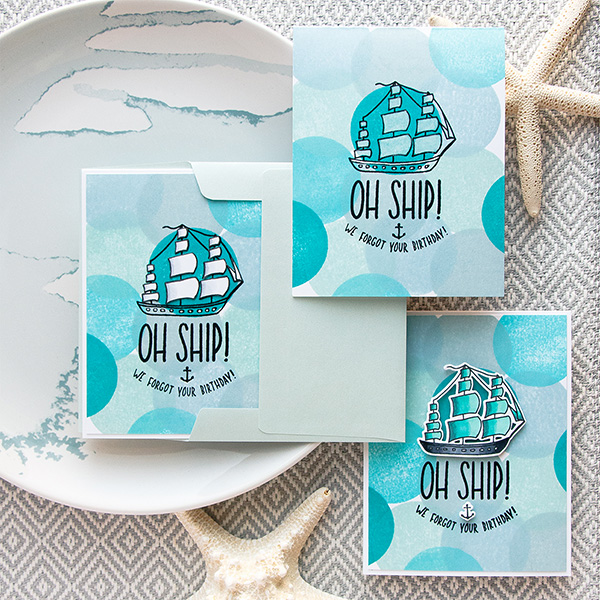
Hi everyone, this is Yana Smakula and I’m excited to bring you another episode from my by-monthly “Yippee For Yana” video series! In today’s video I’m showing how to stamp a belated Birthday card. I am sharing one card 3 ways – from a very simple one layer mail friendly project to a slightly more layered dimensional card.

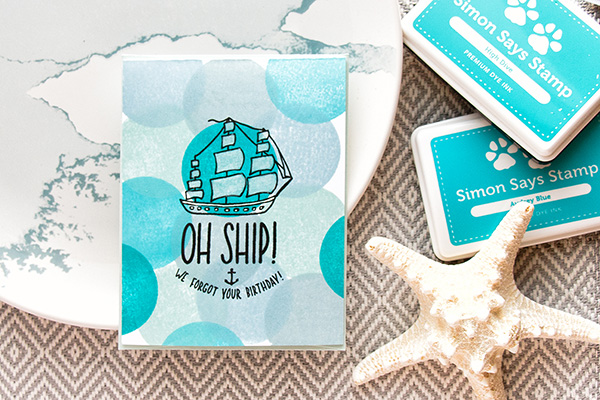
The stamp sets I picked for these cards are Enjoy The Journey from Hero Arts and Big Perfect Shapes from Simon. As for the colors of ink I went with Lake Shores, Winter Sky, Cloudy Sky, Audrey Blue and High Dive.
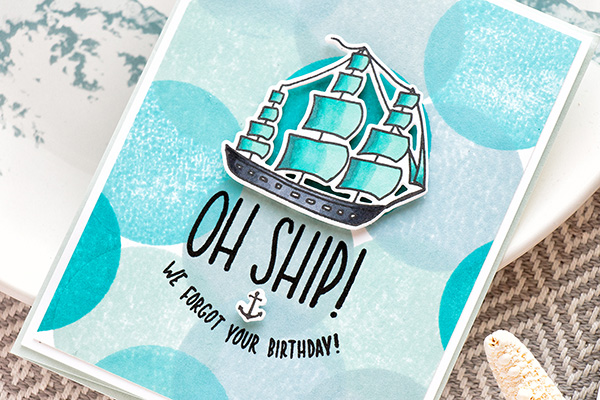
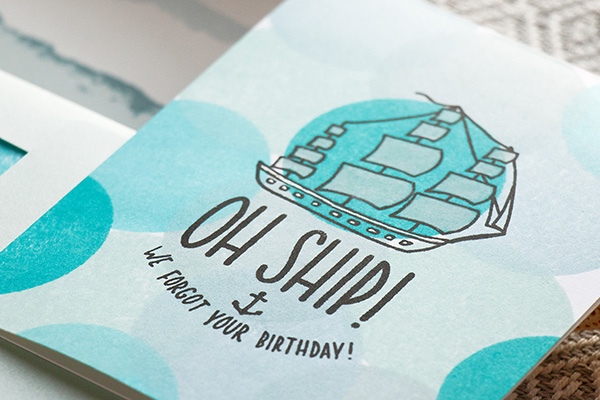
I started working on my cards by creating a background. I used circle stamp and stamped a random looking pattern using all 5 ink colors. Each color was stamped 3 times. You’ll notice my images overlap a lot – this is the look I was going for.
After my backgrounds were done I used my mini MISTI and stamped the ship as well as the “Oh Ship!” message in Versafine Onyx Black ink. I also added an additional “We Forgot Your Birthday” sentiment at the bottom and I curved it for a more interesting look.
From here I finished each card slightly different. The one layer stamped card front was left almost as is – I used a white Prismacolor pencil and whitened the sails of my ship.


To complete my 2 and 3 cards I trimmed my panels down to 4 by 5 1/4 inches and adhere them onto A2 top folding card bases. I also stamped 2 more ship images and an anchor onto a separate piece of cardstock. I used my Simon’s Intense black ink this time as I knew I’d be coloring these images later.
Using coordinating dies I cut out one of the ships and also an anchor and I set those aside to use for the 3rd card.
To complete my 2nd card I cut out the individual sail sections with scissors and adhered them onto the stamped sails on my panel. That took a bit of time, but the sail images aren’t detailed, so they weren’t difficult to cut out at all.
I used my Crystal Katana tool to pick up and move the cut out pieces and my Tonic Deluxe adhesive to add glue. I really loved the way this ship turned out – the white sails added a lot to the overall look and made the image pop off the colorful background. Because they were cut out and adhered they also added a little bit of dimension to this card without actually adding any physical dimension to the project.
I also used a C3 and C1 copic markers along with a colorless blender and added a bit of shading to each white piece to make it appear a bit more realistic.
To complete my 3rd card I colored my die cut ship using Copic markers. The colors I picked were dictated by the colors I used for my background stamping, I wanted my ship to match in color as much as possible. I used BG18, BG15 and BG32 markers to color the sails. For the hull of the ship I picked cool grays. You’d expect it to be brown since the hull of that kind of ship would be made out of wood, but I didn’t want to introduce additional color to these monochromatic cards, so I went with gray instead and I think that turned out rather nice. I used C9, C7 and C5 colors.
Using foam adhesive I adhered the ship and the anchor onto my last panel.
Watch the video:
So here are 3 completed variations of one card – the one layer pencil colored one, the one with the white cut out sails and the 3rd card with the colored, cut out and foam mounted ship and anchor.
I am curious to hear which one you like best. My favorite is the 2nd one, but I do love that added dimension on the 3rd one as well.
Have fun stamping!
SUPPLIES:
 |
 |
 |
 |
 |
 |
 |
 |
 |
 |
 |
 |
 |
 |
 |
 |
 |
 |
 |
 |
 |
 |
 |
 |
 |
 |
 |
 |
 |
 |
 |
 |

Blog Candy Alert!! Follow our blog via email and comment on this post for a chance to win a special blog candy!
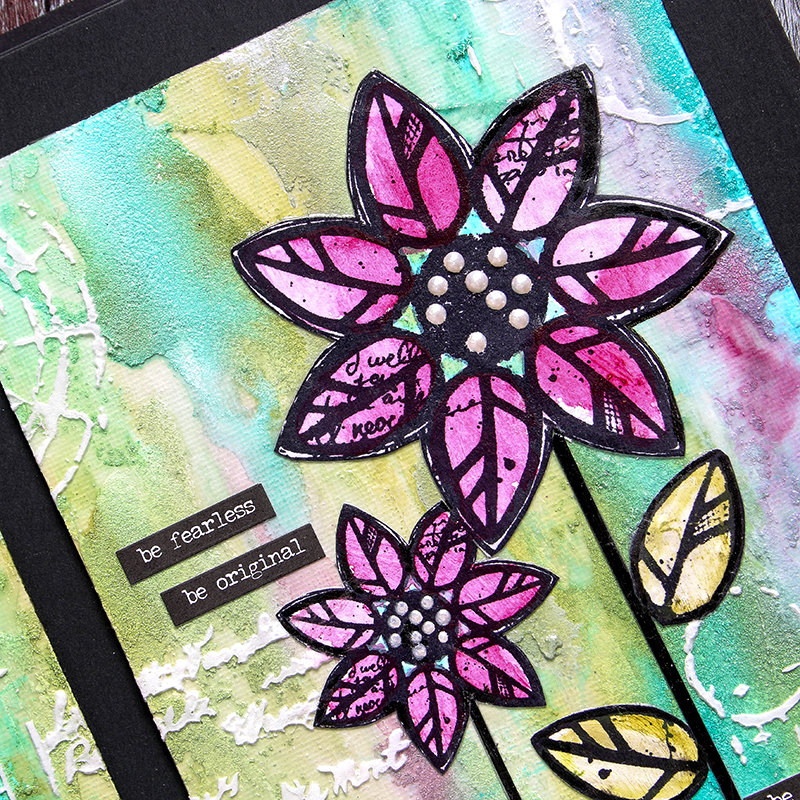
Art Journal: Be Original with Shari Carroll
Happy Tuesday everyone!
I’m sharing an art journal page I created using the Dina Wakley Media Boards. To start off, I used Tim Holtz Grit Paste to add some texture then played with acrylic paints to get a watercolor effect. By using paints as your base you can use other mediums on top without fear of your colors running or moving.
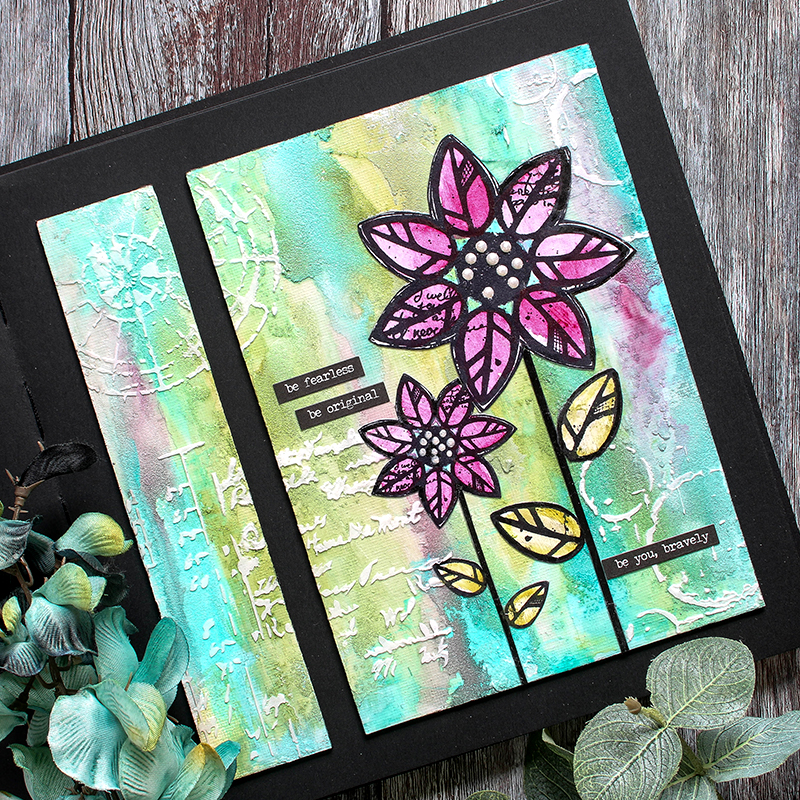
Once I had my background texture and color in place, I used some paste through a stencil to add more dimension. The stenciled image breaks up the background with the addition of white and additional texture.
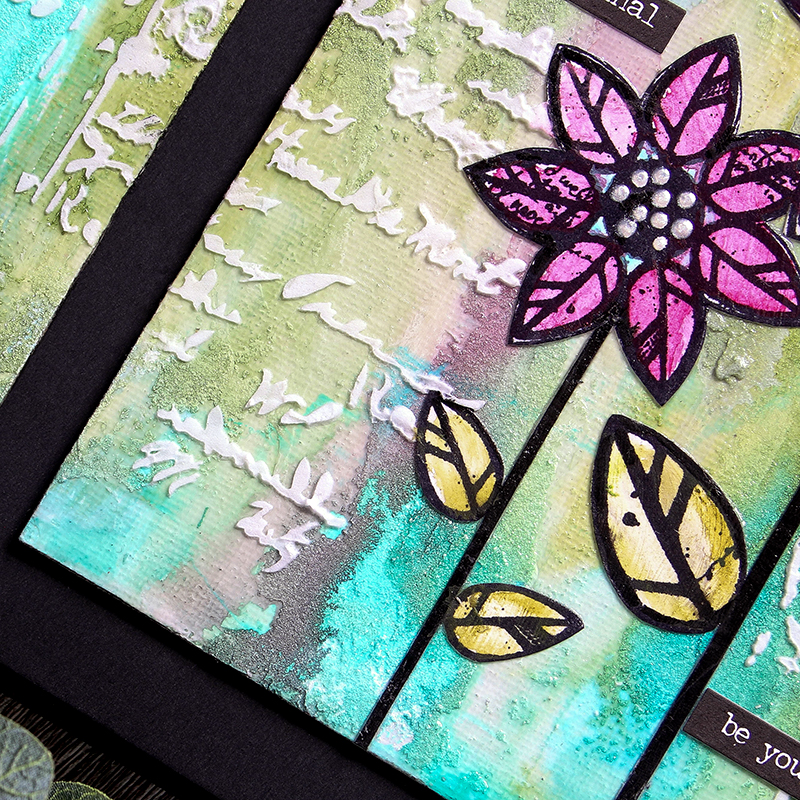
I finished off my design by stamping a couple of flowers which I painted with diluted acrylic paint and then I added a few Small Talk message strips. I love the overall look of this entry with it’s vibrant watercolor effect which flows in and around the texture.
I have filmed a full process video that you can view below or on our YouTube channel HERE.
Blog Candy Alert!! Follow our blog via email and comment on this post for a chance to win grab bags and blog candy! Remember to tag your projects with #simonsaysstamp on social media so we can see what you are creating!
Thanks for stopping by today! Happy Journaling!
 |
 |
 |
 |
 |
 |
 |
 |
 |
 |
 |
 |
 |
 |
 |
 |
 |
 |
 |
 |
 |
 |
 |
 |
 |
|
Studio Monday with Nina-Marie: 10 Crafty Must-Haves!

Hello everyone, Nina-Marie here with you on this fabulous Monday! In our world of crafts, we have so many products coming out every month; sometimes it seems hard to decide what exactly one should pick up next!
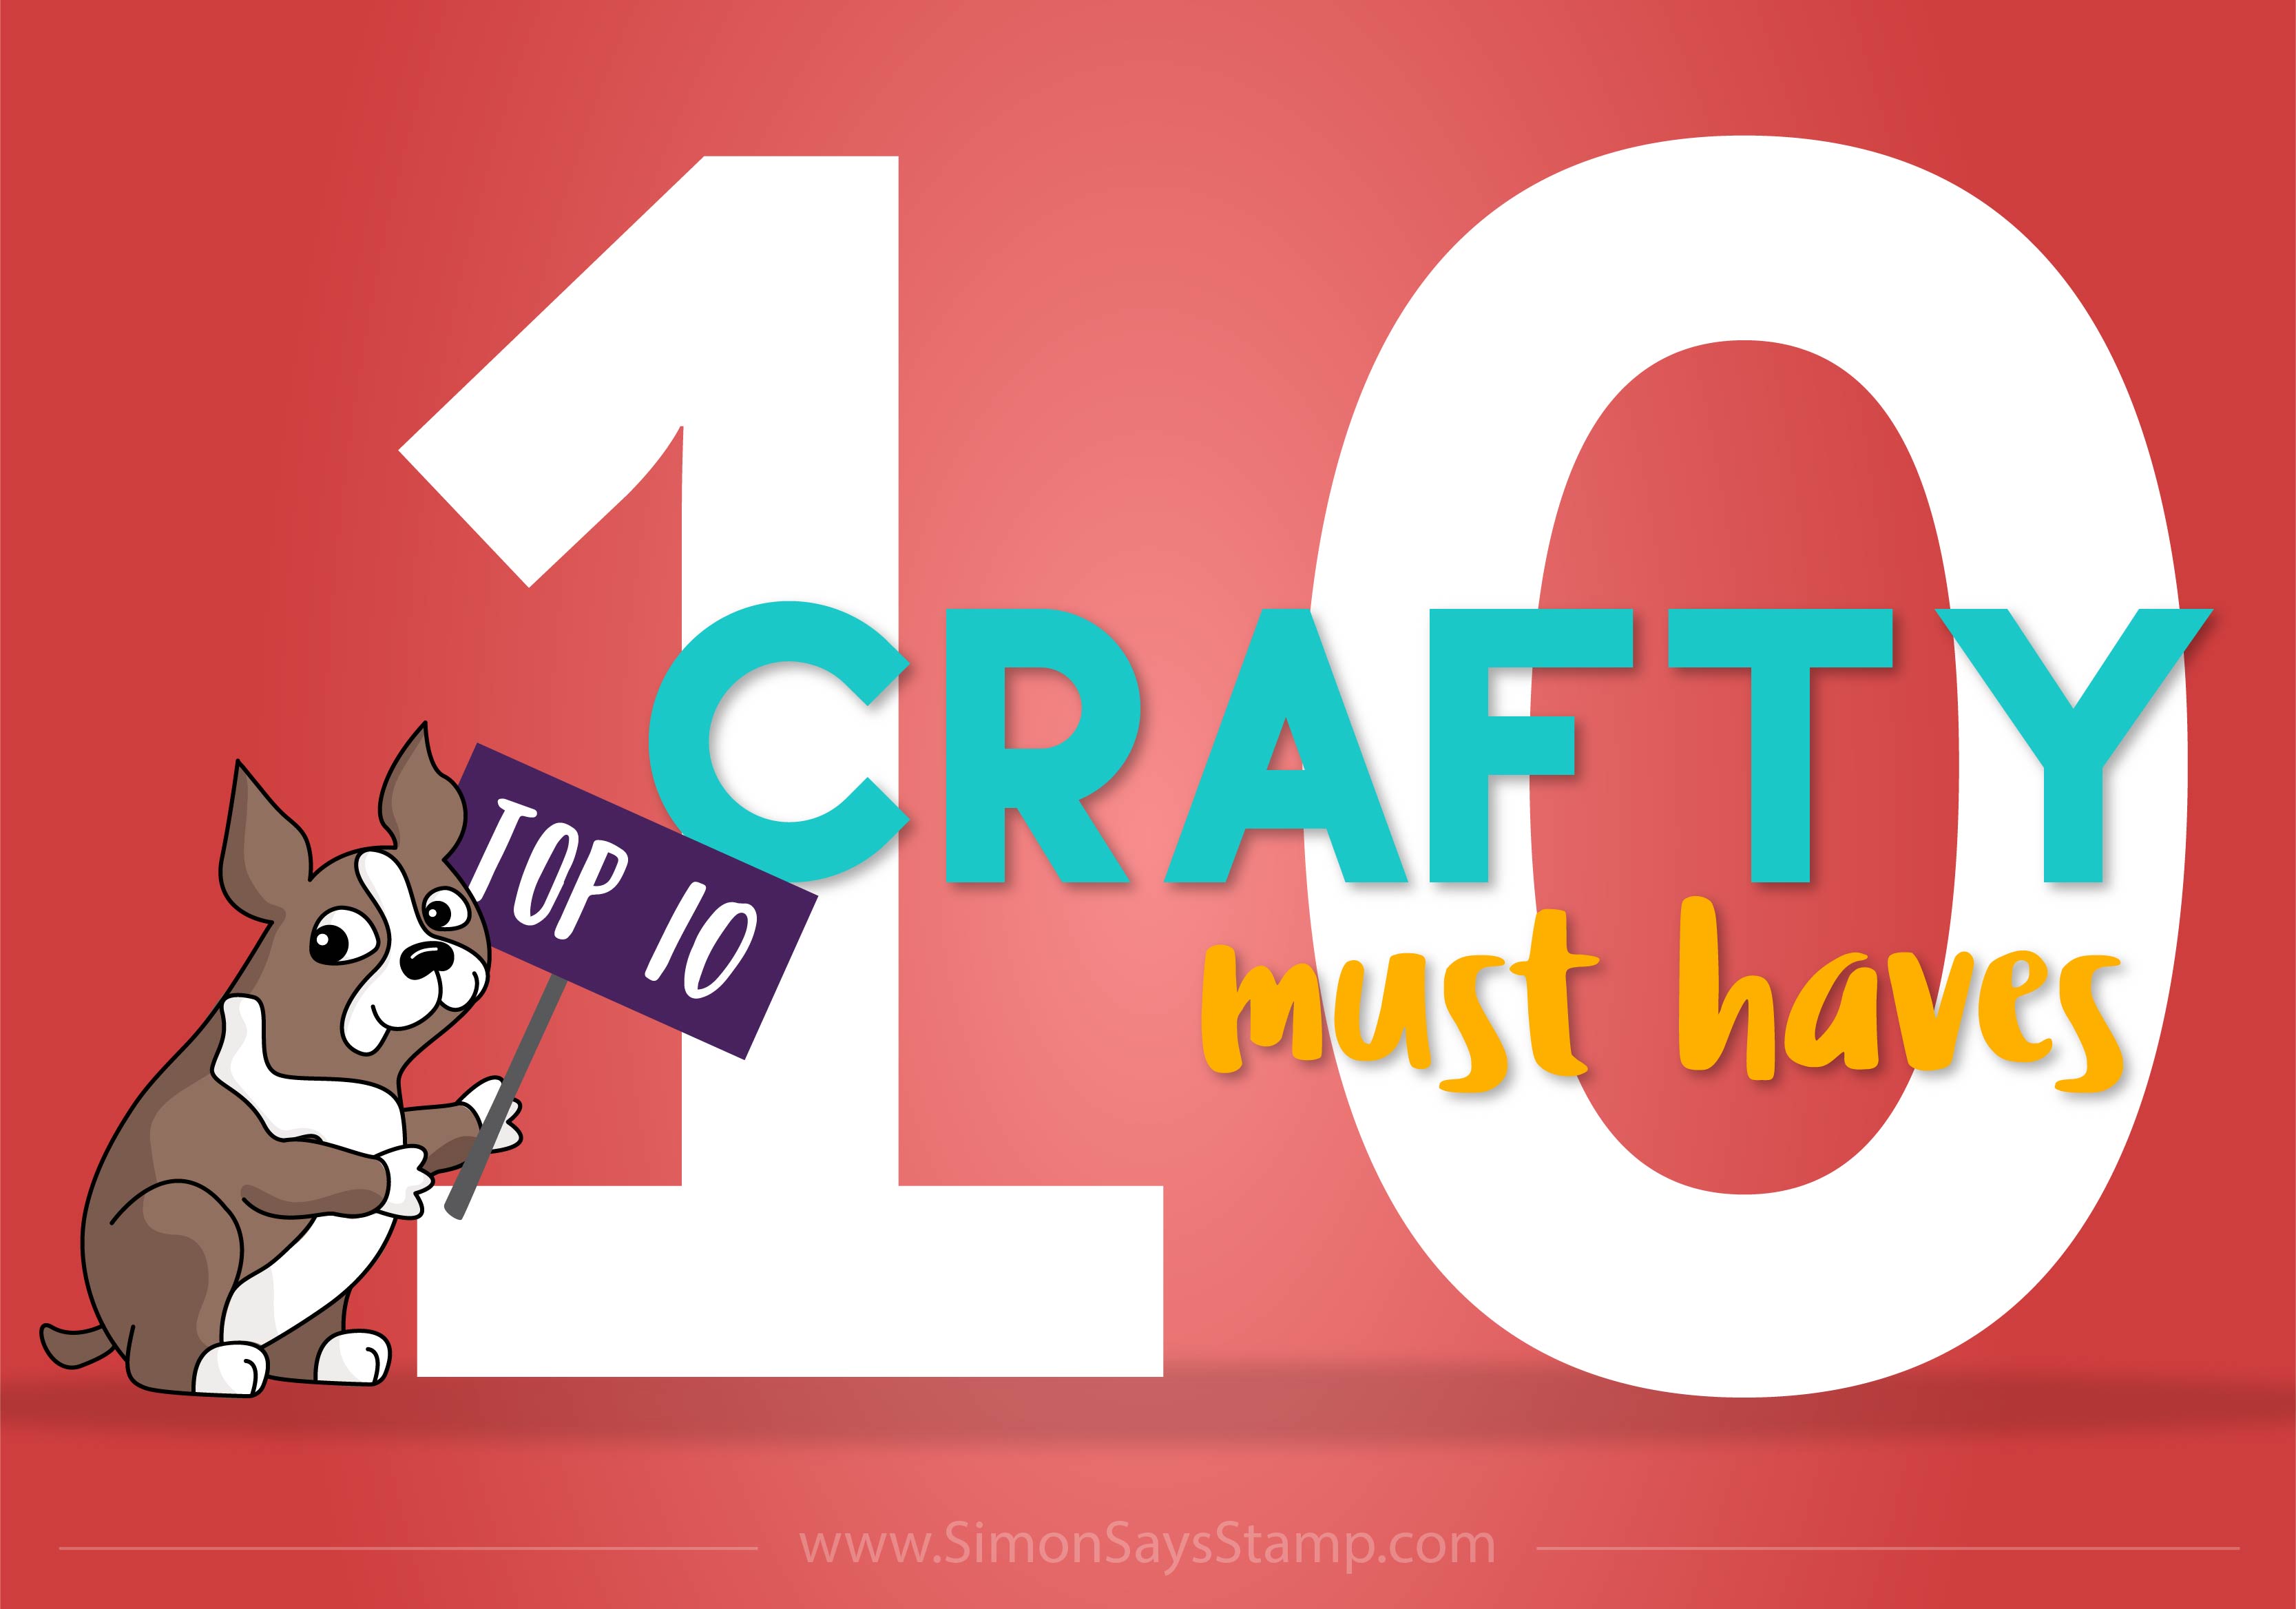
A few months ago I did a top-10 crafty must-haves post that you all really enjoyed and found helpful. So today I am rounding up 10 more top picks that I think are true must-haves in any craft room!
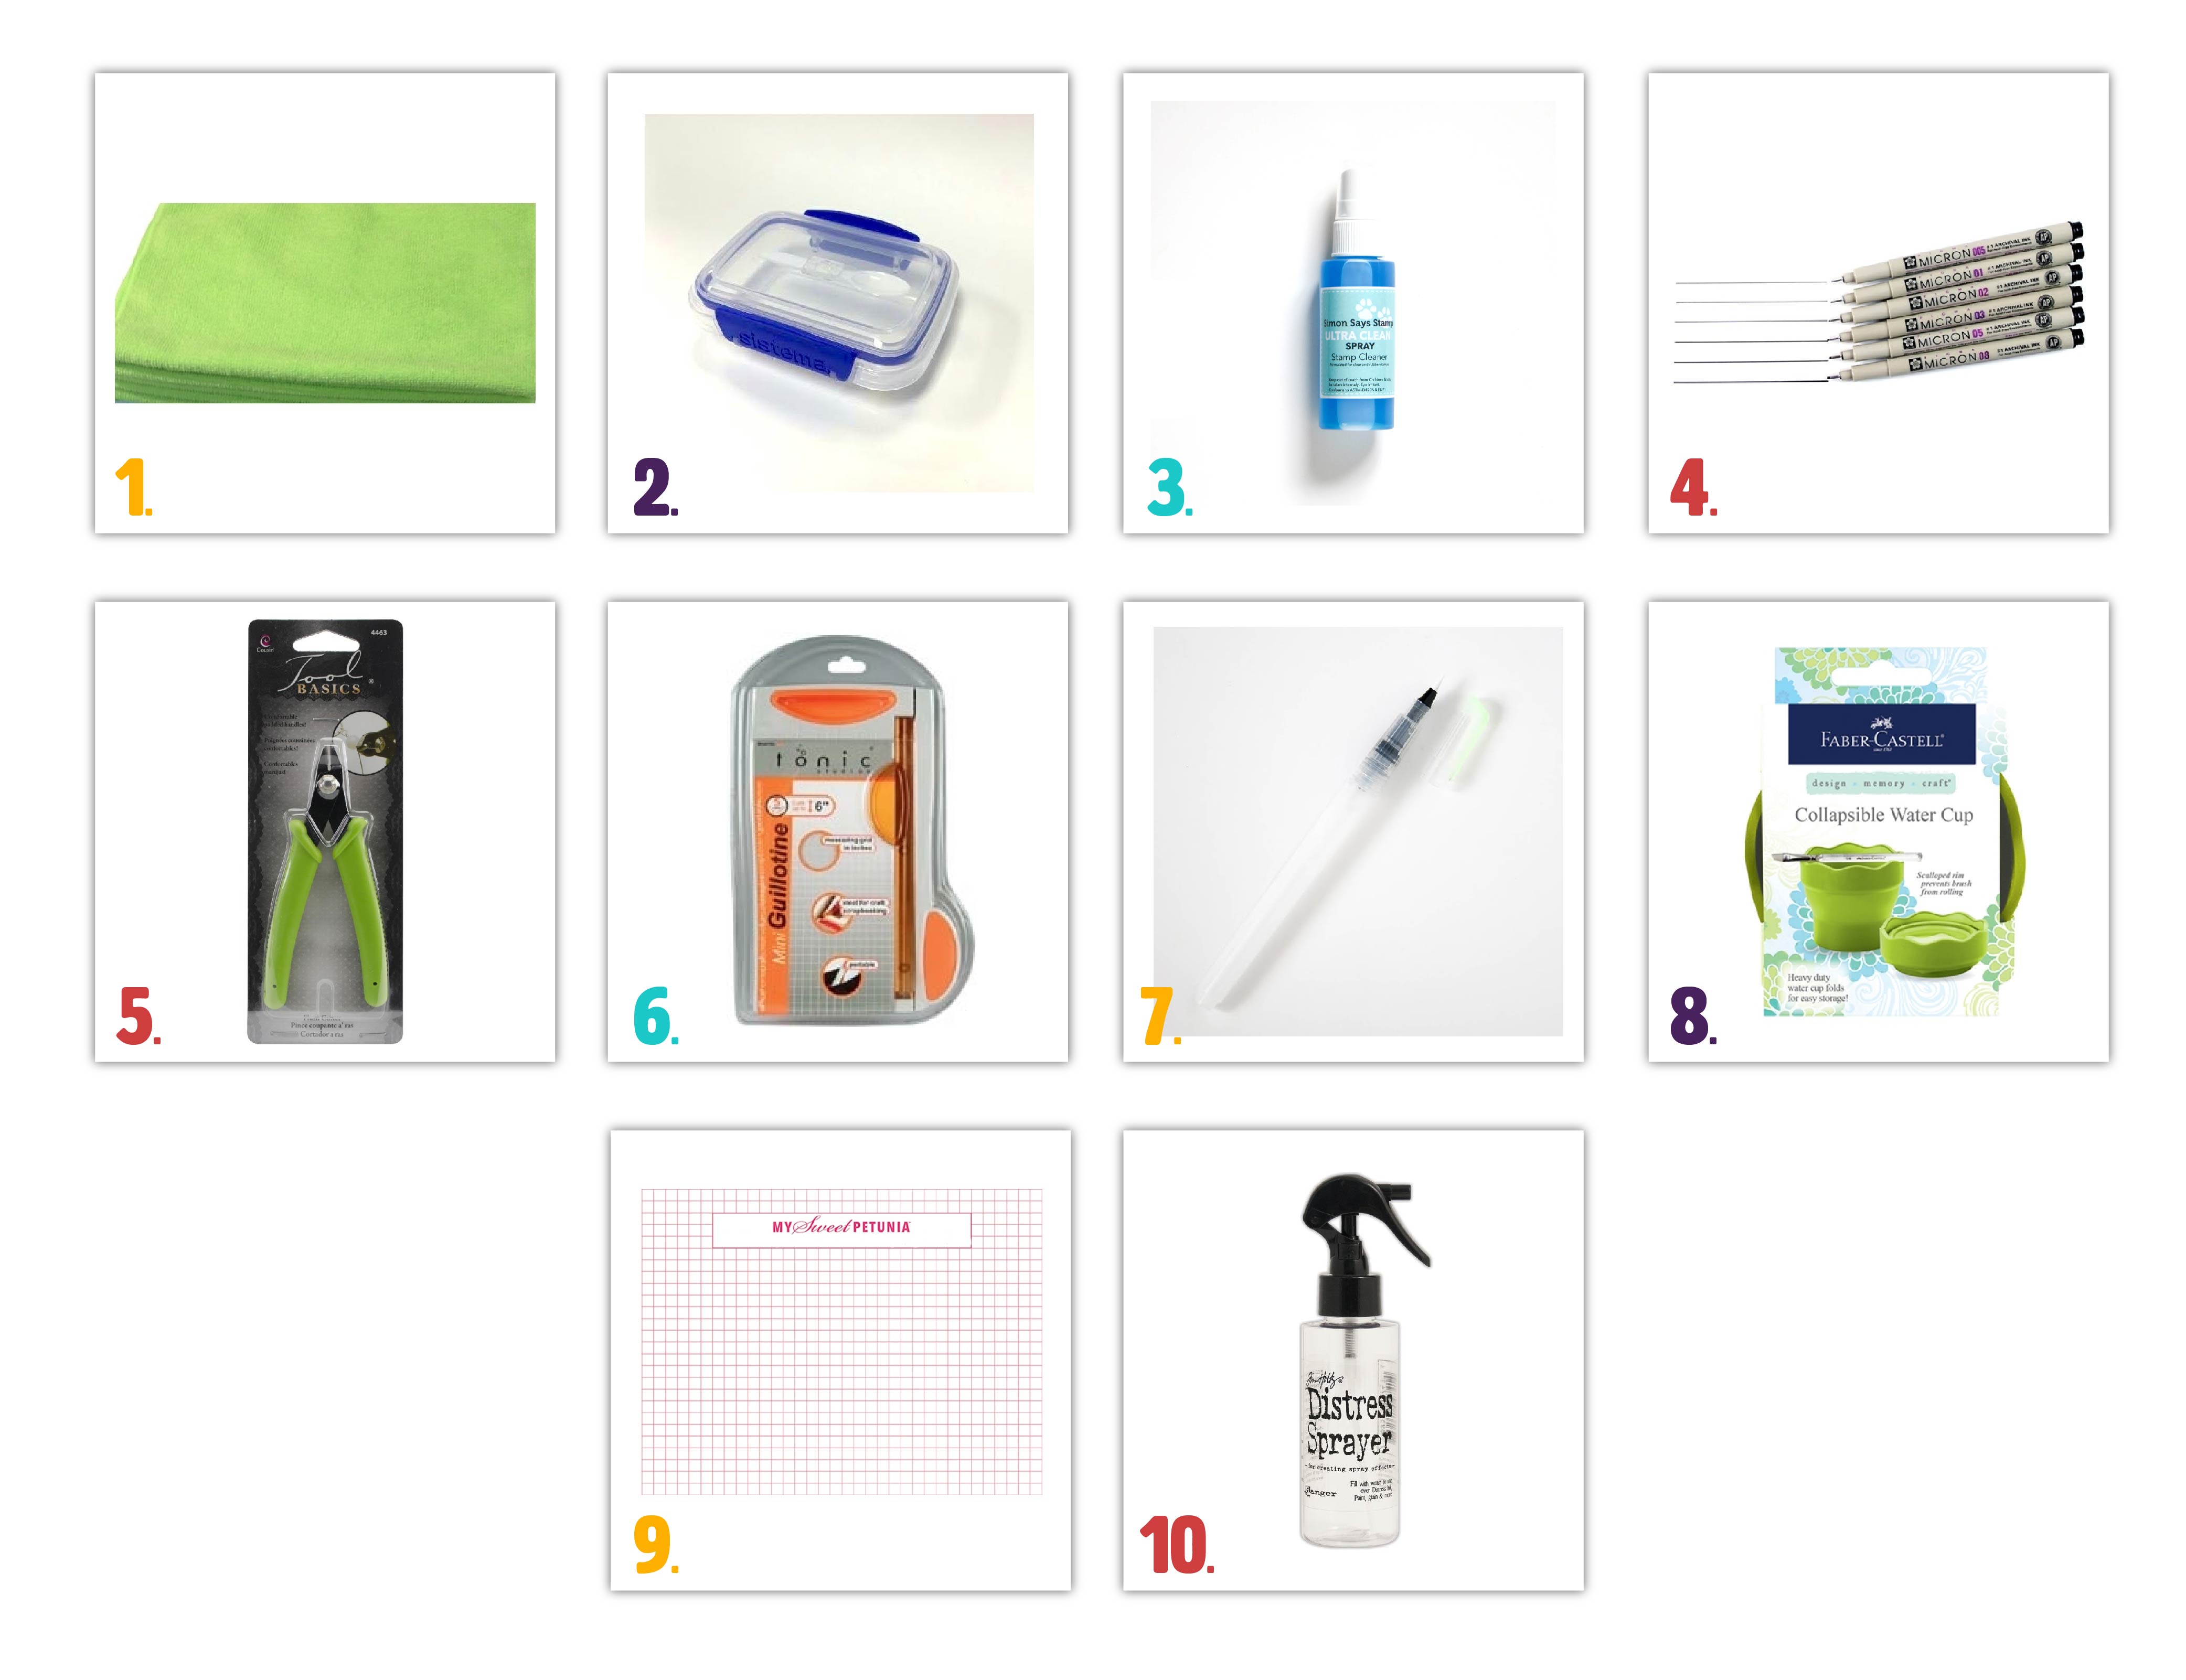
The first crafty must-have on my list is a microfiber cloth. In the past, I used old rags that I had laying around. But when I switched to microfiber cloths I immediately noticed the difference they made! No longer did I have lint stuck to stamps whenever I dried them off. With cotton rags, I always found that little pieces of lint would be left behind. I also find microfiber cloths hold up much better to constant use.
Embossing powder is something I use all the time; but it can sometimes be time consuming to try to carefully pour out powder from the little jars onto a project – and THEN have to funnel it back into the jar. For all my most-reached-for powders, I use Sistema plastic containers. These are small, lockable containers, so you never have to worry about the embossing powder spilling out.
The containers we carry at Simon Says Stamp also feature a little spoon that allows you to easily scoop the powder right from the container onto your project. And, because of the wide open mouth of the container, as you sprinkle powder onto your project over the container, there is nothing to clean up because the powder simply falls back inside! These are so convenient!
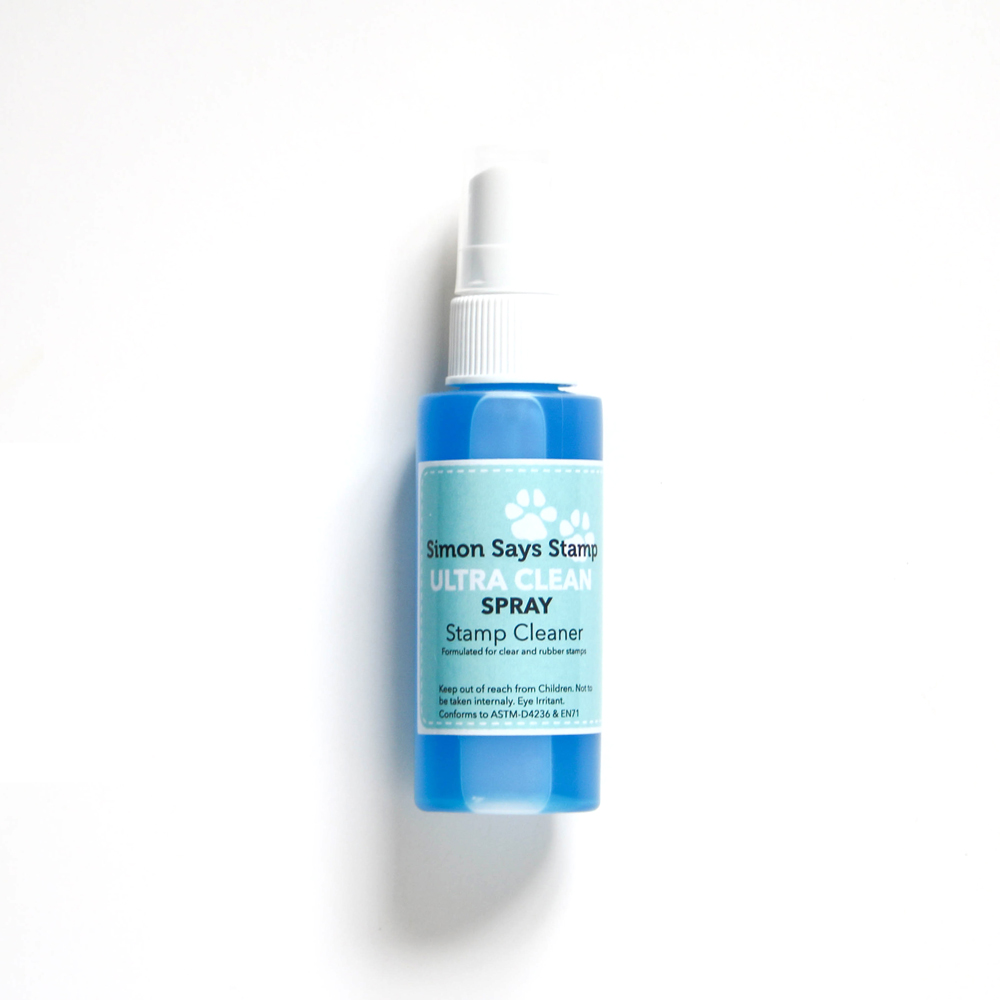
Stamp care is so important; having a “dirty” stamp never bodes well for your project. Whenever I finish a project, or I’m changing stamp colors often during the creating process, I scrub my stamps well with Simon’s stamp cleaner. I spray the cleaner into my Hero Arts Scrubber Pad, but you could spray into a rag instead if you don’t have the scrubber.
The cleaner is formulated to be gentle on clear stamps (other cleaners, especially those made for rubber stamps, are not recommended to be used on clear stamps). I love the results I get with this cleaner; it even helps take away a little of the staining that certain inks can cause.
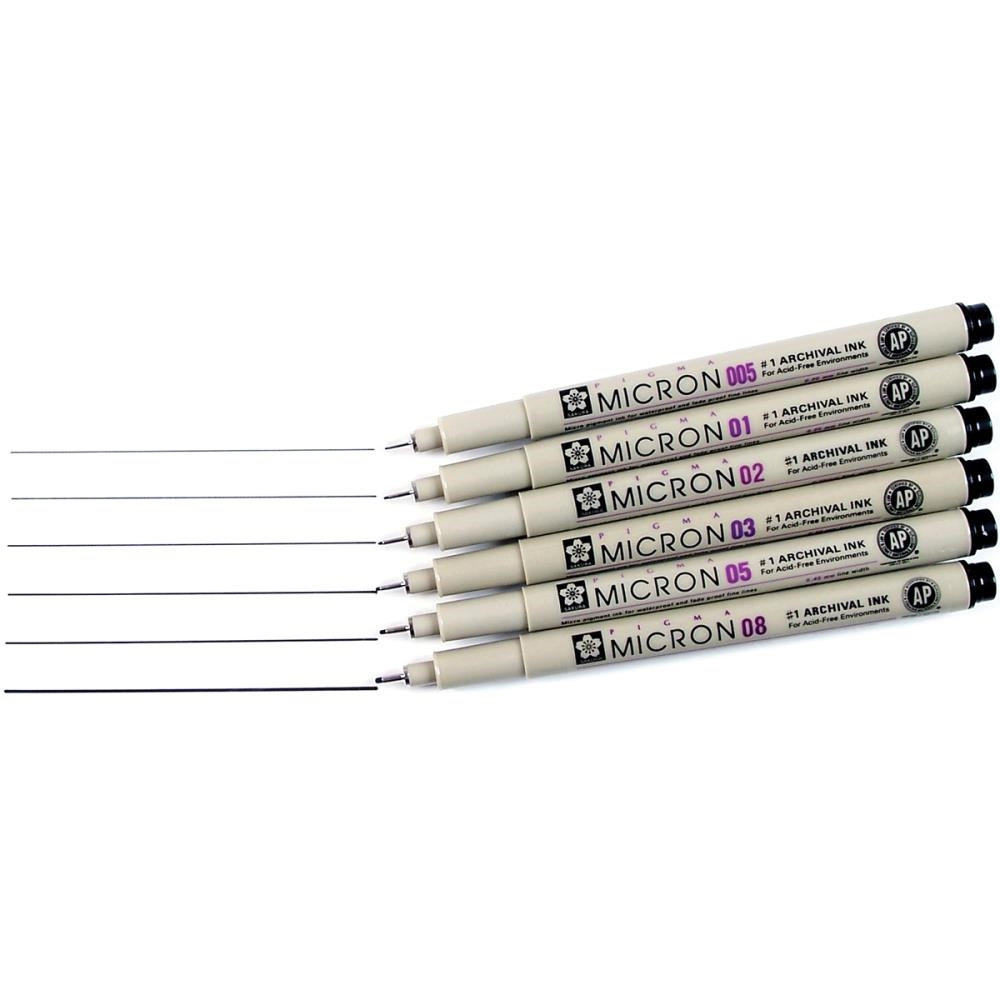
I don’t know about you, but I find having good quality black pens handy is invaluable. I reach for my Sakura Micron pens most often because they are waterproof, chemical resistant, quick drying and bleed proof. These are all important qualities to look for in a pen because this means you can use it on virtually any card and not have to worry about your pen lines having adverse reactions to other mediums.
These pens are also useful for touching up black stamped images or filling in any areas that may not have stamped correctly. The Micron pens come in a variety of point sizes, so you are always sure to have one that works for whatever you need.
5. COUSIN’S TOOL BASICS FLUSH CUTTERS
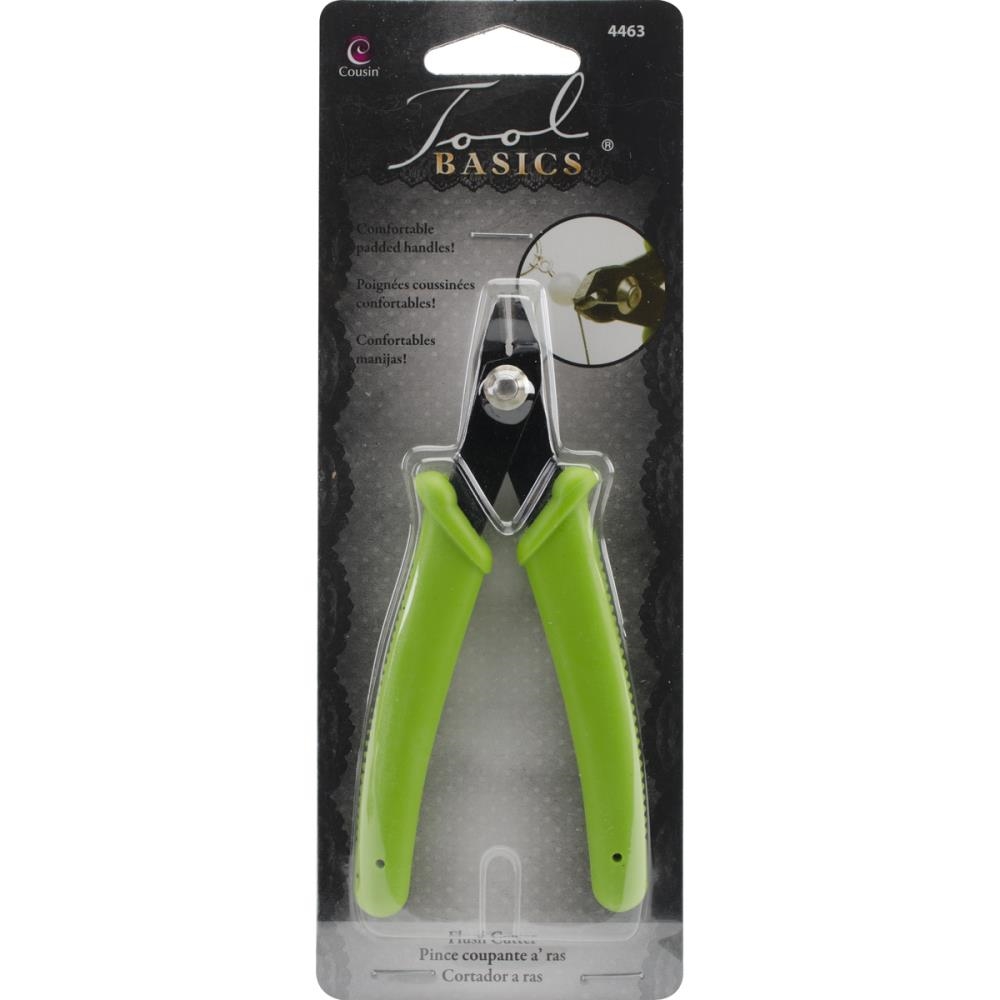
Most die sets we purchase come attached together by small threads of steel that need to be cut apart so that the dies are no longer attached. The majority of wire cutters however are not small enough at the tip to get in between the dies to trim these threads. When I came across the Tool Basics flush trimmers from Cousin about a year ago, I was completely thrilled! Meant for cutting delicate jewelry, these have a fine tip that fit in between dies perfectly. Since getting these, I’ve never had an issue with getting my dies apart!
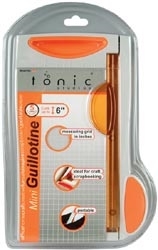
Paper trimmers are a must-have for any papercrafter! I have a few different trimmers in my studio that I use for certain things. The one that is extremely crucial for me is the mini Tonic trimmer. I use this for trimming small pieces, such as overhang paper on A2 cards, sentiment strips, etc.
This trimmer doesn’t take up much room on my desk; as I create I don’t have to worry about clearing space for it. It also tucks away into my Ikea Raskog cart perfectly, which is where I store many of my most-used tools. I really recommend having a paper trimmer like this handy for all those little cutting jobs that don’t require big trimmers.

As many of you know, I am a big watercolor fan. This was the medium I first started off with when I began my crafting journey in 2007. For watercoloring, I often reach for Simon’s medium or small watercolor brush. I find these perfect for coloring in almost any stamped image.
These of course can be filled with water, but I don’t always keep them filled.
When I want to control how much water I am using, I dip the bristles into a jar of water just like a regular paint brush. Other times I do fill them with water; again, it all depends on how much water I want in my coloring. These brushes are also great for portable painting!
8. FABER CASTELL COLLAPABLE WATER CUP
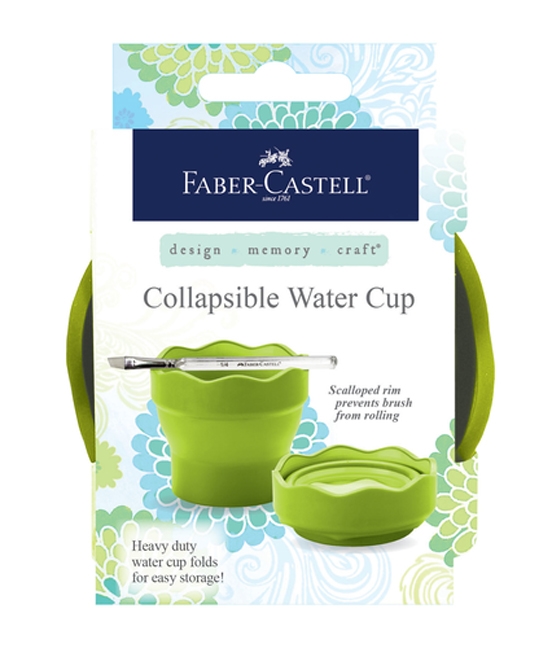
Speaking of watercolor, my go-to container for holding water is the Faber Castell collapsible water cup. Not only is this cup super stylish with it’s scalloped edges and green color, its also extremely functional. The scalloped edges are great for balancing a brush on – or for pushing the bristles against to squeeze out extra water.
The cup can be used either collapsed or open. I find the collapsed size perfect for when I just need a small amount of water, and the opened size for larger amounts of water. This is also another great on-the-go product because of its small size.
My next recommendation is a must-have tool for any MISTI user! The MISTI Mouse Pad inserts are an alternative insert to the black foam piece that comes with the MISTI or the grid paper inserts.
What makes this Mouse Pad insert so convenient is that it combines the functionality of both the foam pad and the grid paper into one with an extra bonus; it’s a cleanable surface. The Mouse Pad inserts have a plastic coating that allows ink to be cleaned off easily. Plus, with the grid printed underneath the coating, you still have the advantage of being able to precisely line up your paper inside the MISTI. And the thickness is exactly the same as the original black foam insert. I use these Mouse Pad inserts inside both my Mini and Original sized MISTIs all the time.
10. TIM HOLTZ DISTRESS SPRAYER
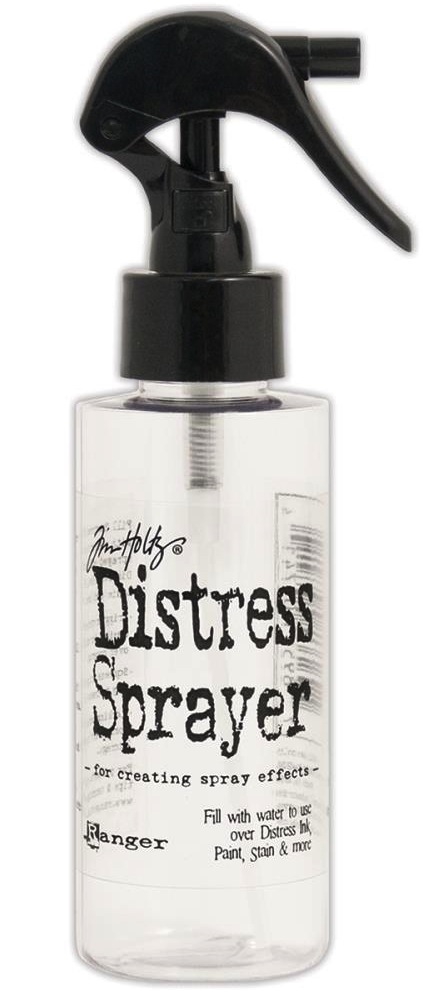
The tenth and final crafty must-have for today is Tim Holtz Distress Sprayer. Though I have tried other spray bottles in the past, I find I use this sprayer exclusively. Here are a few reasons why:
- For one, it is larger than most bottles on the market, so I don’t have to refill it as often
- The spray mechanism also is lockable, so you never have to worry about spraying water accidentally
- And finally, this bottle can produce two different spray types. If you squeeze the trigger completely, you get a even mist of water. But if you spray halfway, you get perfect drops of water to create that popular splatter effect!
I love using all of these products I’ve shared here today. I hope that this list will help you to discover some new tools that you can add to your crafting stash too!
Thanks for stopping by and visiting with me today; I will be back again next week with a new Studio Monday video!
SUPPLIES


Blog Candy Alert!! Follow our blog via email and comment on this post for a chance to win grab bags and blog candy! Remember to tag your awesome projects with #simonsaysstamp on social media so we can see what you are creating!


