Happy Thanksgiving! We are SO thankful for YOU!
Hi crafty friends! Happy Thanksgiving! This is a special time of the year to gather and celebrate the people in our lives that we are so grateful for. We hope you know that we are SO THANKFUL FOR YOU: our loyal and loving customers! You inspire us, make us smile, and allow us to do what we love. THANK YOU!

To celebrate that gratitude, we are having a ONE DAY THANKSGIVING SALE! Please shop our Simon Says Stamp brand with the code THKS985 and take 30% off.

As a special bonus, any order that is subtotaled at $100 or more will automatically receive this adorably sweet Cocoa & Love stamp set for FREE! This stamp set will be available as a free gift while supplies last and is not currently available for sale separately. We hope you enjoy this special treat! Happy shopping!
Yippee for Yana: Joy To The World Card – Pencil Coloring Over White Heat Embossing
Hi friends! Happy Wednesday! Welcome to the latest edition of Yippee for Yana! You won’t want to miss the whole tutorial of this festive beauty. Be sure to watch the video and enjoy!
Hi everyone, this is Yana Smakula and I’m excited to bring you another episode from my by-monthly “Yippee For Yana” video series! In today’s episode I want to show a one layer Colorful Christmas card created with the help of stamps and colored pencils and share some coloring tricks (or rather one trick) over white heat embossing.
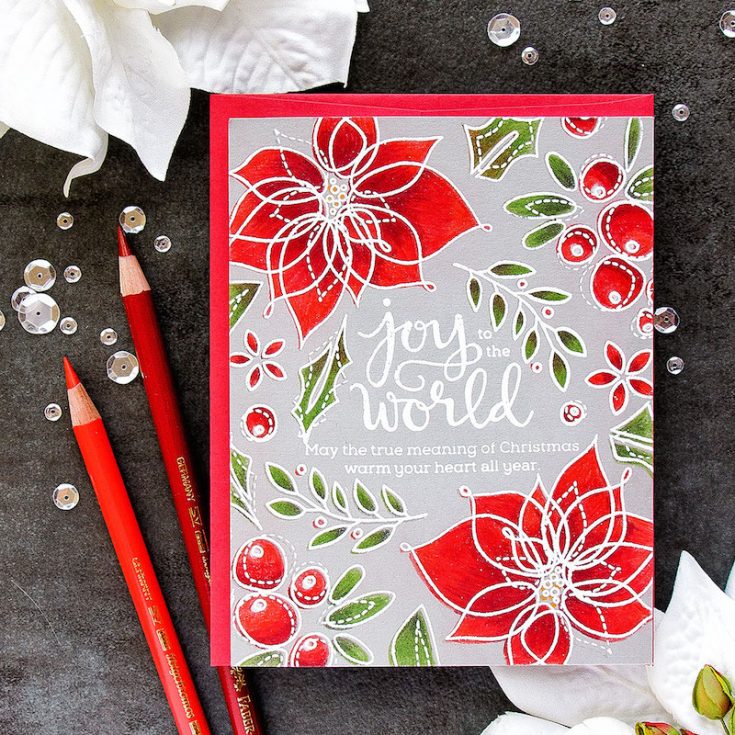
I started working on my card by heat embossing sentiment from the Peace on Earth stamp set in Hero Arts white embossing powder onto Smoke Gray cardstock panel cut to 4 1/4 by 5 ½”.
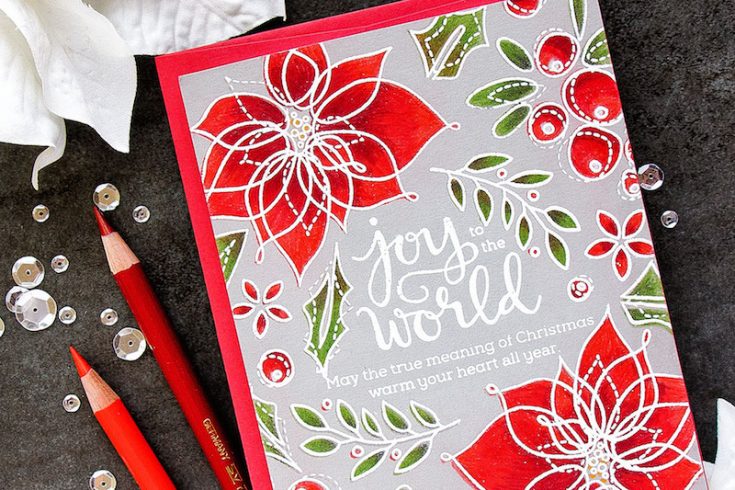
I’ve been coloring a lot with colored pencils on black and very dark gray papers with gold or antique gold heat embossing but I never actually tried it with white. And this is where I encountered my problem – as I was coloring images I kept accidentally going over the heat embossed line and coloring the line with my pencil. This probably does happen when you color a gold heat embossed image, but it’s much less visible.
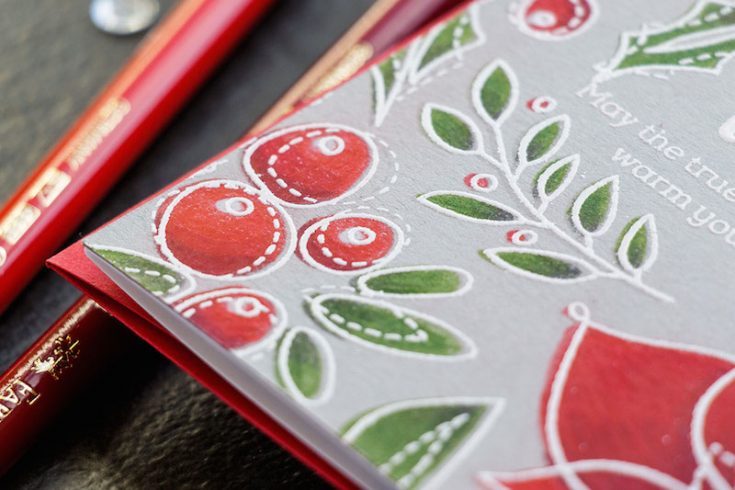
I decided I would do my coloring first and would heat emboss images later. This simple trick really did help to solve the problem. The process ended up being the following – I arranged images I wanted to use for my background on the door of my MISTI stamp positioner (you need to use a stamp positioning tool for this technique unless you are very good at eyeballing and double stamping). Placed my background panel inside the misti and stamped images in light color of ink.
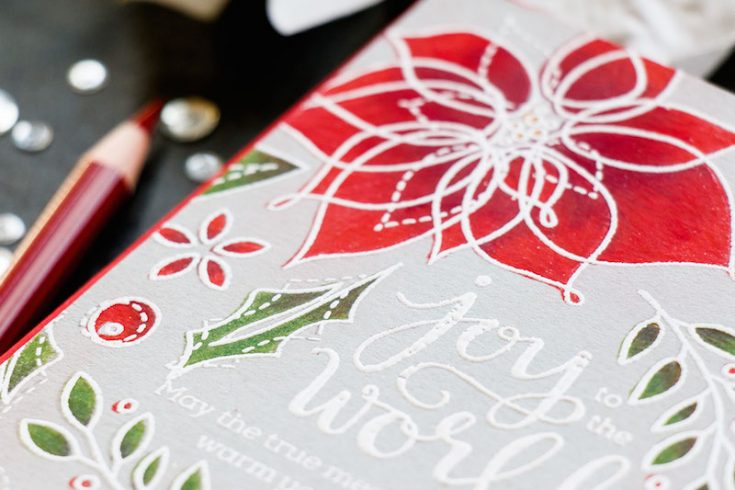
You can use watermark embossing ink, I used Simon’s’ Fog ink. Next, I colored images with pencils as if doing a no-line coloring (I made sure to stay inside the line); repositioned the panel inside the MISTI, prepped for heat embossing, stamped the images that were still mounted on the MISTI door in clear embossing ink and heat embossed in white embossing powder.
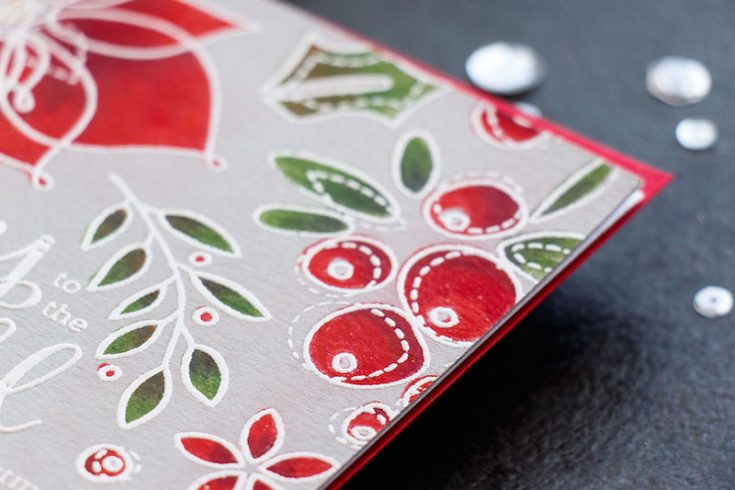
This does take longer vs heat embossing and coloring, but it gives a much cleaner look. You can even do this if you find pencils dull the color of metallic embossing powder after coloring. Plus this allows to use highly detailed images like this poinsettia – there are a lot of dashed lined to this image that aren’t that easy to color around, but if they aren’t there when you do your coloring – you don’t have to worry about them.
I used Polychromos Pencils from Faber Castell, you can also use Prismacolors for this. I’ve been enjoying coloring with my Polychromos so this is why I picked those today. Once my background was finished I adhered it onto an A2 side folding card base and that pretty much finished my project. This is a one layer card – perfect to send in the mail!
I hope you’ll give this idea a try. Have fun stamping!
WATCH THE VIDEO:
SUPPLIES:
|


Thanks for reading today, and thanks to Yana for being our guest!

Blog Candy Alert!! Follow our blog via email and comment on this post for a chance to win a special blog candy!
Doodling with Debby: Picture Book Christmas
Hi friends! Happy Tuesday! Thanks for popping by today! Please read on below to see how Debby Hughes made this absolutely adorable Christmas card! Be sure to watch the video and enjoy!

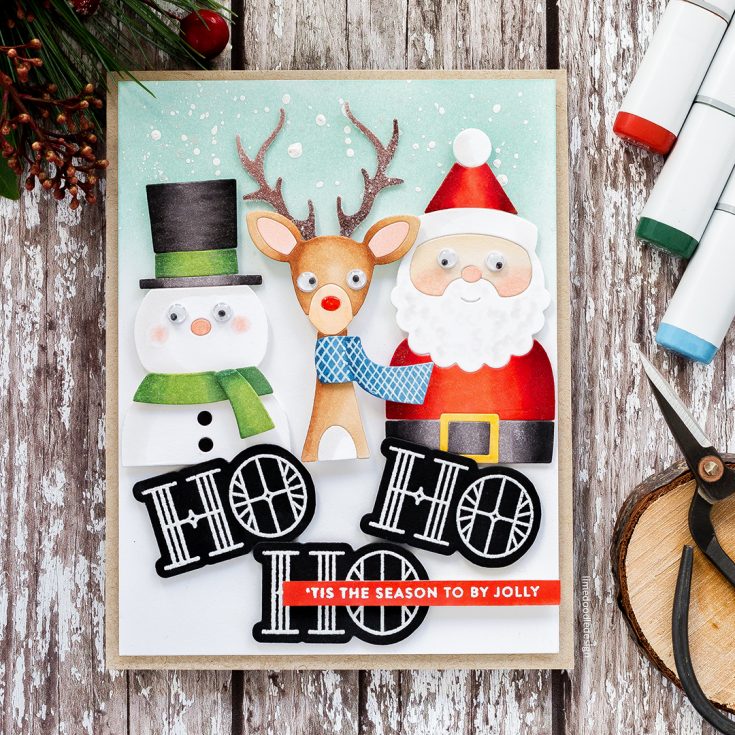
Hello, it’s Debby here today with my monthly video feature, Doodling With Debby! I love the look of no-line colouring – stamping an image in a pale ink and then colouring, so the original line is no longer visible. Well, I’ve called today’s technique no-line die cutting.

In the same way as the stamping technique, no-line die cutting results in a coloured image without any black lines and the Picture Book die series from Simon Says Stamp are perfect for this.
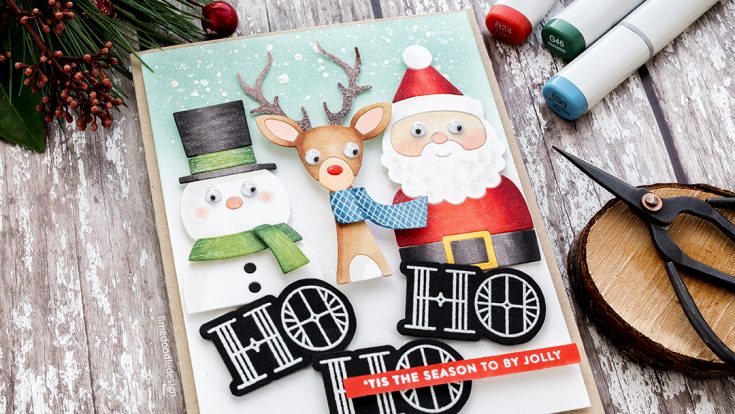
I die cut the Picture Book Snowman, Picture Book Deer and Picture Book Santa from Neenah Solar White card and then coloured with Copic Markers. I had great fun colouring these die cuts with simple shading to bring them to life.
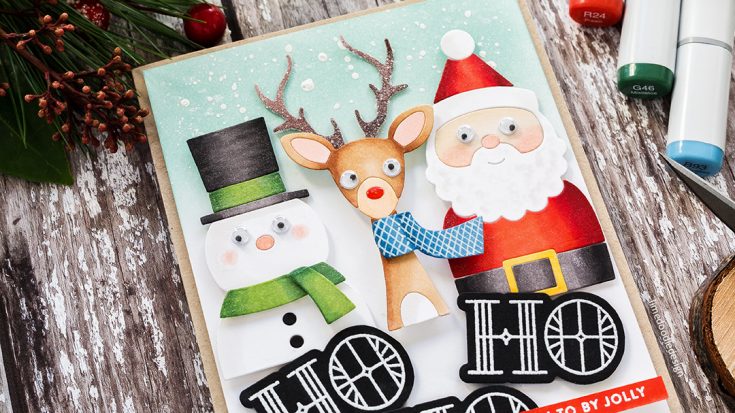
Once I’d coloured the pieces for each character, I glued them to a piece of white card and trimmed out before adding a pair of wiggle eyes. I rubbed Ranger Multi Medium Matte over Rudolph’s antlers and dunked them into a tub of Rock Candy Distress Glitter before adhering them to the back of the deer’s head with a glue dot. Also, I added Glossy Accents to Rudolph’s red nose. To dress up Santa and the snowman, I added Wink Of Stella glitter pen to their outfits.
I blended Lake Shores ink into the top of a panel of white card and splattered with perfect pearls solution and then white gouache before mounting the trio of characters with foam adhesive.
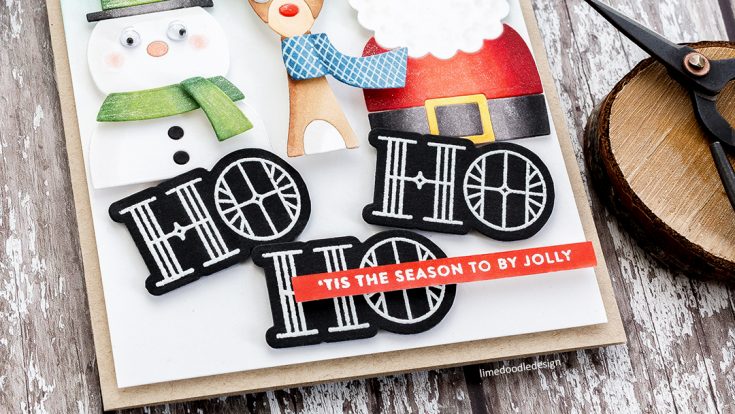
For the sentiment, I stamped, and white heat embossed the ‘Hope’ sentiment from the Stained Glass Greetings set three times and die cut with the matching die. I then trimmed out the ‘HO’ from the beginning of each die cut and mounted them below the three characters. I completed the sentiment by stamping a phrase from the Fa La La set in clear embossing ink on card coloured with a red marker and white heat embossed before trimming into a skinny banner.
I added the finished panel to a side folding Desert Storm card base.
Thank you for joining me today, and I’ll see you next time for Doodling With Debby!
Watch the VIDEO:
Watch below or in HD on YouTube.
SUPPLIES:
|


Thanks so much for stopping by today, and thanks to Debby for being our guest!
Blog Candy Alert!! Follow our blog via email and comment on this post for a chance to win a special blog candy!
Congrats! Blog Candy Winners!
From: Studio Monday with Nina-Marie: Lawn Fawn Pop Up Holiday Gift Card: Denise Bryant!
From: A Tim Holtz Winter Wonderland by Richele Christensen: Deborah Thomas!
From: Yippee for Yana: Christmas Lights in Blue and White: Neha Parab!
From: Masked Christmas Squad: Amy Cooley!
Please email [email protected] with the name of the blog you won from, the prize you won, and your address (if applicable), to redeem your prize(s)!


