Choose Joy: Simon Says Stamp Card Kit Reveal and Inspiration
Step into spring with our March Card Kit Choose Joy!
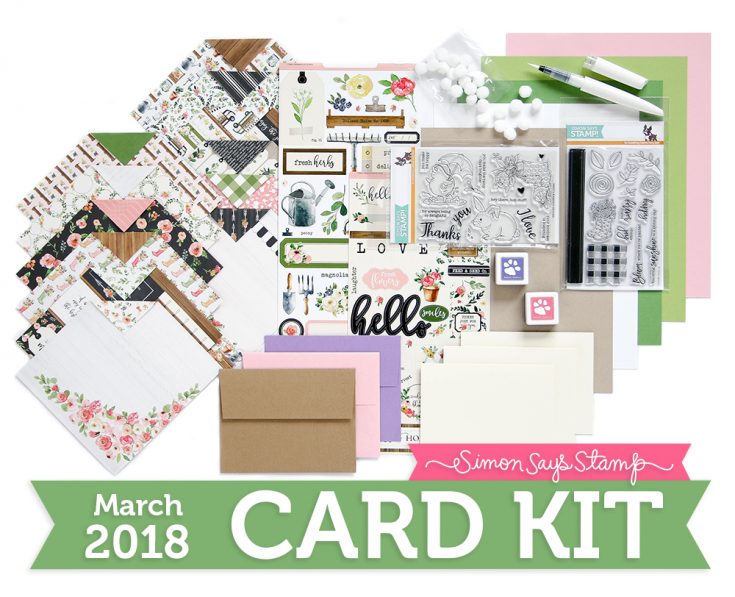
Spring is coming, and soon the world will be awash in freshness as the earth reawakens! Our March Card Kit celebrates the joys that spring brings. Twelve double-sided 6×6 patterned papers and two sticker sheets from Carta Bella’s Spring Market collection anchor this gorgeous kit. The lovely shades of peach, pink, blueberry, yellow, rustic browns, and fresh greens are complemented perfectly by hand-picked, coordinating cardstock from Simon and Neenah. With this kit, you’ll give in to spring fever!
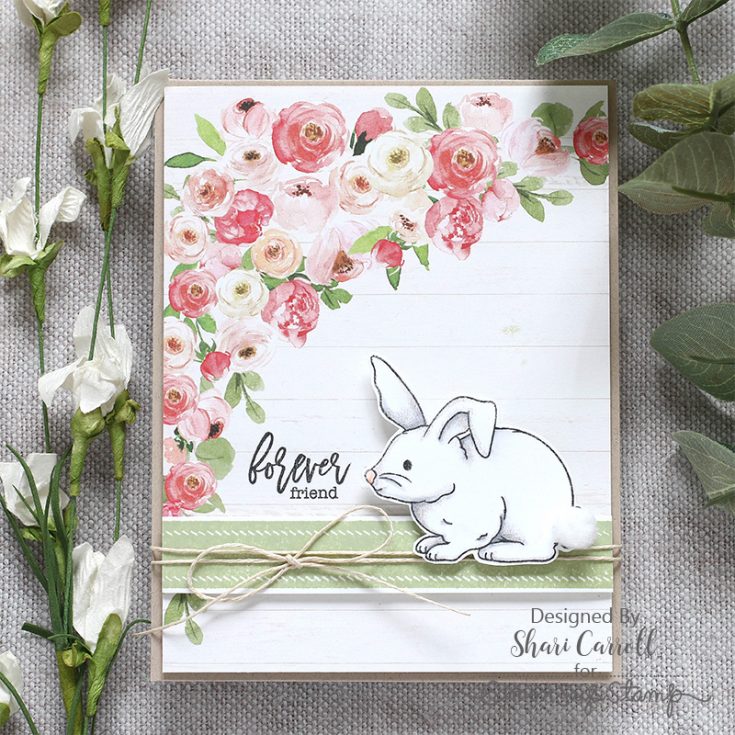
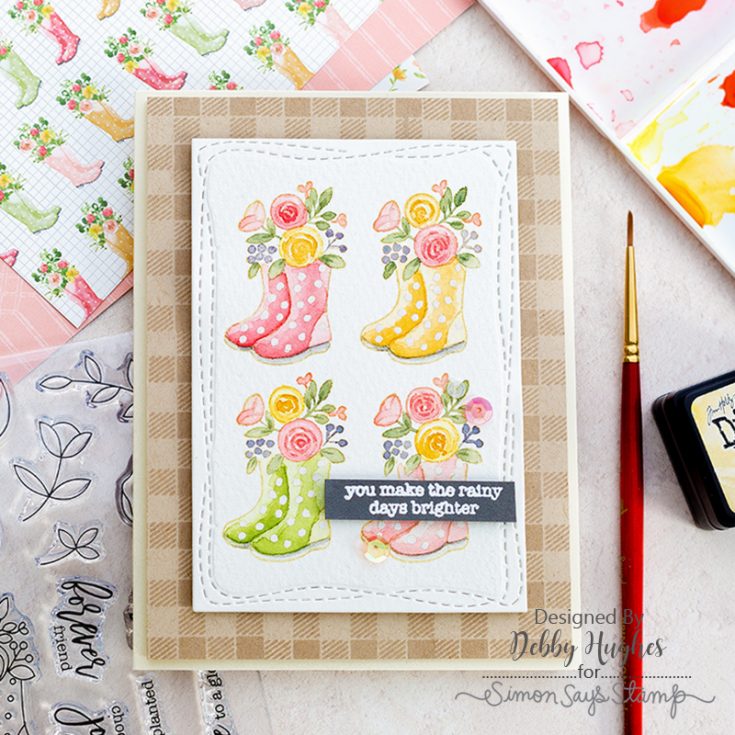
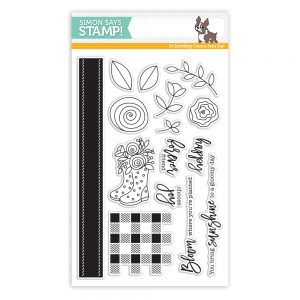
Check THIS out! The kit includes not one, but TWO Simon exclusive stamp sets. Oh my goodness, YAY! First up is the Choose Joy stamp set which includes pretty florals and an adorable pair of rain boots filled with a springtime bouquet. In addition, there are five lovely sentiments in a gorgeous font and a striking stitched border. The gingham stamp is particularly unique—it’s been engineered to interlock so that you can build a gingham border or even a background!
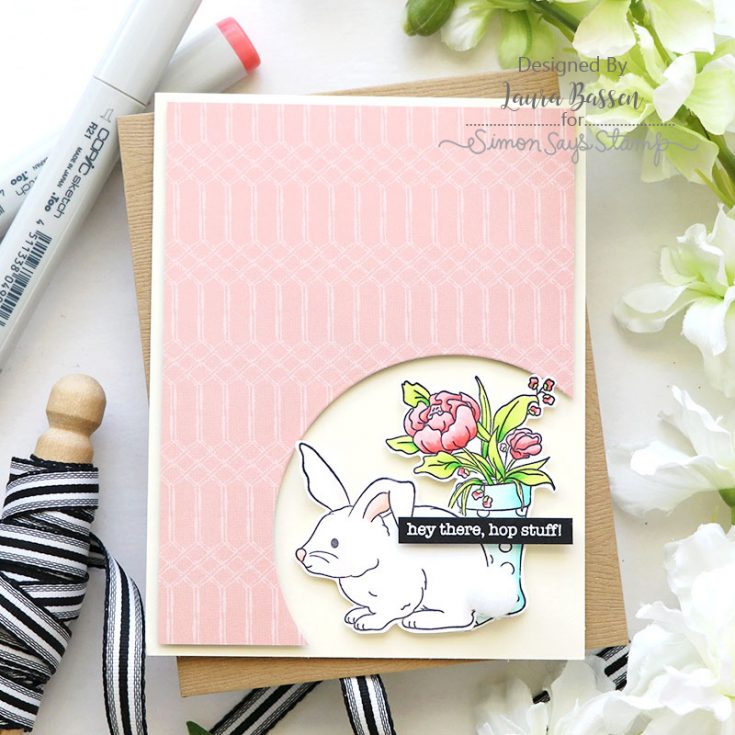
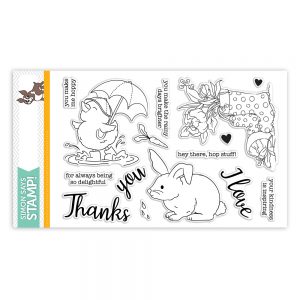
The second Simon exclusive stamp set is the sweet Showers & Flowers. Grab your favorite coloring medium and bring to life an adorable bunny, a chick splashing in the rain, and a super-cute pair of galoshes festooned for spring. Add details with hearts, a carrot, and raindrops accents. Then finish off your project with any of the seven delightful sentiments. You’ll be singing in the rain as you create!
All of the little details are what take your designs from good to amazing, and we’ve got you covered there! Add gorgeous shimmer to your raindrops (or anything else you please!) with the Glitter Gloss Aqua Shimmer pen from Tonic. You can control the amount of shimmer with a light or heavy touch and apply layers for eye-popping, yummy sparkle. And the adorable bunny needs a cottontail, right? A fun pack of white pom-poms from Darice will add fun dimension and touchability to the bunny’s bottom! And your ink stash will thank you with the addition of two pretty, pastel ink cubes from Simon in Wisteria and Hollyhock.
Rounding out this delightful kit is a three pack of Simon Says Stamp pre-scored cards in Cream, and three coordinating Simon Says Stamp envelopes (that Khaki Woodgrain is to DIE for!), because we like to encourage you to send your cards when they are complete!
Our March Card Kit Choose Joy will put a spring in your step!
We have a walkthrough video for you which you can view below or on our YouTube channel HERE.
The Choose Joy and Showers and Flowers are available for individual purchase in our store.
 Don’t forget! We have LOTS of gorgeous card kit inspiration to access and add to in our Card Kit Galleries!
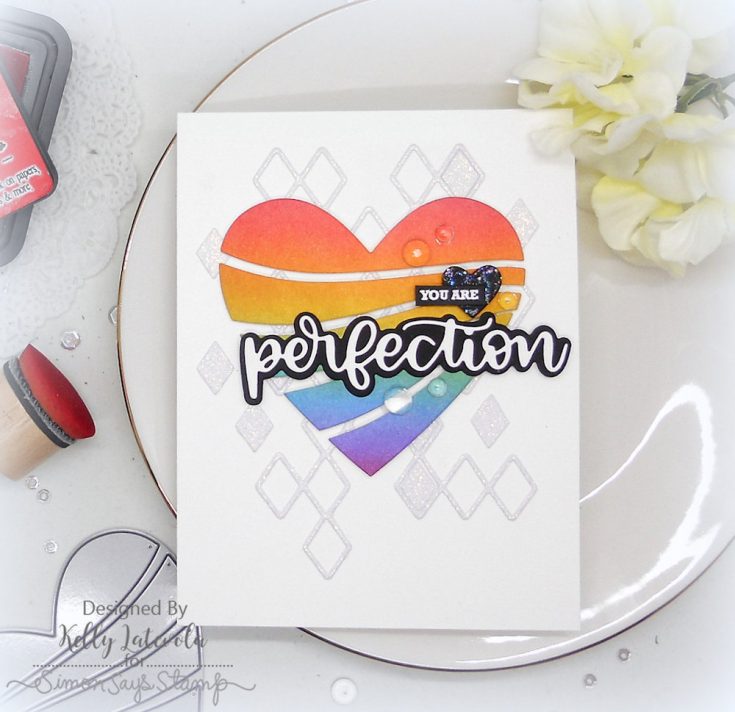
Blended Rainbow Perfection
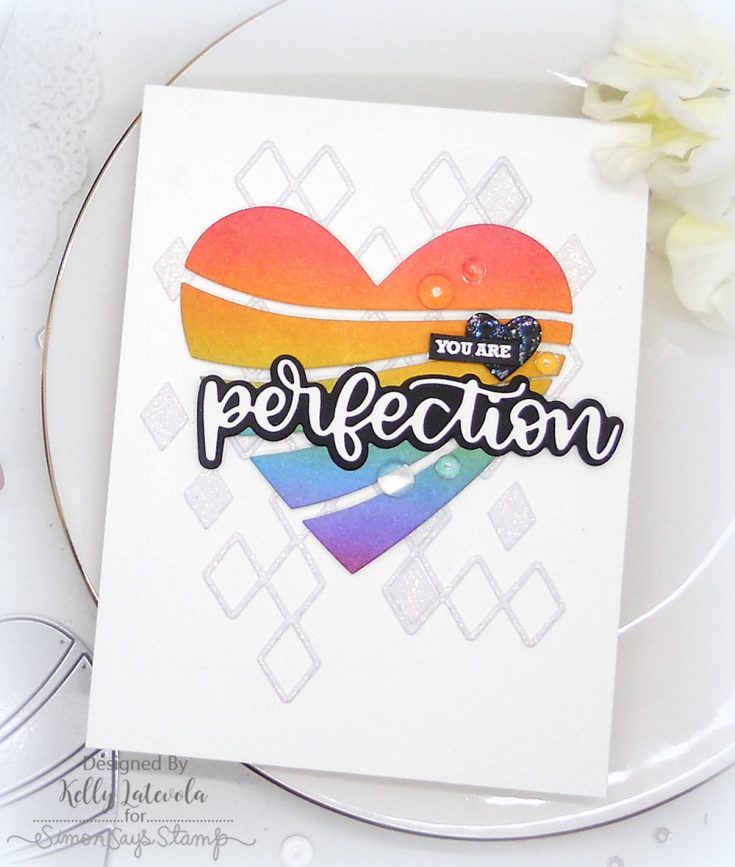
Hi friends! Happy Tuesday! I hope your week is starting off fabulously! Please welcome back the always inventive and delightful Kelly Latevola wither her latest feature on our blog! She’s using our brand new Streaming Heart, Shining Heart, and Perfection exclusive dies as well as the Stacked Diamonds die and Sketch Ranunculus stamp set! Be sure to watch the video for more information, and enjoy!
WATCH THE VIDEO:
SUPPLIES:
|


Thanks for reading today, and thanks to Kelly for being our guest!

Blog Candy Alert!! Follow our blog via email and comment on this post for a chance to win special blog candy!
Congratulations! Blog Candy Winners!
From: Studio Monday with Nina-Marie: Dry Embossing 5 Ways: Dawn Skene!
From: Yippee for Yana: Repeat Background with Breakfast Buddies: Stacy Kowbel!
From: Simon’s 10 Creativation Crafty Must-Haves: Karen Hale!
From: Altenew February 2018 Release Blog Hop + Giveaway: Barbara Martin!
From: Have you seen the LATEST from Avery Elle?!: Donna Rinckel!
Please email [email protected] with the name of the blog you won from, the prize you won, and your address (if applicable) to redeem your prize(s)!
Studio Monday with Nina-Marie: Dry Embossing 5 Ways

Hello and Happy Monday everyone! I am thrilled to be bringing you the latest Studio Monday video with five different ways to use the dry embossing technique! Note that today’s video is only about the techniques themselves and not a step-by-step for making the finished cards. However, you can see how I turned all of these techniques into cards in the photos! I tried to keep the finished cards fairly simple so that you could look at the photos and easily tell what I did to embellish them.
So, let’s get technique-y, shall we??
DRY EMBOSSING #1: Simple Embossing + the Faux Tin Ceiling Effect
Have you ever seen the Victorian-era tin ceilings in old homes? I live in a home that was built in the waning years of the 19th century, and in the dining room there is a beautiful tin ceiling; with its seemingly “embossed” texture, this inspired me to want to recreate a similar effect on a card. I have the Jungle Background die from Couture Creations, which to me, was a reminiscence to Victorian print. With that background die, I embossed the design into Mirror cardstock from Tonic Studios. Mirror cardstock is going to give you that “tin ceiling” effect, as the very nature of tin itself is a bit on the shiny side.
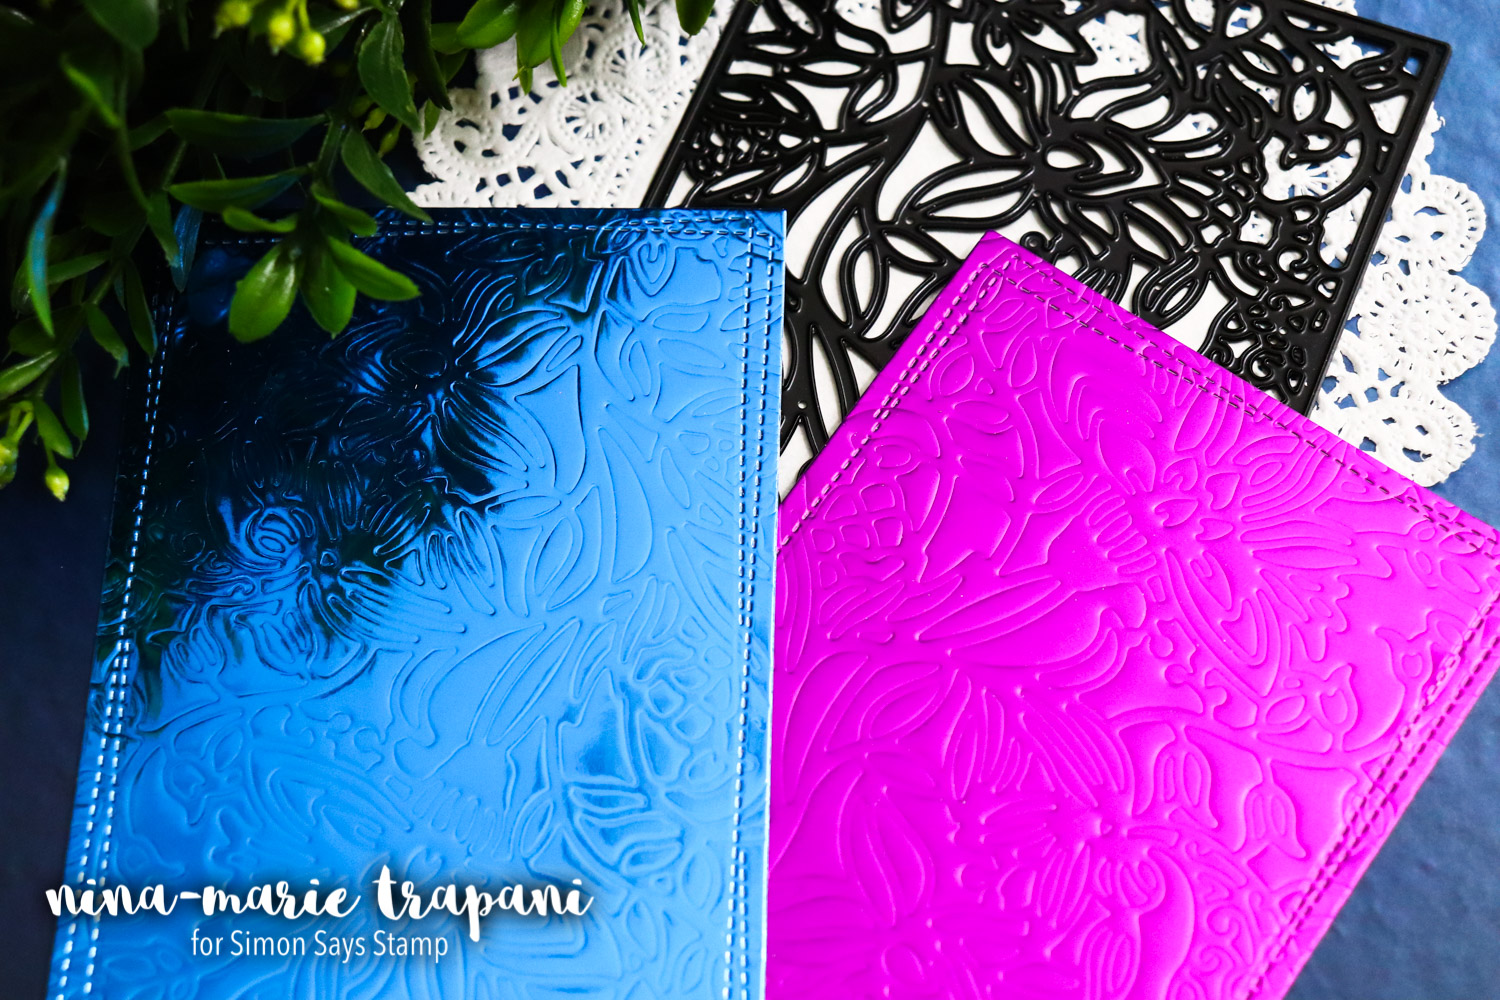
This technique is also the most-basic of all the embossing techniques, as we did nothing but embossed a design into paper. But just because the technique is basic, does not mean that it isn’t beautiful. Sometimes the most beautiful things are the ones that are simplest. Just look at that embossing!
DRY EMBOSSING #2: Enhancing with Color
Dry embossing in of itself is a stunning technique. But have you ever tried enhancing that embossing with ink or even markers? I’ve got two examples for you today on this technique! The first uses the new Neat & Tangled Geometric die (I love the crisp, modern vibe of this die). After running it through my die cutting machine in an embossing sandwich (we don’t want to cut this, just emboss), I broke out some inks and daubers! With an assortment of bright Distress Inks, I used the die as a stencil and inked through the openings to make the raised portions of the panel colored. The result is a stunner!

The second method is to use markers. And as a bonus embossing technique, this card was embossed using lots of dies from the Modern Flowers die set; another great way to make use of the small dies you have! I embossed these florals into blue cardstock and then using 2 Copic markers, I shaded all of the raised areas of the panel. You definitely do not have to add shading on this; you could use just a single marker and get amazing results! I just am addicted to coloring and don’t know when to stop sometimes! ;)
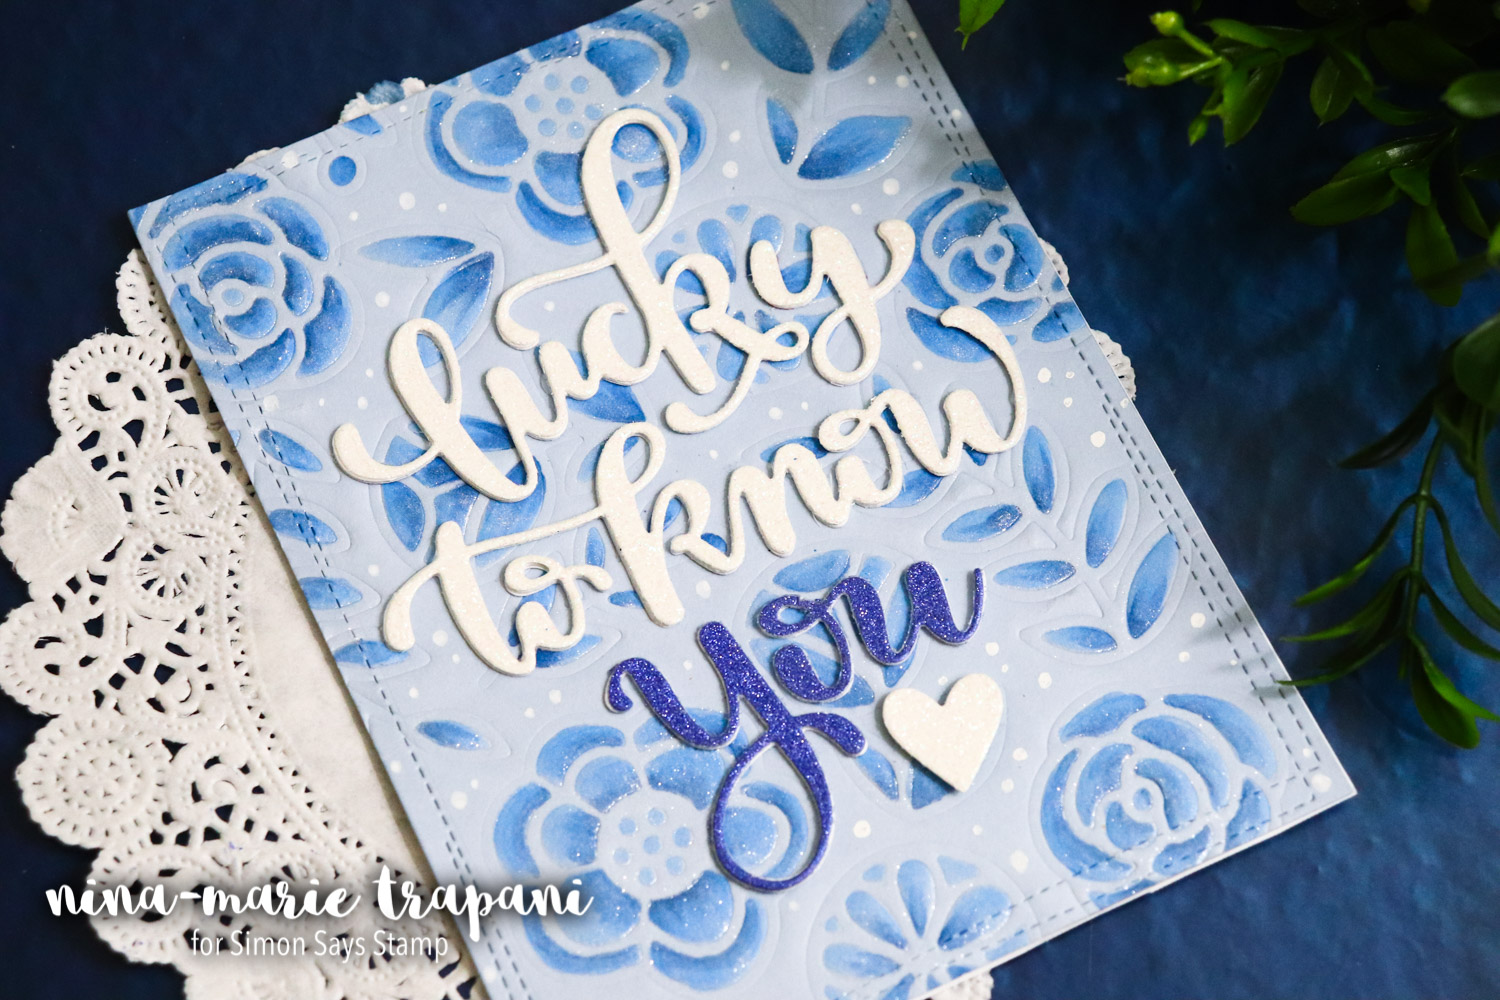
The way the coloring looks on both of these cards with the embossed texture is mesmerizing. I love running my fingers over the paper to feel that embossed texture!
DRY EMBOSSING #3: Using Embossing Folders with and without Mediums
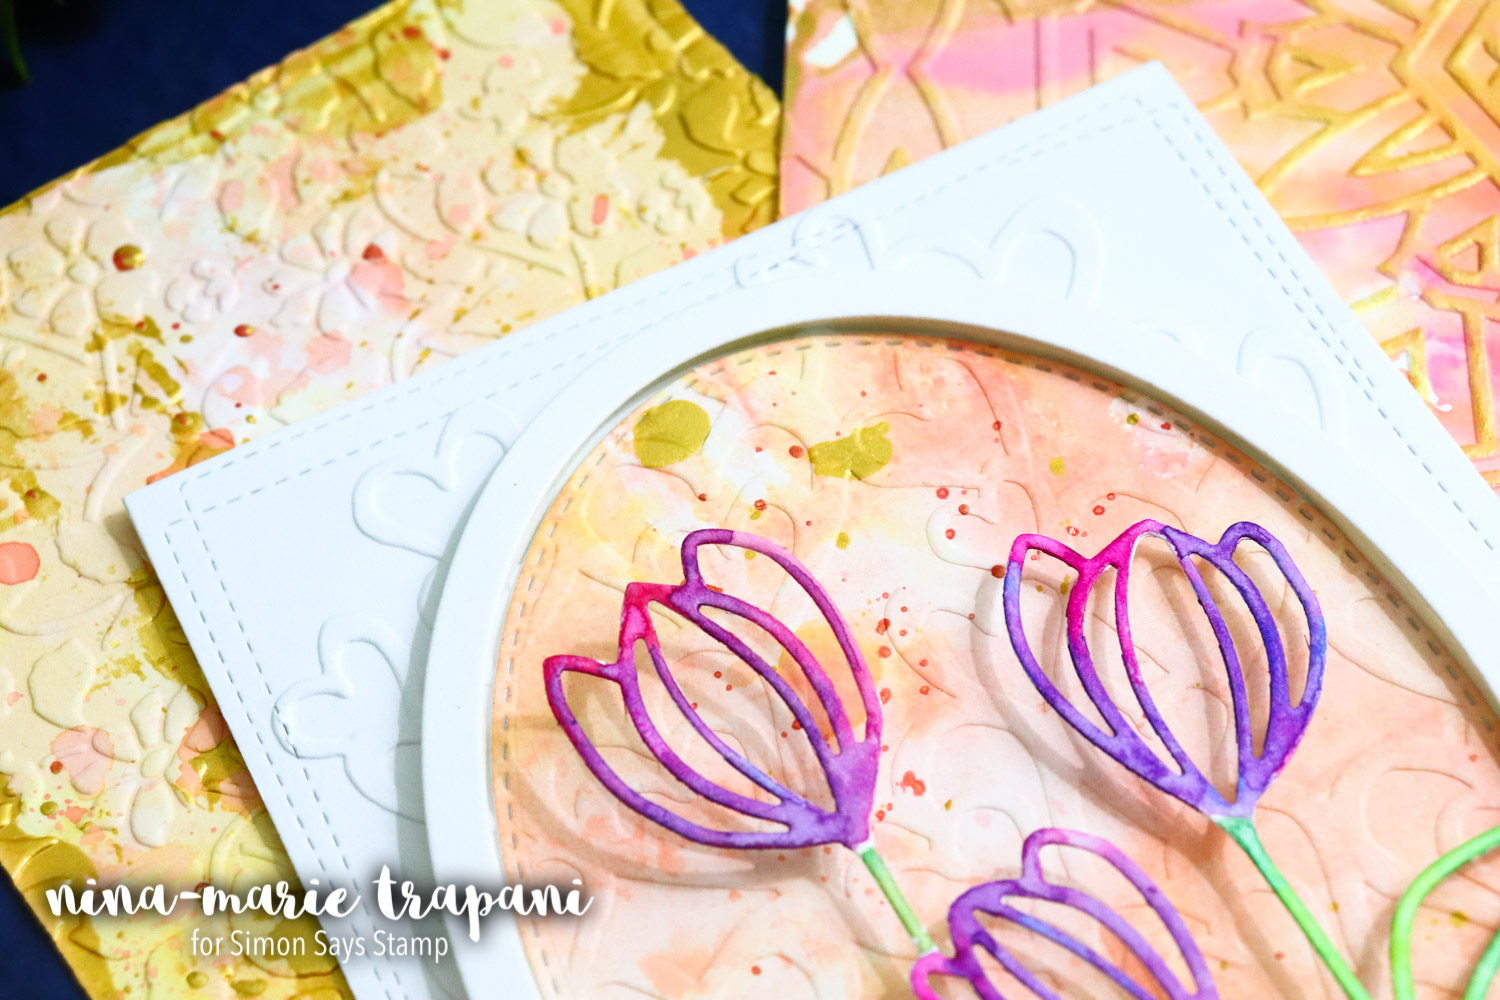
One of the most popular ways to dry emboss is with embossing folders! There are so many gorgeous ones to choose from, and really, they don’t get enough love I think! I’ve used three different folders today with backgrounds I made, to show you some fun ways you can add texture to your inked panels. Side note, all the inking was done with Distress Oxide inks and there are gold and pink paint splatters on each. The folders used here were the Couture Creations Field of Daisies and the Carabella Envolée de Coeurs. On the finished card, you see some beautiful tulips that are from Memory Box’s Floral Bloom Oval Frame die set.
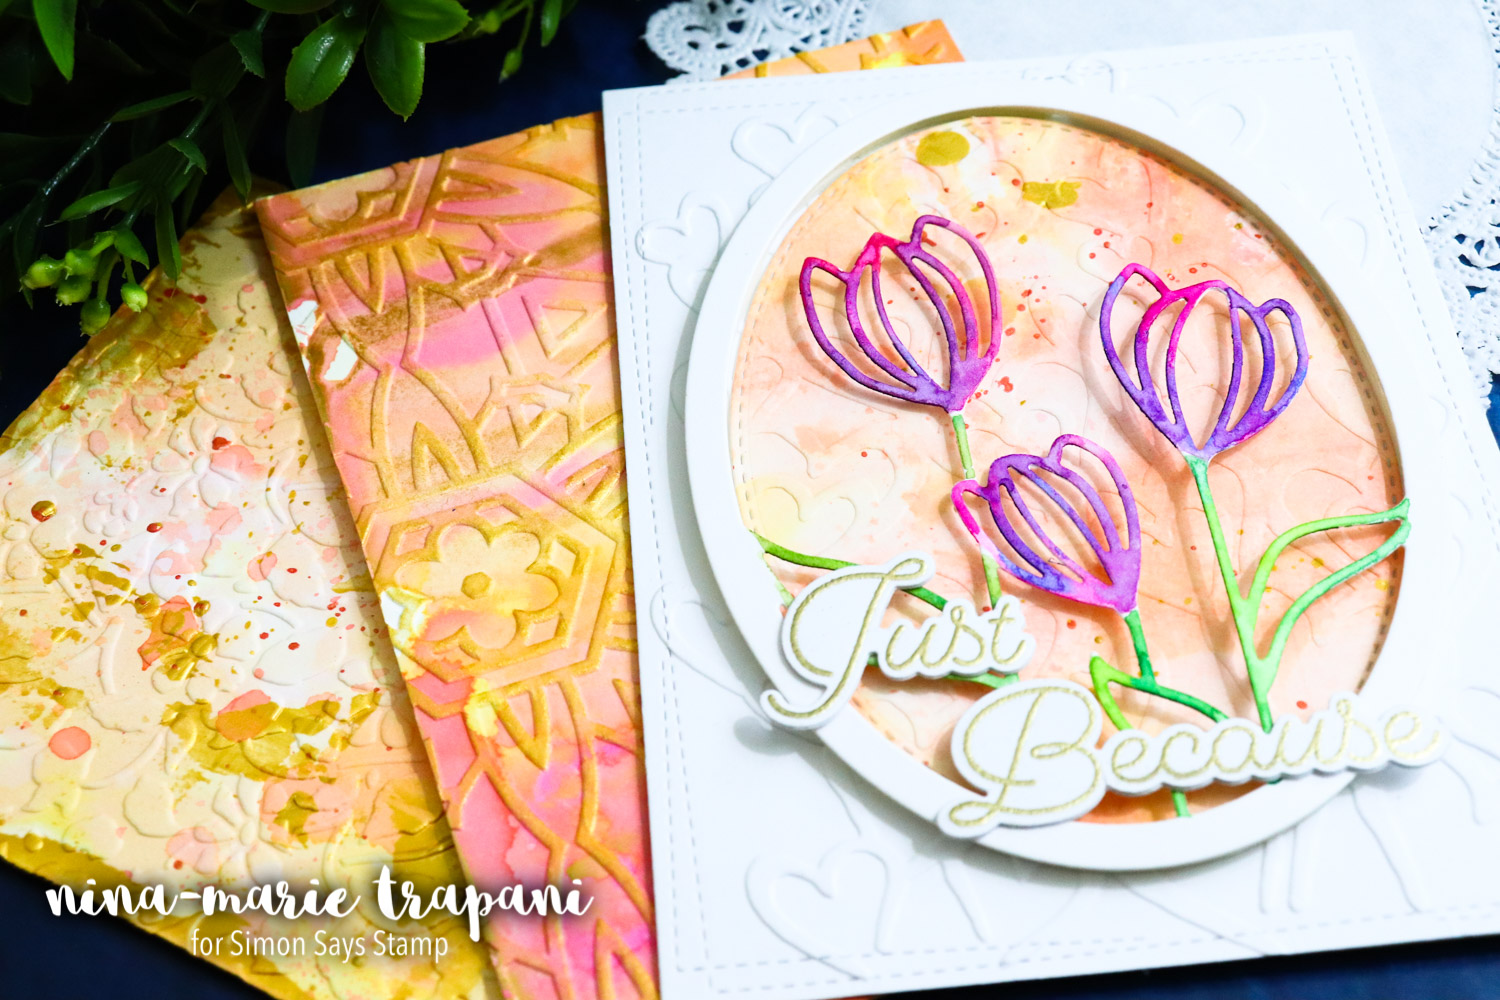
But of course, embossing folder impressions do not have to be subtle! The stunning Floral Burst from Brutus Monroe (middle panel in photo above), looks amazing when embossed… but then, when you add ink overtop to enhancing the embossing? Just WOW. It brings the design front and center, creating a focal point instead of an accent. I did not make cards with all of these backgrounds, but have saved them for future use! Take a close up look at the texture…
DRY EMBOSSING #4: Faux Letterpress with a Stencil
I’m sure most of you are familiar with the gorgeous letterpress designs you see on stationary, business cards and more. Relief printing has become so popular, and for good reason! Have you ever tried getting that same effect using a stencil and inks? Its super easy and very addicting! ;)
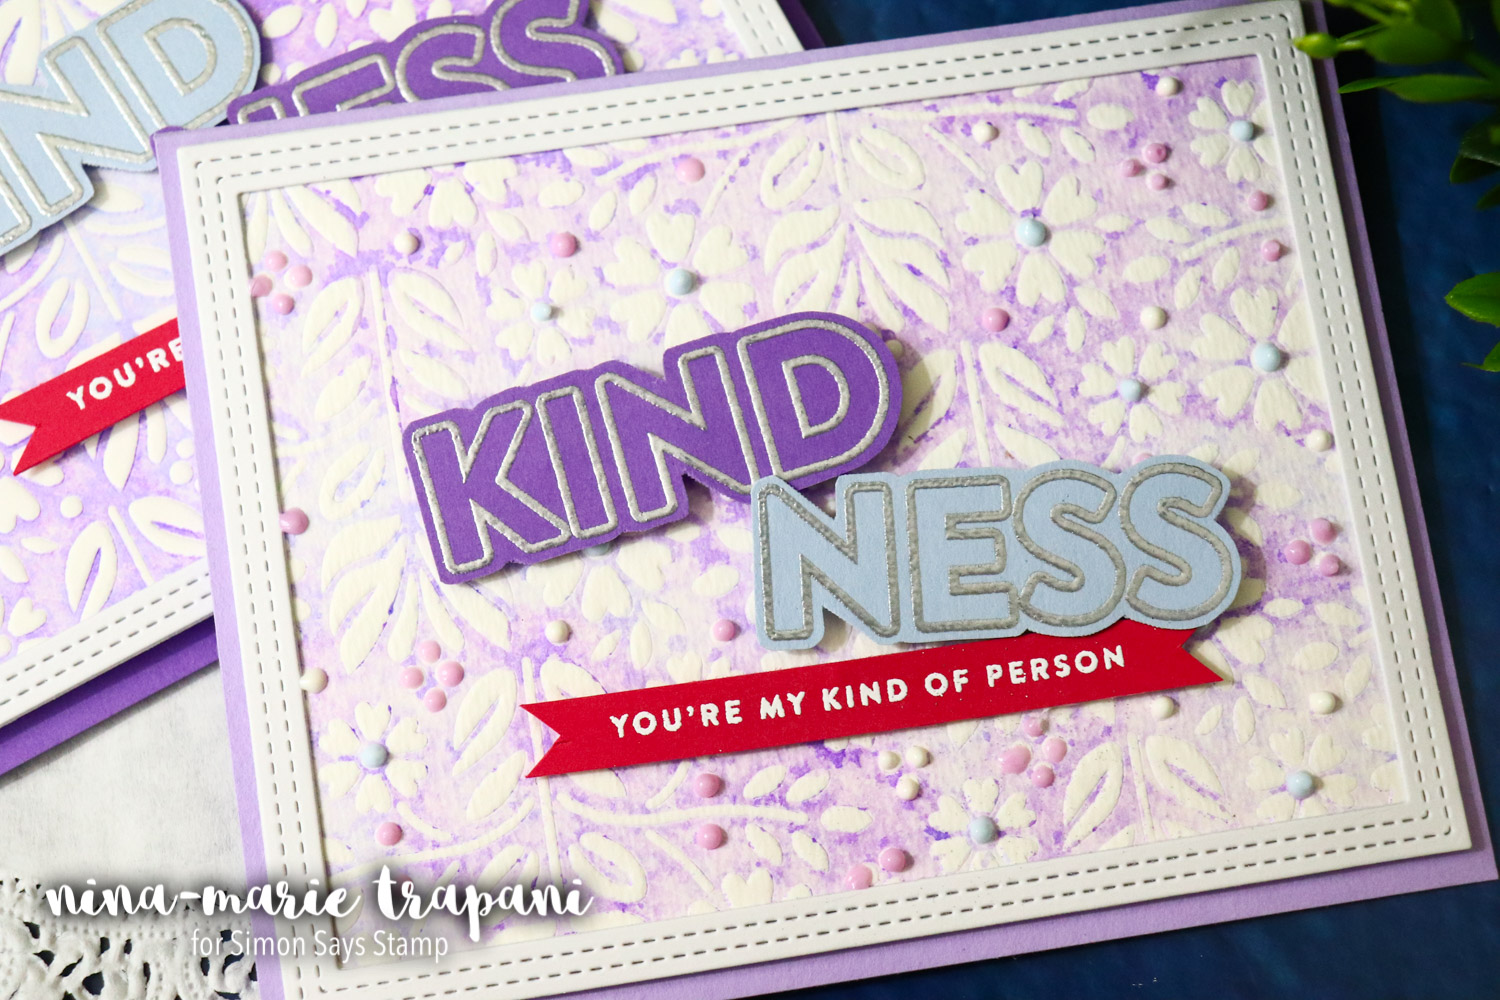
On both of these cards I used the Folk Dance stencil and both Shaded Lilac and Wilted Violet Distress Inks. The only difference between these two designs are the choices of paper. I wanted to demonstrate that depending on the paper, you may get slightly different results (which isn’t a bad thing!). The first card used Bristol Smooth cardstock and you can see that the ink was transferred very smoothly, as there was not any texture to interfere…
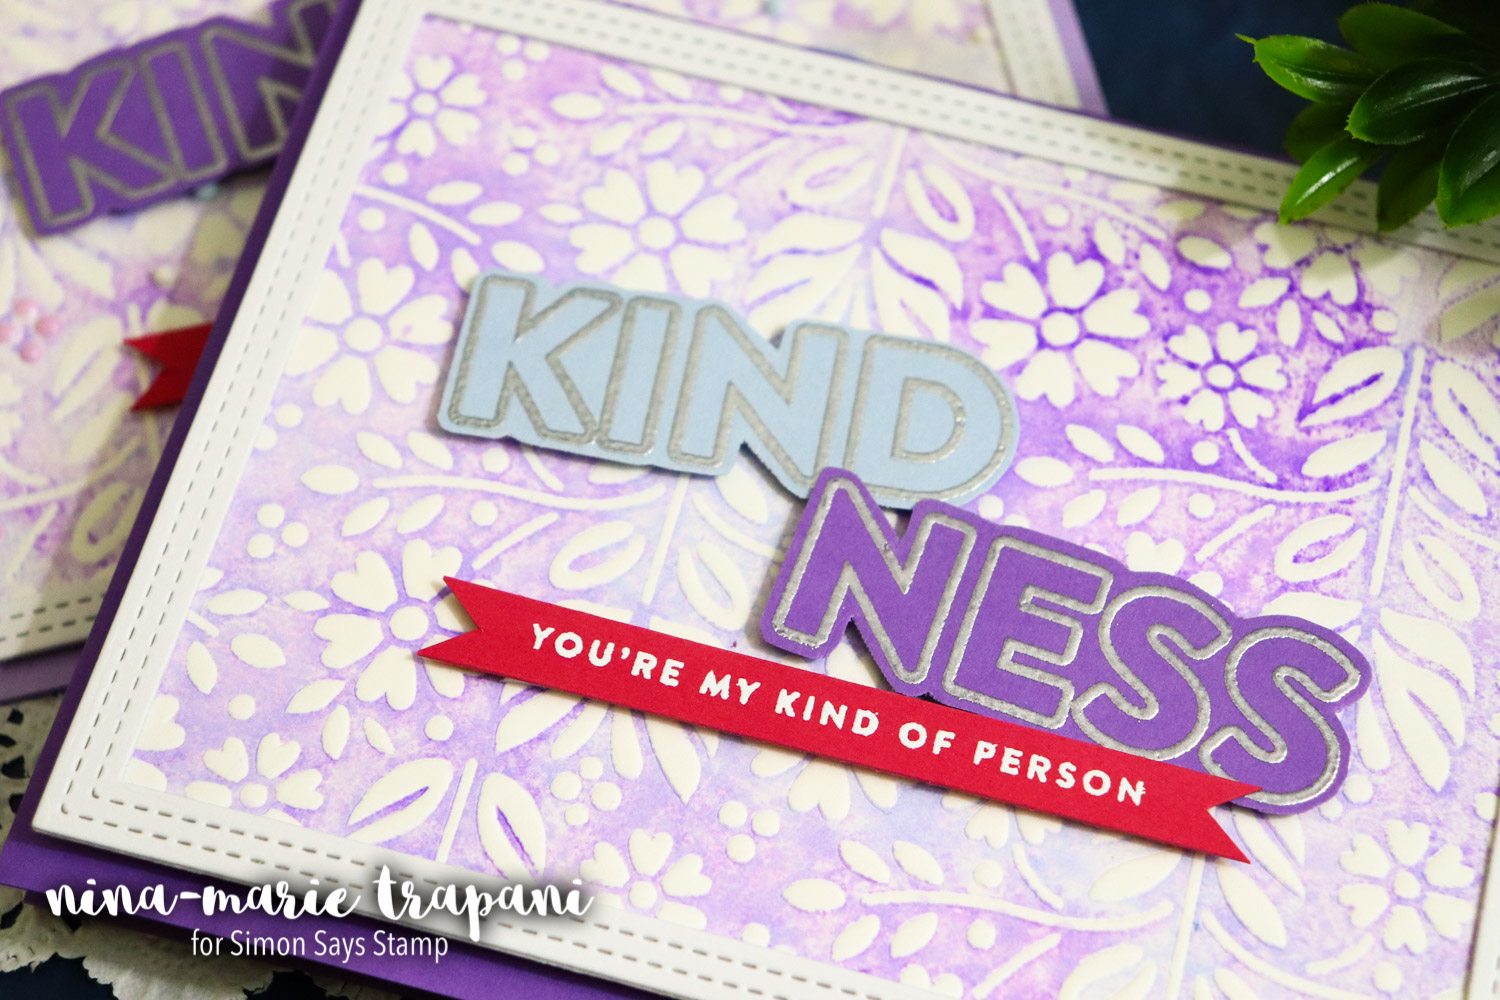
The second version uses cold press watercolor paper from Strathmore and the results are much more textured. I think both look equally as beautiful! I embellished these cards with greetings from our Kind Flowers stamp set and on one of the cards I used a few Nuvo drops on the embossed dots.
DRY EMBOSSING #5: Creating a Ghosted Sentiment
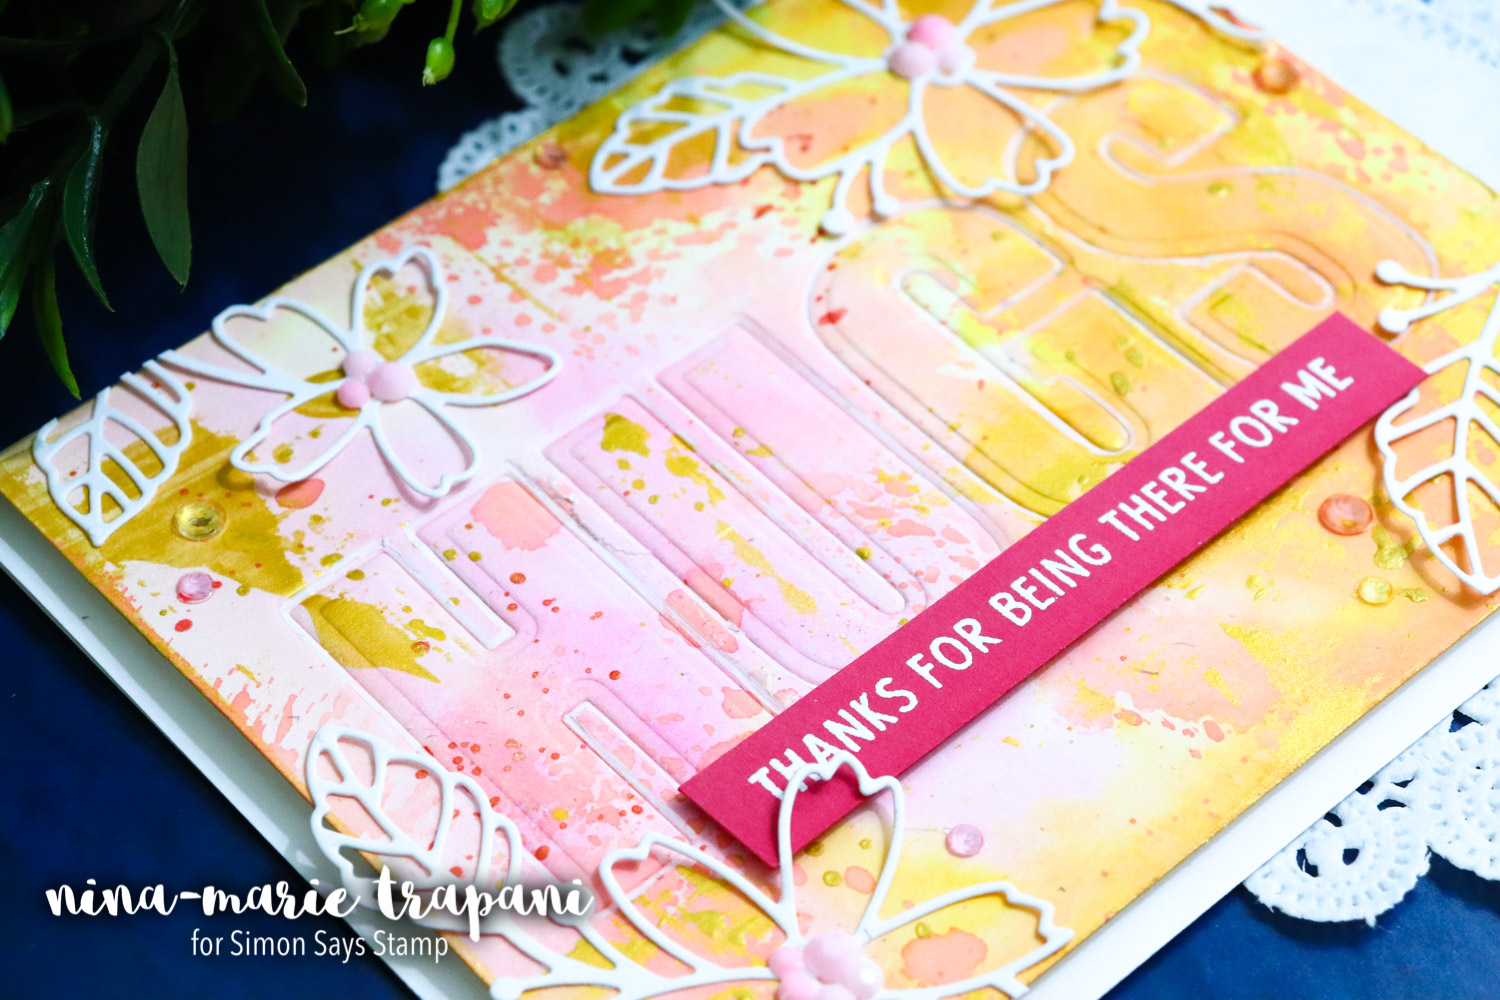
This is a fun way to accent a greeting you have on a card! By taking letter dies, you can emboss them into a beautiful background and then place other elements on and around that embossing because it’s an embellishment. My sentiment “hugs” complements the thank you greeting underneath and grounds the rest of the design. Those letter dies were from Altenew’s Caps Bold Alpha set.
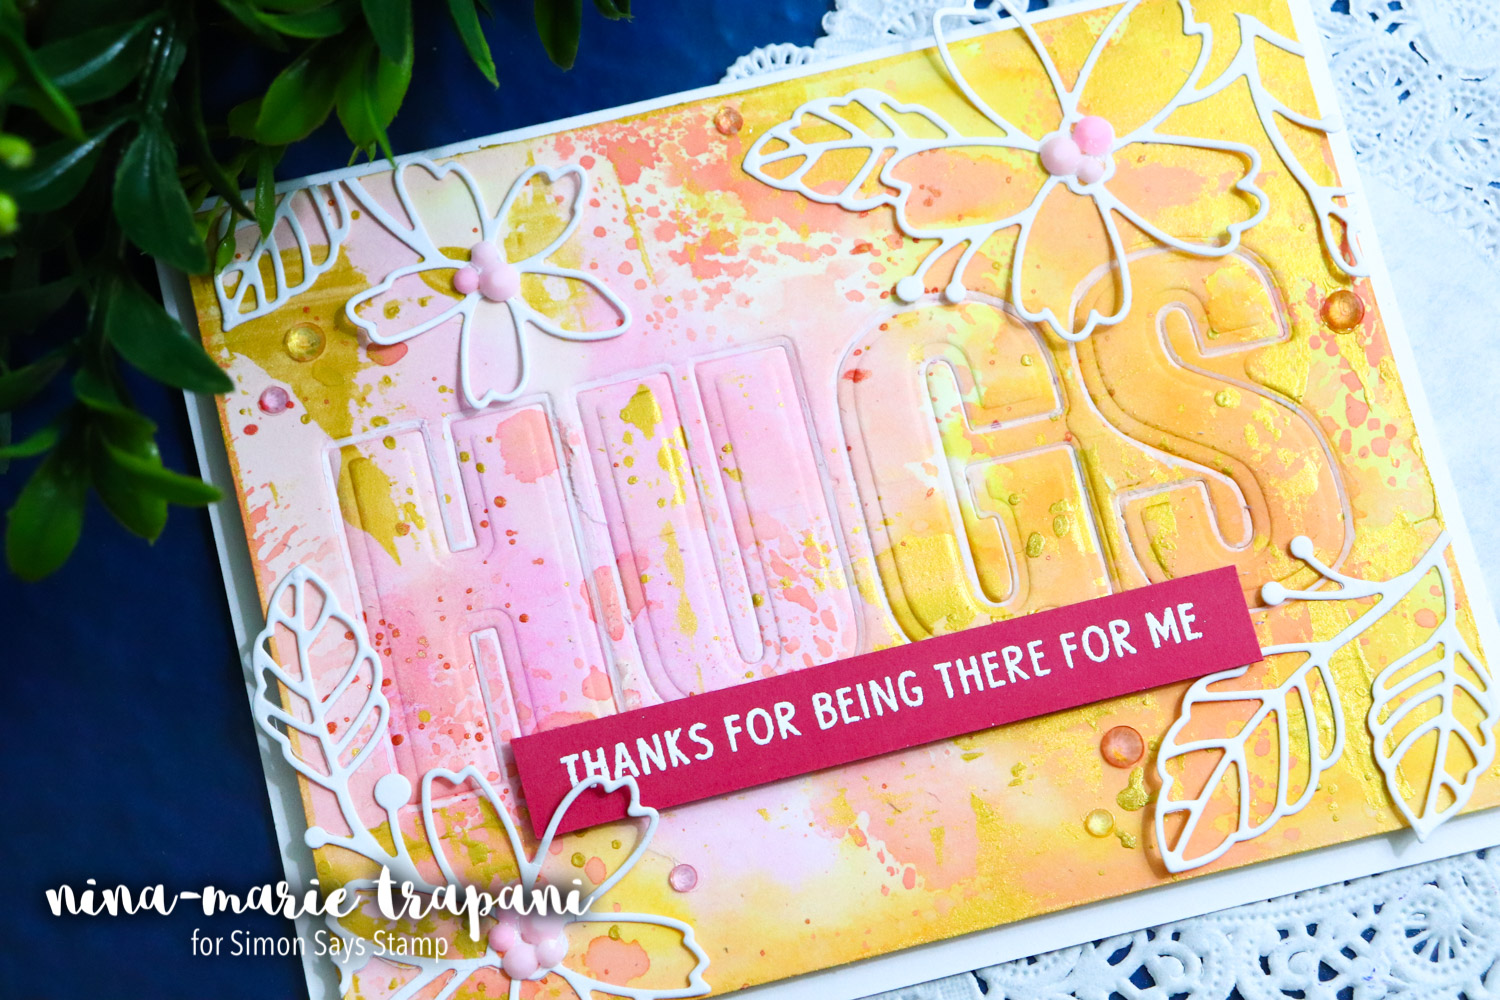
I framed this card with the stunning Fresh Picked Flowers die from Memory Box and added small crystal gems from Studio Katia’s Cupid’s Kiss mix. The texture and layers of this card were very much inspired by mixed media. Check out the close up of the relief of the letters!
I hope you will watch the video below to see how I made each of these techniques work, as they are really fun to do. I find it so exciting to experiment and play with these techniques to see what other things can be done to enhance them and create even more techniques. I hope that it inspires you to do the same in YOUR crafty projects!
Thanks for joining me today; stop back again next week to see my next Studio Monday video!
WATCH THE VIDEO
SUPPLIES
|


Blog Candy Alert!! Follow our blog via email and comment on this post for a chance to win grab bags and blog candy! Remember to tag your awesome projects with #simonsaysstamp on social media so we can see what you are creating!


