Sizzix DieCember® Sale + New Inspiration!

Sale alert!! In celebration of DieCember®, we’re spotlighting some awesome die companies like Sizzix that we love with a fun sale!
Take 15% off any in-stock Sizzix (& Tim Holtz Sizzix) items with code SZX428 this weekend only! Shop early for the best selection and enjoy!
Some fabulous designers from Sizzix also provided some video inspiration using some of their favorite products! Take a peek and be inspired!
WATCH THE VIDEO:
WATCH THE VIDEO:
WATCH THE VIDEO:
Thanks so much for stopping by the blog today and thanks to the Sizzix designers for the special inspiration! We hope you find something new to try to take advantage of this limited time savings!

Blog Candy Alert!! Follow our blog via email and comment on this post for a chance to win special blog candy!
Congrats! Blog Candy Winners!
From: Snowflake Christmas Wall Hanging: Karen Hale!
From: Mixed Medium Die Cutting Techniques with Shari Carroll: Tammy Arndt!
From: Crafty Quintet: Five Favorite Holiday Products 2018: Barbara Lassiter!
From: Something NEW to LOVE from Lawn Fawn!: Kelsey Thomas!
From: Yippee for Yana: Last Minute Christmas Cards: Jennifer Petersen!
From: Studio Monday with Nina-Marie: Quilled Mini Gift Boxes: Janet Mack!
From: Amore Laura Fadora: Simple Mod Shakers: Chris Eder!
From: Pop Art Cookie Love Card Featuring Waffle Flower Crafts: Linda Carson!
Please email [email protected] with the name of the blog you won from, your prize(s), and your address if applicable!
January 2019 Card Kit – More Card Kit Inspiration with Kristina Werner!
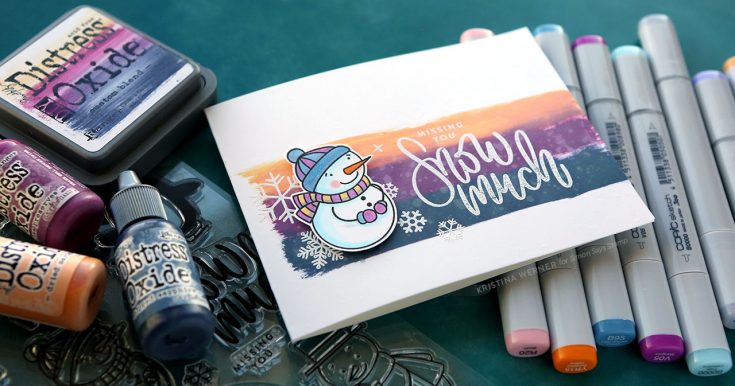
Hello, all! Kristina here! Today I have a card and video featuring the January 2019 Card Kit! :)
The first thing I did was add ink to the Distress Oxide Custom Blend (empty) ink pad that’s included in the kit. I choose three colors of Distress Oxide Ink that I already had in my stash (the re-inkers are not included in the kit): Dried Marigold, Seedless Preserves, and Chipped Sapphire. After applying the ink to the pad, I swiped the ink pad over the lid of the pad so that I’ll know in the future what colors I used. NOTE: I don’t show this step in the video, but you can see the lid of the ink pad in the photo above.
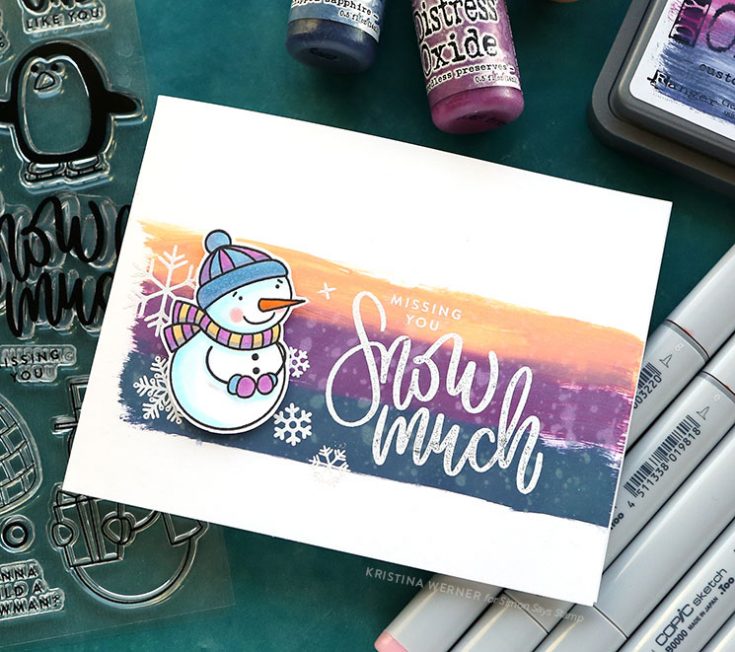
I swiped the ink pad across the front of my card base, and then sprinkled some water over the area for added texture. The Distress Oxide ink reacts with the water!
Then I stamped one of the snowman from the Snow Much stamp set in Intense Black ink and colored him with coordinating colors of Copic markers. I cut out the snowman and left a slight margin around the shape.
Using a MISTI, I stamped the greeting and snowflakes in VersaMark ink and applied white heat embossing powder. I then adhered the snowman using foam squares.
I hope you enjoy the video! Thanks for stopping by! You can get the January 2019 Card Kit on it’s own, or you can subscribe to receive this kit and future kits.
Supplies
|


Snowflake Christmas Wall-Hanging
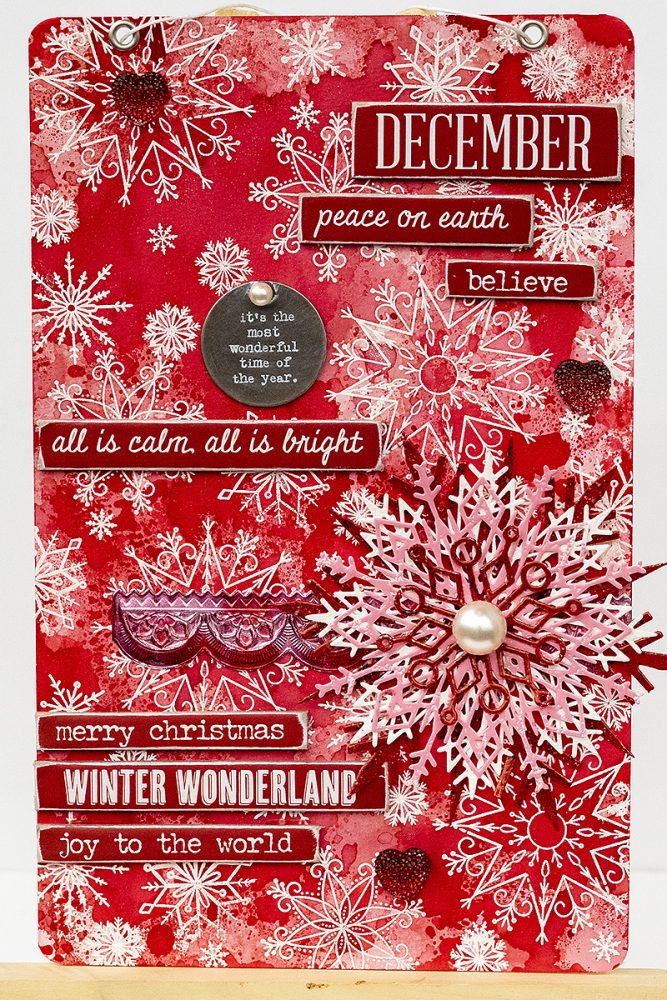
Hi everyone! I am so happy to be here today with a fun Christmas tutorial. At this time of the year, I am often busy making Christmas gifts and this panel will be one of them and it is going to someone who I know really appreciates a handmade gift.
Unlike some of my other winter projects, which often include a bit of blue and/or turquoise, I decided to go with red, white and a little pink here. It is always fun working mainly with shades of one color, and you could easily do the same project in blue, green, brown or purple. The Simon Says Stamp Comfort & Joy stamp set is gorgeous, and I especially love the finely detailed snowflakes. You can make very many different types of Christmas projects using only this one stamp set.

1. Start by white embossing snowflakes all over a piece of watercolor paper. Mine was 6 x 9.5 in, but any size will work and the design can easily be turned into a card or a tag.
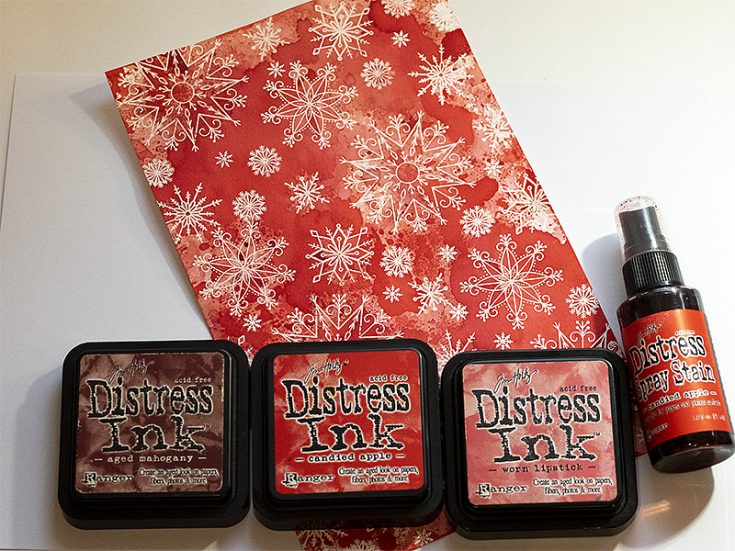
2. Smear Distress Inks on a craft sheet and mist with water. Press the paper into the ink and repeat if you want darker colors. In the end, I sprayed Candied Apple Distress Spray Stain on the sheet and pressed my sheet into the ink, to get a darker shade of red.
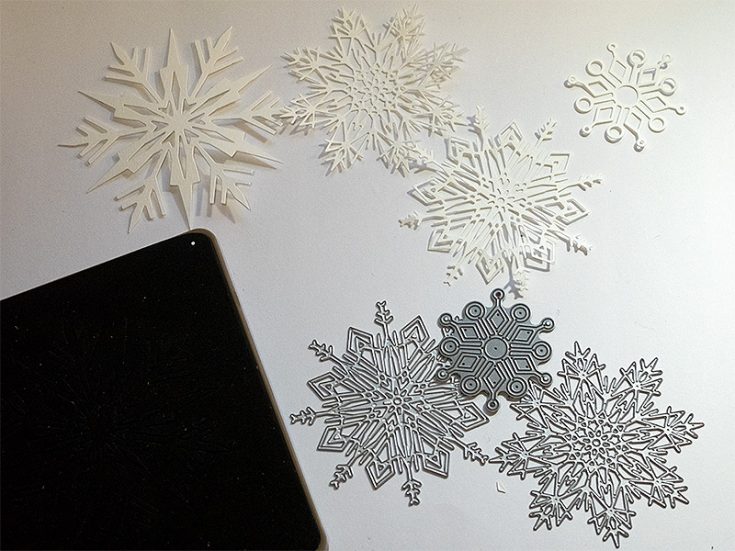
3. Die cut four snowflakes from watercolor paper. I used the Sizzix Tim Holtz Flurry 3, Flurry 4 and Ice Flake dies, and the SSS Kinley Snowflake.
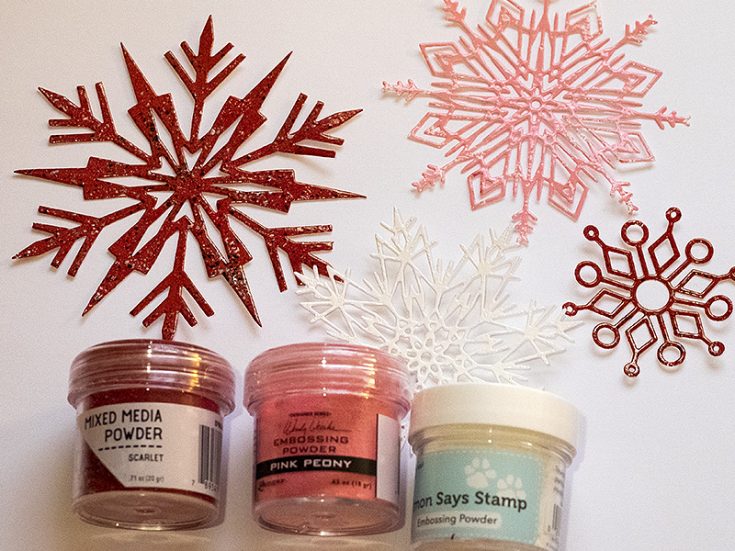
4. Cover them with embossing ink and emboss with three different powders: Ranger’s Mixed Media Scarlet, Pink Peony, and SSS white powder. Be careful not to burn yourself and don’t touch the melted powder until it has cooled down completely.

5. Adhere a piece of silver Sizzix Foil Adhesive Sheets to cardstock. Cut and emboss (the folder does both in one go) in the Mini Scallop 3D Impresslits. Ink with Cranberry and Poppyfield alcohol ink, using an ink blending tool with a piece of felt.

6. I also colored Gumdrop Hearts with the alcohol ink. Just add a drop to the heart.
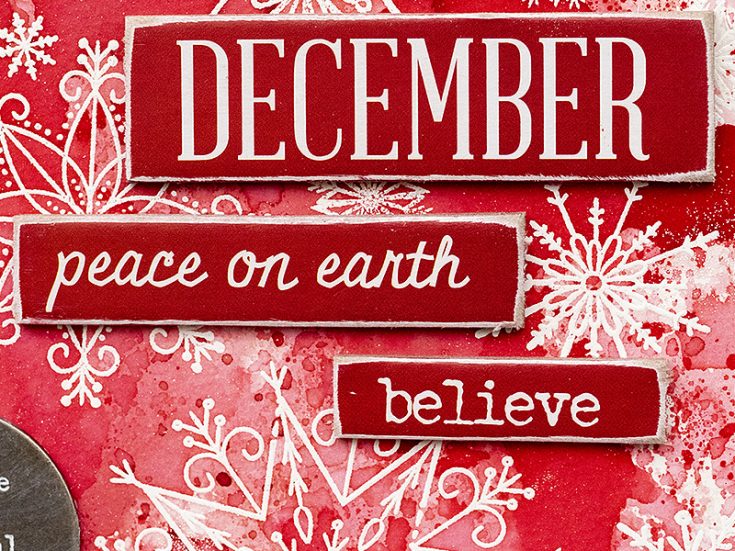
7. The watercolor paper was glued to Little Sizzles Mat Board to give it stability. I also sanded a bunch of Christmas Quote Chips and glued them to the background.
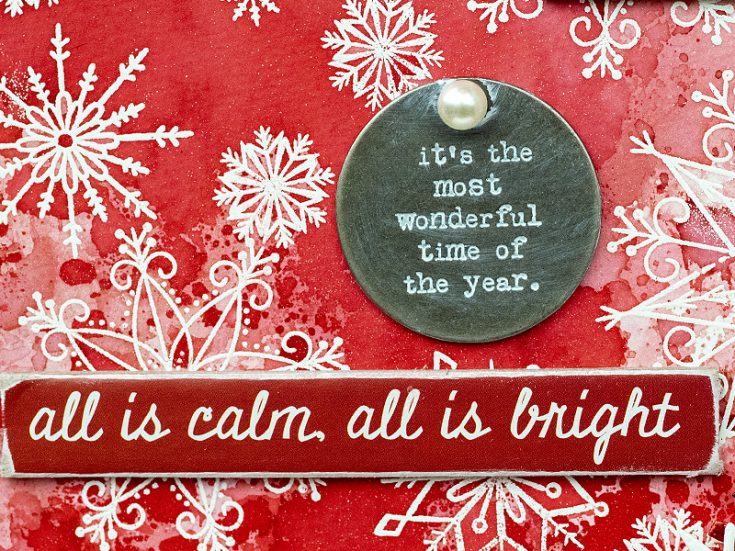
8. Rub white paint into the words on the Christmas Quote Token, so that they are more visible. Glue a bauble at the top.
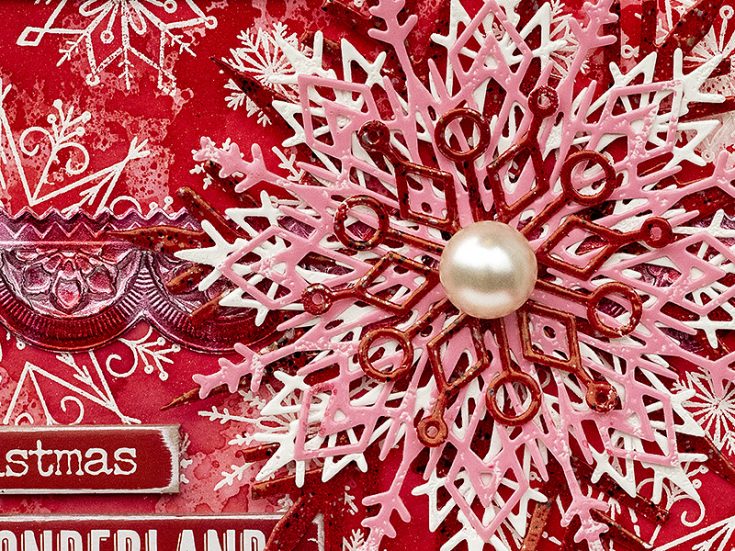
9. Layer the snowflakes on top of the embossed metal, and glue them with Distress Matte Medium. Add a larger bauble to the center.
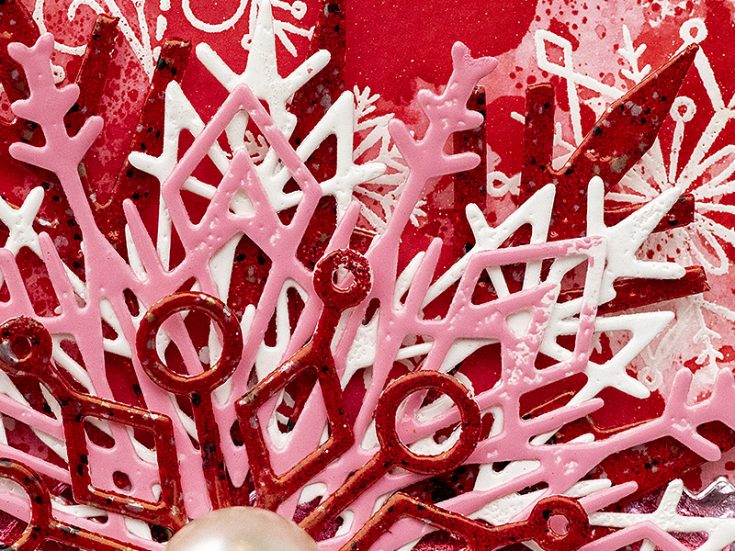
10. I love the look of the different embossing powders. Don’t worry if the embossing isn’t perfect since it just adds to the look.
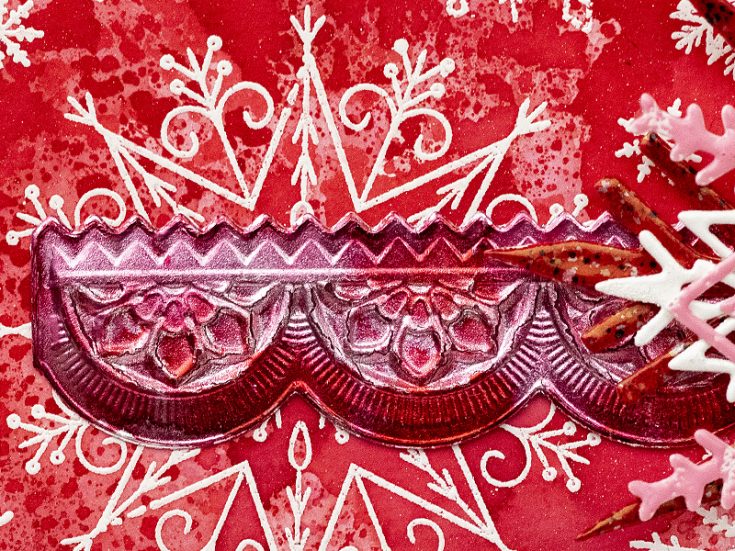
11. It is easy to transform metallic surfaces with alcohol ink, and using two colors gives this embossed piece an interesting look.
I hope this tutorial inspired you in your Christmas/winter crafting and to try to combine shades of red and pink. It is really a lot of fun and gives a great result.
Thank you so much for looking!
Happy Christmas crafting!
Anna-Karin
SUPPLIES:
|


Thanks so much for stopping by and thanks to Anna-Karin for being our guest!


