Lovely wall hanging with Emma Williams
Hello everyone, it’s Emma here and today, I’m thrilled to be sharing my ‘Falling In Love’ tutorial with you all. In this tutorial, I will be showing you how to create a fall wallhanging with plenty of texture and dimension.
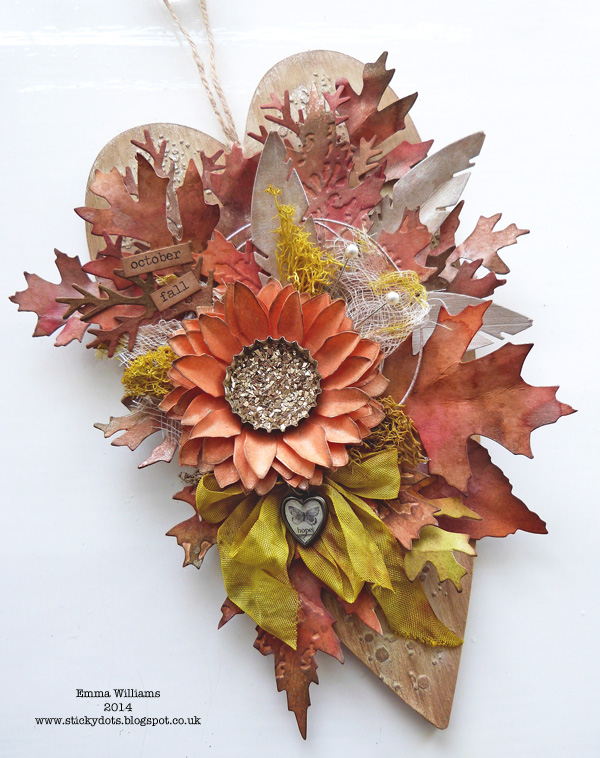
Inks, paints and stains can give the most wonderful array of colours to a project and these are exactly what I’ve used to create some natural looking effects from just paper and mdf.
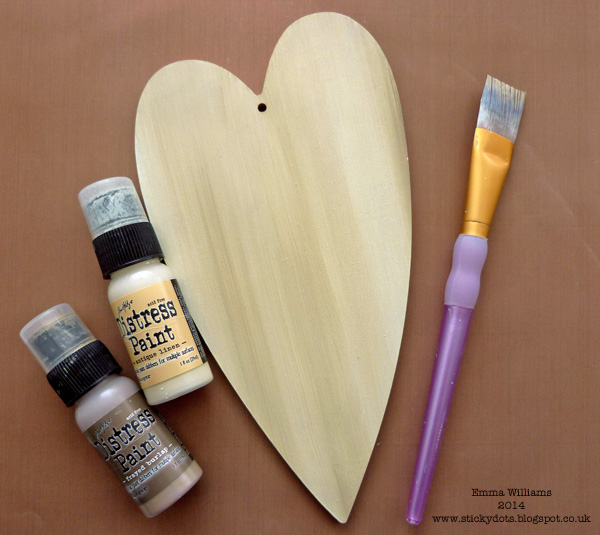
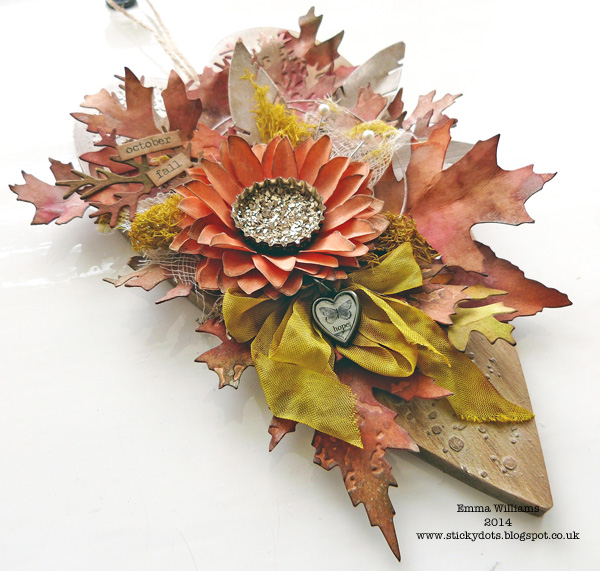
I began by using a mdf heart that I had in my stash, (you can use any surface that you choose). I gave the heart a coat of Gesso to prime it before drying it with a heat tool. I then applied a layer of Antique Linen Distress Paint over the surface, blending it with Frayed Burlap.
Once the first layer of paint was dry, I started to add some texture onto random areas of the heart by applying Texture Paste through the Speckles Layering Stencil with a palette knife.
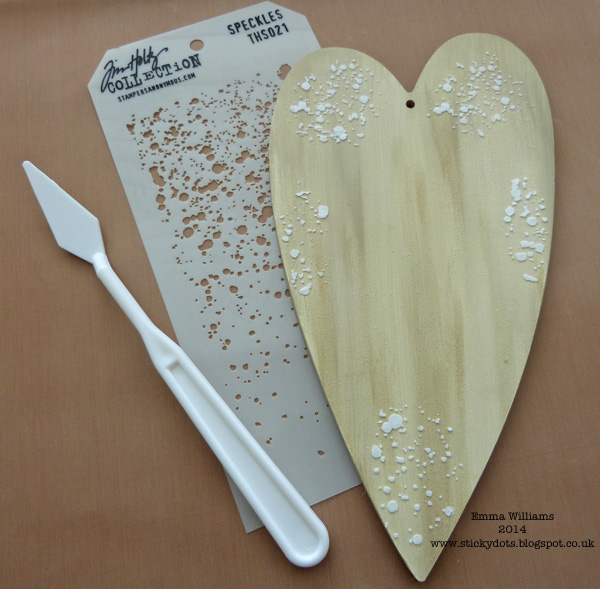
Leave the paste to dry or give it a quick blast with the heat tool, being careful not to overheat the paste or to bubble it and then, add a layer of Gathered Twigs Distress Paint over the surface, blending the paint with a brush to give the look of wood. Once happy with the blend and effect, I would give the surface a coat of Multi Medium and then, place the heart to one side to dry.

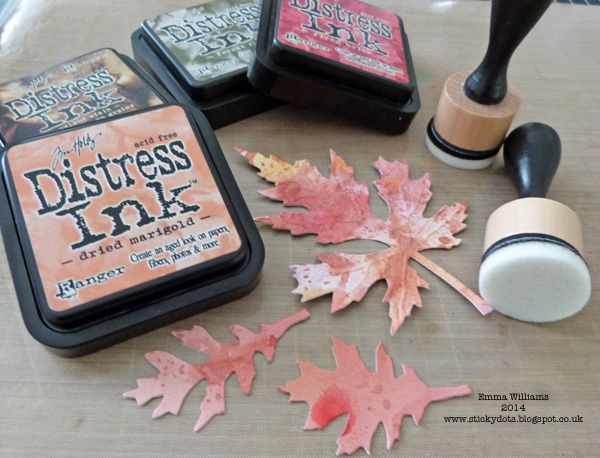
To start creating the leaves, add various colours of Distress Stain to a craft sheet and spritz with water.
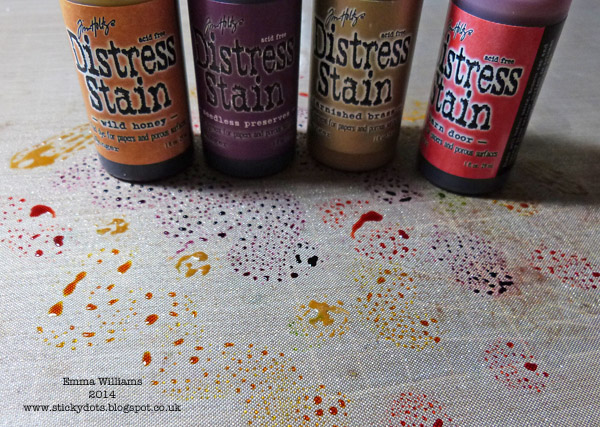
Swipe a piece of Manila card through the stains and pick up all the colour on your mat. (Continue to do this with several pieces of card, so that you have enough stained card for die cutting your leaves). Heat dry the card and then, die cut a good selection of leaves using the Mini Movers and Shapers Tattered Leaves and the Tattered Leaves Bigz die. At this stage, also die cut and emboss two leaves using the Layered Leaf die.

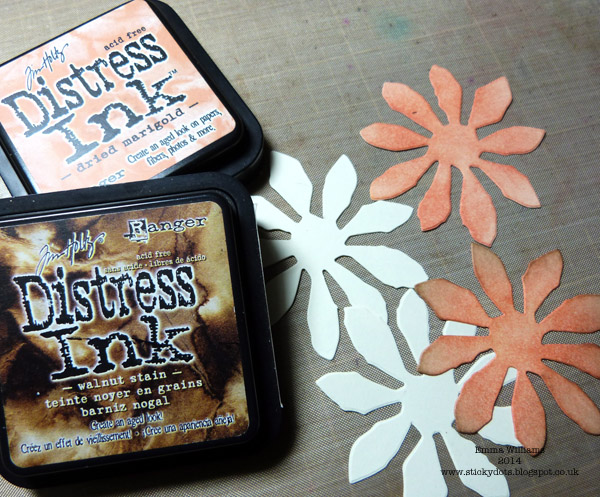
To add more colour to your leaves, ink the surface of each die cut with Distress Ink, blending the colours together to give a realistic look and then continue to add even more colour by inking the edges with Walnut Stain Distress Ink.
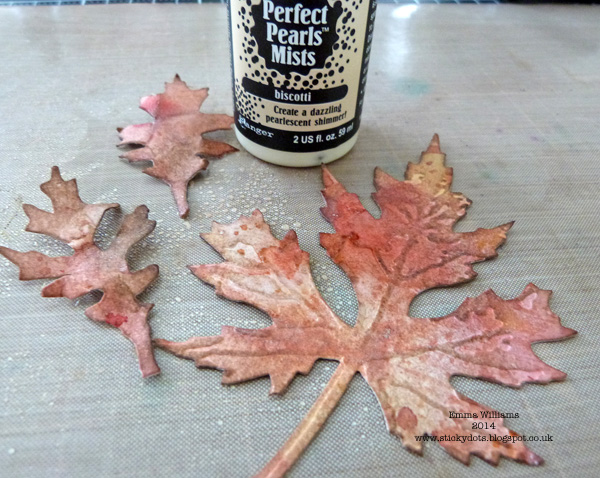
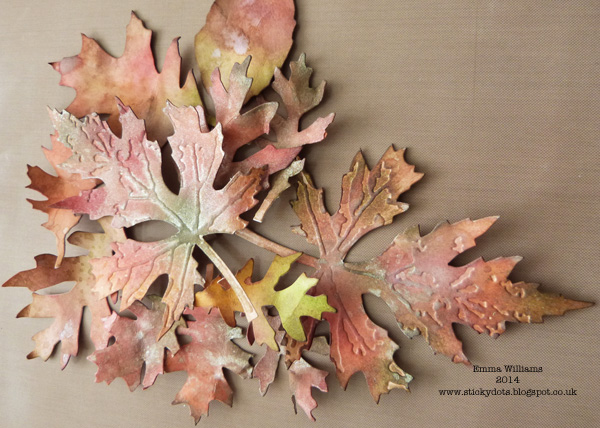
Spritz all your die cut leaves with Biscotti Perfect Pearls mists and then, gently scrunch each of the leaves in your hand, before opening them out and leaving them to dry.
Set aside the leaves to use later.
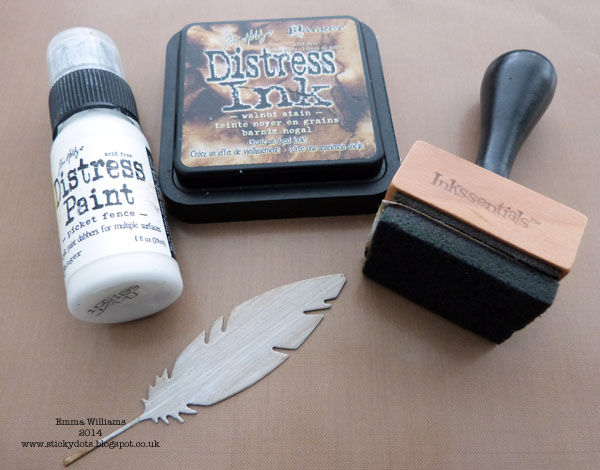
Die cut 3 of the large feathers from kraft card, using the Pointed Feathers die.

Paint each feather with Picket Fence Distress Paint and then ink the surface with Walnut Stain Distress Ink and set aside.
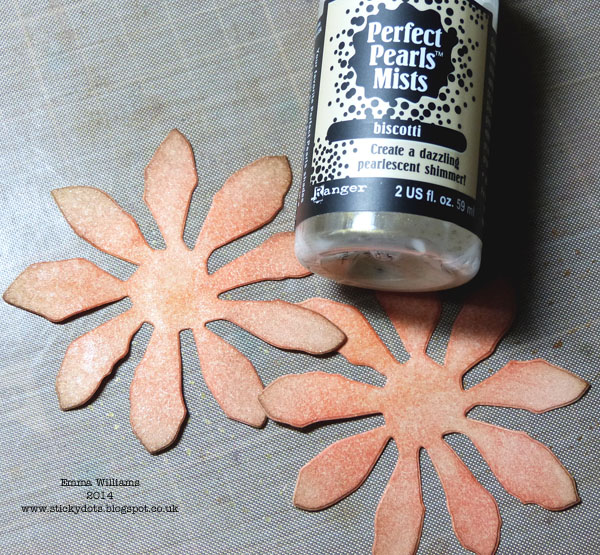
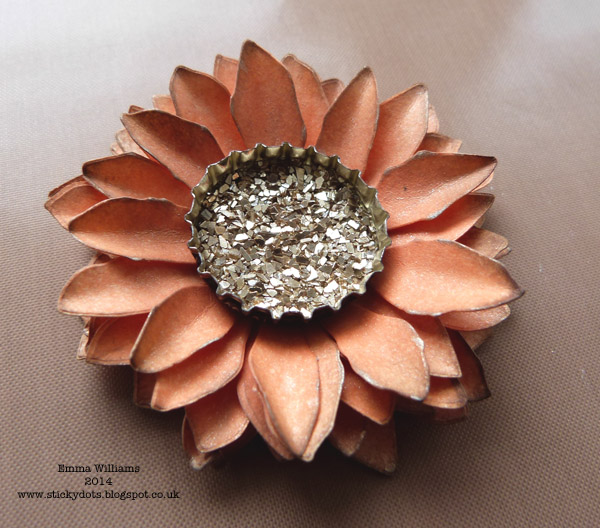
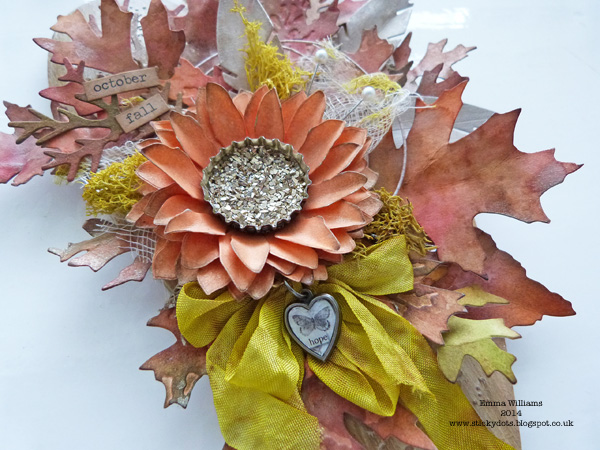
Using the Tattered Florals die, die cut eight of the “spikey” flower blooms from Manila cardstock. Blend the surface of each die cut with Dried Marigold Distress Ink and ink the edges with Walnut Stain.
Spritz the inked die cuts with Biscotti Perfect Pearls Mist.
Once dry, shape each of the petals around a pencil, which will give movement and dimension to your flower. Layer the petals over the top of one another, slightly offsetting each petal and attaching them with a small amount of glue.
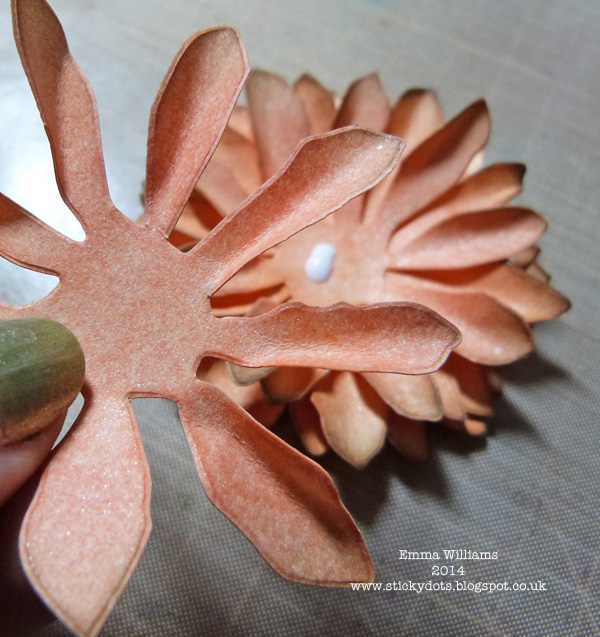
Continue to do this until all eight die cuts are layered over one another to give one complete flower.
To create the centre of the flower, I used an old bottle top which I washed and dried. I attached a 1″ punched circle of card to the centre of the upturned top before adding a good layer of Glossy Accents.
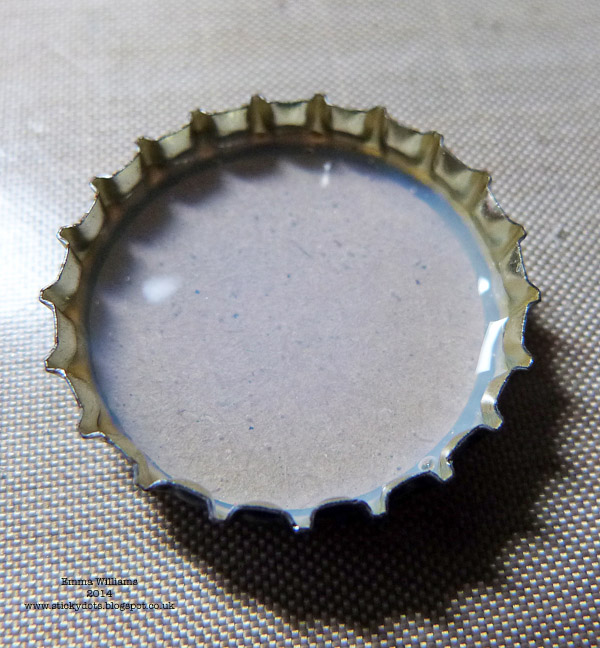
I then sprinkled a good amount of Glass Glitter over the Glossy Accents, tipping the excess back into the bottle.

Allow to dry, before attaching to the centre of your layered flower.

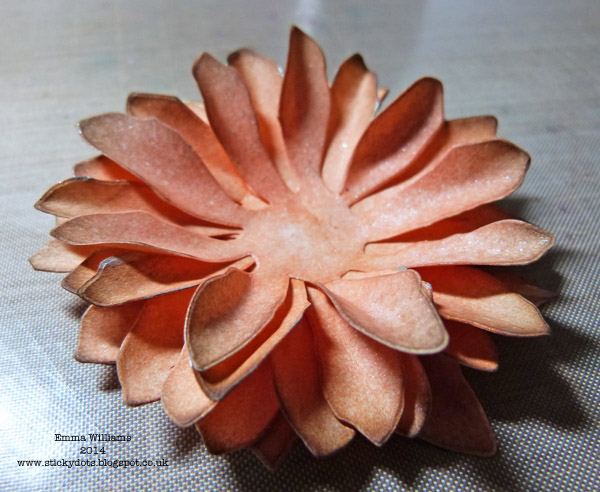
You now have a complete flower to use on your project, alongside all your die cut leaves and feathers.
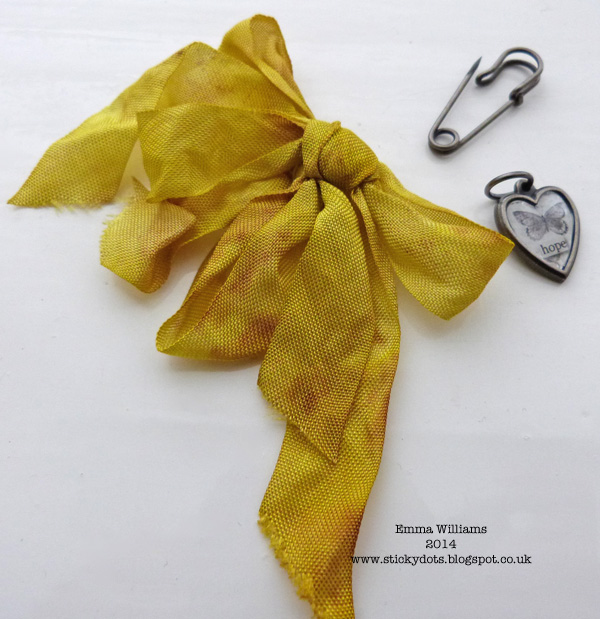
Cut a strip of Crinkle ribbon and dye the ribbon using some Crushed Olive Distress Stain, applied to your craft sheet and misted with water.
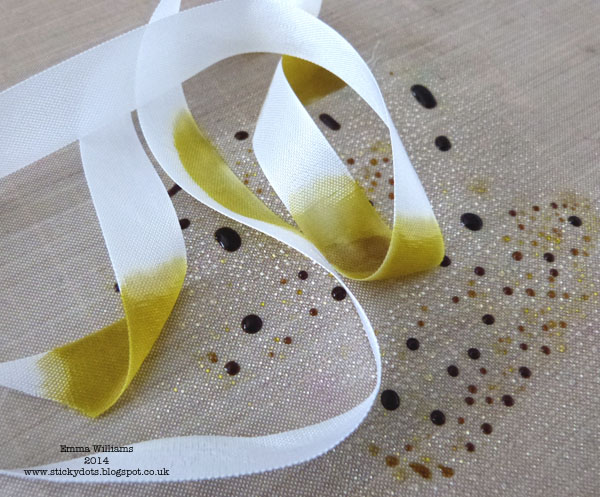
Leave the ribbon to dry before tying into a bow and attaching a heart charm using a wire pin.
Arrange and layer all your leaves and the feathers onto your painted heart, overlapping the sides and shaping each leaf to give dimension. (At this stage you can always add die cut branches if you want to create a fuller look to your arrangement)
Add the large flower over the top of the cluster of leaves, layering it over some coiled wire and cheesecloth.
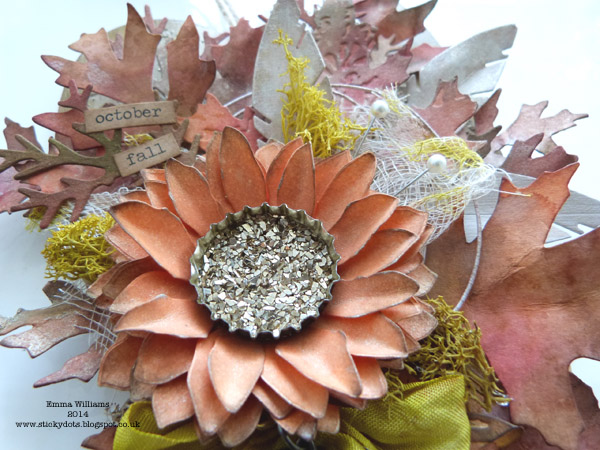
If you have some dried moss then this will look fabulous and can be tucked into the leaf arrangement. Attach your bow by placing it just underneath the flower and finally, add some Chit Chat stickers, attaching them to the leaves and hang this piece using some twine.
I hope you enjoyed this tutorial and it’s inspired you to create some autumnal home decor pieces of your own.
Enjoy the rest of the week and happy October!
Supplies:
Surfaces: Manila Cardstock
Dies: Simon Says Stamp Pointed Feathers. Sizzix Tattered Leaves, Mini Tattered Leaves, Layered Leaf, Tattered Florals
Distress Paint: Antique Linen, Frayed Burlap, Gathered Twigs, Picket Fence
Distress Stains: Wild Honey, Seedless Preserves, Tarnished Brass, Barn Door, Crushed Olive
Mediums: Multi Medium, Gesso, Glossy Accents, Texture Paste
Distress Ink: Dried Marigold, Forest Moss, Walnut Stain, Fired Brick
Embellishments: Idea-Ology Chit Chat Stickers, Crinkle Ribbon, Heart Charm, Wire Pin. Prima Marketing Wire Thread, Twine
Layering Stencil: Speckles
Sprays and Glitter: Biscotti Perfect Pearls Mist, Stampendous Frantage Champagne Crushed Glass Glitter
Tools: Big Shot, Craft Sheet, Blending Tools, Hot Glue Gun, Palette Knife
Items from my own stash: mdf heart, bottle top, dried moss, cheesecloth

Thank you Emma for the jaw-dropping and amazing fall project tutorial and beautiful inspiration! Now guess what? it’s your turn! Join us this week in the challenge and show us what techniques you’re ready to rock!
Challenge Badge

Spotlight Badge


Spectacular project Emma, always love your flowers and leaves you seem to have a little Nature Sprite with you at all times helping you to create such wondrous and perfect flowers :-)
Ohh wow Emma! This home decor piece is amazing! Love the fall theme! Everything looks fabulous! Hugs, Sandra
Lovely home decor piece Emma, beautiful colours , leaves and flower. Tracy x x
i am so going to have to try that method for coloring twine, ribbons, etc. Beautiful artwork.
This is beautiful Emma! Love the flower!
this is lush Emma. truly inspirational. i might just try to create something to this effect although i don’t have all the paints or stains. and that flower is just super. would never have thought it was the tattered flower die, hugs xx
this is so beautiful Emma. Really wonderful with all the leaves layered over the heart. That s for sharing your talent!
Beautiful! You have a great sense of color!
Jaw dropping is right! LOVE this & thank you for the instructions!
Thanks for showing and inspiring!
Such a gorgeous creation, Emma. Love all the beautiful details. :)
That’s lovely….and a lovely tutorial too….I’m inspired, I’m going to give it a go! Thanks Emma
Emma! I enjoyed this tutorial so much. Your work is always filled with such extraordinary detail. I loved seeing all these details close-up and learning the processes you used.
Amazing piece Emma! Your tutorial is absolutely wonderful , thanks for sharing with us! The fall theme is one of my fav and your interpretation is stunning! BArbarayaya
Thanks for sharing the technique. I love Autumn and those leaves are amazing! Looks like they came right off of the tree!
This is gorgeous Emma! I love the sunflower center, so clever, the tucked in moss and every element you used to create this beauty!
Wowzer! That is one gorgeous heartful of Fall! Beautiful tutorial!
Stunning project Emma, TFS this tutorial, Cathy x
Amazing project Emma!! Love all those leaves and the dimensional flowers, on the heart background.
Oh Emma this is so gorgeous!! Thanks for taking the time to do the step by step so I can try to make one too! I love it!! :)
*mwah*
Steph
Simon Says Stamp!