Challenge: Paste
Stencils are all the rage, and I’ve noticed an increasing variety of paste mediums to go along with that. This week – we challenge you to get out your paste or stencils and make some texture on your project! Whether you’re a fan of gel mediums or embossing pastes, using gesso and a stencil to make texture or you just love ‘pasting’ bits of paper together decoupage style – let’s see what you can do!
Sandra Mouwen made a colorful tag celebrating that Spring is just around the corner
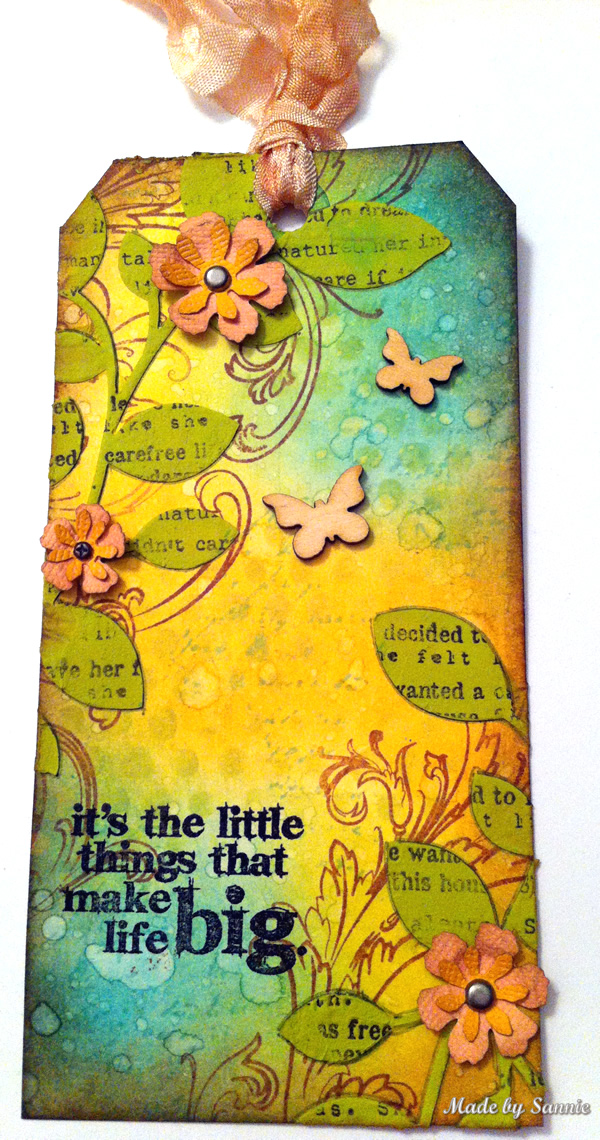
Well okay, maybe not so close to the corner as I would like it to be. Spring is my favorite season of the year. I love it when everything turns to bright colors and the weather gets warmer. So with this tag I wanted to bring the colorfol season around sooner. For the background I used Peacock Featers, Wild Honey and Crushed Olive Distress Ink, along with Bundled Sage and Peeled Paint Distress Paint with the Bubble stencil. I simply love coloring Modeling Paste and this time I colored it with Lettuce Paint Dabber, to make those beautiful Leaves.
Emma created a box canvas using pastes to add some gorgeous textures.
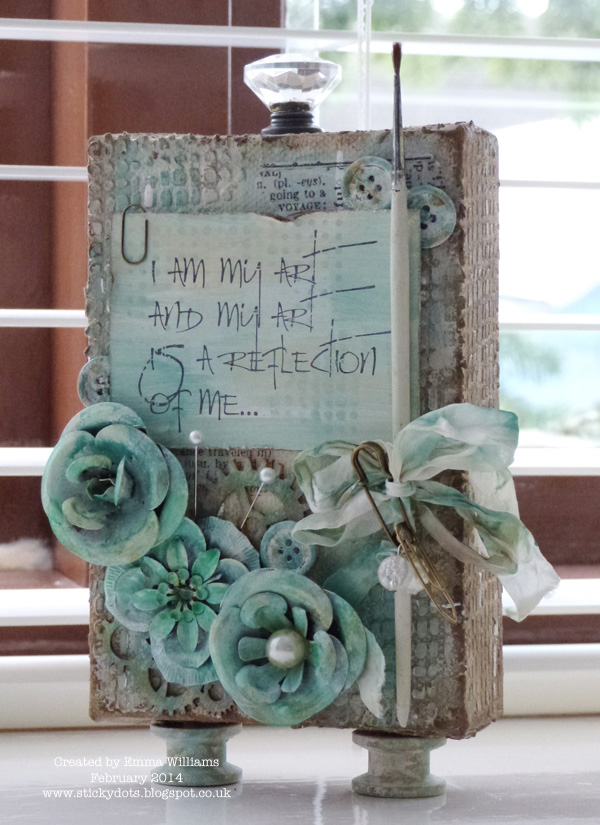
I love the look of natural burlap and decided that I wanted to emulate that as a background to my little “arty” box canvas. To create the texture around the sides and on the front of the canvas, I used Wendy Vecchi’s white Embossing Paste, (which I’m totally addicted to and absolutely love!) and applied it through the Tim Holtz Burlap Layering Stencil. Inspired by Wendy Vecchi’s quote, I used the I Am My Art stamp as my main focal point and clustered various embellishments, including metal flowers, an old paintbrush and Idea-ology pieces around it.
For this challenge Barbara immersed herself into the atmosphere of the Venetian Carnival, creating a mask suited for the occasion.
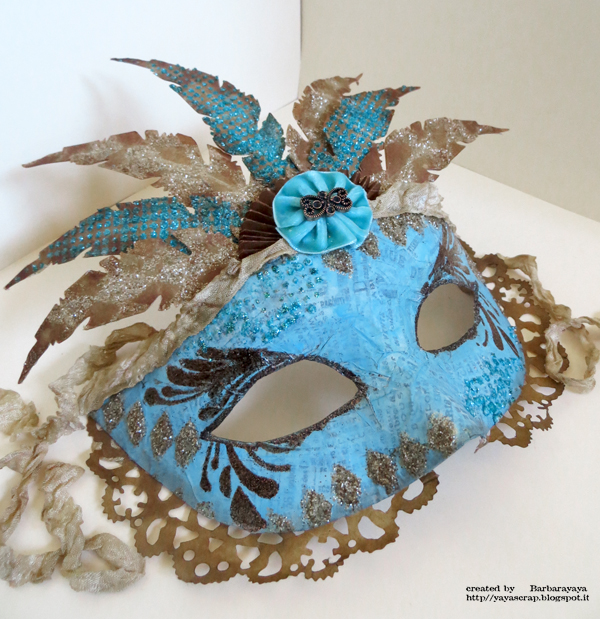
To copy the sparkling decorations of this style I used embossing paste covered with distress glitter. For the designs I used two of my favorite Tim Holtz stencils- Harlequin and Dot fade. At this point I wanted to give a soul to my mask and I did with the Wendy Vecchi stamp set My Kind of Art (one of my favorites), perfect for contouring the eyes of my creation. And you know the eyes are the mirror of the soul!
Anna-Karin loves Wendy Vecchi’s embossing paste and used a lot of it on this little canvas.
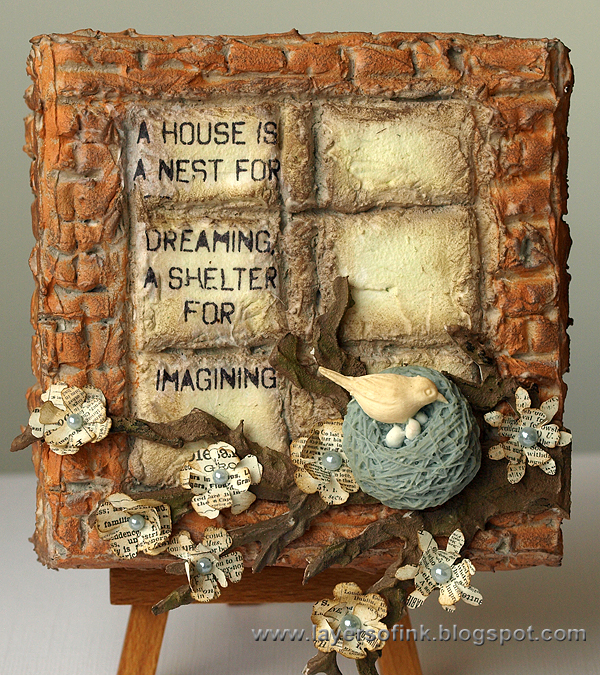
Embossing paste is such a fun medium and you can do so much with it. Here I covered a little canvas in a thick layer of paste and carved a window and bricks into it. When dry, it was painted with Distress Paints and I added a sentiment with a Wendy Vecchi stamp. The branch die cut was also covered in paste for a great wood texture. Little flowers were die cut from text paper to finish the canvas.
Textural layers are the order of the day in Tracy’s funky design.
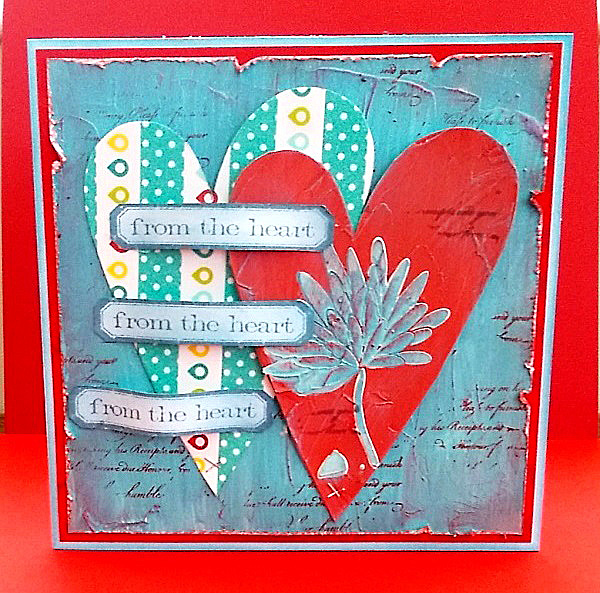
I don’t seem to be able to create anything at the moment without adding texture in some shape or form, however Wendy Vecchi’s White Embossing Paste is a must for me when creating any texture or dimension in a design. In this piece I have added layers of Embossing Paste giving yet more texture to my design. Wendy Vecchi’s Large Heart Stencil is key to this design and I also demonstrate that Embossing Paste does not only have to be used with Stencils it can also stand alone in a design!
Ashli decided to put both a stencil and paste to use on her layout this week…

I just love the tone on tone effect that Modeling Paste has directly on plain Sticky Back Canvas. That was my starting point for this layout about my girls getting dressed up for a cold day. The Mini Frag Stencil was my choice as it reminds me of both a snowflake and a sunshine. To finish things off, I layered up some Dear Lizzy Project Life Cards and added in some adorable Clouds by October Afternoon. The perfect combination of elements to tell this fun story!
Michelle used metallic embossing paste to add a bit of shine to her textural Thank You card.
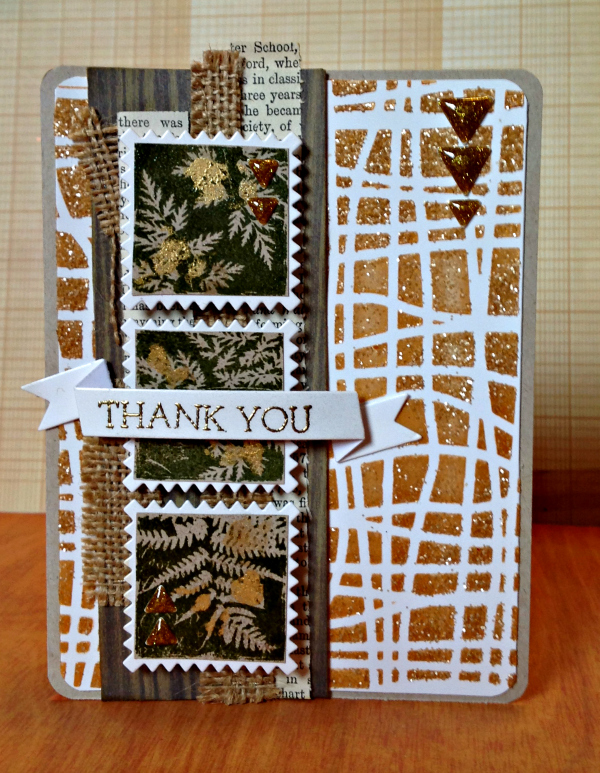
This card is all about the texture. Shimmer and shine was added by using Wendy Vecchi Gold Embossing Paste. The Antique Linen glitter not only added extra sparkle, it gave the paste a wonderful texture as well. The beautiful Paper Artsy fern is framed with the Avery Elle Pinked dies and the Simon Exclusive banner and sentiment tops it all off.
Mona was inspired to create a tag featuring lots of texture created using embossing paste:
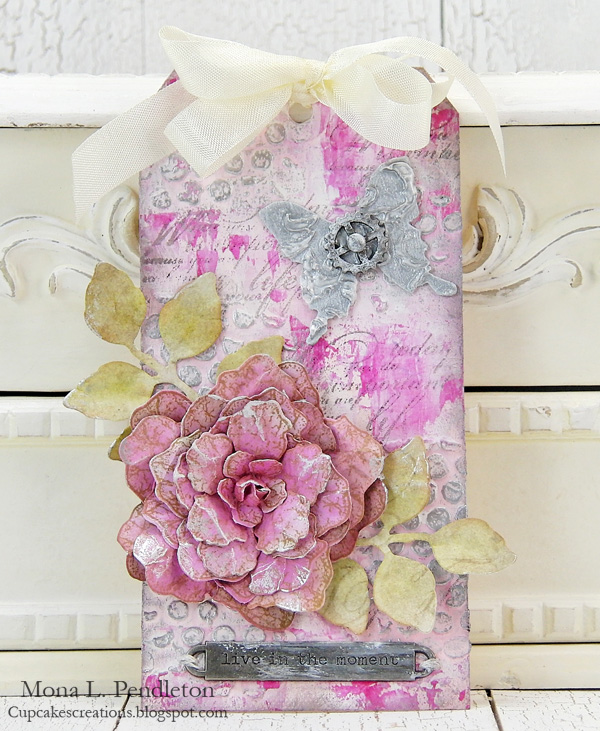
After creating a colorful acrylic painted layered background on the tag, I added texture and design using the Bubble Stencil and Liquitex modeling paste. I embellished with a Vintage Floret blossom and a grungepaper butterfly that also has awesome design and texture.
Suzz was playing with embossing paste and embossing folders to create her projects.
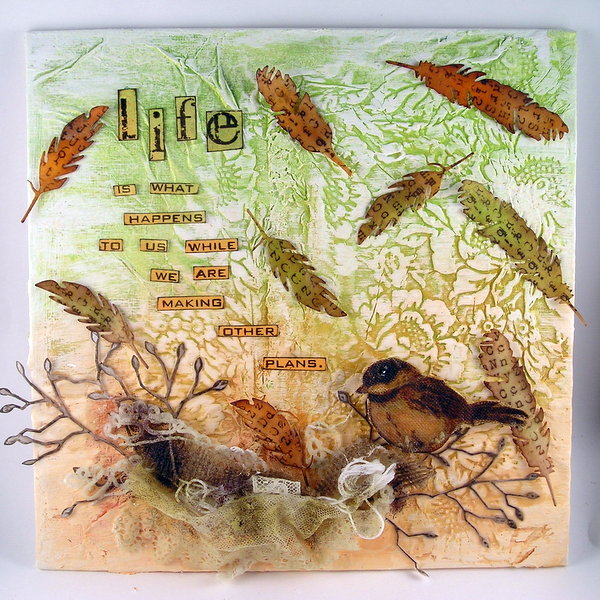
I love playing with the embossing pastes and exploring new ideas. The Wendy Vecchi White Embossing Paste is the foundation that took the shape of the Poppy Anna Griffin Embossing Folder. The canvas is a reflection of us having one bird leave the nest and another getting ready to spread her wings. The Simon Says Stamp Feather Die seemed an appropriate way to reflect our kids starting to fly on their own.
Andrea explored the possibilities of modeling paste, stencils and embossing powder to create her Grand Explorer tag.
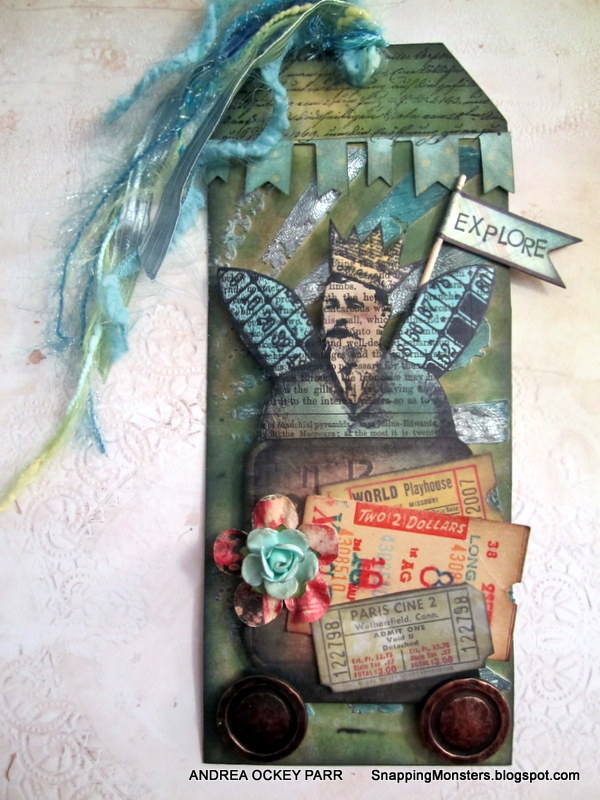
I do love the concept of exploring, even if it doesn’t involve leaving the house. One can find hours of adventures just by fiddling around with craft supplies in a lovely temperature-controlled, mosquito-free environment. This week I had all sorts of fun as I played with Tim Holtz’s “Rays” stencil, Liquitex modeling paste, silver embossing powder and the fabulous Winged Things 2 stamp set.
I (May) have the time of my (crafty) life when playing with paste.
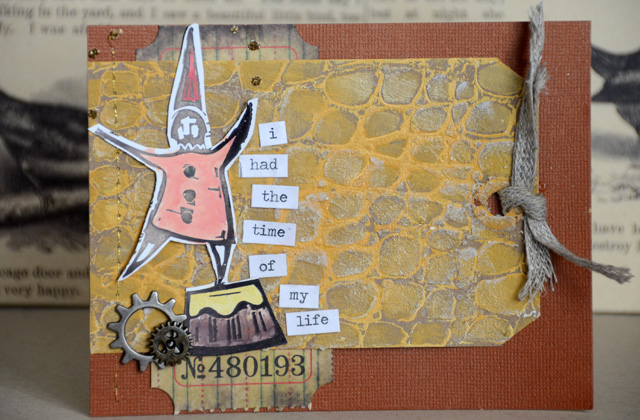
I love playing with color + texture, so this was the perfect challenge for me! The Tim Holtz Big Top stamp set inspired this card – but the texture is really what makes it. I used both distress paint and some paste with a stencil to get some added texture and depth to this card.
Meihsia will be here on Wednesday to share how she used a stencil and modeling paste to create her mixed media project on the canvas.

Be sure to check out the team’s blog posts to see more photos, full supply lists, and details about their projects. Then, it is your turn to get creating!

As always, Simon Says Stamp is giving away a $50 gift voucher that will go to a random entry chosen by random generator. To qualify all you need to do is create a new project that ties in (in any way!) with our theme and post it, along with a link back to this challenge, and add a link here. This challenge will end at 11:59pm on Sunday March 2and Eastern time.
We will also be choosing some of our entries to put in the spotlight – a special honor where we talk about why we loved that entry in particular and award a special badge too!
For the full rules, read the “challenge rules” posted in the side-bar here on our blog.
[raw]
[/raw]
Challenge Badge

Spotlight Badge


Well, if anyone ever needed inspiration for using embossing/texture paste this is certainly the place to find it!!
amazing challenge
I love, love. love to work with stencils and enjoyed the beautiful inspiration here! Now just hope that I have time to make and post it…. Inky greetings, Gerrina
Perfect challenge for the paste and stencil trend! Wonderful DT projects!
Thanks for the inspiration to get to know the paste I bought and thanks for all the inspiring projects to get those creative wheels in my head turning!
Such inspiration…who wouldn’t want to play along…will have to make something…love this challenge…tfs
Wow wow wow, what a set of ALL fabulous projects using pastes!!! Thank you for the inspiration and this great challenge idea!
LOVE your projects!! I used some crackle paste on a couple of cards and added them to the link up. I’m not sure what crackle paste is *supposed* to be used for, but it works really well through a stencil. ;)
Love this challenge. Just added my card.
Love all the projects, wonderful inspiration and great challenge.
Fabulous theme – very close to my heart, so I’m glad I got to play along. Thank you for another wealth of amazing inspiration – loads of stuff I’m going to try out!
Alison x
Fabulous projects from the DT :)
I love being challenged and have enjoyed the inspiration to try new media mixes. Just added a card.
Karren
Love all of your beautiful projects! ;)