Yippee for Yana: Shading Solid Images with Ink Pads
Hi friends! Thanks for stopping by the latest edition of Yippee for Yana! In this edition Yana takes us through Waffle Flower Crafts’ brand new Stitched stamp sets with tips and tricks on how to use them! Be sure to watch the video and enjoy!
Hi everyone, this is Yana Smakula and I’m excited to bring you another episode from my by-monthly “Yippee For Yana” video series! In today’s video I’m showing how to take cross stitching and quickly apply it onto paper with Waffle Flower cross stitch stamps!
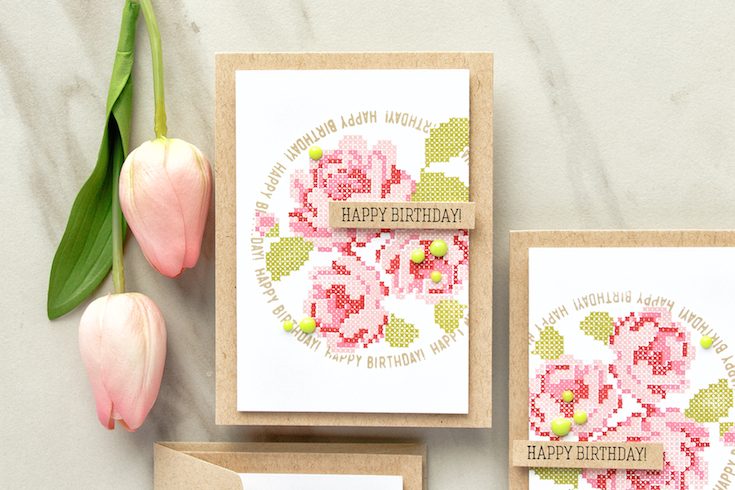
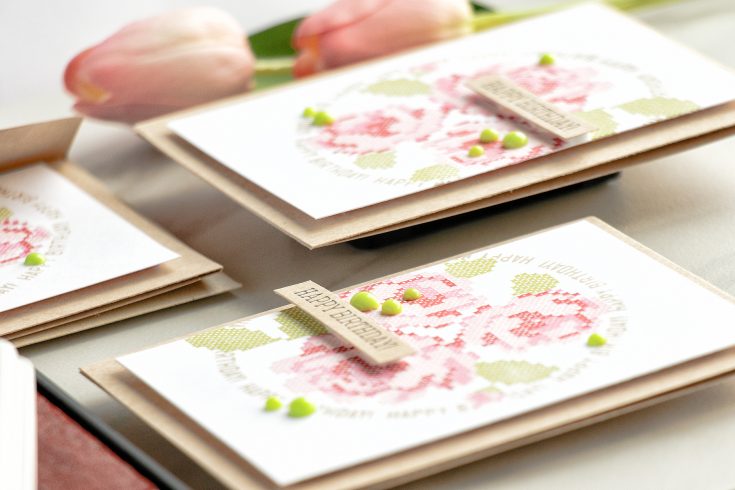
I spotted these at the Creativation show back in January and was very much impressed and fascinated by the concept. I made several almost identical cards using Stitched Roses stamp set. I need to point out that I am making 4 bar cards and not A2 because this size is often deceiving, it might look like these are A2 cards and thus stamped elements look bigger than they really are. So this is just something to keep in mind. Images shown in this video are not going to look as big on an A2 size card.
Stitched Roses set is a bit difficult to align in a sense that you need to have perfect alignment for great results. I do recommend using a stamp positioner like MISTI just because it makes stamping these roses a much much easier task.
When you look at this stamp set it has the instructions for you right there on the sheet. There are letters and numbers. Numbers indicate which shade of ink needs to be used for that layer – a light, medium and dark. And letters indicate the layers to the same flower. So it’s pretty straightforward, although this stamp set does take a little bit of practice.
The way I like to stamp my images, the way I find it to be easiest for me – I like to start with the top most darkest layer. This way I am able to see much better though my stamp and align my medium and bottom layers much better.
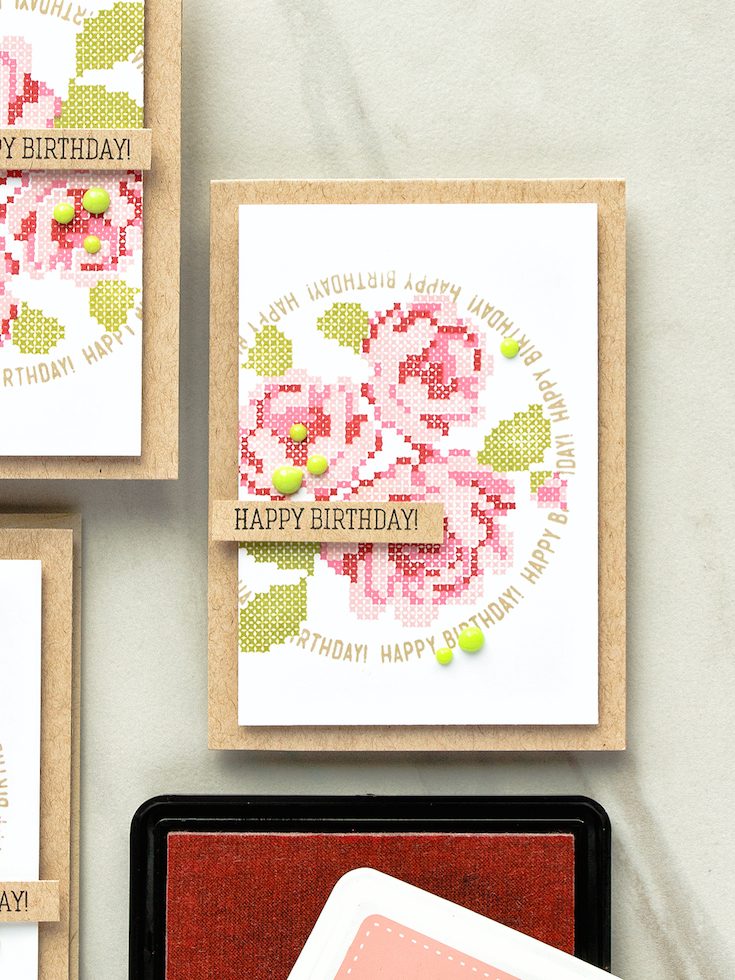
I used Simon Says Stamp Lipstick Red (darkest), Hollyhock (medium) and Twirling Tutu (lightest) ink colors to stamp roses. For my leaves I picked Willow.
To create a sentiment for this card I used a Round Happy Birthday message from the Circle Sayings stamp set from Simon. This is an older set that I have re-discovered recently and I’m loving it for all sorts of cards.
I did some quick masking to stamp it and I used Simon’s Khaki ink color – I feel it’s a perfect match to kraft cardstock I used for the card base for my cards. I also stamped simple Happy Birthday sentiment in black ink onto kraft paper and foam mounted it onto my card over the roses.
You can change up the sentiments and make these cards for another occasion. I think this design would make a great Mother’s Day card and also fabulous Thank You or Miss You cards.
Lastly, I added a few dots using Nuvo Crystal Drops in Apple Green.
Have fun stamping!
Watch the video:
SUPPLIES:
 |
 |
 |
 |
 |
 |
 |
 |
 |
 |
 |
 |
 |
 |
 |
 |
 |
Thanks for reading, and thanks to Yana for being our guest!

Blog Candy Alert!! Follow our blog via email and comment on this post for a chance to win a special blog candy!
Congrats! Blog Candy Winners!
From: Studio Monday with Nina-Marie: Adding Dimension to Solid Stamping: Linda Duensing!
From: Doodling with Debby: Quick & Easy Distress Oxide Background: Maureen Chandler!
From: Copic Coloring Funny Food with Kelly Latevola: Valerie DeWitt!
From: Serenity: Color Coordinates with Shari Carroll: Danielle Dietz!
From: Wild and Colorful Card Kit: Action Wobble Accent: Becca Straub!
From: Stitched Cacti Hugs – Adding Depth to Images: Maaike Uijthoven!
Please email [email protected] with your mailing address (if applicable), the name of the blog you won from, and the prize you won to claim your prize!


Such pretty work, I think I need to add this cross stitched series into my collection!
Beautiful cards.
The cross stitch set is so pretty and I love how you have put the circular sentiment around it!!
<3 J
jwoolbright at gmail dot com
HerPeacefulGarden.blogspot.com
Such pretty cards! I’m definitely going to try stamping the top layer first! I have a hard time matching my stamps, so maybe that will help.
Great job Yana , look just like the real deal !
Gorgeous cards! Congrats to all the winners!
How cool!! Love it
Lovely card design by Yana. Agreed, this design can be used for so many occasions. Thanks for the stamp alignment tips, have a wonderful day!
These stamps are so pretty. They look so incredible to stamp with. I need to add these to my stamp supply.
Your cards are beautiful. I used to love to cross-stitch!!
Thanks for the tips. The results are great
Gorgeous work on
your lovely cards!
Carla from Utah
What a special stamp set, gorgeous card!
Such a beautiful technique. I am inspired to try my hand at it. Thank you.
Putting two of my favourite crafts together has made my day! Such a pretty card and great video.
Gorgeous cards! I love the soft colors & the circle sentiment is perfect.
Adorable stamps set and cards! Thanks for sharing Yana!!!
Love the stitched flowers. Have done cross-stitch
and needlepoint for many years and it’s fun to be
able to do it as much faster and easier with the
stamps.
great card.
thanks for sharing.
What a gorgeous card! Stamp layering has always been a challenge for me. Thanks for sharing the tip about going from the darkest to lightest! Can’t wait to try that!
This set is so pretty. Love your cards.
Pretty. Pretty. Pretty.
You do beautiful work, enjoyed your video. Thanks for the inspiration!
Great video Yana. I think these new stamps from Waffle Flower are so cool. I even love the cacti one. Thanks for the very useful tips.
Those are the most beautiful cards I ever seen! So love those stamped cross-stitched roses.
Beautiful. Love the cross stitched look.
The cross-stitched look is certainly something new and different. Lovely card!
so pretty, and thank you for your great tips on using this stamp set!!
I am really loving these stitched sets! They make me want to spend some time with my cross-stitching again! Great cards Yana!
This is a delightful card–especially like the circle sentiment like an embroidery hoop. Your video tips are great. Thanks for sharing.
The cross-stitch look of this is wonderful; especially for someone that has the cross-stitching talent.
Melissa
“Sunshine HoneyBee”
Great cards! :)
Oh wow, this is such a pretty effect!
Wow, gorgeous cards. Awesome colors. I LOVE cross stitching.
A very pretty card it looks like stitching but it is so much easier …pretty too!!
Really beautiful! I love that Round Happy Birthday stamp!
Beautiful cards – the flowers are perfectly stamped!
I love watching Yana’s videos! Her technique for stamping the last image first is right on. I have been doing this for some time and it really does help. Love these stamps and her cards!
I love this card so much! I used to cross stitch a lot, but this stamp set gives you the look of the cross stitch, without the hours and hours of work.
Very sweet cards!
What a cool stamp set.
lovely. . .beautiful stamp set
I love these cross stitched flower stamps. I have to get my hands on one and create!
Fun and pretty idea! Thanks for sharing!!
Very pretty! Love the colors you used ♥
These stitched waffle flower stamps are just so awesome! Beautiful cards :)
Gorgeous Yana!!!
Those cross stitch stamps are amazing!
A great set of cards and I love Waffle Flowers stamps, they are beautiful! A fantastic job as always Yana!
My adventure with card making started with cross stitched images so this stampset is definitely going on my wishlist :-) lovely cards!
Amazing cards!