Yippee for Yana: Sea Party Birthday

Hi friends! Happy Saturday! Be sure to not miss the latest super fun and Summery Birthday card edition of Yippee For Yana with the fantastic Yana Smakula! Be sure to watch the video for more information, and enjoy!
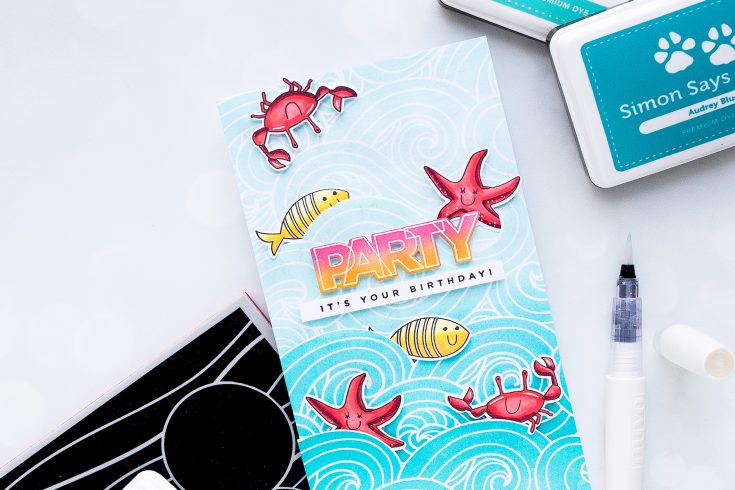
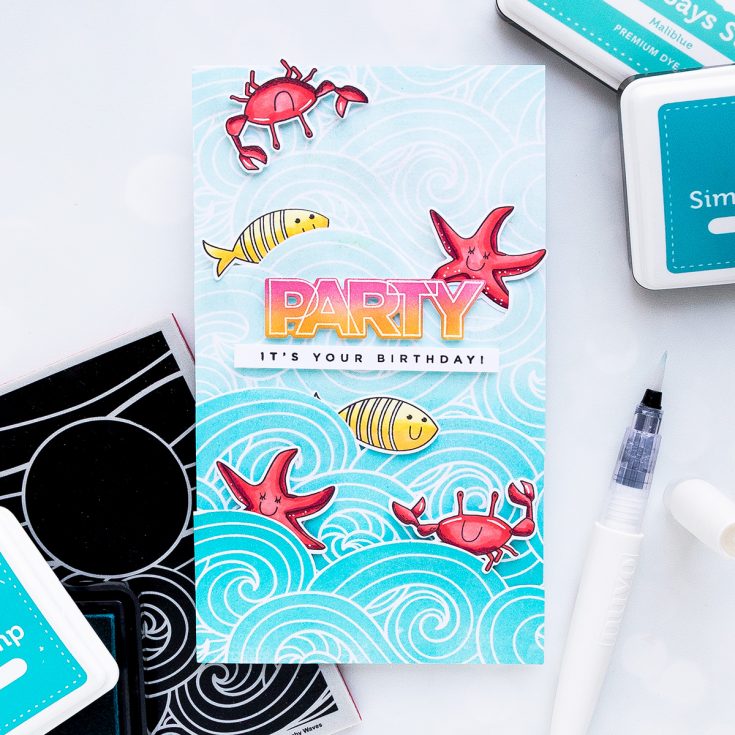
Hello friends, this is Yana and welcome back to another Yippee For Yana video! I love the Beachy Waves background stamp from Simon’s Recent release and I’ve been wanting to use it for some cards. I’m going to show you how you can use just a portion of the background and extend it cover the front of an A2 or even bigger card.
I’m using Simon’s Dye inks in delicious Summer colors – High Dive, Audrey Blue and Maliblue colors; these are just the most perfect shades of blue and are oh so so awesome for Summer stamping or ink blending. I have a serious crush on the Maliblue color – I’ve been using it a ton this Summer.
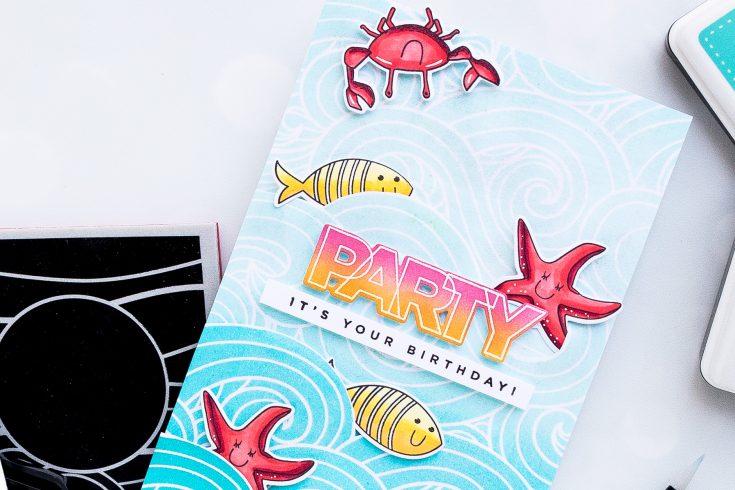
The trick here is to stamp the portion of the Beach Waves background (the waves portion) onto separate pieces of paper multiple times and piece each portion together with the others to create a continuous background for a card.
I want my background to have a gradient to it, the bottom portion of my waves is going to be darkest, and the top – lightest so I’m using multiple shades of blue when inking the stamp for each portion. Starting with High Dive and Audrey Blue for the bottom, Audrey Blue and Maliblue for the middle and Maliblue for the top.
To simplify this you can totally ink up one section with High Dive, one using Audrey Blue and one using Maliblue.
To help me piece these layers together I used scissors and cut along the wave lines. At first, I wanted to make an A2 card, but later seeing how I had a ton of background space I decide to make a taller card. I am always inspired by Kristina Werner and how she makes these super fun tall cards and I decided to give one a try. My card ended up being 4 1/4 wide by 7 3/4” tall.
Next, I stamped critters from Under The Sea Animals stamp set. I used Simon’s Intense Black ink and stamped 2 of each – crab, fish, and starfish. I used Copic markers in R39, R24, R22, Y35, Y15, and Y11 to do the simple coloring. Later, I added white pen details to crab and starfish.
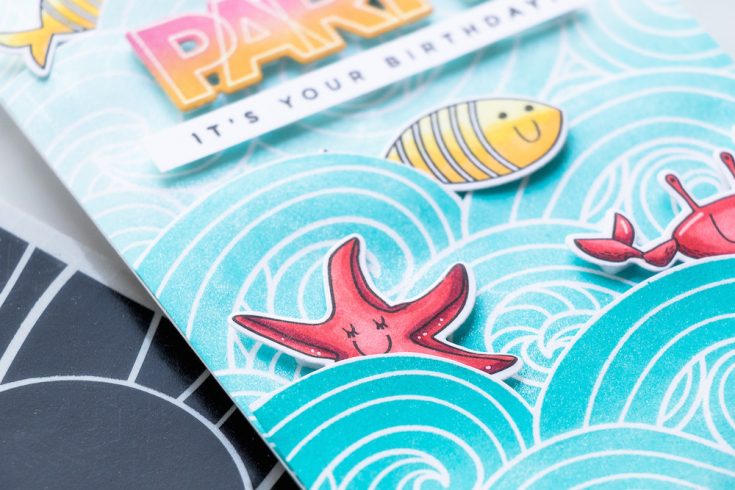
I also need a sentiment and for this, I white heat embossed “Party” from Cathy’s Birthday Palooza stamp set. I used Sunshine and Hollyhock inks from Simon for some emboss resist ink bleeding. Using coordinating dies I cut these out and arranged on my card with the help of foam adhesive. I also stamped “It’s Your Birthday” and foam mounted it under the “Party”. Lastly, I used my Tonic Studio shimmer pen and coated my entire background with this shimmer.
Have fun stamping!
WATCH THE VIDEO:
SUPPLIES:
|


Thanks so much for stopping by and thanks to Yana for being our guest!


Perfect card for summer, I love the smiling starfish. I already follow by email.
This is such a fun card! I love how you created the ombre background. It looks cool as a taller than usual card :)
This is a really sweet card and a great set. The size is awesome, I love any cards made in a larger format.
Ooo, I love the fussy cut of a background stamp. That’s so fun, and yet I haven’t thought of doing that. Why? Who knows. So thanks for this idea, and now I’m going to have to see what other backgrounds and stencils I can try this with.
I do occasionally make a shaped card, or an odd-sized card, both of which are made easier with the envelope maker. Still, my go-to is the standard A2. I think I to venture out of this rut more. Look what you did! And it’s fantastic!
How cute!
This is a fun summer card♥
Fabulous card Yana! Love how you built the waves and added the sea creatures.
So cute and fun!
I love those waves and the sea life peeking out.
Love this super creative and fun card Yana! I love your videos showing us how you create step by step.
too cute – I love their little smiles!!
Very cute!
Such a cute and fun card! Love the background. And the sea critters are just too sweet!
Love your work!
Adorable summer card!
The size of my card is dictated more by what I’m making, so if the card has to be bigger than I will make it bigger, but my norm is A2 size which I’m sure most will say. I’ve never tried to piece together a background piece like your’s before, but let me tell you, I absolutely LOVE the card and that background is awesome!!! And something I’m going to try in the future! Thanks so much for sharing!! I’m a big fan and I’m a subscriber to your blog, YouTube and IG for a longtime now! I get so much inspiration, so thank you!!
If it’s ocean and blues, it’s got my vote!
Cute sea theme card.
What a fun card, so cheerful and happy! Another great project, Yana!
A dun sunny somercard!
Fabulous card! I really like the way you did the graduated waves for the background, and the sea creatures are so cute!
This card is great. Fab idea to tuck fish behind the waves. xx
Love this card. Just makes you happy. With the vivid sea creatures and the brilliant blue sea.
Love anything that will make it easier for
me to make fun backgrounds. The waves
are great and the little sea creatures
are darling. Fantastic card.
thanks for sharing
txmlhl(at)yahoo(dot)com
Adorable! Great idea for the waves.
What a very cute and summery card!!
These cards are soooooo CUTE!!
Great summer card.
Suchh happy colors! I love the wave swirls. Totally cute card!
Cute card! I love how you tucked the sea critters behind the waves. I usually make the standard A2 sized card, but maybe I’ll get adventurous and try a tall card. Yours look fantastic!
Fantastic card! I like how you layered your wave pieces. Smart so little critters can be tucked in :)
This is so cute and colorful, I love all of the sea creatures and the awesome wavy background!
Super cute card!
What a fabulous card! So cute!! I love that aqua blue.
What a cool summer card!
Such a fun and cheery card, just perfect!
The sea creatures are just perfect for summer. NICE job.
Adorable card! Love the waves!!
Wonderful card! Really like how the sea critters are peeking out from behind the waves!
This card makes me so happy! It’s so cheerful!!! Adorable colors and design!!!
Such a fun, adorable and summery card!
Cool card, LOVE your waves!
You are so creative Yana! Love these sweet sea creatures and those fabulous waves and sky!!
Adorable. Love the look of all those waves. Too cute!
Fabulous card, Yana! your shades of blue are amazing!
Good post. I find out something new and challenging on articles I stumbleupon day-to-day. It will always be exciting to study content material from all other editors and practice a little something from other online websites.
have a nice day. a good working day
Fantastic card. Love how you did the background. Thank you for the great tips.