Yippee for Yana: Ombre Ink Brayered Backgrounds
Hello crafters! It’s time for another installment of our Yippee for Yana series! In this video, Yana is showing how much fun it can be to use a brayer with dye inks to create backgrounds. Be sure to watch her video and then give the technique a try yourself!
Hi everyone, this is Yana Smakula and I’m excited to bring you another episode from my bi-monthly “Yippee For Yana” video series! In today’s video I’m showing you how to create quick ombre backgrounds using ink pads and a brayer!
Brayers have been around for years and there are many wonderful techniques out there that involve the use of a brayer. I decided to go back to basics and share a very simple and approachable technique of brayered backgrounds for simple cards.
I pre cut several panels of white paper, I used 110 lb Neenah Solar White and cut them to 4×5¼“.
I decided to use 4 colors for every panel, you can also go with 5 if you don’t want to have any white spaces on the sides or if you want to overlap your ink stripes a bit more; or you can go with 3 colors if you are making a smaller card, a 4 Bar card for example.
I am looking forward to trying this technique on other kinds of cardstock, maybe on textured watercolor paper and on woodgrain cardstock. I’m curious to see how that would look.
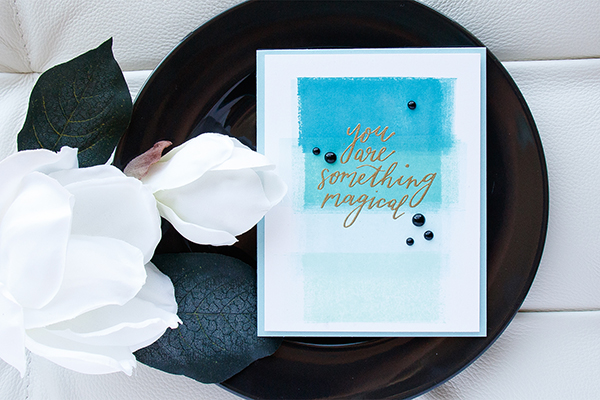
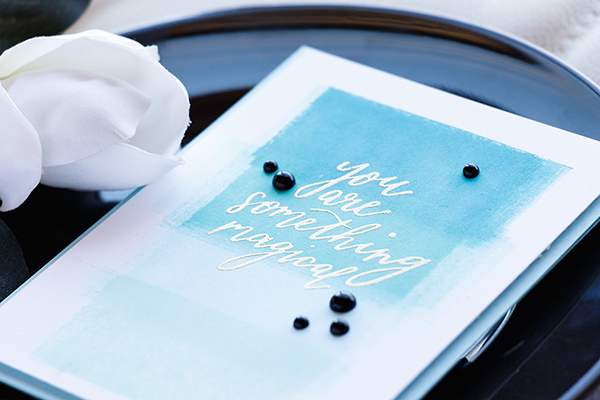
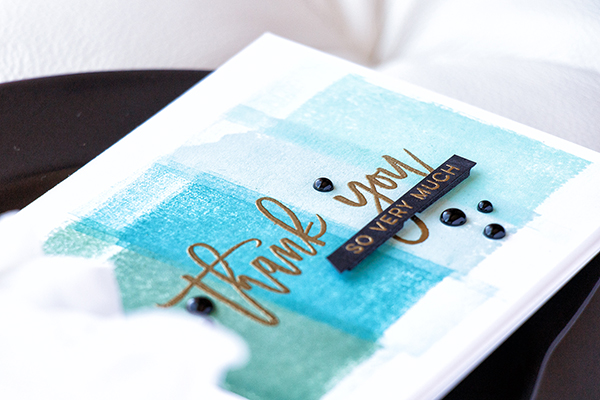
For my first color combo I used High Dive, Scuba, Maliblue and Mint. What’s really awesome about this technique and what makes it very quick is the fact that you don’t have to clean the brayer when you change ink colors; just roll the brayer on a piece of white paper and it’s ready to go for the next color.
Stamp used: Hero Arts Something Magical Woodblock stamp
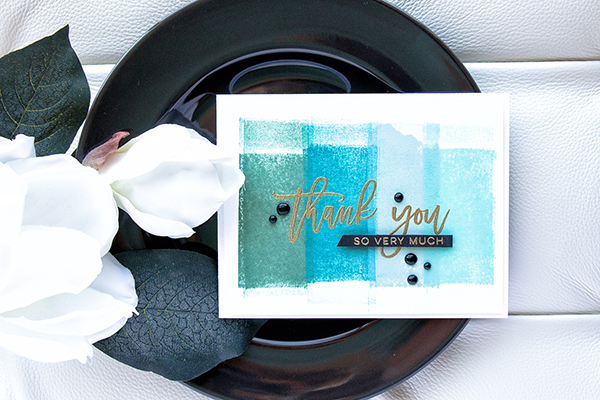
For my second color combination I used Evergreen, Teal, Dusty Sage and Mint Candy.
Depending on the type of paper you are using and the look you are going for you might need to add more or less ink. I inked my brayer several times to get better coverage – and I also always started my inking in the same spot – I started from the bottom and rolled the brayer up.
Stamp set used: Right At Home Script Greetings.
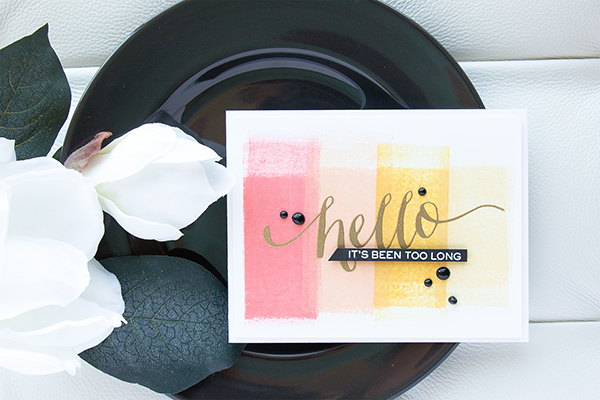
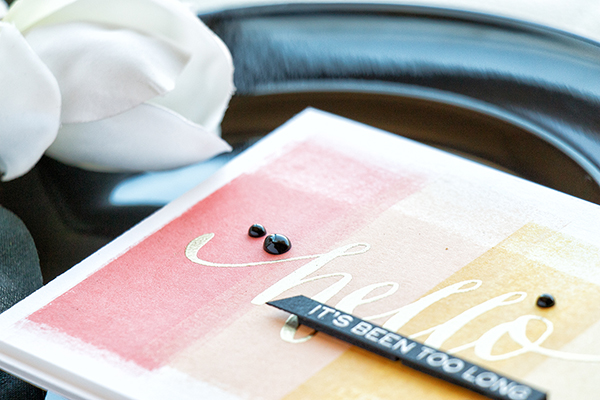
I also made a background using Coral Reef, Melon, Sunshine and Duckling. I wanted to point out that the ink color will lighten up a bit once the ink is dry on the paper. So while it might not look nice when you first apply the color I would suggest you wait for the ink to settle and dry – you will have a lighter color and a better transition between colors.
Stamp set used: WPlus9 Hand Lettered Hello.
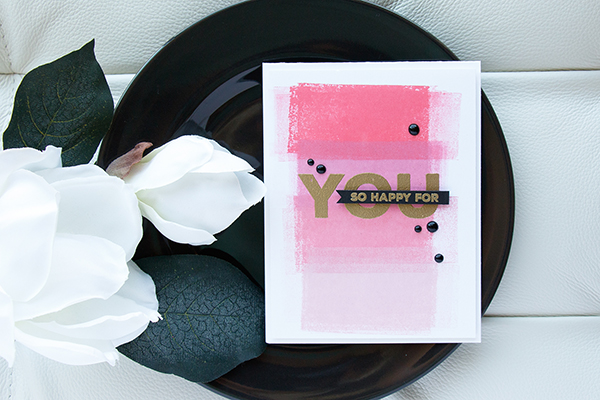
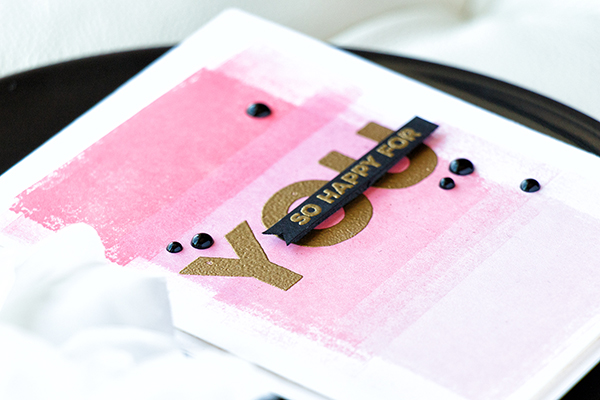
For my pink color combo I used Hot Lips, Hollyhock, Teeny Bikini and Twirling Tutu. Stamp set used: Simon Says Stamp Big U Words.
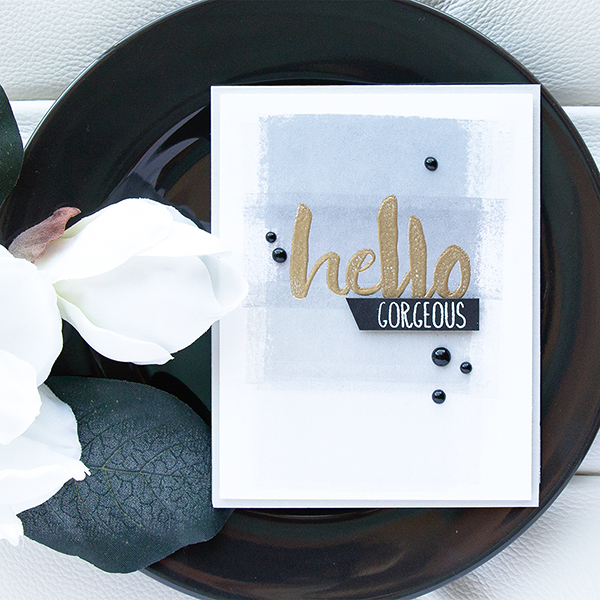
I also decided to do one more combo using gray colors. I went with Smoke, Cobblestone, Stone and Fog. Stamp set used: Honey Bee Hello Gorgeous
I also made one more panel using purples. I used Deep Purple, Hot Mama, Magnolia and Thistle and I used Hero Arts Celebration Words stencil with texture paste and gold embossing powder, but I didn’t turn that background into a card.
I heat embossed the main part of the sentiment on all of my panels directly onto the background in Hero Arts Gold embossing powder and also heat embossed sub sentiments in either white or gold onto black cardstock, cut into strips and foam mounted over the main heat embossing.
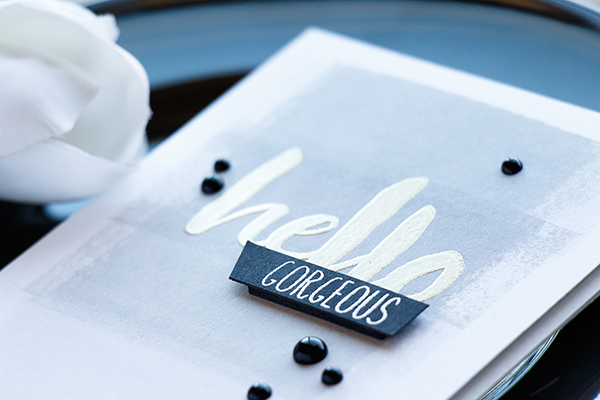
My backgrounds were foam mounted onto A2 top folding card bases (I went with white and Fog colors) and lastly I used Nuvo Drops in Black to add finishing touches to these projects.
Have fun stamping!
WATCH THE VIDEO
SUPPLIES


Blog Candy Alert!! Follow our blog via email and comment on this post for a chance to win grab bags and blog candy! Remember to tag your awesome projects with #simonsaysstamp on social media so we can see what you are creating!


Fabulous cards Yana! Love the colors! I didn’t know a brayer was available for the Tool in One! Thanks for the video and inspiration!
I love these cards!! They are gorgeous and the sentiments you picked are fabulous!!! Love watching your videos!
These are fantastic! I need a brayer. Love these ♥
What fun cards to make with a cool background. Thanks for sharing with us.
very cool, i esp love the grey one with hello
Awesome cards! Fun technique!
Love the ombre look but haven’t had
much luck with the ombre pads.
Now I can get the look so much
easier and nicer looking.
thanks for the video.
AWESOME cards! Thanks for the technique video!
What a fabulous technique! It makes such a super background for sentiment stamps!
Beautiful and so artistic
these are so pretty–and simple, too! Great idea.
Wonderful video Yana. I need some quick cards today so I think I’ll be trying this technique today. Love your color combination!
Thank you for the tutorial!
Great video and ideas for quick Ombré cards. I like the smaller size brayer too. I have the larger 4″ wide one which I never use any more.
I love your cards. So simple but yet so elegant. Thanks
Wow! These cards are so pretty :)
These are all very pretty and such a simple & elegant way to make a card for any occasion.
What a great technique — each card is simple, yet really beautiful!
Love the simplicity of these designs – very creative:)
Your cards look SO SOPHISTICATED, Yana! AND I LOVE that they are so easy! BEAUTIFULLY DONE!!!!!!!!!!!!!!! ;) THANK YOU also, for showing us how you did this! Now, to add this brayer & attachment to my cart! LOL ;)
Wonderful cards! I want to try ombre, just haven’t had the time.
Love this technique and the mini brayer…good reason to buy this tool! Love ALL your work!
Great cards and technique! :)
Simple yet elegant, never thought about using a brayer to do this technique. Love how the cards turned out. I will be trying this.
You certainly made that look quick and easy, and yet so pretty. Thanks for the video.
Gorgeous ombre cards!
Just love those colours!
I really love these cards, Yana! Great way to embrace the imperfect look you get with a brayer–can’t wait to try it!
Beautiful backgrounds for these pretty cards!
Love these. I need that smaller prayer. Mine is about 4″ wide. Thanks for sharing.
These are Awesome Yana!!! Love all the brayered backgrounds you created!!!
Love, love, love your cards and the technique.
I love these backgrounds, they all look fantastic!
Great video. . .just love the versatility of this technique. Thanks for sharing it.
Thanks for the trip back to basics! What fantastic results. Truly inspirational.
Love the ombre!
Thanks for the basics. Being a newbie, this things are helpful. While I dont own a brayer, if I run into one, I know what I can do with it. Thank you
The cards are so pretty!
Beautiful cards and awesome technique! I need to dust off my brayer! Thank you to Yana for inspiring!
Wow, these are amazing, you are so talented Yana!
Beautiful cards and colors!!!
Love this idea and the colors! Thanks!
Love these gorgeous CAS cards!
Love those brayered backgrounds!
Such a fun idea! Great cards!
It’s a long time since I used a brayer but you’ve inspired me to try again
What beautiful cards!! This is a great technique and I’m going to have to give it a try soon.
fab quick and easy cards!
Such a great tutorial! I enjoyed watching the video! Time to put my brayers to use! Thanks for the inspiration!
Love the ombre effect on these cards!