Hi friends! Happy Wednesday! Thanks for stopping by today! Please join me in welcoming back the fabulous Yana Smakula in her latest edition of our Yippee for Yana blog series! Read on and don’t forget to watch the video for the full tutorial and enjoy!
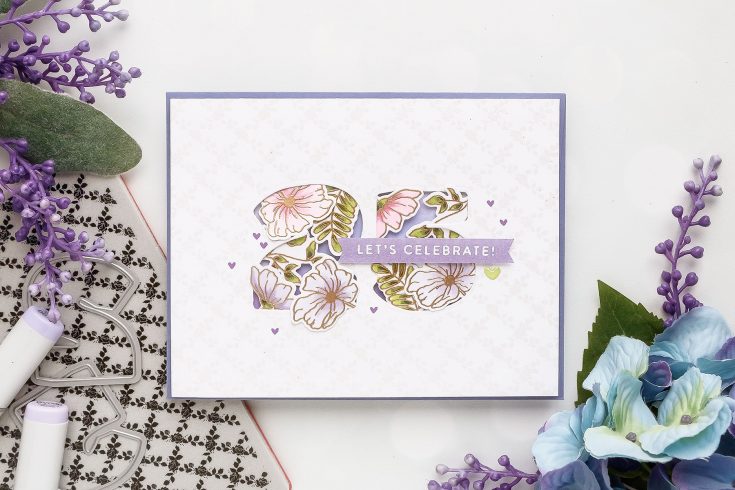
Today I have a simplenumbered Birthday Card idea to share using a few current favorite supplies from Simon Says Stamp. My card is for 25th Birthday, but you can change the numberto be anything you need, from 1st birthday to 99th!
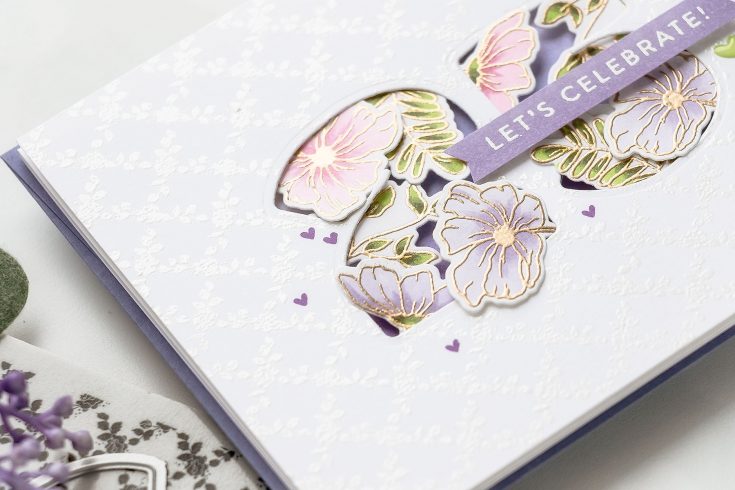
One of the key ingredients for these projects is the coordinating die set for the Birthday Numbers stamp set. I’m using just the dies today and actually skipping stamping the numbers. Having dies you can create all sorts of looks; the look I’m going for today is negative die cutting.
I wanted to add some interest to my background panel so I heat embossed Rose Lattice background background stamp in White Satin Pearl embossing powder from Hero Arts to have a tone on tone look. It doesn’t show much on the card, but it gives it a nicetouch. Alternatively, you can opt to use specialty paper for the front panel ofyour card, like woodgrain cardstock, you can also use something like a textureplate and add some dry embossing or texture details to the card front, justsomething to make it less stark white.
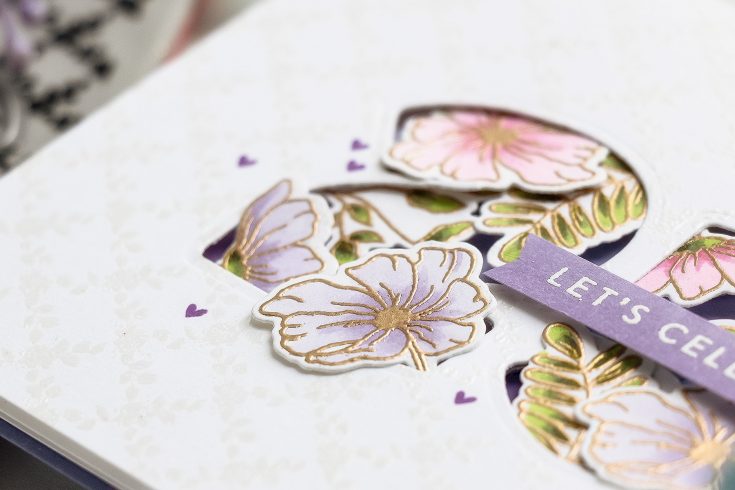
I wanted to decorate the number openings, the positive number space with flowers. As if the numbers are blooming. To do thisI used floral images from the Moments of Grace stamp, it’s such a timeless andunique set, and even though it has a lot of sentiments for sympathy cards Ioftenfind myself using it for other occasion projects.
I didn’t want to stamp flowers in black ink, so I opted for heat embossing once again and embossed them in Antique Gold embossing powder. I used a bit different color combo – pale violets, pinks and greens.BV000, BV00 and BV11, RV23, RV11, RV10, G99, G94 and YG03 markers.
To add some color in the negative die cut opening I ink blended Velvet Orchid and Deep Purple ink colors directly onto the cardbase. I used foam adhesive tape and foam mounted the negative die cut palenonto my card base. Once that was in place I used both foam adhesive and glueand adhered all of the floral elements.
Finally, I added that Let’s Celebrate sentiment,a green enamel heart and a few purple stamped hearts on this card.
This is such a beautiful card and a fantastic way to use these number dies. I am definitely going to be trying this. The background stamp looks beautiful on it as well. Gorgeous!
What a beautiful way to celebrate a birthday! Love the flowers behind the die cut numbers. I can see your pretty embossed bg just fine. :) What a neat idea!
A lovely idea! I can see how it can be done simply using pattern papers and still be beautiful! Pinning this one to remember the inspiration! Thank you!
Gorgeous card – I love the regal pairing of purple and gold. I also love the almost reverse layering – all the decorative colour, layers, and detail coming from behind the die cut numbers and layered through them – beautiful and unusual!
In business since 2002, Simon Says Stamp is striving to offer you the best online selection of stamps, altered art, scrapbooking, mixed media, card making and paper crafting products in the world. We stock over 100,000 quality items in our warehouse so that we can offer you quick service and one stop shopping at a great price!


What a stunning card, I love the soft colors and beautiful gold embossing!
Absolutely beautiful. Love how you die cut the numbers and covered them with flowers. Thanks for sharing.
Linda D.
So beautiful and tranquile!
Beautiful card. I love the unique design.
Beautiful card. Love the technique.
Very beautiful!
Yana’s work is beautiful as always, and creative, too!
Lovely colors and a lovely card.
Well this is just really pretty. I already follow by email.
Super gorgeous card, love the colours!!
Very pretty!
Such a good idea to add embossing to the main the main panel for even more interest!
Elegant card!
Absolutely gorgeous and perfectly elegant!
Your card looks so amazing with every single details!
Pretty card! I love the soft colors and the flowers coming out of the numbers.
This is so gorgeous – love the colours
This is such a beautiful card and a fantastic way to use these number dies. I am definitely going to be trying this. The background stamp looks beautiful on it as well. Gorgeous!
I love this idea of putting the flowers in the cut out numbers. Thank you for sharing this technique. Your card was simple, but elegant.
I love every inch of this card from the color palette, the flowers, gold embossing, white trellis, you name it! I can’t wait to give this a try!
I love Yanas card!! It is so lovely and I love the soft lavenders she used. Beautiful!!
What a beautiful way to celebrate a birthday! Love the flowers behind the die cut numbers. I can see your pretty embossed bg just fine. :) What a neat idea!
Such a gorgeous and creative way to make birthday card!
SWOON!! Such a BEAUTIFUL Card Design!!
Beautiful and unique card Yana. Lovely colors.
Beautiful floral images, love the soft pastel colors you used on the card. Thanks for sharing with us.
I never thought of filling the negative space of a die with floral images. So pretty.
Wonderful and elegant card!!! Love it!!!
This card is gorgeous–and what an awesome idea!
Awesome card Yana and a fabulous idea. Love also your lovely colours. Thank you so much for showing and enjoy your leave in march.
Beautiful card Yana! An innovative way of using number dies!
Oh wow, that is so pretty!
Beautiful card!
This is so beautiful! I love how the flowers are coming out of the die-cut numbers.
A lovely idea! I can see how it can be done simply using pattern papers and still be beautiful! Pinning this one to remember the inspiration! Thank you!
So pretty! Thanks for the inspiration!
you make such stunning cards
I love this elegant, wedding inspired Card.
Gorgeous card – I love the regal pairing of purple and gold. I also love the almost reverse layering – all the decorative colour, layers, and detail coming from behind the die cut numbers and layered through them – beautiful and unusual!
Beautiful! Love the soft colors!
What a beautiful and elegant card! Love the flowers peeking through!
Such a pretty card. Love the soft subtle colors.