Yippee for Yana: Heat Embossing with Copic Coloring

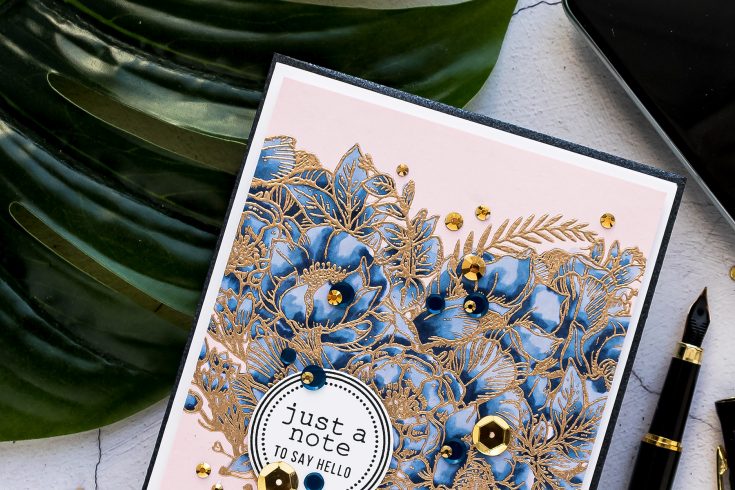
Hi friends! Happy Wednesday! Oh my goodness, how pretty does our Botanical Heart stamp look gold embossed colored with blue Copic Markers? It’s the latest card in our Yippee for Yana blog series with Yana Smakula! Be sure to watch the video for more information and enjoy!
Hi everyone, this is Yana Smakula, welcome back for another Yippee For Yana video! For today’s episode, I decided to go back to two of my favorite techniques – first, coloring with Copic markers on colored cardstock, I’m using very pretty light pink cardstock from Hero Arts, this is color Peony. And 2nd – combining Copic coloring with heat embossing. I know I share Copics and heat embossing very often and a lot of you are concerned about coloring with Copic markers over heat embossed images so I decided to share a refresher on a workaround for this trick.
The whole idea is to first stamp the image in Copic marker friendly ink, then color the image using Copic markers. Next, replace the panel in the stamping tool, and heat emboss the image over the previously stamped and colored one.
This way you will end up having a gorgeous heat embossed image that was colored Copic markers and you would not have used your markers over heat embossing. I personally don’t mind coloring over heat embossing, but the embossing powder can get onto the tip of your marker and it can damage it and I have had that happen just because I’m rather reckless when it comes to my markers, it doesn’t really bother me, but if you’d rather be on the safe side and if you have a stamp positioner, I feel like everyone now has at least one stamp positioned tool in their stash, you can do this technique.
I mounted my clear stamp on the door of my new MISTI, I just love this new updated design of this tool, I’m using Hero Arts MISTI in black. I also have a MISTI corner there in the right-hand side bottom corner – is it acting as a spacer for my panel as the stamp I’m using today is very big and it goes outside the edges of my panel. The stamp set I am using is called Botanical Heart and it is an utterly gorgeous floral stamp set with a beautiful oversized heart.
Next, I inked up my stamp with Copic marker friendly ink, I used Memento and stamped the image onto my paper. I did use my MISTI stamping tool as this is crucial to making this technique work. You need some sort of a stamp positioner tool to be able to do this technique.
I didn’t care how perfect or imperfect my stamping was, I just needed to stamp the image onto the paper well enough to be able to color over it.
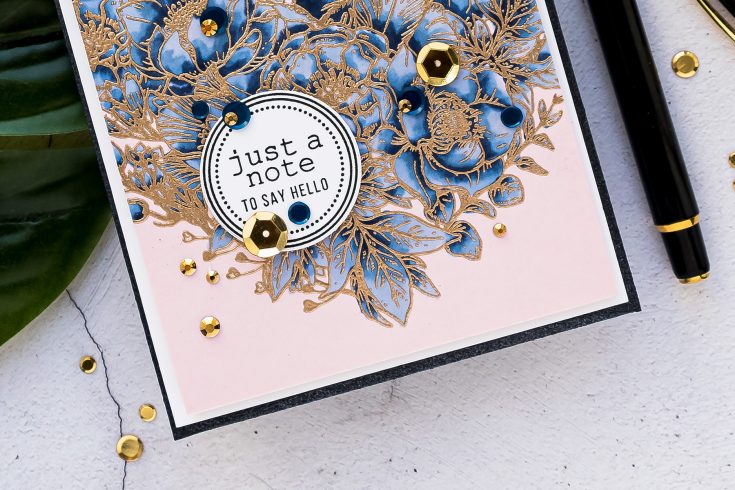
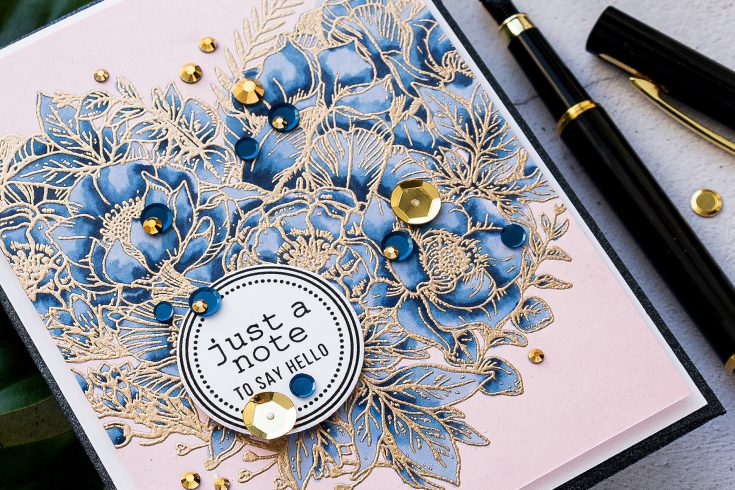
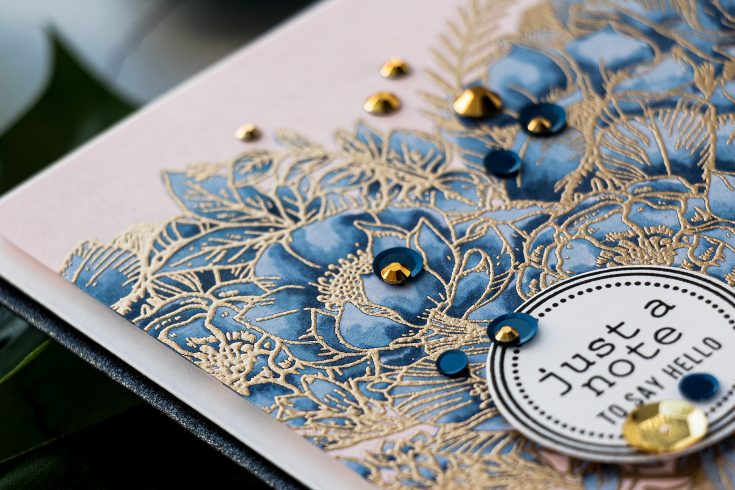
With my stamping done, I started to color the image. I love the look of deep dark blue on pink, so this is the color combination I went with for this card. I used B21, B34 and B39 markers.
I was not being very careful when coloring. Because we will heat emboss this image outline over out coloring the coloring doesn’t have to be perfect. In fact, I went for a rather speedy coloring. It took me about 20 minutes to color this heart, but like I said, I wasn’t being too careful or too precise when doing my coloring. The embossing really covers up a lot of the coloring, so there’s no sense stressing over tiny details or any imperfections. Just do simple coloring and most importantly – enjoy the process.

I did leave my panel to dry for about 30 minutes. I went and took a shower and I let it sit in the mean time. By the time I was back the ink was already dry and I was able to heat emboss the image. I did test the background first by pouring embossing powder over it. None stuck to the paper where my coloring was, so that indicated that my panel is dry and I can proceed to heat emboss it.
I placed the panel back into my MISTI. Because I had the MISTI corner in there it allowed me to place it exactly as it was before, perfectly spaced away from the edge of the tool.
I treated the paper with anti-static powder, I like to tap on the powder tool and then use a dry paint brush to distribute the powder on the paper. Next, I closed the door of my MISTI to double-check if the images lined up. They did line up and so I went ahead and inked up the image with clear embossing ink, and stamped it onto my panel.
This, perhaps, is the scariest moment as it is very easy to mess things up if you don’t place the panel exactly as it was before. You can shift it slightly and the embossing is going to be off. So better double check before stamping.
Next, I added antique gold embossing powder. I did get some stray embossing powder onto the panel where there wasn’t any stamping and I cleaned that up using that same dry paint brush.
Next, I used my heat tool and heat set the powder in place. Everything lined up perfectly and I ended up with a stunning heat embossed and colored image.
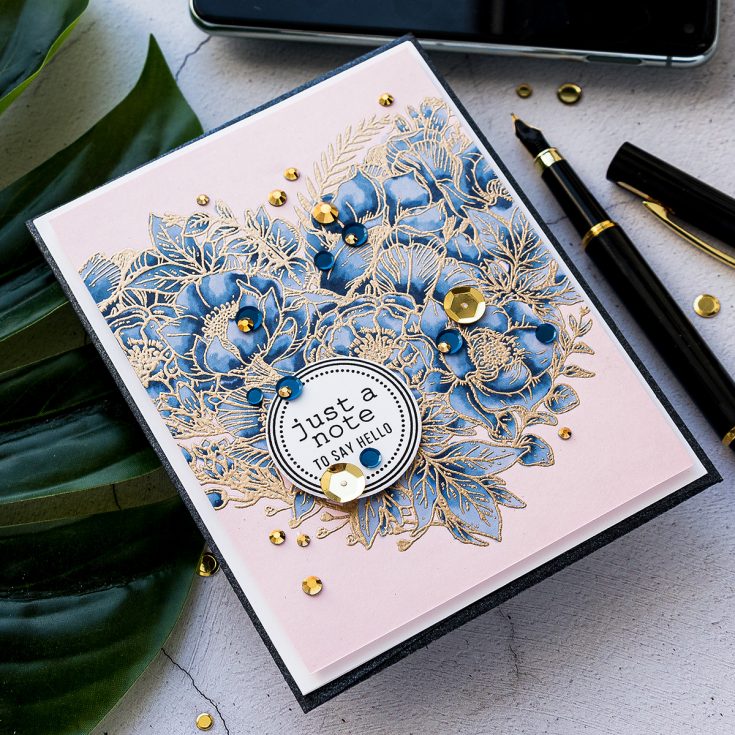
I stamped a sentiment that reads Just a Note to Say Hello. I also stamped a decorative circle and cut it out using a coordinating die. The sentiment comes from the same Botanical Heart stamp set as the heart itself.
I’ve foam mounted the panel onto an A2 white side folding card base and foam mounted the sentiment circle over it. I also used sequins from the Gala set from Simon and Gold Jewels from Pretty Pink Posh to embellish this card. Have fun stamping!
SUPPLIES:
|


Thanks so much for stopping by, and thanks to Yana for being our guest!


This is so beautiful. WOW! Thank you for sharing your talent with us.
Gorgeous! You make Copic coloring look so easy. I don’t have Copics, but I’m always inspired to try your techniques with my Spectrum Noir markers. I’ll be trying this one soon.
So So pretty! I loved the video! The soft pink and the blue is amazing. I love the gold, and how when you were colouring it didn’t have to be perfect. My type of card! Thanks also for still putting blog posts up even though you have to be “shut” down.
Wow Yana, this is so pretty, I love the blue on the pink with the gold embossing, it’s very elegant.
OH MY GOSH, this is gorgeous! I love the gold and blue, and how you colored the blue!!
Thanks Yana for the video and refresher on stamping Y& coloring first and then restamping for the heat embossing! Gorgeous creation!
This is so lovely. I have several big stamps that would be perfect for this technique. Thanks for sharing this.
Sooooo Gorgeous!!!! Love the gold embossing with the blues!!!
Gorgeous card Yana, thanks for reminding us of this great technique!
It’s absolutely stunning!
Wow! This is stunning!
Fantastic card. Thank you for the great tips.
Stunning card Yana, I love the bright blue colours you used on the soft pink cardstock and the bold gold lines.
Thank you so much for sharing and have a wonderful day.
So elegant with the blue and gold.
I don’t have copics so this wasn’t a technique I’ll use,but I always enjoy see how Yana does things. She does them with style! Amazing card!
Wow, wow, wow!!! This is gorgeous!!! I did a similar technique just the other day and the scariest part was definitely hoping I had the image lined up perfectly when I restamped it with the versamark. Luckily, it turned out perfectly!