Weekender with Wanda – Emboss Resist Technique with Tim Holtz Supplies!

Hi everyone! Happy Saturday! So nice to see you here for the latest edition of Weekender with Wanda on the Simon Says Stamp Blog! It’s a beautiful Autumn weekend here in California. Perfect sweater days and football days and all kind of fun things. I hope you have a wonderful weekend planned at your house. Did you check out the awesome blog hop yesterday? CLICK HERE to do the hop. There are prizes at each stop! The new Simon Says Stamp Holiday 2016 release is live too and it’s all beautiful. CLICK HERE to see the Believe in the Season release in its entirety.
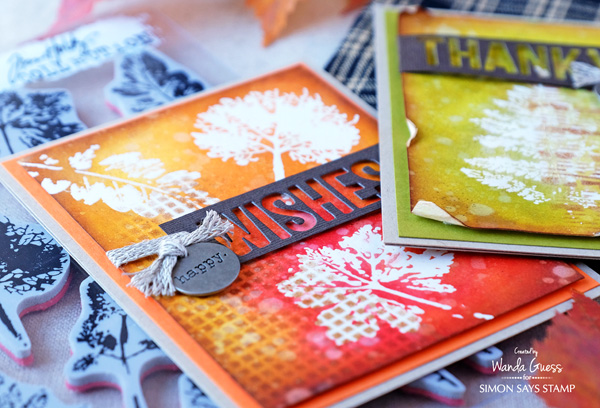
Today is my monthly post in which I use Tim Holtz and Ranger supplies to bring you a new technique or idea to try. I’m using some beautiful new supplies from Stampers Anonymous by Tim Holtz along with some old favorites from Tim too. I made two cards using the same supplies and I had fun revisiting the Emboss Resist technique. I hope you will be inspired to give it a try! I love the Leaf Prints stamps and thought it would be nice to use those, since we are in Fall crafting mode.
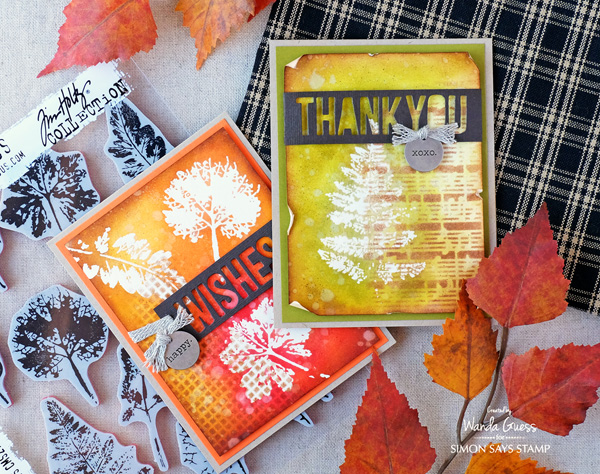
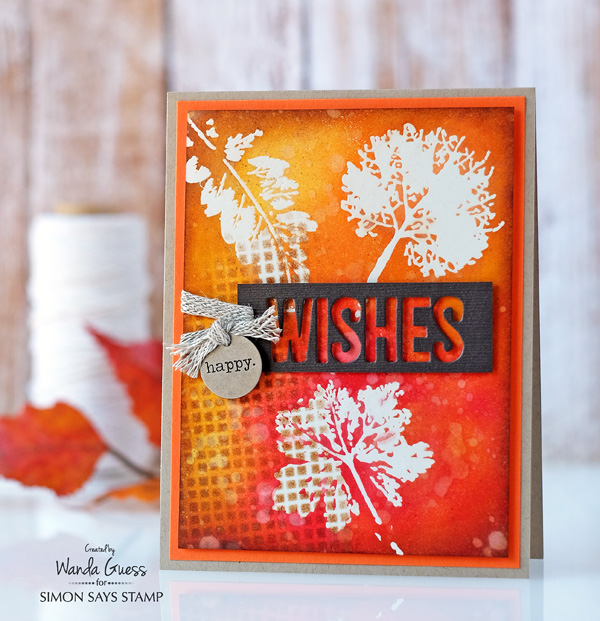
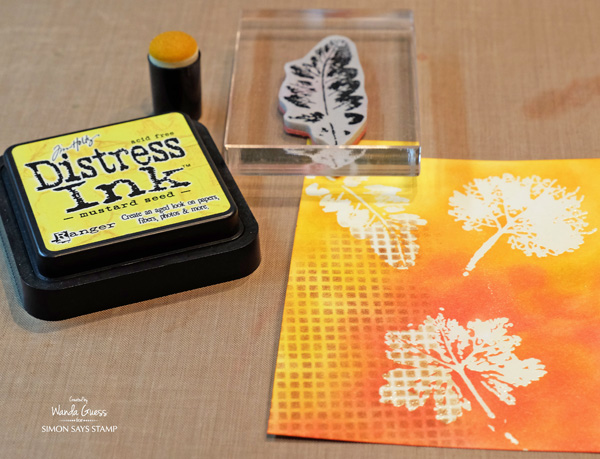
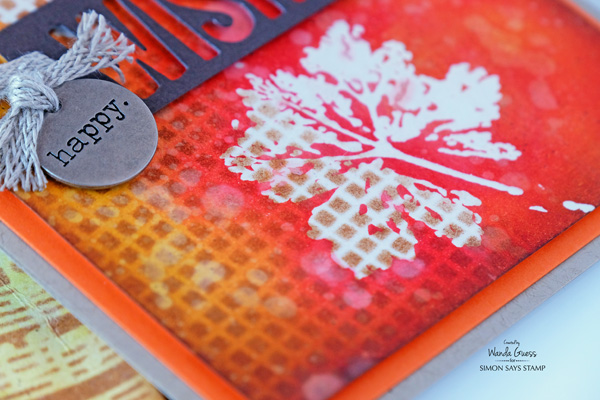
This first card is made using the Mini Burlap Stencil from the Tim Holtz Mini Stencils 22 set. I layered the embossing with the Tim Holtz Leaf Prints stamps and then inked it all up with vivid Autumn Distress Ink colors of red, yellow and orange.
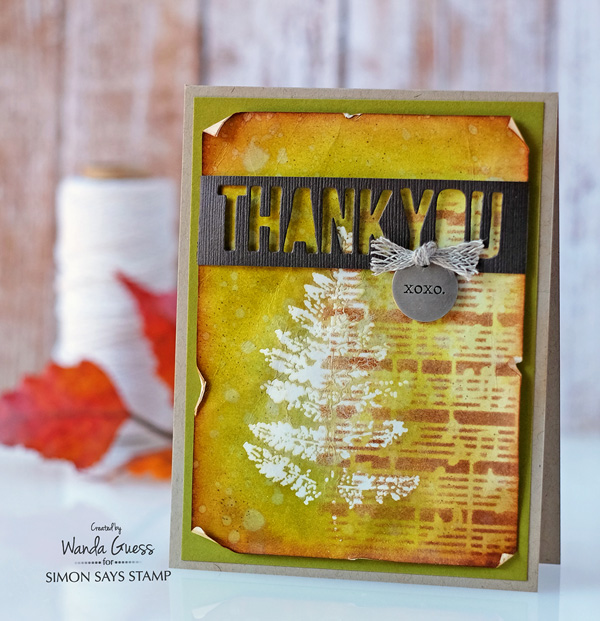
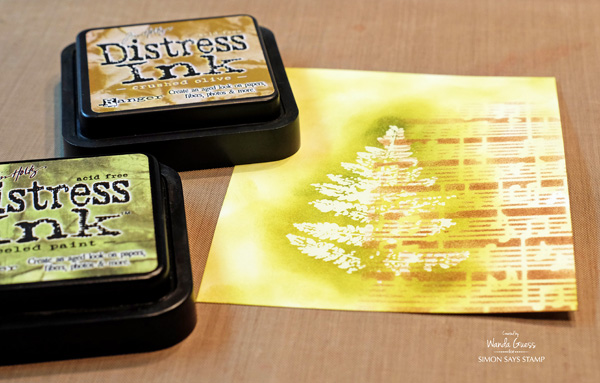
The second card was made using the Music Stencil from the Tim Holtz Mini Stencils 20 set. I layered just the pretty fern leaf from the stamp set and used Distress ink shades of greens and browns. For this card I distressed the paper a bit more, also, giving it a rustic feeling.
Here is a close up of the layers of inking, embossing, and then more inking!

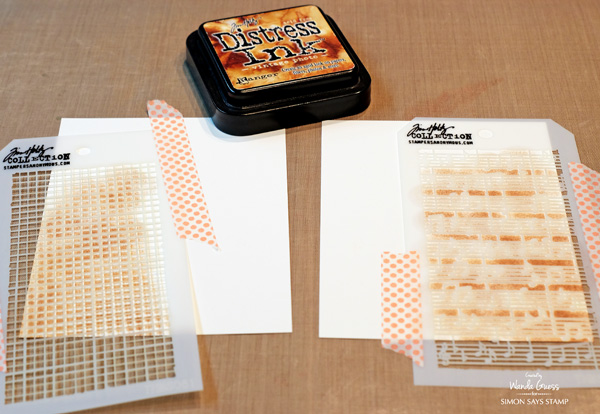
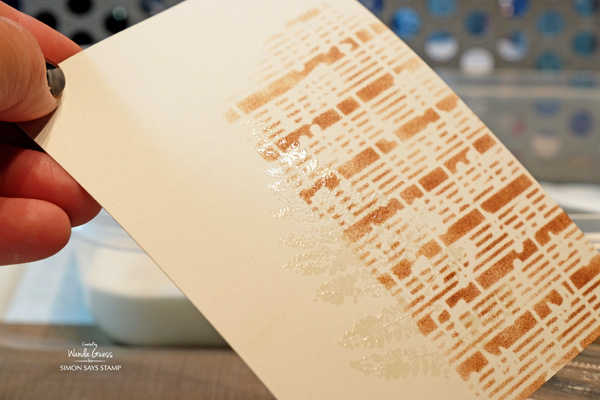
I started with a sheet of Ranger Manila paper (this is the same paper that the tags are made of) and then I inked the mini stencils with Antique Photo Distress Ink and a sponge dauber. These stencils are not large enough to cover an A2 card front, so I taped them down and used just parts of the stencil!
This is the fun part! After the background stencil image was applied. I used the leaf print stamp with SSS Clear Ink and SSS Clear Embossing Ink and heat embossed the image right over the stenciled part. Once it’s inked over, you will see the stencil under the embossing. This also is a great technique to use with patterned paper underneath – like a text paper.
I used sponge daubers to ink Crushed Olive and Peeled Paint Inks around the images and over the entire panel. I like to ink darker closer to the image.
I did the same exact technique for the orange and yellow card.
After I inked them all up to the look I wanted, I used the Tim Holtz Distress Sprayer and splattered clean water over the panels. This gives a really cool effect and sort of mottles the ink a bit. Next I used Vintage Photo Ink and a sponge to ink all around the edges of my panels. This step really provides depth to all the other color.
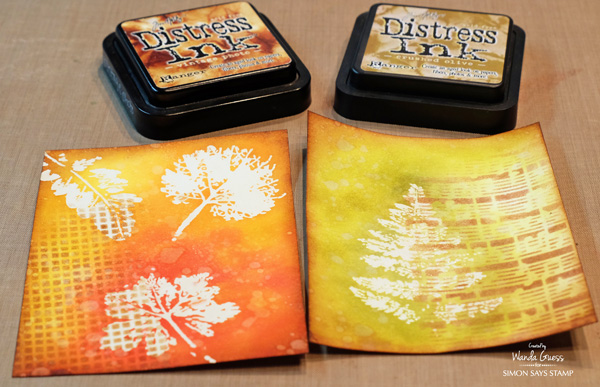
This is the finished look of the embossing over the stenciling! You can see the water drops here too. I also used the Tim Holtz Distress Marker Spritzer tool and added some specks of Vintage Photo ink. The whole key to this is just play and have fun! Every single one will turn out totally different and that’s the magic of it!
Since there is a lot going on with all the ink and stamping, I wanted to keep the rest of the cards pretty clean and simple. I used the Tim Holtz for Sizzix Celebration Words dies and rich brown paper to die cut sentiments for the cards. For the green card, I wrapped the die cut portion around the top layer of the card before attaching it to my color layer. Tip – die cut your cardstock strips to one inch wide before die cutting these words. Perfect fit every time!
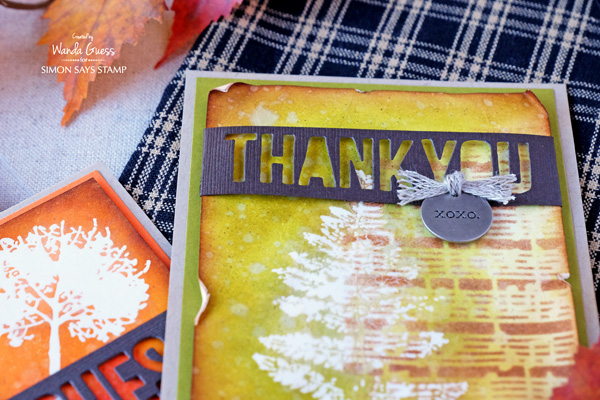
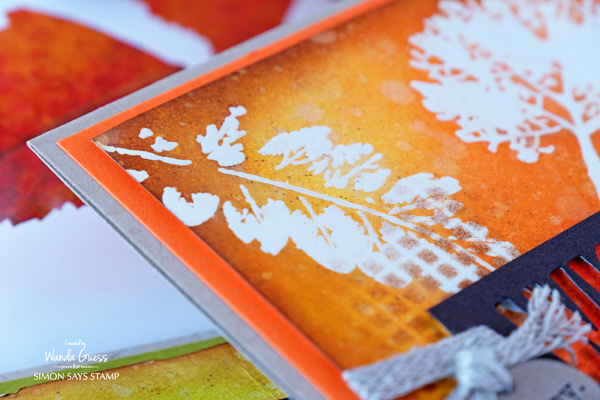
To used bits of Linen Ribbon on each card for accents. These cards have a ‘nature’ feeling to them and I thought the linen was a good soft texture to use. I added Ideaology Typed Tokens on each card to complete the message. Each card base is A2 size and made from Kraft Cardstock.
Have you tried Emboss Resist before? I hope you will try it now! Get out all your inks and get messy! Have fun and do some creative play. I believe it’s good for us! Thank you for spending part of your weekend here with me! Take care, until we meet again.
SUPPLIES FOR TODAY:
 |
 |
 |
 |
 |
 |
 |
 |
 |
 |
 |
 |
 |
 |
 |
 |
 |
 |
 |
 |
 |
 |
 |
 |
 |
 |
 |
 |


Wow, that looks like some fun stuff to play with. The tags looks great and I love emboss resist techniques, such dramatic results
Love the shabby chic look and fall colors.
Like the look achieved with the stenciling, embossing & inks. Wonderful use of Tim Holtz products.
Melissa
“Sunshine HoneyBee”
Gorgeous cards, love this technique, looks fabulous!!!
OH Wanda, these are beautiful! ♥ them!
Lovely autumnal cards! Beautiful Fall colours.
Great cards and fall colors. This is a technique that is fun to play with.
You chose the classic Fall colors with the Distress Inks. Love the combination of inks, stencils and the leaf stamps for this emboss resist technique.
Thanks for sharing your creative talent with us. I love the layered look with the stencils, stamps and inks, very inspiring.
Christina
Gorgeous cards! Can’t wait to try this technique!
You are always showing us new stuff to try and cool ideas and tips and techniques….love you guys!
beautiful cards. Yes, I have done resist technique. it’s a go to technique for me. thanks for sharing
stamping sue
http://stampingsueinconnecticut.blogspot.com/
Lovely cards! Love the emboss resist technique. I love that you used the negative part of your die cut words.
Such a lovely technique! I’d try it so soon… thanks for sharing.
Oh I LOVE your cards!! I have done the resist technique but not used a stencil. I am going to have to try that!!
Wonderful cards using the embossed resist technique! I shall have to give it a go.
Love this technique. Looks amazing. Thank you so much for sharing
Wanda’s emboss resist is beautiful! I love both of these. I have tried this technique before but not in a long time so I would like to try it again. Love how these turned out!
Love the project with the music background.
I always enjoy Saturdays with Wanda.
Beautiful Fall colours!!! I love your technique!!!
These are just gorgeous!
Gorgeous cards! Love this technique!
Two very different, but very gorgeous cards!
Loving all the colors!!!
These are beautiful! They’re totally my style card.
Great techniques. Fab results. Yummy colours. Hugz
Love the fall colors and leaves! So neat!
Gorgeous! I actually think I could do this technique! Thank you for the inspiration and tutorial!
~carol
Beautiful technique!
Wow, love the sponged backgrounds – they are gorgeous:)
Neat technique.
These cards are just amazing.
Beautiful cards and interesting technique. Thank you for the inspiration!
Great cards and technique! :)
Very nice, these would be especially good for sending to my son and grandsons.
Beautiful cards with those rich, Autumn colors. I have used the emboss resist technique several times. I think it’s great fun. Thank you for sharing your beautiful cards and techniques. Have a lovely weekend also.
cards are lovely, especiallly the one saying Wishes.
Beautiful–I like the fall colors and the texture.
Love the colors Wanda! Pretty cards!
Lovely autumn cards.
Very pretty cards Wanda. I love how colorful they are. Thanks for sharing.
Oh my these cards are beautiful!!!!
Great cards, thanks for inspiration!
VERY ARTSY, WANDA!!!! I LOOOOOVE them ALL!!!! ;)
What yummy colours Wanda! Love how vibrant your blended distress colours are. Just like the fall trees here. I love my Tim Holtz layering stencils they add such visual texture. Gorgeous cards.
Stunning cards showing Autumn colors!
Great cards, Wanda, using those Fall colors! Have done emboss resist before but not using stencils. Eager to try this. TFS!
Wonderful cards! You make me want to run to my craft table & start playing.
Wow, great cards. I love Tim’s products–his stamps and stencils are terrific–and the entire line of distress!
This looks like a cool technique! Nice cards :)