Watercolor Wonderland!
Hi readers! Happy Tuesday to you! I’m pleased to welcome first time guest designer Justine Hovey to our blog today with some fabulous tips and tricks for gorgeous watercoloring! Read on!
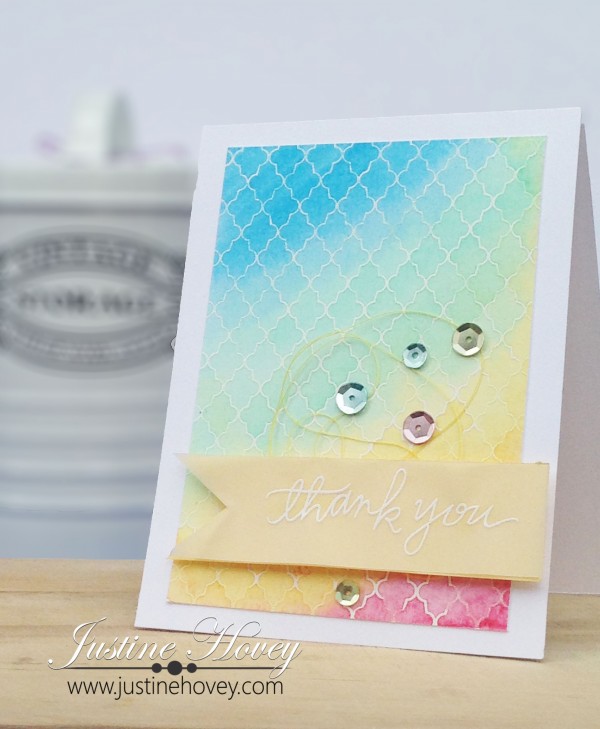
Using a Tim Holtz Watercolor Paper on the smooth side, I stamped the Lattice Background stamp in Versamark ink and embossed it using Ranger White Fine embossing powder. I saturated the paper with clean water and added watercolor in diagonal stripes. I pulled the colours into each other to blend with each new colour added. I heat embossed the Thank You Sentiment from the Many Thanks Stamp from Simon Says Stamp in white on vellum and cut out a banner. I added a piece of yellow cardstock on the back so the sentiment didn’t get lost. I added yellow thread and glued it down using the 3D tape I used to attach the sentiment. I coloured some sequins using Copic Markers and attached them to the card. I mounted the watercolor cardstock using a strong liquid adhesive onto White Cardstock.
SUPPLIES:
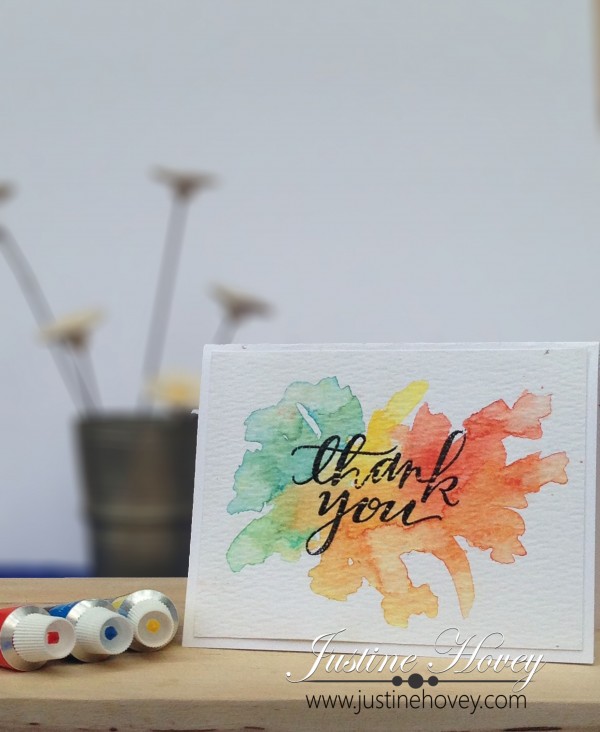
I used the rough side of the Tim Holtz distress watercolor paper this time around. I began by using black embossing powder to heat emboss the thank you from the many Thanks Stamp from Simon Says Stamp. I then took water and saturated the paper around the sentiment. I then took my brush with lots of water on it and flicked out from the centre of the card. I picked up my watercolours and went over the water I previously spread out. They spread on their own and blended quite well. I went back in and added more final touches with water and color. I mounted this card also on a white base.
SUPPLIES:
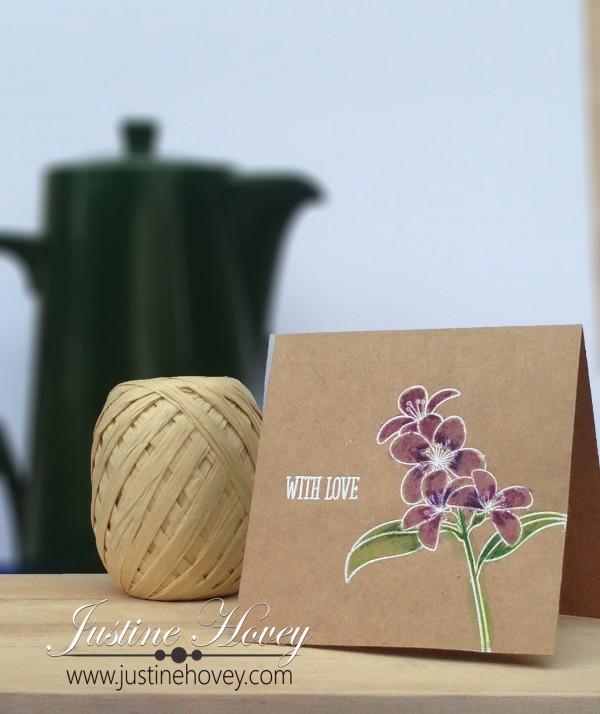
This time I created a card that looks watercolored but it isn’t! I used Intense pencils to create this intense look on Kraft Cardstock. I white heat embossed this stamp from Clearly Besotted and coloured in the stamp using Inktense. Using the Tim Holtz Waterbrush, I went over the color to make it blend creating a more intense watercolour look!
SUPPLIES:
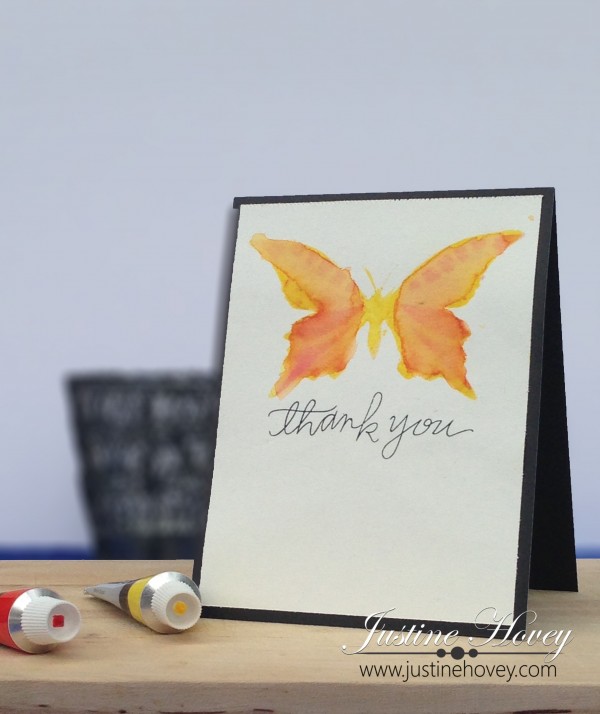
For this card I taped down the Mini layered Butterflies Stencil from the Crafters Workshop using Washi tape. I dunked my brush in water and picked up the watercolor from my palette. I painted the stencil using red, yellow and orange watercolour paint. I removed the stencil and some spread underneath to create that extra special watercolour look. I finished off the card with the Thank you sentiment from the Many Thanks Set from Simon Says Stamp and a black card base.
SUPPLIES:
Thanks for reading today and thanks so much to Justine for these watercolored beauties to inspire us!
Blog Candy Alert!! Follow our blog via email and comment on this post for a chance to win a special blog candy!
Congrats! Blog Candy Winners!
From: Spotted! At CHA!: Lynn Hardy!
From: Multi-Medium Wood Decor!: Patsy Fidelak!
From: Virtual Tour CHA Winter 2015: Darci Powers!
Please email Samantha ([email protected]) with your mailing address and the name of the blog you won from to claim your prize!









Wonderful explanations of how to do all these projects. I am itching to pull out my watercolors now.
These are so soft & pretty, Justine. I don’t color, but can really appreciate the talent it requires of those who do.
I ADORE WATERCOLORS! ALL of these cards are BEAUTIFUL!!!!!!!!!!!!!! ;)
Gorgeous samples! Have to break out my watercolors and try some of these techniques!
All of your cards are beautiful, but I really like the one on the kraft cardstock. The look of white on kraft is one I always like. Then, you did such a great job getting the color just right in that pretty stamp.
I am really enjoying the white embossing with the water color look! Pretty cards!
You have a beautiful flair! Nice work using watercolors!
Gorgeous cards! Thank you for the explanations on how you did them.
beautiful colors – lovely cards – thank you for the inspiration and ideas. Julie
thanks for the beautiful, inspiring cards that make me want to watercolor!
Awesome cards! Thanks for sharing your time, talents, and inspiration with us.
Love these! such wonderful inspiration.
Oh they are all so pretty!
Beautiful watercolors….
I love all of the beautiful ways you used the watercolors.
Wow! What incredible cards! I love them all. Thanks for the tutorials. These have made me dig out my watercolors & my Inktense pencils so I’ll do more watercoloring. Thanks!
There is only one word to describe these cards- beautiful!!!! Love the watercolors on it!!!!
beautiful cards.. tfs..
-Berina
Moxie Craftie
The way you blend colors is beautiful and I love the velum banner…Beautiful!
Beautiful cards – thanks for sharing your tips :)
BEAUTIFUL!!!
THANK YOU for sharing your techniques and inspiration Justine!!!
I have SO MUCH to learn and been a bit disheartened by my 1st attempts, looking forward to getting back in the crafty saddle and trying again :)
Absolutely love watercolor backgrounds!
These are all such beautiful cards! Thanks for sharing Justine!
I just love the watercolors!
All of these Water colored cards are absolutely lovely!!
Awesome watercolours!
Beautiful Cards Justine. The explanation’s are clear and simple. I’m going to definitely try this.