Village Graveyard Vignette Box
Hi friends! Happy Sunday! Thanks for stopping by today! I’m so excited to share this GORGEOUS decor piece special guest Emma Williams made for us to share on the blog! It’s packed full of Tim Holtz goodness in Emma’s own amazing and fantastic style! Be sure to keep on scrolling down for more information on the project and close up shots. Enjoy!
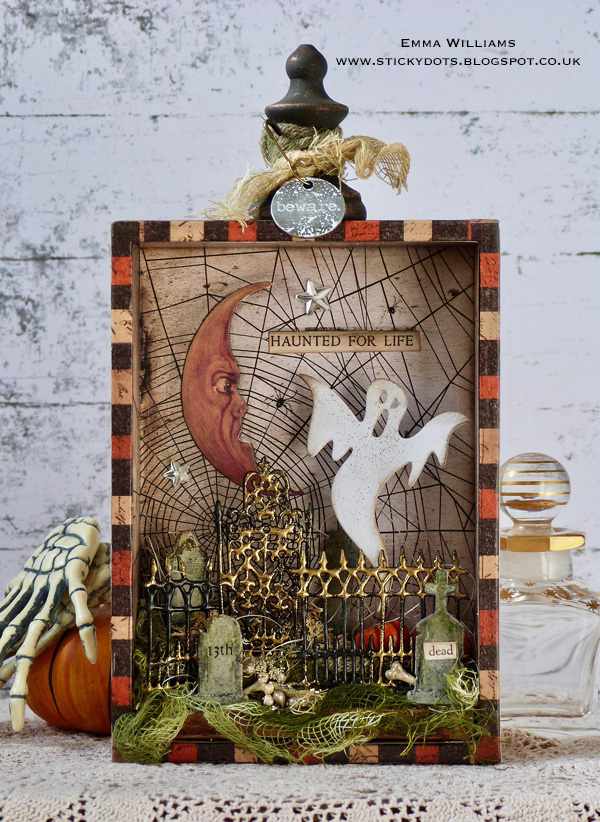
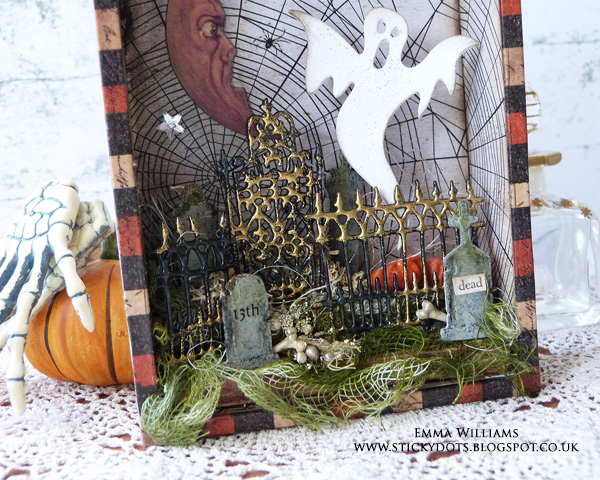
Hi everyone, it’s Emma here and I’m really happy to be back here on the Simon Says Stamp blog! October is one of my favourite times of year, Autumn has now arrived, Pumpkin Spiced Lattes are ready and waiting and of course, Halloween is nearly here. So with this in mind, I thought it would be fun to create a piece that is perfect to display in your home on October 31st and I used some of the fabulous new Tim Holtz Halloween products including the Village Graveyard die from Sizzix to create this spooktacular scene full of dimension…
1. Using the largest size of Vignette Box, apply the striped tape from the Halloween Design Tape set around each of the raw edges on the front of the box.
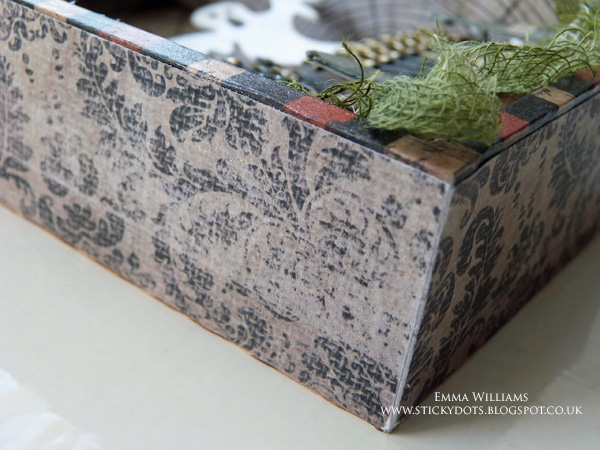
2. Cut four pieces of patterned paper from the Halloween Paper Stash and line the outside of the box with these panels, attaching them with Collage Medium to secure them into place.
3. Line the inside of the box, using panels of the spider’s web paper from the Halloween Paper Stash cut to the size of each of the four sides and the back of the box. Again, I attached each piece of paper to the inside of my box using a Collage Brush.
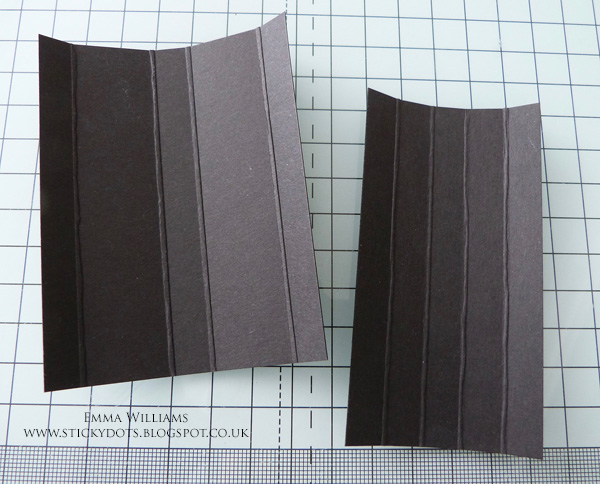
4. To create dimension inside my box, I created a small platform which I inserted along the base, allowing me to build up my die cut pieces. I started by cutting two pieces of card, first piece 7 x 9cm and the second, 5 x 9cm. Take the larger of the two pieces, place in front of you and score vertically at 1cm, 3cm, 4cm and 6cm. Fold along the score lines to create a cube shape. Take the second piece and score at 1cm intervals and again fold along the lines to create a cube.
5. Attach the two cubes together to form a step.
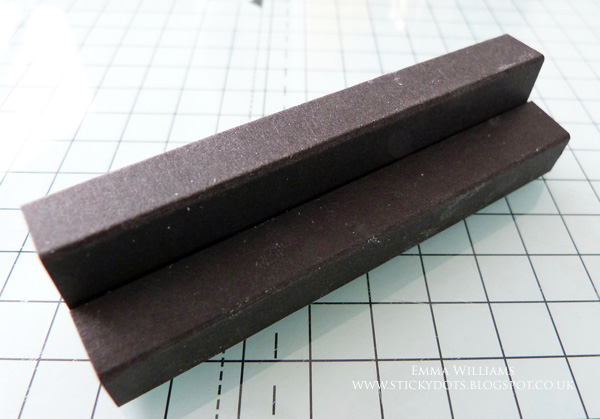
6. Adhere the ‘step’ in the base of your box using Collage Medium to secure it into place.
7. Cut a section of cheesecloth and spritz the cloth with Peeled Paint and Forest Moss Distress Spray Stain. Heat dry and then arrange and drape the cloth over the step you created in the bottom of the Vignette box. Attach the cloth with Collage Medium.
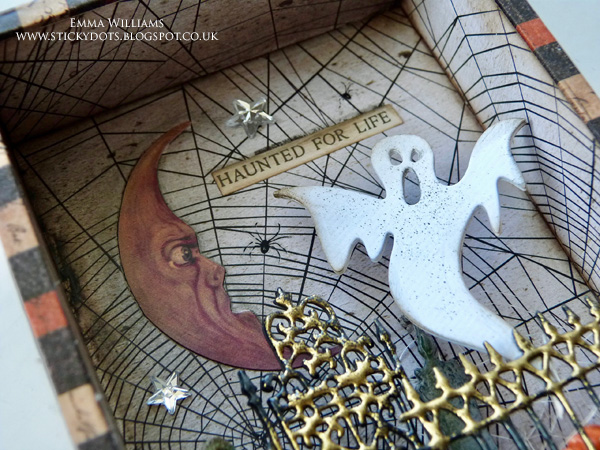
8. Attach the small moon from the Halloween Ephemera pack onto the left hand side of the inside of the box using Collage Medium to adhere it in place and then apply a coat of Collage Medium over the entire box to seal it.
9. Once the medium is dry, I added a couple of spider rub ons from the Halloween Remnant Rubs set and placed these directly onto the paper so they looked like they are crawling on the webs.
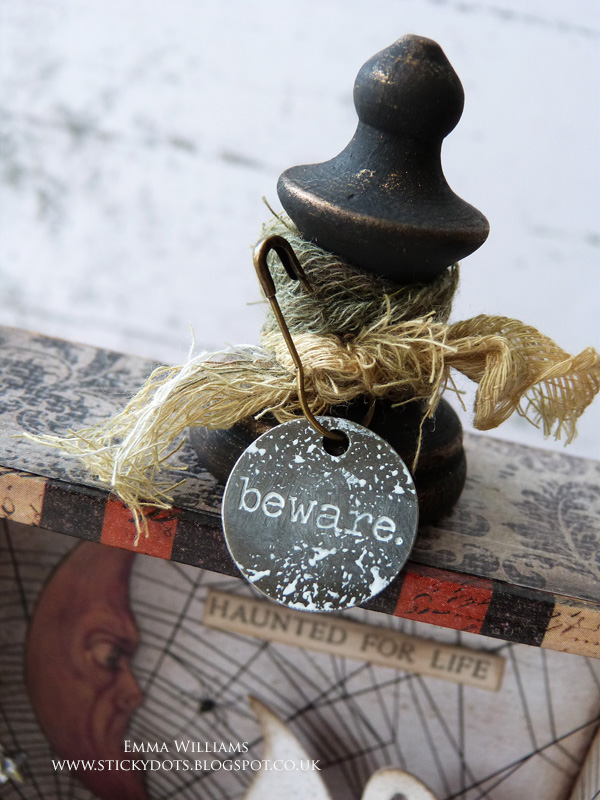
10. Using the largest of the Vignette Finials, apply a coat of gesso and then dry.
11. Then, cover the gessoed finial with two layers of Black Soot Distress Paint, allowing each layer to dry thoroughly.
12. Once touch dry, rub a small amount of Aged Brass Alchemy Wax over random areas of the finial to create a more antique looking piece. Attach the finished finial to the top of your box using Collage Medium.
13. Now to start making those fun embellishment pieces to build and create that spooky village graveyard scene.
14. Using each of the dies from the set, die cut two separate pieces of each shape from Mixed Media Heavy stock card. Take one of the shapes as seen in the photo below and apply a layer of Collage Medium to the back of the die cut. Layer the first die cut piece over the second to create one image that will be substantial enough to stand freely without bending.
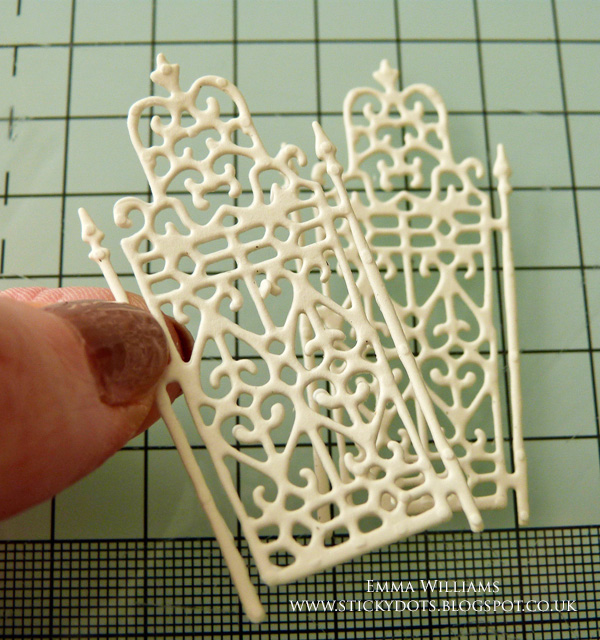
15. Repeat with every die cut shape from the die set to create all the separate elements.
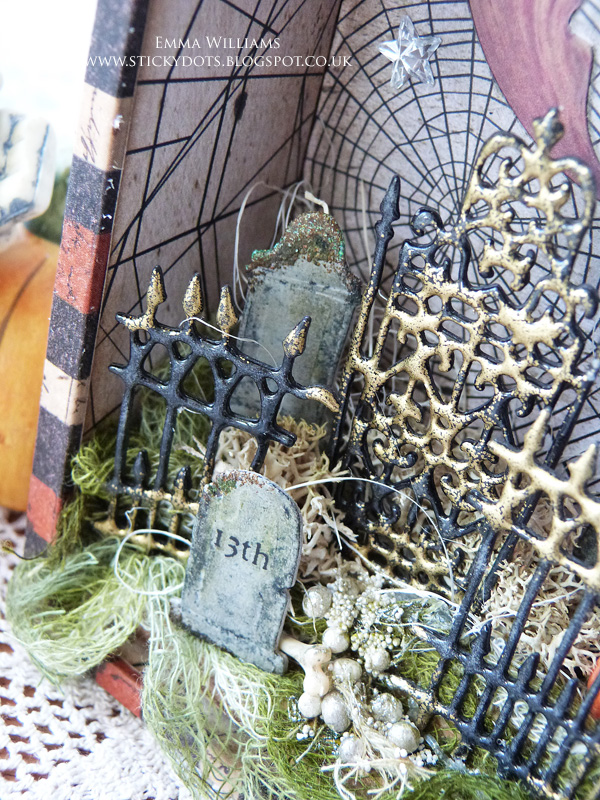
16. To create the gorgeous look of iron on the fences, dab a Versamark Ink Pad over the top of die cut and then sprinkle with black embossing powder. Tap away the excess and gently heat the powder until molten.
17. Once the powder is cool enough to touch, dab the same ink pad over the top of the embossed die cut and sprinkle with a second layer of the black embossing powder.
18. Tap away the excess powder, heat and cool.
19. Apply the ink pad to the embossed fence, dabbing the ink onto random areas and then sprinkle gold embossing powder over the top. You don’t need to add this to the whole die cut piece, so brush the powder away from any areas you don’t need it to be.
20. Heat the gold powder until molten and shiny and repeat this process on the remaining fence die cuts.
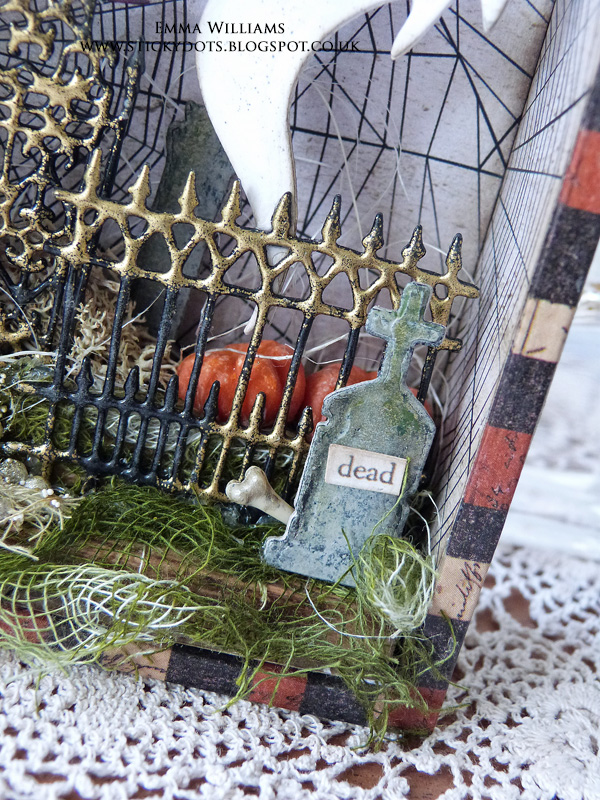
21. Moving onto the tombstones ~ use your finger to apply a small amount of Grit Paste to the tops of each tombstone. Once dry, apply a layer of Pumice Stone Distress Paint over the top of each die cut section and give them a blast of heat to dry them thoroughly.
22. To add more depth of colour and a mossy effect to the stone, take the Peeled Paint Distress Crayon and run it over random areas of the die cut piece, blending out the colour with your fin-ger. Finally, add some Black Soot Distress crayon around the edges and blend. Add remnant rubs or Halloween Clippings Stickers to the stones ~ you can use as many or as few as you want.
23. For the final die cut element, take the ghost and apply a layer of Picket Fence Distress Paint over the top of the die cut. Dry and if needed add a second layer. Ink the edges of the ghost with Ground Espresso Distress Ink and then flick some Black Soot Distress Paint over the die cut.
24. Now for the fun part, assembling your scene! You can do this anyway you choose and you have the step that was created in stage 6 to create the levels and dimension for all your embellishments that fit inside of the box.
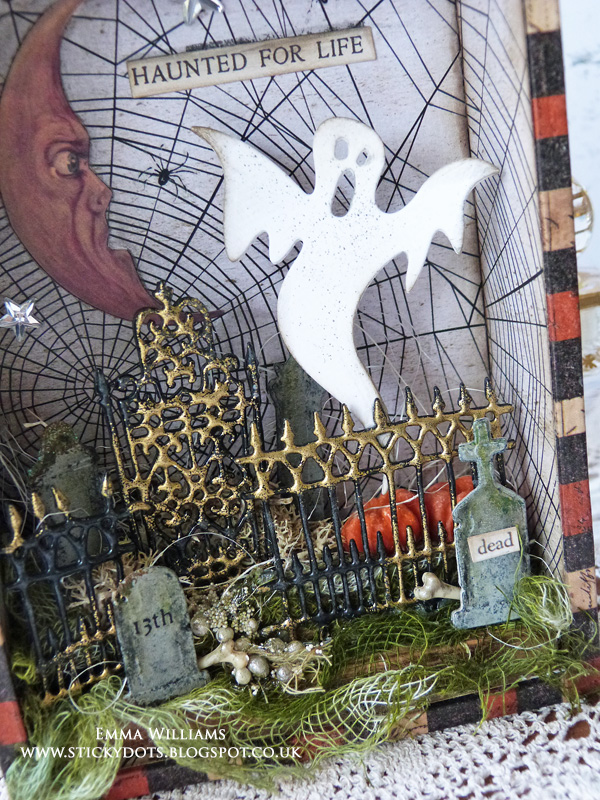
25. I attached each of my die cut pieces using a hot glue gun, applying a thin line of glue along the bottom edge of each piece which will secure them into place.
26. To complete the scene, I added some Art Stones which I sprinkled over Collage Medium to create a path. Once the stones are completely dry, paint them with a small amount of Unicorn’s hair Alchemy paint to create a shimmer. I also added some mini pumpkins to my scene, boneyard findings and dried moss.
27. Finally, I attached my ghost by applying a small amount of Collage Medium to the tail and placing it behind the fence, so that it appears to be floating and added mirrored stars and a Hallow-een Clippings Sticker to the background.
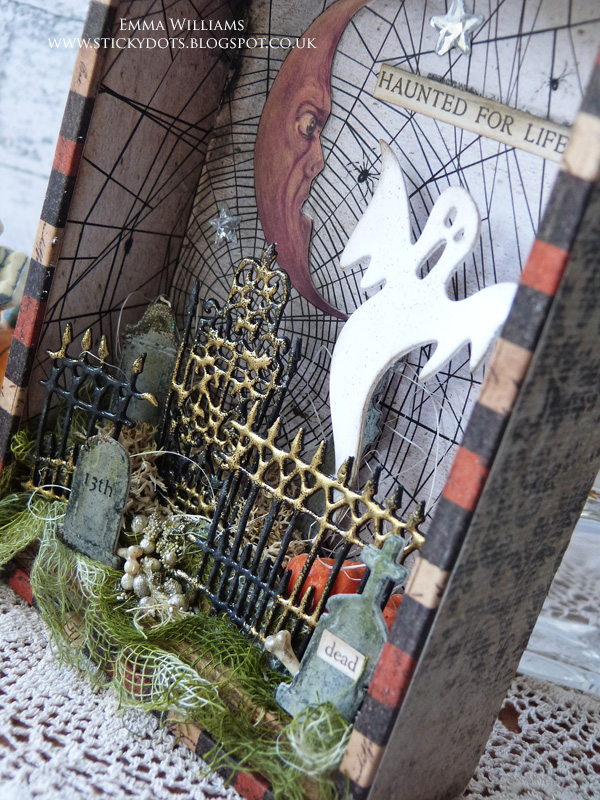
28. For the finishing touch, take some more of the cheesecloth, dye it with Antique Linen and Pum-ice Stone Distress Spray Stain and once dry, tie the cloth around the finial. Take a Looped Pin to attach a Halloween Typed Token altered with Picket Fence Distress Paint to the cheesecloth.
I really hope you’ve loved the creative process behind this fun Halloween project and that you’ll be inspired by the piece I’ve created! Thanks so much for stopping by today and I’ll see you again very soon!
Emma
SUPPLIES:
|


Thanks for reading and thanks to Emma for this fabulous inspiration!

Blog Candy Alert!! Follow our blog via email and comment on this post for a chance to win a special blog candy!


WOW what an amazing project!!!!
Interesting shadow box card. Thank you for sharing.
This is so cool–what a spooky decoration for Halloween!
Spooky but fun!
Wow very creative box!
Wow Love all the details! Great project!
I agree with everyone that this is an amazing project!!
Wow!!! This blows me away. I love all the attention to detail. Makes you feel the wind blowing and the wolves howling. Thanks for sharing.
Great project!
This is amazing! There is so much detail (evidence the number of steps!). Especially love the embossed fences!
What an awesome project! Truly amazing. Love it!
this is so well crafted, a great addition to Halloween home decor. tfs
This is wonderful–so many cool details! It makes me chuckle how the moon appears to be looking at the spider :)
Beautiful mixed media project. The details are fantastic!
This is creative. Beyond my skill set :)
Oooh! So cute and spooky! Love the moon and the ghost.
Wow, I love this box. It’s so creepy!
Wow – that is just stunning! Love all the details!
wow so much in details! What an amazing decoration you created!
LOVE LOVE LOVE IT! What a great idea. Beautifully decorated too of course by the very talented Emma. xxx
Oh the details, the details… WOW ! I just can’t express it enough of how wowed I am about these details and the techniques you use this is “fabtabulously spooktacular ” hahaha (spell check suggested I ask goggle for suggestions for MY word) I’m seriously tickled !!
That moon and the ghost look like they are having a dialog LOL !
How cool is this? Love it!!
A fun little Halloween scene! I really love the way you’ve decorated the fence. I just finished a 3D project featuring these dies, and after photographing it, I wished I’d gone with a box! Fabulous project! Hugs!
The level of detail that went into this piece is just amazing. Don’t think I’d have the patience for it. Thanks for sharing your creativity.
LOVE the shadow box! Great details.
I love all the details, that fence looks amazing!
This is sooooo AWESOME!!!! I love it!!!
That is such a cooooool project… you did an amazing job with your fence….love love love :)
Great Halloween card. Thanks for sharing.
Linda D.
This is probably my favorite Halloween project so far!! Thanks for the step-by-step, there’s some great techniques!
Really cool project!
This is such a great Halloween decoration. I love all the details, great work.
Very spooky and fun!! I love what you did!! Thanks for sharing!
Emma is so gifted at her craft. I always enjoy looking over the project she has made, taking it all in.
Wow!! What an amazing project!
Wow, what a tantalizing creation! it is “spook”tacular!
Great presentation and the love that went into the project shines brightly
Wow, fabulous
work and love
all the elements
used.
Carla from Utah
An amazing creation! So many details to enjoy. I salute Emma for all the creative detail of this fabulous piece!
Thanks for the step by step
I really love your black fence and added also gold on some part
stunning
and so scrarry box you have made
really feel halloween at dark night
hugs
Monika
How did I even miss this post? This is such a Stunning project!!!! Thanks for sharing and for the great inspiration!!
Gorgeous. Love how you embossed the fence. HUgz
Every single project I’ve seen of Emma’s is a fine example of her incredible talent- this project being no exception . Spooktacular .
x
Eek. What an awesome project.
I really like the gate / fence! It would be great for projects other than Halloween too.
Wow super! So much details and so much to see! Great work!
This is one very impressive creation !! Thanks for the great explanations.
Such a cool project!!