Tim Holtz Victorian Carolers
Hi friends! Happy DieCember® 5th! We hope you’ve been enjoying our celebration of the amazing pizzaz that die cuts provide to your crafting! Today we continue the spotlight and love of die-cuts with a special feature from the always fabulous Emma Williams! To see even more great projects by Emma, tune into our Monday Challenge Blog each week! Be sure to read on and enjoy!
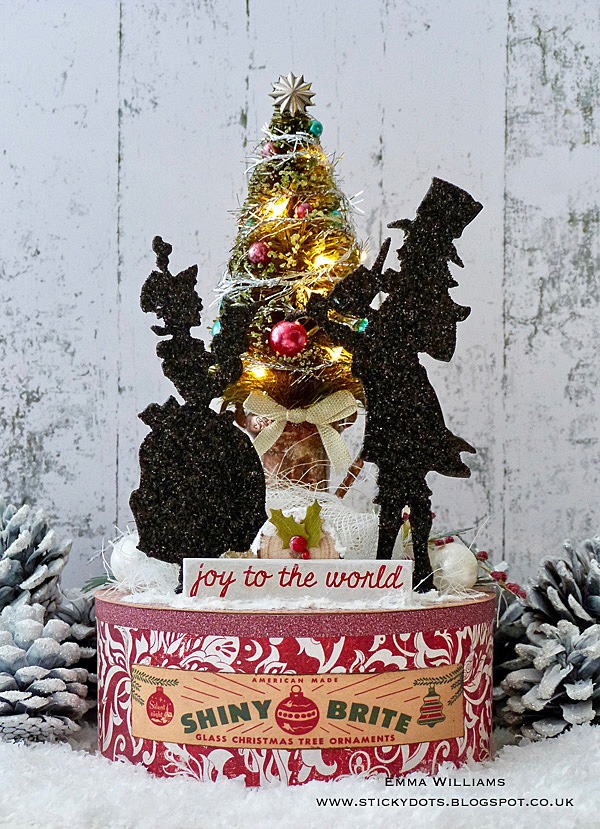
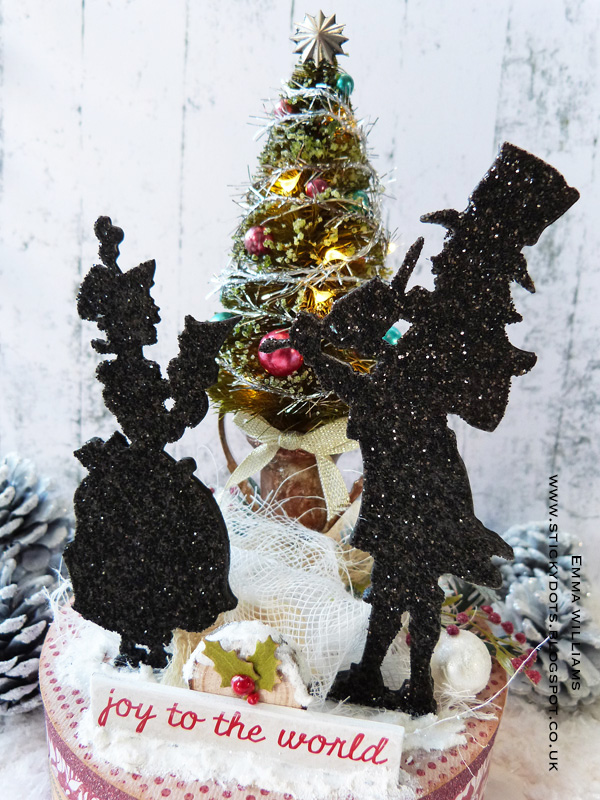
Hello friends, Emma here and I’m thrilled to be back on the Simon Says Stamp blog sharing my Victorian Carolers Home Decor project, featuring some of my favorite seasonal products and dies from Tim Holtz and Sizzix. This vintage style project is full of sparkle and shine and can you believe the base actually began life as a chocolate box!
So, let’s get started and here’s how I created this project….
1. Using the lid of the chocolate/candy box, (you can choose whatever shape you prefer but I chose a round box) I gave it a coat of gesso to prime the box ready for decorating.
2. Select papers of your choice, I used one of the beautiful papers from the Christmas Paper Stash by Tim Holtz and cut panels of the paper to fit the sides of my box. Depending on the size of the box and the size of your papers, you might have to cut two sections and join them, which is what I did on mine, joining the papers on the side. Adhere the papers onto the box using Matte Collage Medium.
3. Cut another piece of paper with a coordinating design to fit the top of the box and again, adhere the paper using Collage Medium.
4. Taking the Shiny & Brite piece from the Christmas Ephemera pack, attach this centrally to the front of the box and then apply a coat of the medium over the entire box to seal it. Allow drying time.
5. Using the red sparkle tape from the Tidings Design Tape set, attach the tape around the top of the box.
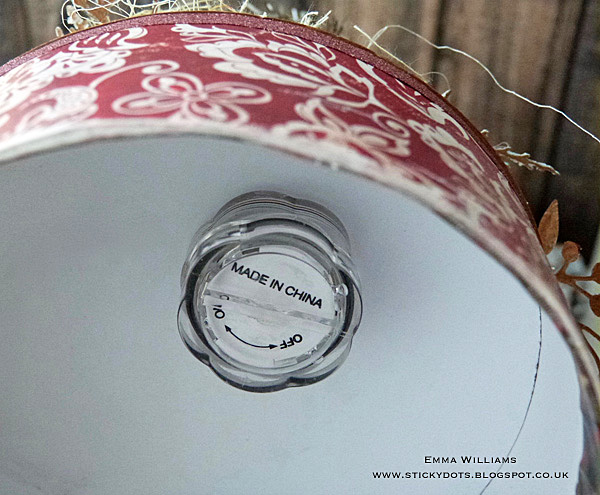
6. I then made a hole in the top of the box and threaded through a battery operated wire light strand. Attach the battery compartment to the underside of the box, where it will be hidden away from view but ensure that you can get to the battery compartment to change the batteries.
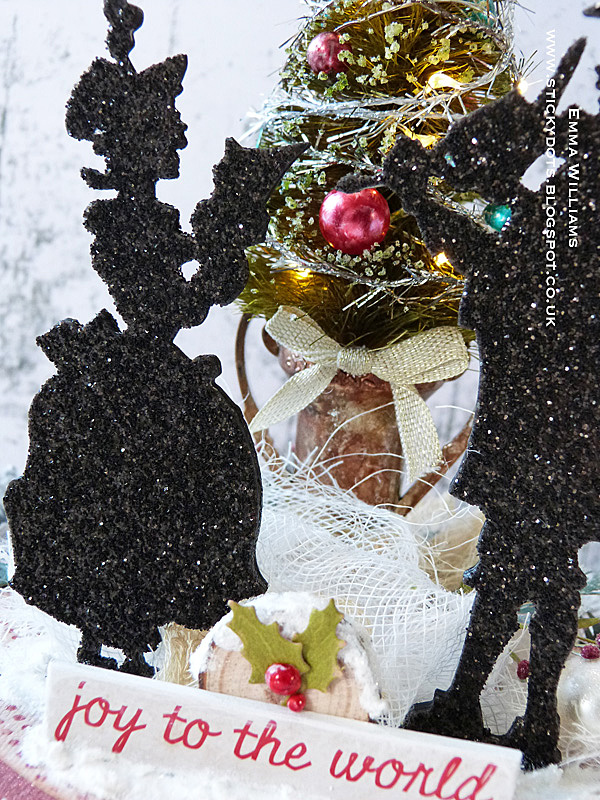
7. To create the two Victorian Carolers, which will need to be substantial enough to stand on their own once they are attached to the base, I used the Victorian Carolers die to die cut three pieces of chipboard for each image. Using Collage Medium between each individual chipboard die cut, layer them over the top of one another to create the two individual figures, which are now going to be really substantial.
8. Paint the chipboard die cuts, back and front with two coats of Black Soot Distress Paint and allow to dry in between each application.
9. To complete the figures and add the glittered top layer, I applied a sheet of Be Creative Double Sided Tape over black card and cut the two carolers from the card. I then attached these layers over the top of my chipboard figures adhering the die cuts with collage medium on the side without the tape sheet attached. Peel away the backing sheet of the tape and then sprinkle each die cut figure with Black Soot Distress Glitter, tapping away the excess.
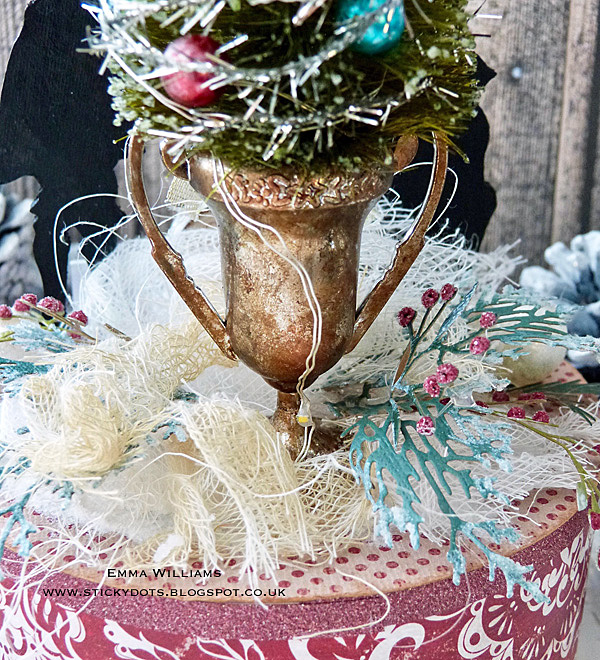
10. To create the tree, I started with the Trophy Cup which the tree is standing in and applied Mushroom and Gold Mixative Alcohol Ink onto the surface to create a more antique, vintage feel.
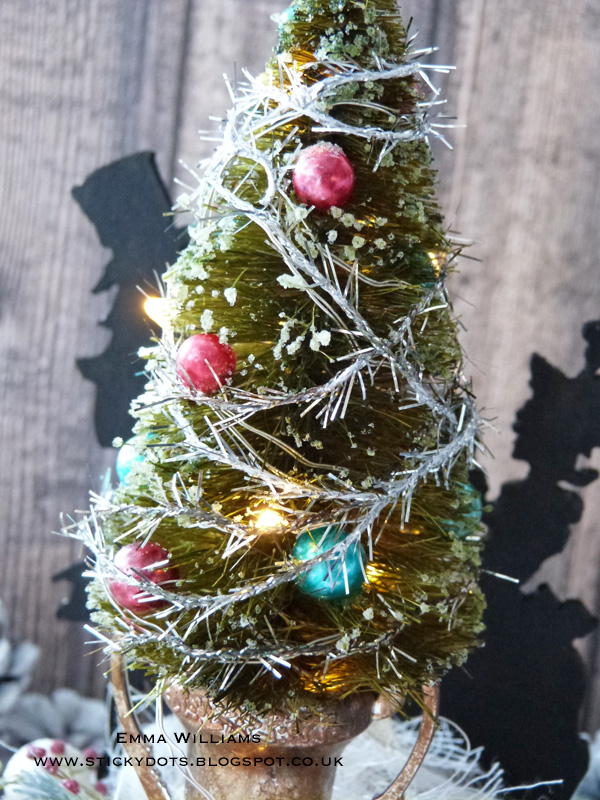
11. I then took one of the Woodland Trees and spritzed it with Peeled Paint Distress Spray Stain. Allow to dry naturally or gently dry with a heat gun.
12. Apply a good amount of Glossy Accents onto a non-stick craft sheet and roll your tree into the medium, picking up small amounts of the medium on the tips of the tree. Sprinkle with a generous amount of Rock Candy Distress Glitter, shake away the excess and allow to dry.
13. To color the baubles for the tree, I placed the baubles into a sealed bag and added two drops of alcohol ink, I used Cranberry and Turquoise. Shake the bag to coat the baubles with color and once happy with the coverage, attach them to your tree using small amounts of the Collage Medium. You will need to use an individual bag for each color of bauble and alcohol ink.
14. Place the tree into the Trophy Cup, attaching it with a hot glue gun to secure into place.

15. Taking the wire light strand that I previously inserted through the top of the box, wrap the lights around the tree. Once the lights are in place, attach the trailing wire to the back of the cup and then attach the completed tree onto the top of your covered box.
16. Wrap some tinsel from the Metallic Trimmings set around the tree and place a fluted star on the top.

17. Tie a small bow from gold metallic trimmings ribbon and attach the bow onto the center of the trophy cup, just beneath the tree.
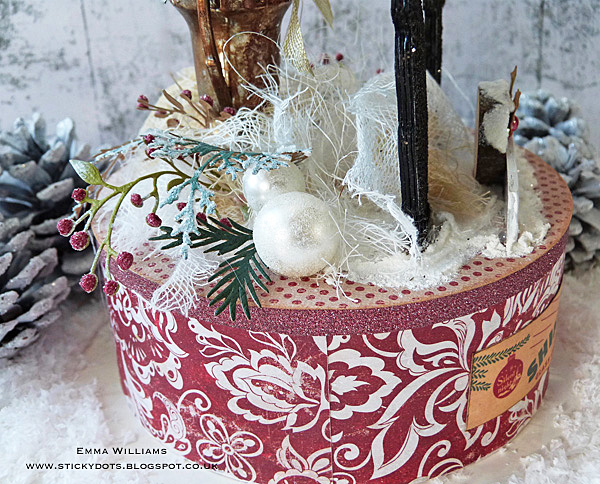
18. Apply a good amount of Grit Paste over the surface of the box to create the look of snow and also add it around the base of the trophy cup before sprinkling the paste with a dusting of Rock Candy Glitter. I then arranged a small amount of cheesecloth and sisal fibers over the paste to create some movement and texture to the piece.
19. Attach your die cut glittered figures onto the top of the box, placing them in front of the tree and adhering them into place with a hot glue gun or Collage Medium which I applied along the flat base of the die cuts.
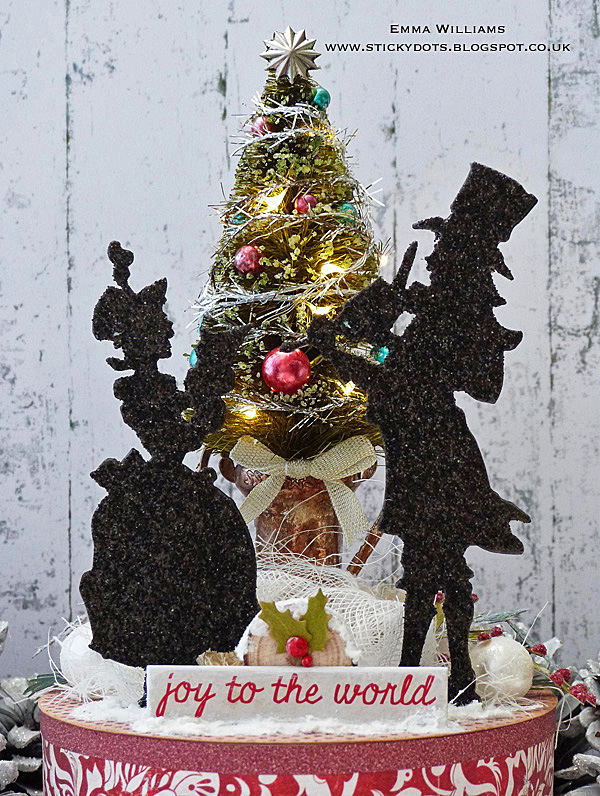
20. Die cut some foliage from a piece of green Classic Kraft card and frost the individual pieces by applying a small amount of Collage Medium onto the tips and then dusting with Rock Candy Distress Glitter. Attach the foliage by placing it, in and around the cheesecloth layer.
21. To create the snowballs, I used three of the baubles and applied a layer of Collage Medium over the surface before sprinkling them with Rock Candy Distress Glitter and attaching them to the project.

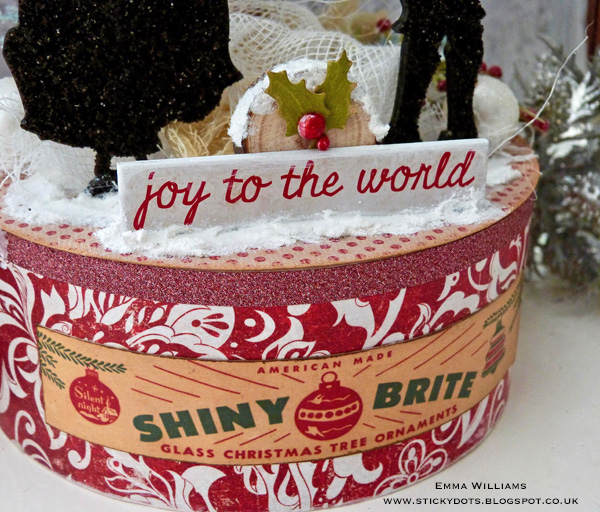
22. Attach a Christmas Quote Chip at the front of the box, placing a Wood Slice behind it that has a light covering of Grit Paste over the top of the slice.
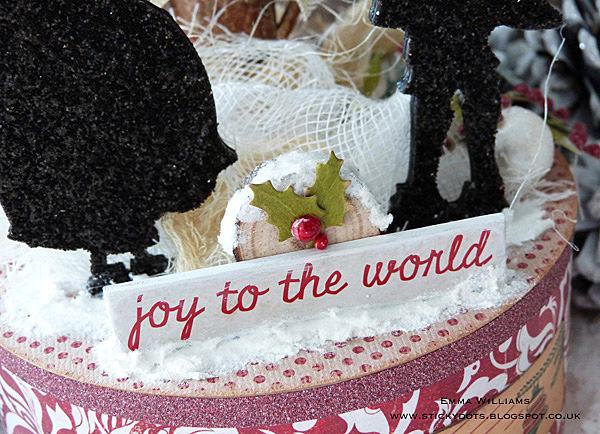
23. Attach two die cut holly leaves to slice and complete with two red pearls.
I really hope you’ve been inspired by this project and the techniques I’ve used and any of these ideas can be adapted in so many different ways. If you want to choose a different die or even a different color or paper design, then anything is possible and you can really make a project that is unique to you, and your home!
Thank you so much for stopping by today, it’s been fun to take you through the creative process of this piece.
Take care and I hope you all have a wonderful Christmas and a very happy and healthy 2018!
Emma
SUPPLIES:
|


Thanks for reading today, and thanks to Emma for being our guest!

Blog Candy Alert!! Follow our blog via email and comment on this post for a chance to win a special blog candy!
Congrats! Blog Candy Winners!
From: Doodling with Debby: Picture Book Christmas: Jeanne Beam!
From: Yippee for Yana: Joy to the World – Pencil Coloring Over White Heat Embossing: Susan Pezza!
From: Mixed Medium: Beautiful with Shari Carroll: Christine Dring!
From: What Would Kelly Make: Volume 13! Plus “Joy to the World” Reveal!: Monika Reeck!
Please email [email protected] with the name of the blog you won from, the prize you won, and your address (if applicable), to redeem your prize(s)!


That’s a very special piece.
Very cool decor piece!
Beautiful project!
Wow – incredible piece of art. Love all the details!
What a clever use for the carolers.
Today’s project is created by a very talented and creative artist.
Festive use of Tim Holtz Carolers.
Melissa
“Sunshine HoneyBee”
What a fun holiday project!
Fabulous project! TFS
This is beautiful!
Wow. That sure is a lot of work. Your attention to detail makes this a darling display of creativity.
Such a fun and festive decorpiece!
Wow, that’s simply amazing, all the detail! WOW!
Stunning project!!!
Congrats to all the winners!!!
Oh my goodness EMMA!!! this is absolutely STUNNING!!! You are way too clever ;-) I absolutely LOVE this!! What a beautiful decoration!! I am going to buy everything so I can make one now ;-)
LOVE LOVE LOVE!!
This is spectacular!!! Cheers.
That is really a gorgeous piece of art. I would to display it on a table. Thanks for sharing..
WOW… this is just WOW-mazing!!!
Really really adorable, got to love T!m Holtz products.
Gorgeous decoration/keepsake!!
Wow, so stunning!
very cool and very time appropriate lol
Oh my goodness ! This is truly an incredible creation ! Congratulations !
What wonderful and elegant projects!
So adorable – TFS
What a beautiful project
This is wonderful, I really like the tree!
Love this–perfect for the holidays.
Wow, that is just beautiful!
Oh this project is really beautiful! I am surely going to try something similar soon! Thank you for sharing!
WOW, what an incredible work of art.
This is such an amazing piece of artwork! Thanks for sharing how to make this.
Such a beautiful center piece.
Such a fun project and thanks for sharing.
Linda D.
Lovely festive decoration! There are so many beautiful details to feast your eyes on!
This is wonderful, Emma. As always you have worked those products and created a really charming piece of Christmas home decor. Thanks for sharing the step by step and for always delighting with your creativity x
Hi there, I am desperately trying to find this die Sizzix Bigz die Victoria Carolers are you able to help me or even help me with some die cuts….I live in the UK….many thanks Ursula x