Tim Holtz Home Decor
Hi readers! How’s your weekend going? Check out this amazing art by Monday Challenge Design Team member, Emma Williams! It’s a Tim Holtz Wonder! For more detailed pictures and info on how she made it, read on and enjoy!
Hey everyone!
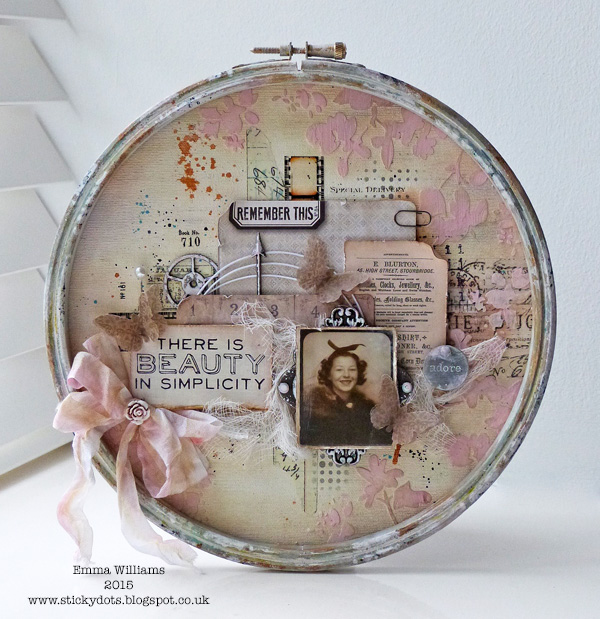
It’s Emma here and I’m thrilled to be back on the Simon Says Stamp blog today, sharing a piece of home decor that was inspired by my love of vintage ephemera and photos. I love how these wonderful little pieces of history can tell a story of yesteryear and wanted to incorporate these in today’s project together with lots of other products from Tim Holtz and Ranger Ink to create my altered embroidery hoop!
- To begin with I took a plain wooden embroidery hoop and applied a coat of gesso over the surface. I dried the paint layer thoroughly and then applied Picket Fence Distress Paint over the top. I then added small amounts of Hickory Smoke, Antiqued Bronze, Peeled Paint and Broken China over the top of the white to create a shabby chic, aged frame. I find that applying the paint with your fingertip is easier and gives you more control over the paints and I also dry the paints between layers so that they don’t become too sludgy in appearance.
- Next, I cut a circle of sticky back canvas the same size as my embroidery hoop and adhered the canvas onto thick white card, trimming away the excess card around the circle of canvas.
- Apply a light layer of Gesso over the top of the canvas and heat dry. Don’t overheat the card/canvas as this might cause it to curl and you need it to remain as flat as possible. When thoroughly dry, mix together some Picket Fence and Antique Linen Distress Paint and paint the surface of the canvas.

- When dry, I used a small amount of Frayed Burlap Distress Paint and dry brushed the colour across the surface to create a vintage look to the canvas.
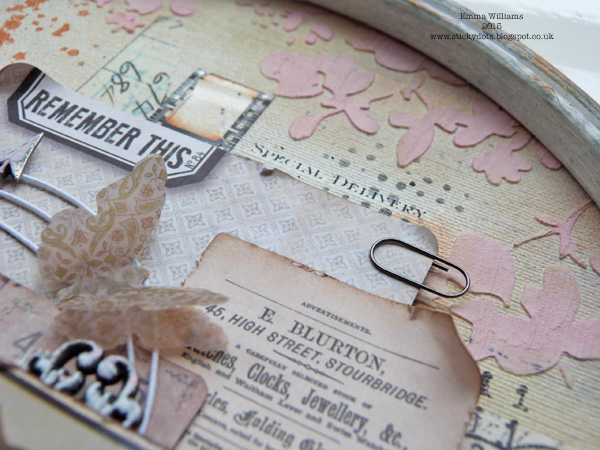
- I then added torn strips of Tissue Tape and Film Ribbon, applying it horizontally and vertically to create a background on the centre of the canvas.
- Using a blending tool, I inked Watering Can Archival Ink through the Dot Fade stencil directly onto the central area of my background.
- Mix Spun Sugar Distress Paint into a small amount of Texture Paste and using a palette knife, apply the pink paste through the Blossom Layering Stencil around the edge of the canvas circle. Leave to dry.
- Next, I used a paint brush or water brush to pick up small amounts of Black Soot, Antiqued Bronze and Peacock Feathers Distress Paint and then flicked them across my canvas. Ink around the edges of the canvas circle with Walnut Stain Distress Ink.
- Apply some Glue N Seal onto the back rim of the embroidery hoop and mount the hoop directly onto the decorated canvas.
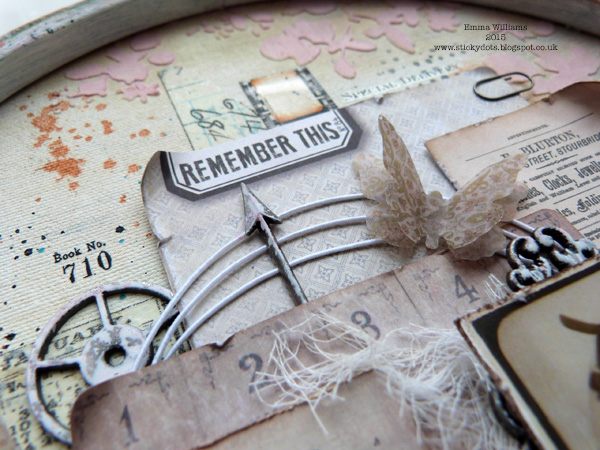
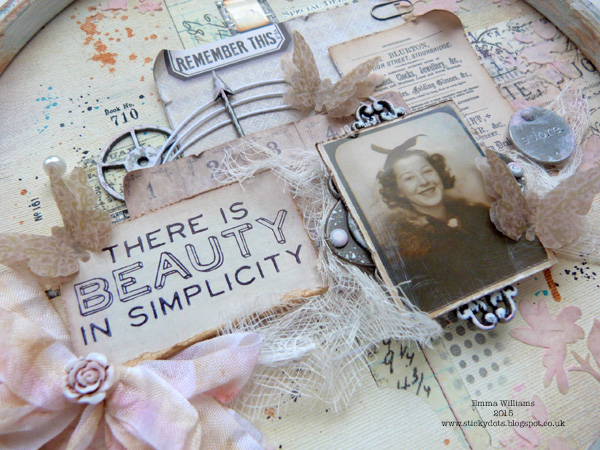
- Now comes the fun part of adding the ephemera and I started by inking and distressing the edges of selected ephemera and pocket cards and then layering these cards over the top of one another, offsetting each card as I attached them with adhesive foam. At this stage, I also tucked a coil of wire thread behind one of the cards.
- I inked the quote with Jet Black Archival Ink and stamped onto a piece of manila card coloured with Old Paper Distress Ink. Distress the edges of the card before attaching onto the cluster of ephemera. Remember, this is all about building layers!
- As the final layer and the focal point for my project, I painted a gorgeous metal Ornate Plate with Picket Fence Distress Paint, allowing the paint to become slightly tacky before taking a piece of kitchen towel to remove some of the colour from the metal. I attached the frame onto my layered background and added a vintage photo-booth image directly over the top of the metal frame, which creates a background.
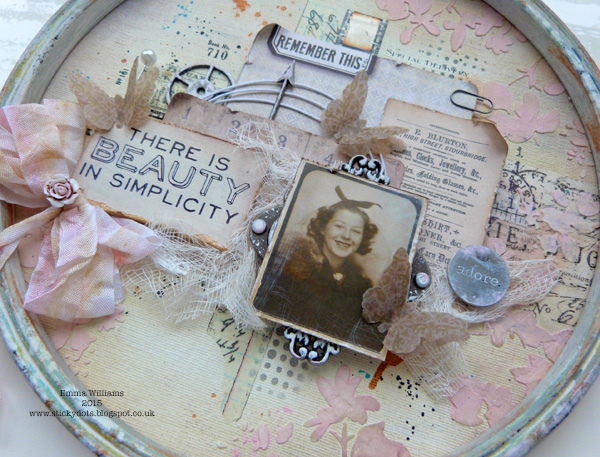
- Apply Spun Sugar and Antique Linen Distress Stains to your craft sheet, mist with water and toss the crinkle ribbon through the stains, picking up the colour. Dry the ribbon with a heat tool and tie into a shabby bow. Attach the bow to the canvas.
- Add a few drops of Latte Alcohol Ink to the Heirloom Rose and attach to the centre of the bow.
- Place various painted pieces of Idea-ology, including an adornment arrow, token, mini paper clip and sprocket gear into the arrangement and add small torn pieces of cheesecloth.
- Finally, I punched six butterflies from vellum and layered each piece to create three double layered butterflies. I attached the butterflies onto my canvas and added various Remnant Rubs onto the background as a finishing touch.

I really hope you’ve enjoyed the creative process for this project and if you haven’t got an embroidery hoop to work with, then these techniques will work equally as well when used on a canvas or even a card!
Thank you so much for stopping by today…
Happy Crafting!
Emma

SUPPLIES:
 |
 |
 |
 |
 |
 |
 |
 |
 |
 |
 |
 |
 |
 |
 |
 |
 |
 |
 |
 |
 |
 |
 |
 |
 |
 |
 |
 |
 |
 |
 |
 |
 |
 |
 |
 |
 |
 |
 |
 |
 |
 |
 |
 |
 |
 |
 |
 |

Blog Candy Alert!! Follow our blog via email and comment on this post for a chance to win a special blog candy!


This is so fun! A great home decor project.
Great project! ;-)
Love this with the vintage Tim Holtz look but pastel colors…wow!
I love it wow
This is lovely!
Wow, this is so beautiful! I love the vintage look and butterflies.
creative~
brilliant as usual/ so many layers and so much dimension created. brill, hugs xx
Wow what a beautiful project, love the soft colours!
Wow, that looks very inricate
Lovely Vintage project. Thanks for sharing!
What a pretty piece of art. I already follow by email.
This is drop dead gorgeous! Best thing I’ve seen all day! Makes me smile. :)
Lovely piece of art. The muted tones are just perfect for a long lasting display.
Love that fantastic hoop!
Thanks for some beautiful inspiration.
That embroidery hoop is just gorgeous! fabulous idea.
I follow the blog by email.
Love the details in the background, love the soft colors too.TFS
This is the greatest thing since sliced bread!
What a treasure!
ohhh!! Its gorgeous!
Emma, your work is totally awesome. I love the composition and vintage look.
Your gorgeous project has given me the answer to what can be done with all the old embroidery hoops sitting in my craft closet!
WOWOWOWOWOWOWOWOW!! Just AWESOME!! I LOVE EVERYTHING About this!! THANKS SO MUCH for sharing and have a FABULOUS WEEK!! =)
Beautiful!
Looks amazing!
Gorgeous! I love all of the texture and elements you used, as well as how well you combined the different mediums. Beautiful colors! TFS!
Beautiful.
Very pretty, and a wonderful keepsake!
Wow! Such creativity! This sure is pretty!
this is beautiful!
I love preserving various pieces of memorabilia along with the photos of the people they involve.
What a beautiful piece of art. Perfect for home decor and saving bits of your life. Lovely.
DELIGHTFUL piece Emma – LOVE IT ALL!!!
THANK YOU for sharing your BEAUTIFUL RECIPE for AWESOMENESS!!!
Art is in many forms and this is truly art!
Awesome project xx
I love this super hoop collage!
How unique!
So amazing project!
Wonderful project! So lovely and past recapturing! Thank you for the inspiration!
The vintage look is my favorite. Beautiful project!
I wish to have such a musterpiece! So soft and tender)
Gorgeous project!
Very pretty
Love how light and lovely this is! Great detail work!!
Love the home decor project and the vintage feel.
OMG & WOW~~~~WOW~~~~WOW!!! Your project turned out amazing You totally did a super outstanding creative Ephemera Job WOW I’m totally in awe of what you did. I’ve always been enamored by Ephemera and girl you so nailed it. Your idea for the embroidery hoop is definitely one amazing clever and creative idea I love it! You definitely have left me speechless with what you created!! WOW YOU so ROCK!!
Great idea to use the embroidery hoop as the frame. Thanks for the inspiration.
Simply is the best
Stunning! Love the many different elements.