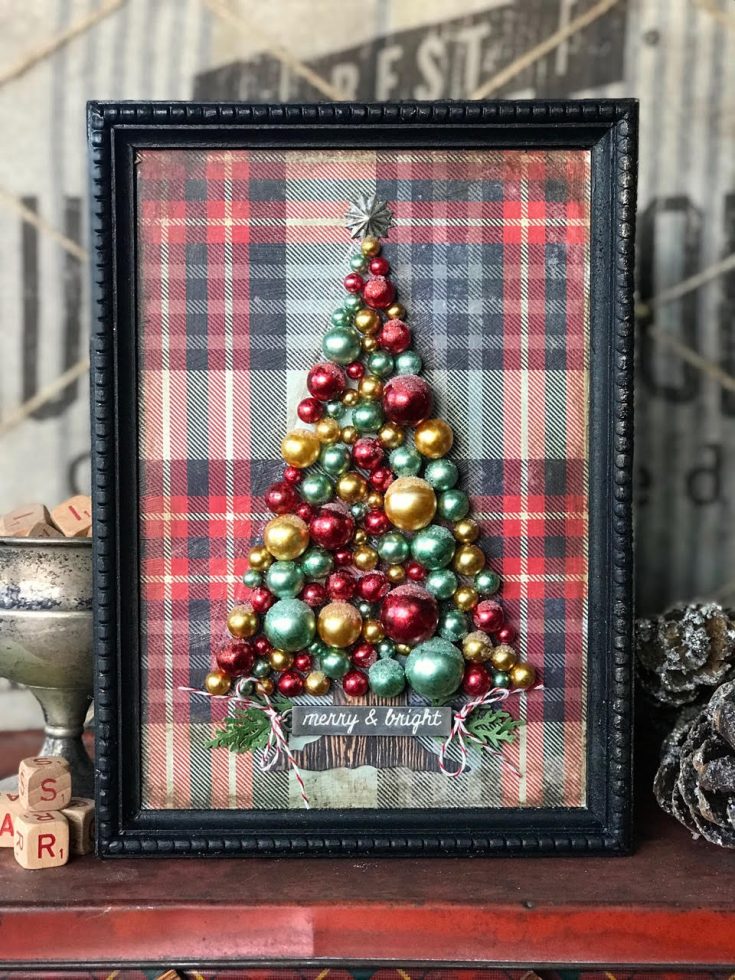
Tim Holtz Bauble Tree by Paula Cheney!
Hi friends! Please join me in welcoming back the incredible Paula Cheney as a guest on our blog! She has made a truly gorgeous Bauble tree that would be super fun to recreate and add a festive decoration to your home! Read on to learn more!
Hi friends!
I’m glad to be here on the Simon Says Stamp blog sharing a super fun Christmas project! I absolutely loved making this project and to be honest I want to make more with different colors of Alcohol ink! Once you read through the instructions you will see how easy this project is…a little chipboard, Alcohol Ink and Baubles and you are half way there! Follow along and I’ll show you how I did it:
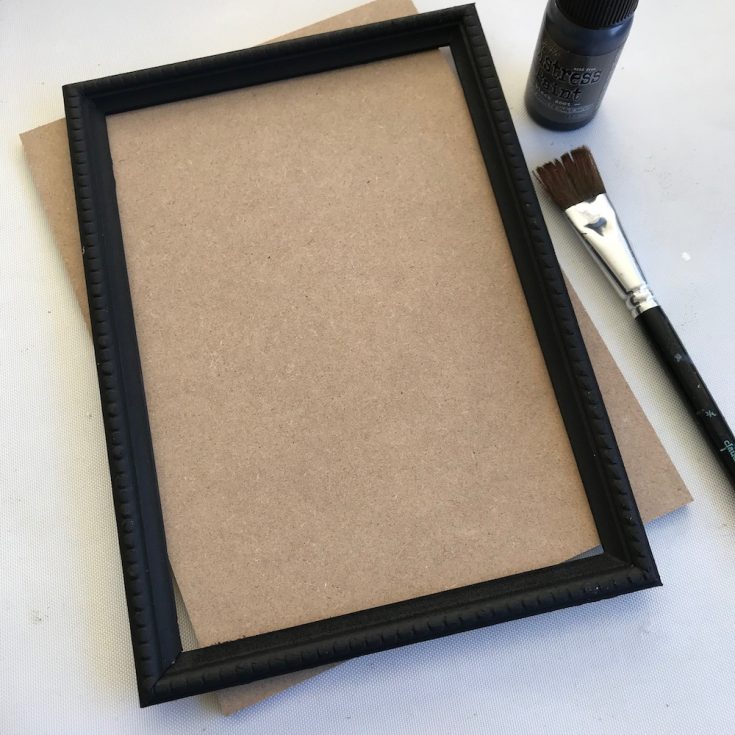
Step 1: Paint Framed Panel with Black Soot Distress Paint. Let dry.
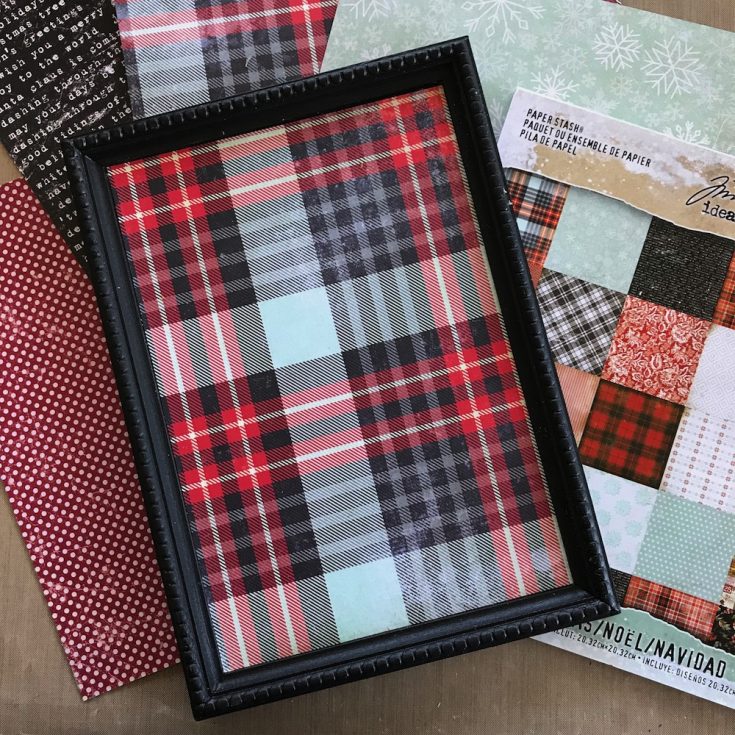
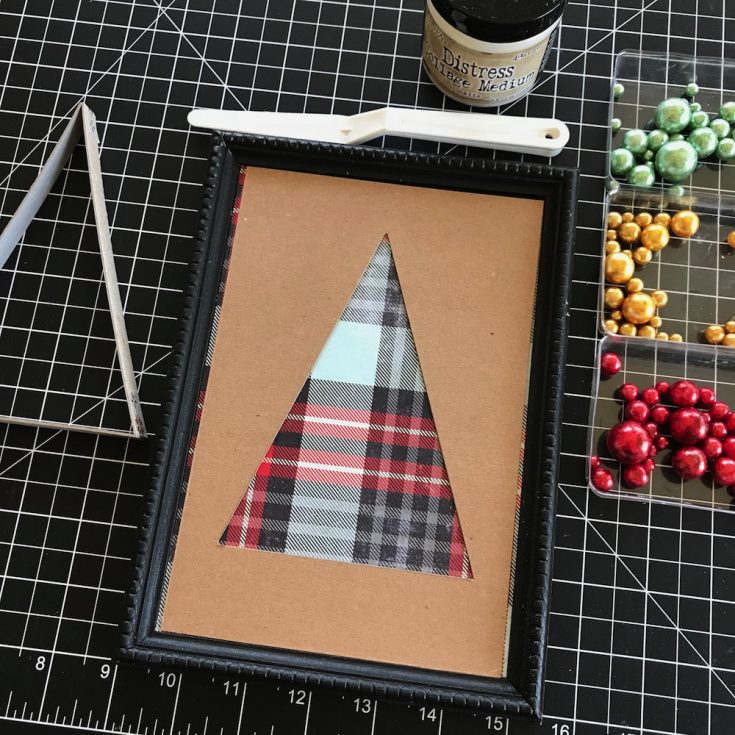
Step 2: Use Collage Medium to glue the painted frame to the panel. Cut paper to fit the frame. I used the turquoise and red plaid found in the Christmas Paper Stash but there are many other choices on the pad that would work beautifully. Paint a thin layer of Collage Medium over the surface of the paper to seal (do not skip this step). Let dry.
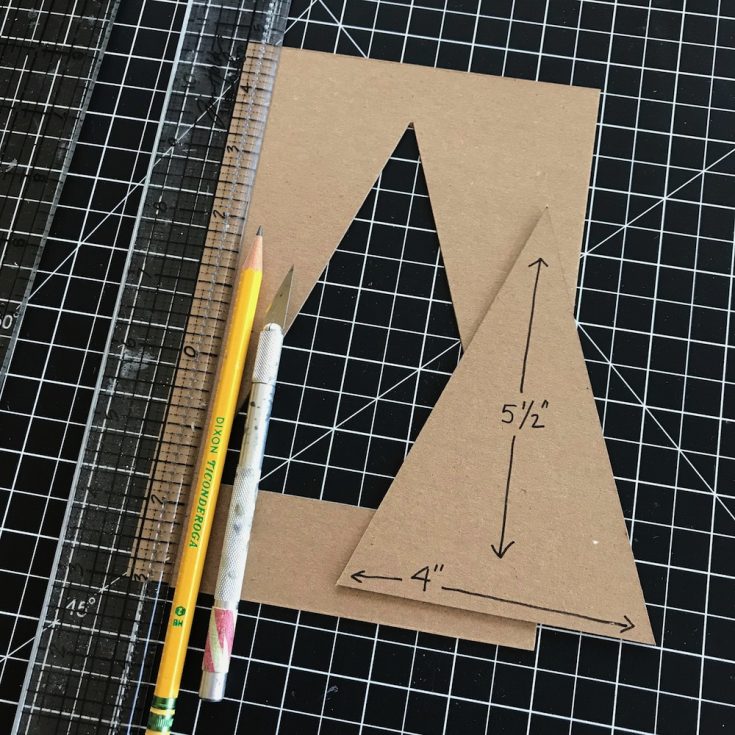
Step 3: Using a piece of chipboard, cut out a triangle 4” wide and 5 1/2” tall. Cut another piece of chipboard to fit the opening of the Framed Panel. Place the triangle on top of the chipboard exactly where you want the tree to be in the Framed Panel. Use a pencil to draw a line around the triangle, then cut out using a Design Ruler and knife. Discard the center cutout.
NOTE: I found it much easier to cut the triangle shape first so I could test the size in the opening of the Framed Panel before cutting the final stencil.
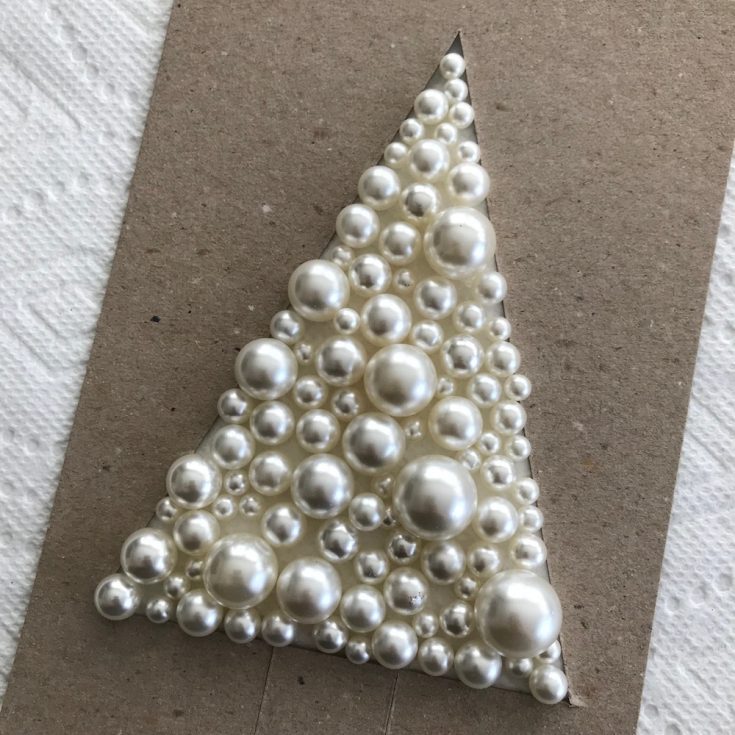
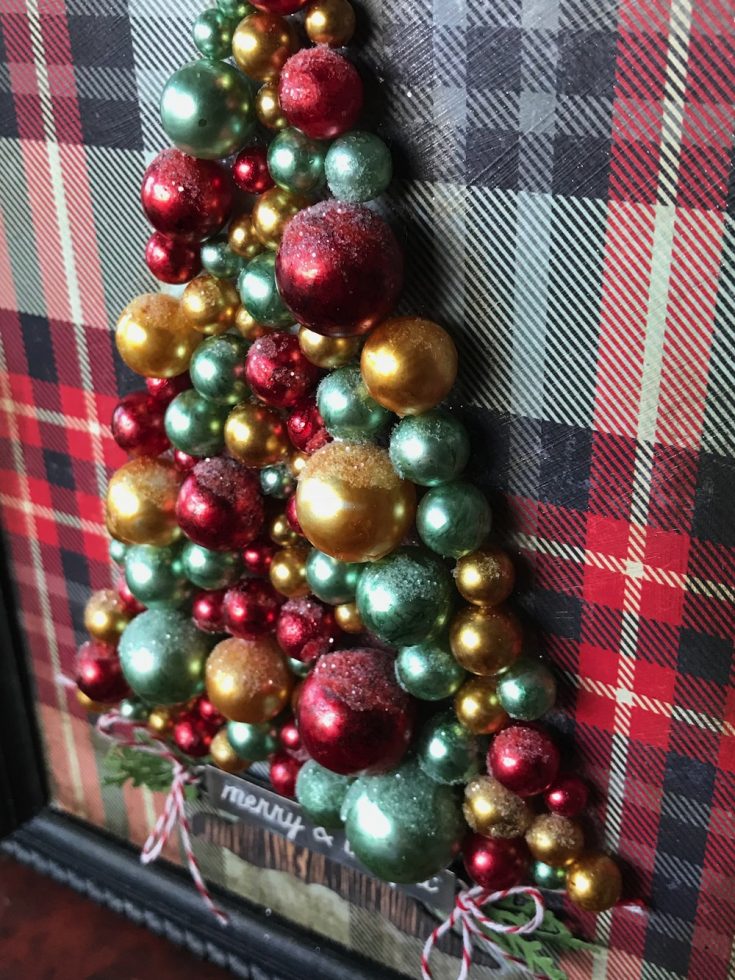
Step 4: To find out how many Baubles you will need to create your tree, lay the stencil over a paper towel and fill the space (the paper towel helps keep the Baubles in place). I used 1 full package + about half of a second one. You can see in the picture that you need quite a few of the smallest size to fill in the gaps.
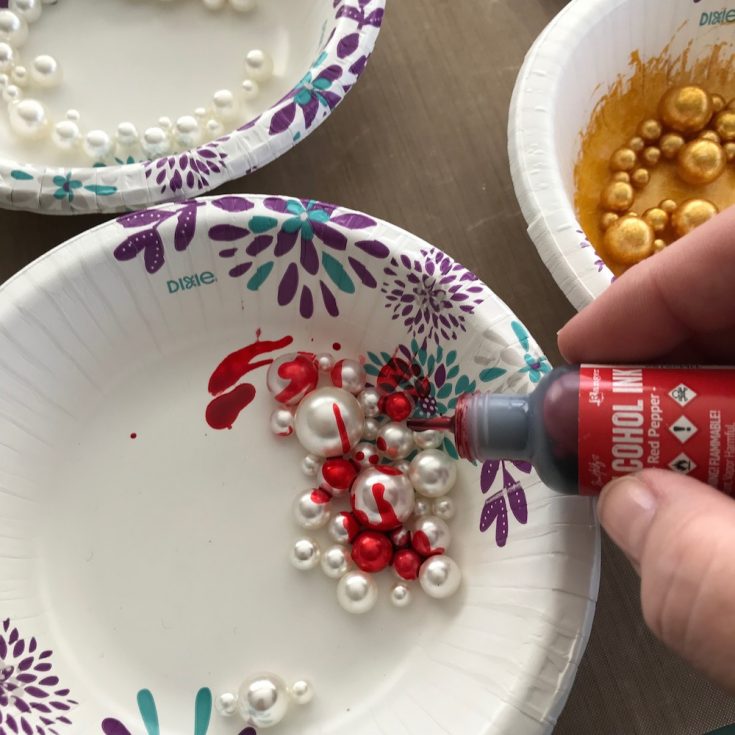
Step 5: Once you determine the amount, randomly split the Baubles into three dishes or plastic bags. Drip a bit Alcohol Ink over the top (a little goes a long way) and roll them around in the dish or if you are using a plastic bag, squish them around until they are covered, then dump them out onto a paper plate to dry.
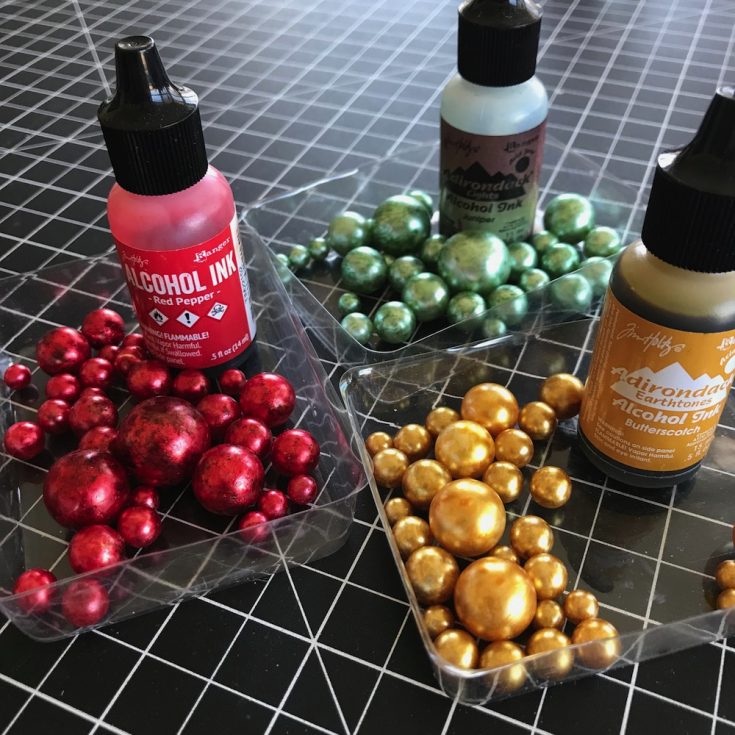
Step 6: I used Red Pepper, Butterscotch and Juniper (one of my all time favorite colors) to color the Baubles. I swear I could color these all day long!
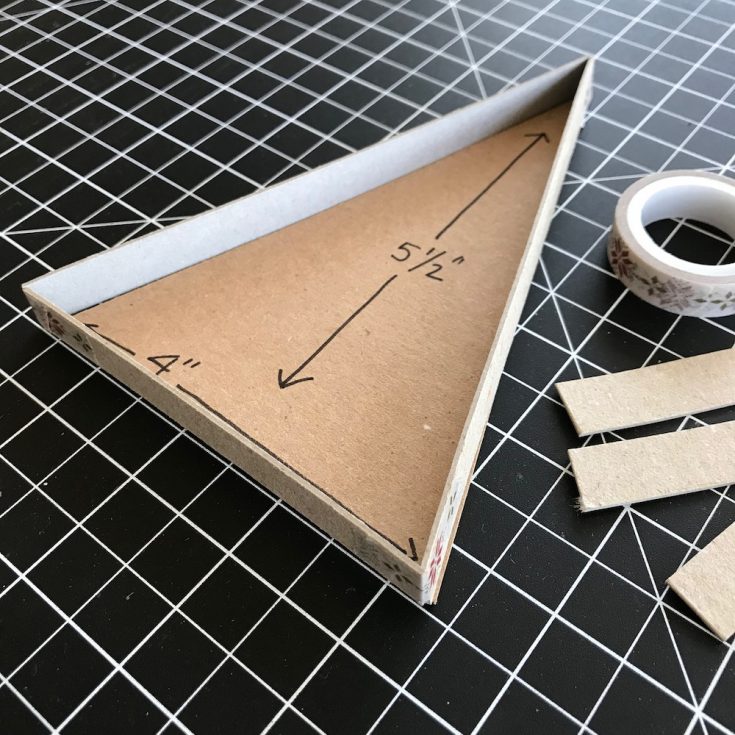
Step 7: Back to our original triangle template. Lay it on a flat surface. Cut three chipboard strips at least 3/4” wide. Cut each strip to match one side creating a triangle “corral”. Use tape to secure each corner. The original triangle should be able to drop out of the corral like cutting out cookies with a giant cookie cutter.
Step 8: Place the stencil you created earlier into the Framed Panel. Gather all supplies needed for the next few steps as you want to work quickly.
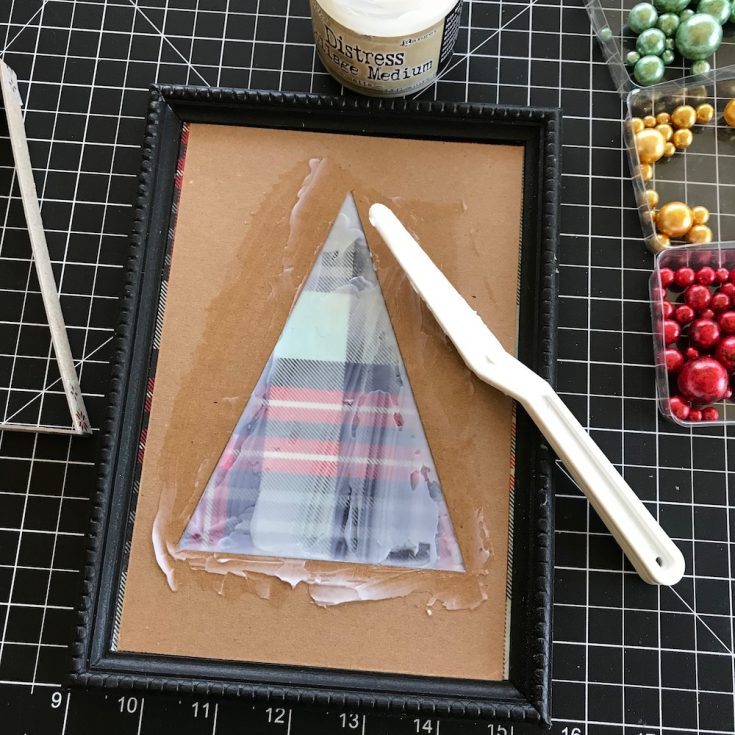
Step 9: Using a palette knife, spread a thick layer of Collage Medium over the homemade stencil. This is where using chipboard is helpful, the thickness of the chipboard allows for a thick layer to build up. If you were to use just paper or cardstock the Collage Medium would be too thin to secure the Baubles in place.
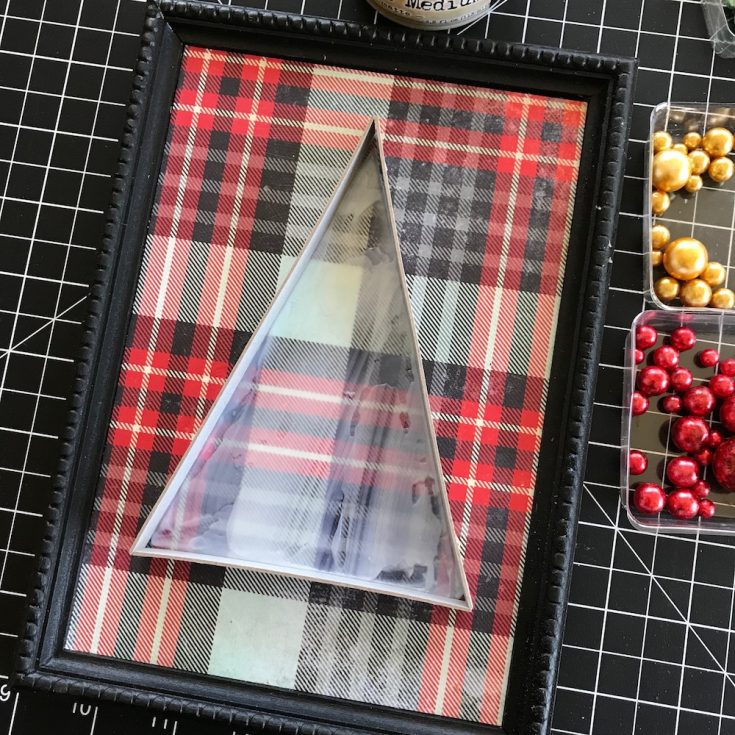
Step 10: Peel back the stencil and add the corral over the glue. Because the corral was created with the triangle inside, the corral will fit right up against the edge of the Collage Medium.
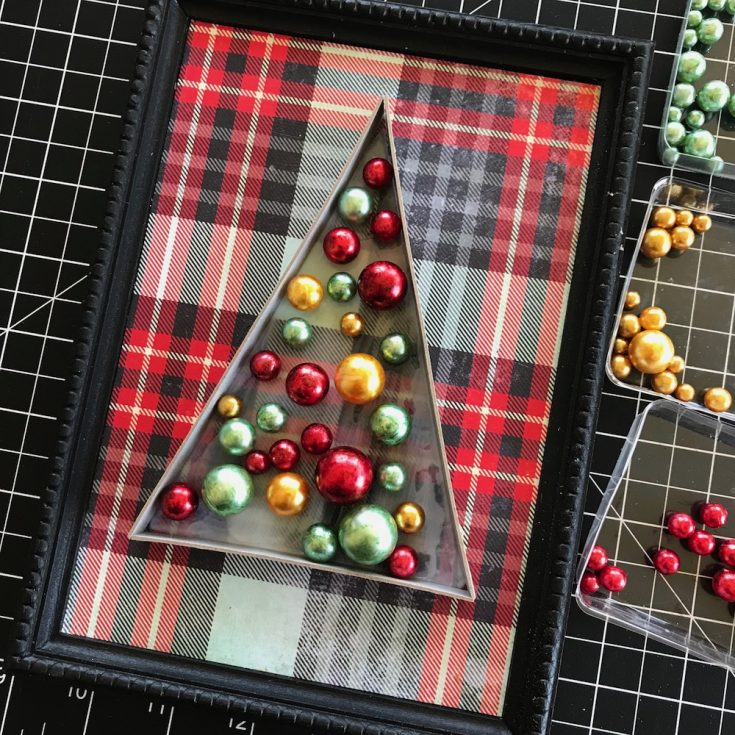
Step 11: Grab a handful of each color Bauble and start to fill the triangle, just dropping them into place.
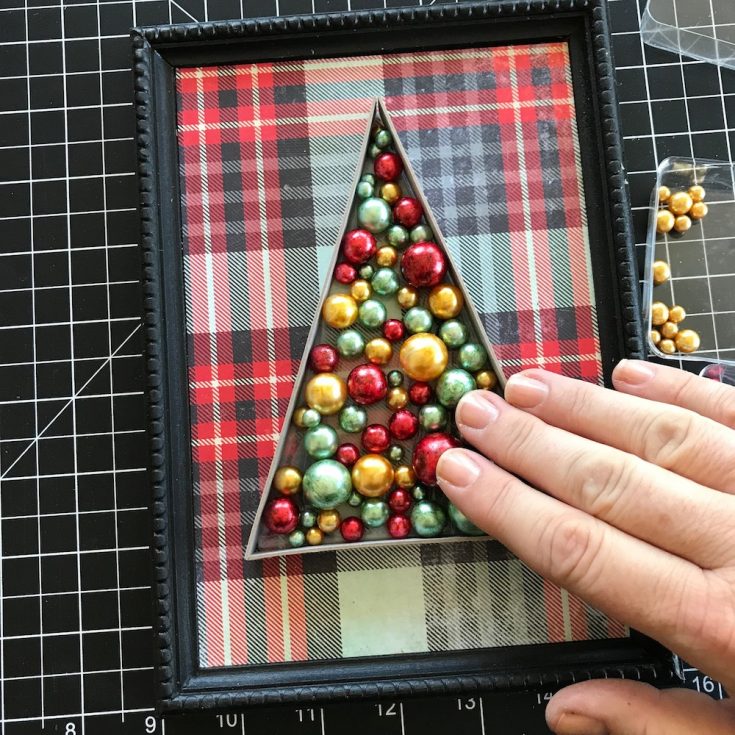
Step 12: As you start to fill the triangle you might notice that some beads fall on top of others. You will need to press them down into the Collage Medium.
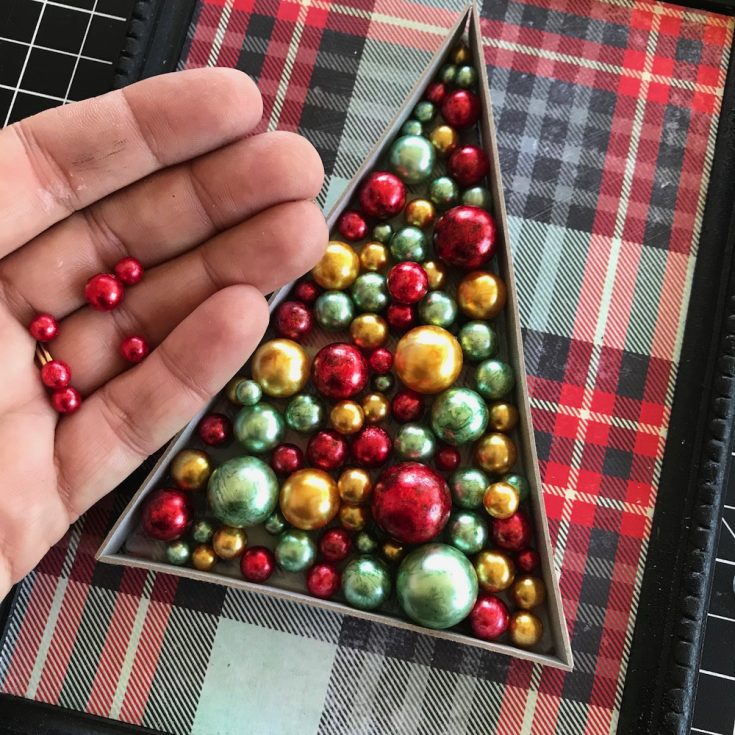
Step 13: Fill the remaining tiny spaces with the smallest of beads.
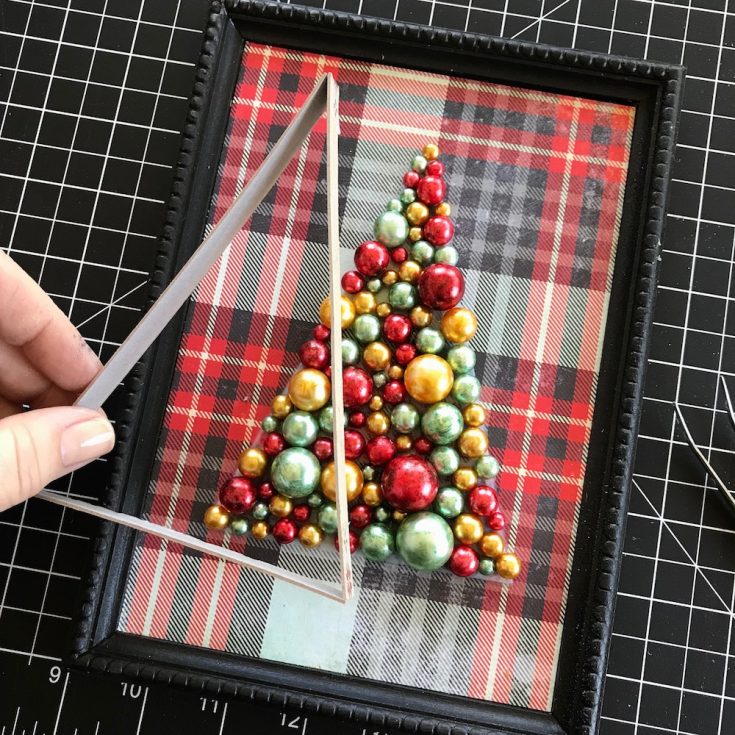
Step 14: Remove the triangle corral from the Framed Panel. NOTE: You will have plenty of open time for the thick layer of Collage Medium to dry, but unfortunately the chipboard corral could dry in place if you leave for too long. Collage Medium loves paper!
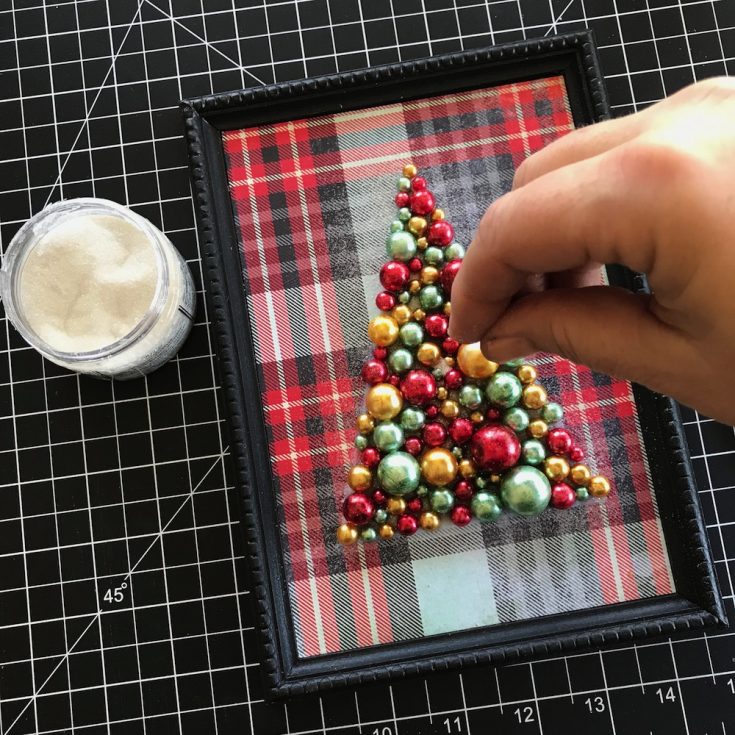
Step 15: Sprinkle Clear Rock Candy Glitter over the tree. It will stick to any Collage Medium that is exposed. Now the hard part…LEAVE IT TO DRY for at least an hour (depending on the thickness of Collage Medium it may take more time).

Step 16: Once the tree is DRY you can stand up the Framed Panel. Use a paintbrush to randomly add Collage Medium at the very top of the Baubles (think where snow would fall if it was coming from the sky).

Step 17: While the panel is in standing position, pour Clear Rock Candy glitter from the top so it cascades down the tree and hits all the places you painted on the Collage Medium. Tap of any excess and return to the jar.
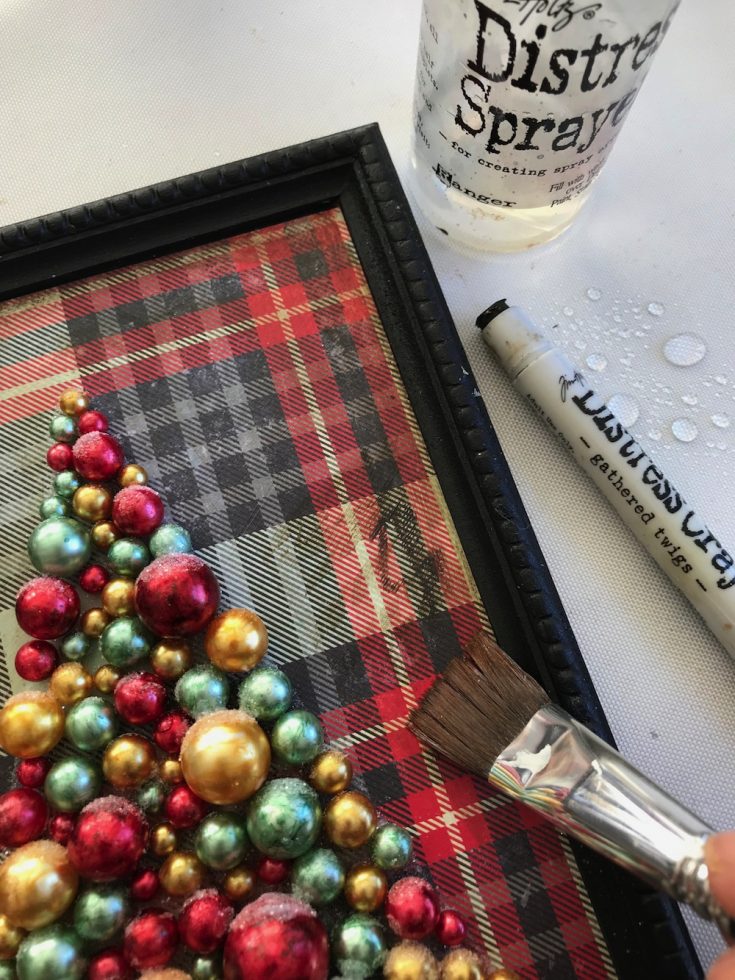
Step 18: Scribble Gathered Twigs Distress Crayon around the edge of the panel. Using a damp paintbrush disperse the scribble lines, creating a more aged appearance. If you get too much on you can always wipe it away since the surface of the paper has been sealed with Collage Medium.
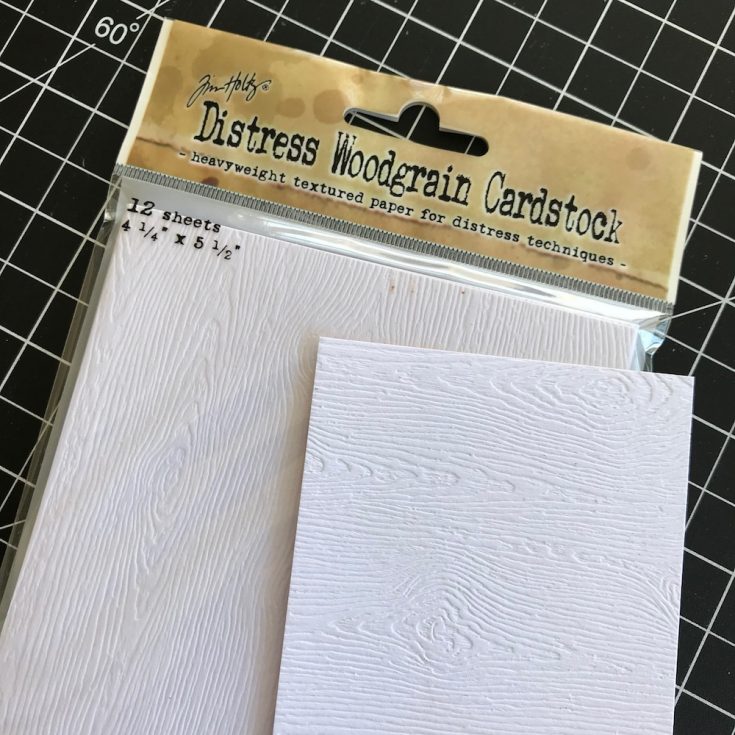
Step 19: Cut a piece of Distress Woodgrain Cardstock.
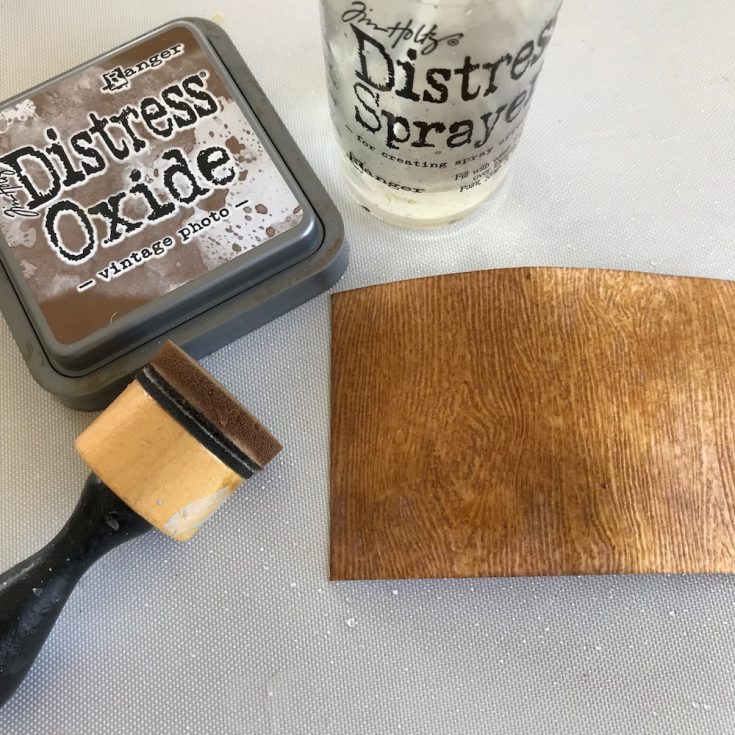
Step 20: Use a Blending Tool to add Vintage Photo Distress Oxide over the surface. Spritz with water and dry with a heat tool (do not skip the drying portion of this step).

Step 21: Using Ground Espresso Distress Ink, rub the pad directly over the surface so the pad just skims the raised portion of the woodgrain. Let dry.
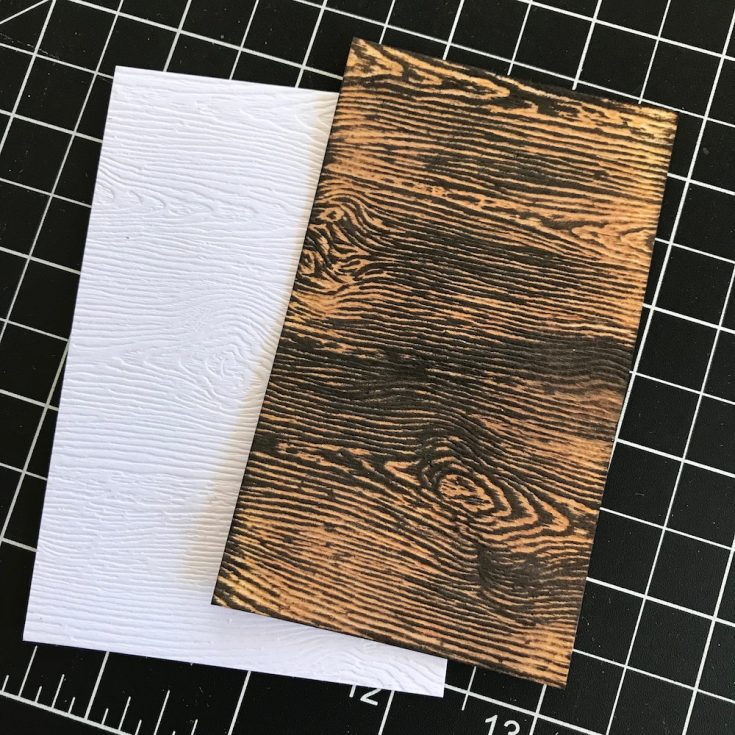
Step 22: Now that is a great before and after! Amazing what a little ink can do to make such realistic looking woodgrain.
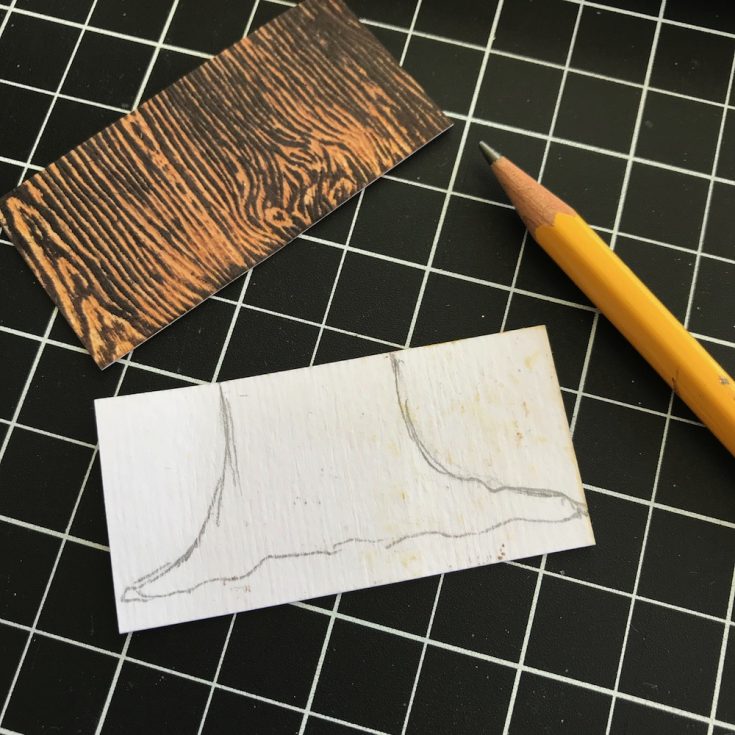
Step 23: Cut the paper to the height you want the trunk to be (make sure the woodgrain is going the right direction!) Flip the cardstock over to draw a tree trunk and cut out.
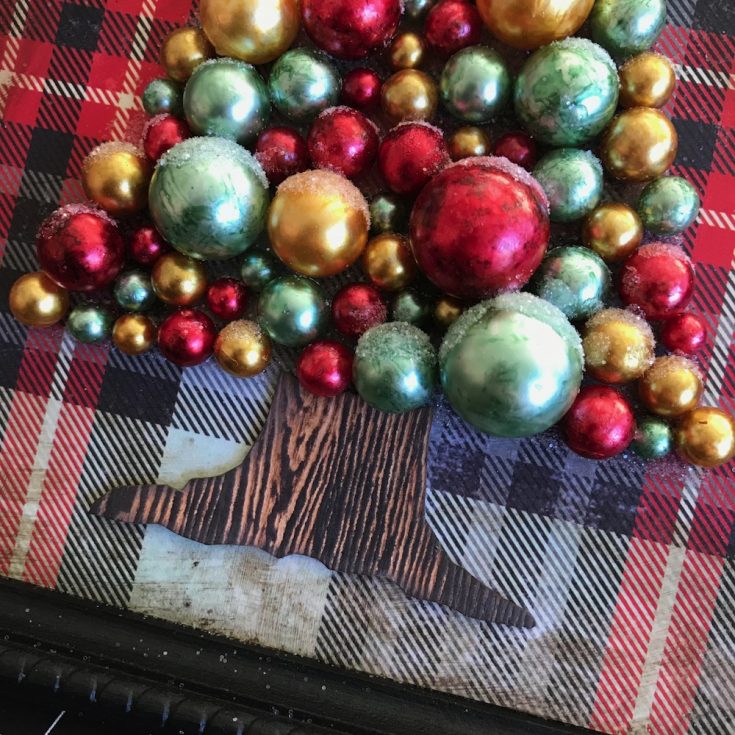
Step 24: Add the trunk to the base of the tree. I used THIN Scrapbook Adhesives foam squares to adhere the trunk to the surface.
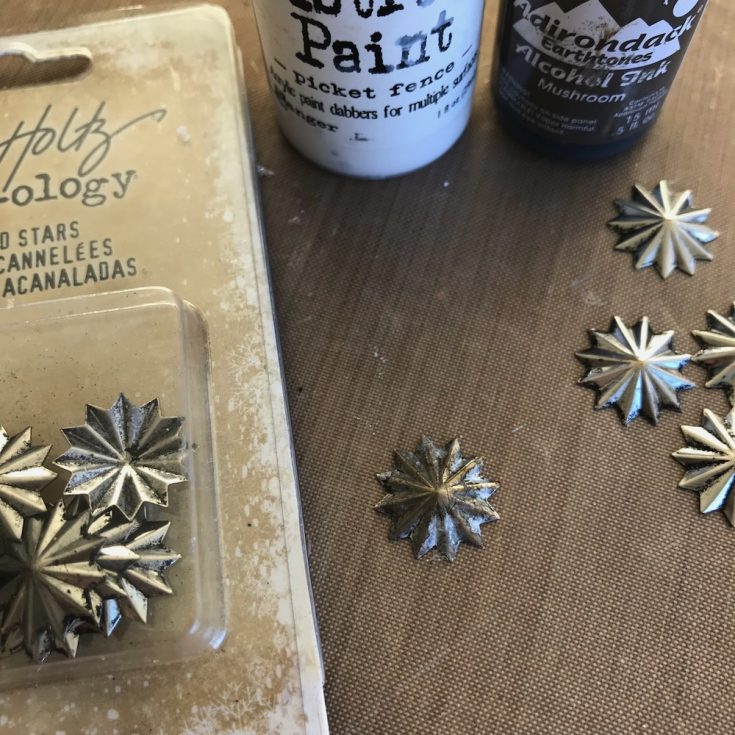
Step 25: Using your fingertip, wipe Picket Fence Distress Paint over the top of a Fluted Star. Once dry, pounce Mushroom Alcohol Ink over the star. Let dry.
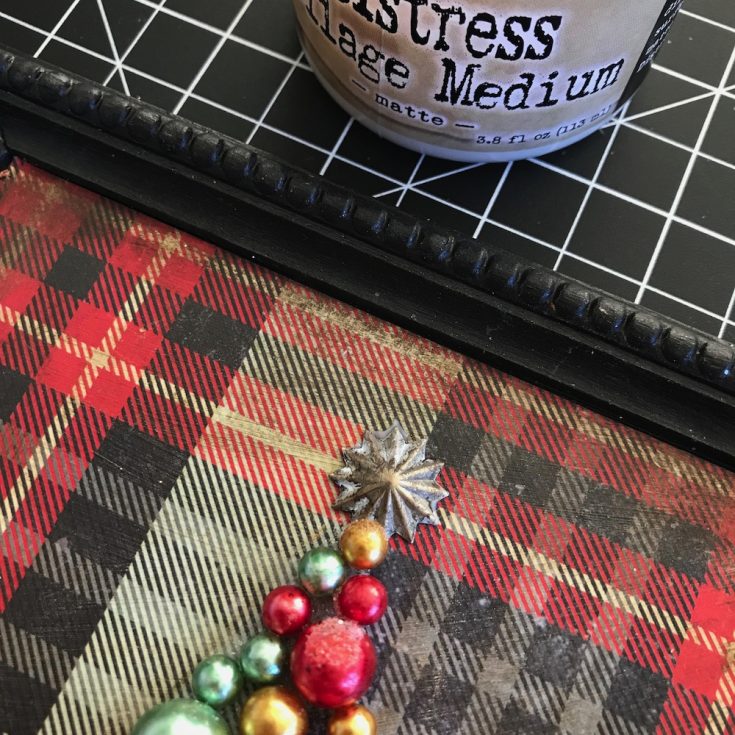
Step 26: Adhere Fluted Star to top of tree with Collage Medium.
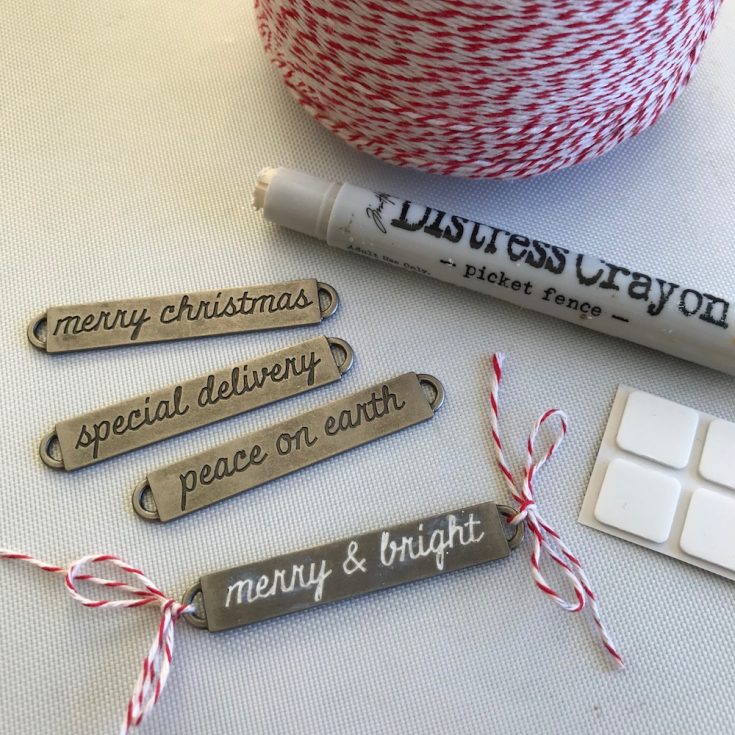
Step 27: Use a Picket Fence Distress Crayon to color in the words on a Christmas Word Band, wiping away the excess. Tie a bow on each end of the Word Band with red and white bakers twine.

Step 28: Adhere Word Band over tree trunk using thin foam squares. Punch a few pieces of juniper with the Tim Holtz/Sizzix Juniper punch. Using a little Collage Medium, slip the juniper under each end of the Word Band.
SUPPLIES:
|


Thanks for reading today, and thanks to Paula for being our guest!

Blog Candy Alert!! Follow our blog via email and comment on this post for a chance to win a special blog candy!


Wow, I am speechless by how amazing this project is. Stunning. I also really like that paper line from TH and have not seen that before.
The tree is fabulous, what a lovely way to use those beautiful pearls!
Fun creation and just in time for the Christmas season.
This is just amazing!
Wow!!! I LOVE this!!! Really Beautiful!!!
What a terrific project and gift!
So creative and pretty.
This looks amazing!! I just love handmade Christmas decor – and yours looks fabulous!!
Oh wow, what a stunning project!
This is gorgeous and thank you for the great tutorial, Paula! I love it all, but my favorite thing is the frosted baubles – they look amazing!
Absolutely marvelous Paula! What a delightfully fun project to make! I’m inspired to make one!! Thanks so much for the detailed instructions. Love the corral idea!!
This project is so festive. My daughter’s have different favorite colors, this would be amazing to do one for each. Thanks so much for sharing this and have a very Merry Christmas….
This is so cool! What a great decoration :)
This tree is absolutely gorgeous–thanks for the tutorial and sharing this TREEmendous project Paula!
This is a beautiful piece of art that will become an heirloom.
This looks like it was so much fun to make, especially dying the baubles (like making Easter eggs!). Love the authentic looking tree trunk. The whole thing is just beautiful!
Absolutely AMAZING! Wow! I love it … I want it!
What a great project! I’m not much of a mixed media creator but this looks like something fun to make with a beautiful result. Awesome tutorial!
This is a marvelous idea for decoration or a gift!
What a gorgeous project, simply amazing!!
Like the tree creation. Especially like the frosted look.
Melissa
“Sunshine HoneyBee”
Beautiful decor project. Thanks for sharing your creativity.
Wow spectacular project! Love the tree made with the baubles.
Gorgeous! I love this idea!
Fabulous project and looks fun to make
The tree is fabulous! So is Paula!!!
Wow, I’m speechless- it’s so beautiful.
THAT is fabulous !!!
Oh my gosh! this is gorgeous! I love it! You gave us really cool instructions. I think even I can do something like it. You are giving me more eeeevillll plans for Christmas artwork for our kitchen. Its looking kind of pitiful. lol hugs, treen
Wow! This is fabulous. Very creative and beautiful. Love that wood grain card stock paper.
Very fun!
What a sweet home decor piece Paula, I would love to try this, its a great idea and very pretty. TFS!
Wow!! This is such a clever idea and looks lux!! Gorgeous!!
I absolutely love this festive Christmas tree!
AS always a fabulous idea! Barbara
What a great project. It will make wonderful gifts for next year. It goes into my Christmas gift file.
OMG it is so beautiful!
What a fabulous project! Thanks for sharing it.
Wow, this is such an amazing.bauble Christmas tree decoration. So creative!!!
That’s a cool, colourful tree!
That Paula is amazing! TU for the well done tutorial and inspiration!
wow…what a cool idea…
Cristina
thehouseoftheblackbirds.blogspot.it
That is just amazing!
Very nice!
What a fun project!
Great project. These would make wonderful Christmas gifts.
What a stunning project, that Christmas tree is gorgeous!
Love that bauble tree! And Paula makes it look so easy to create!
Fabulous project!!
I love this tree, and best yet, I have all the items I need for the project!! I love the creativity on this!