Take Chances Journal Page
Hi friends! Happy Sunday! Please read on for a very special art journal entry from Anna-Karin Evaldsson and enjoy!
Hi everyone! I am so happy to be here today with a fun and easy tutorial for you. I was in the mood for an art journal page, but the techniques work just as well for cardmaking, scrapbooking, tags or 3-D projects.
I try to avoid adding bulky and dimensional elements to my art journal pages, since I don’t want to crack the spine of the book. It is also easier to work on the remaining pages in the book if there aren’t lots of bulky items. But, I still want to create layers and a dimensional look in my art journals, and in this tutorial, I will show you some techniques for how you can do just that, without creating very bulky pages.
I used mainly products by Dina Wakley and Ranger. I really like Dina’s Scribble Sticks and they are so easy to work with and mess free. You can apply the color directly to the page, or pick it up with a paint brush from the tip of the crayon.
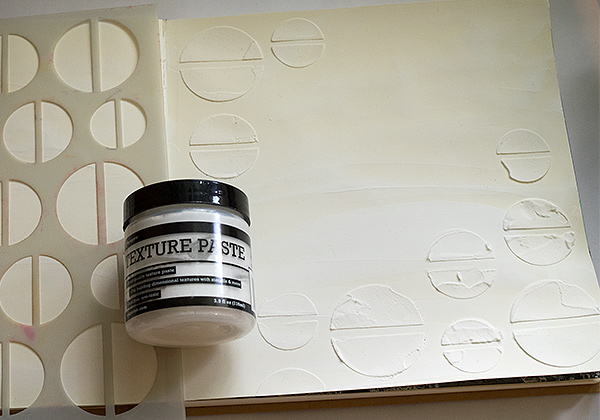
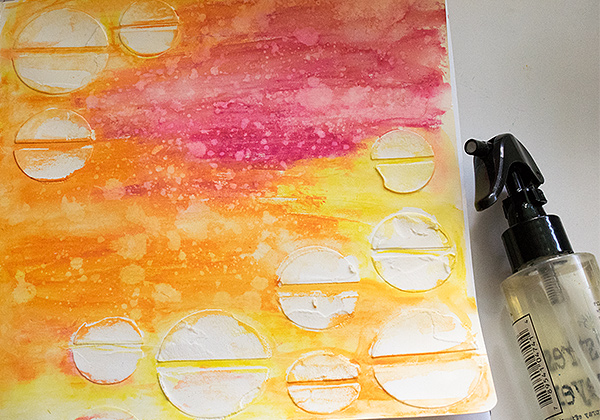
1. Start by applying gesso to a page in a Dylusions journal. I used the square journal. When the gesso is dry, smear Texture Paste through the Halves stencil. Leave to dry.
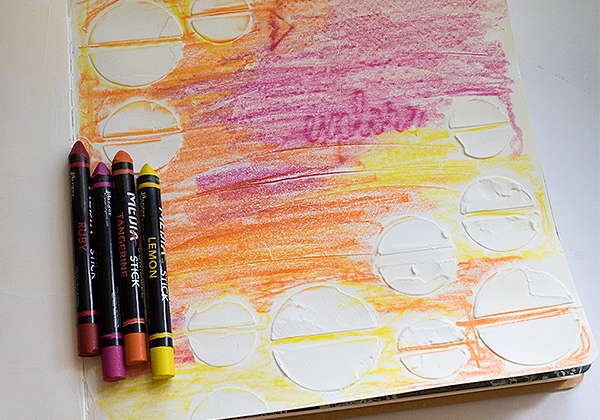
2. Scribble Scribble Sticks all over the page, avoiding the circles (but it doesn’t matter if some gets on the circles). By surprise, I got an ‘explore’ rubbing from the page underneath, a technique I will explore some other time.
3. Dissolve and blend the Scribble Sticks with water and a paint brush. You can blot some off, if you think the shade is too strong.
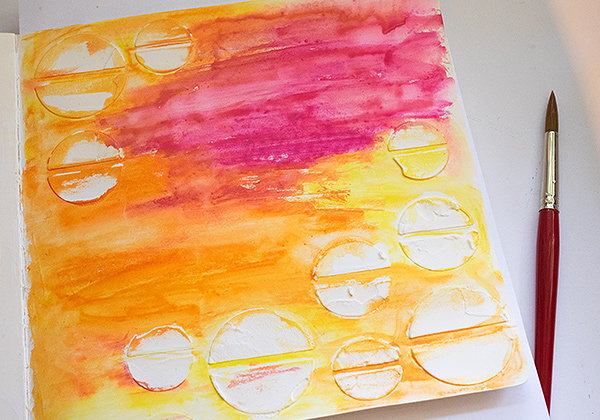
4. Spray droplets on the page with Tim Holtz’s Distress Sprayer. Press the lever about half-way to create drops instead of mist. Blot off with a paper towel. This step creates instant texture.
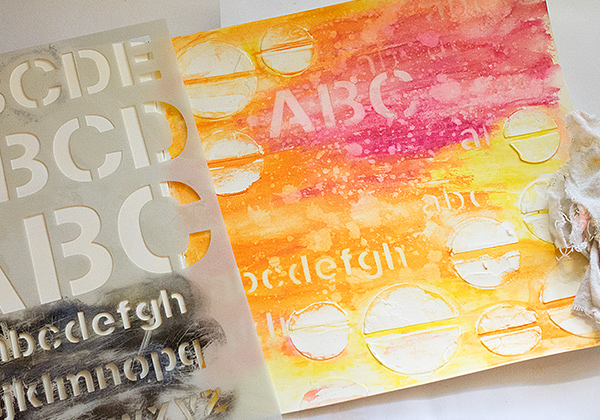
5. Place a stencil on the background and use a slightly wet cloth to remove colour through the stencil.
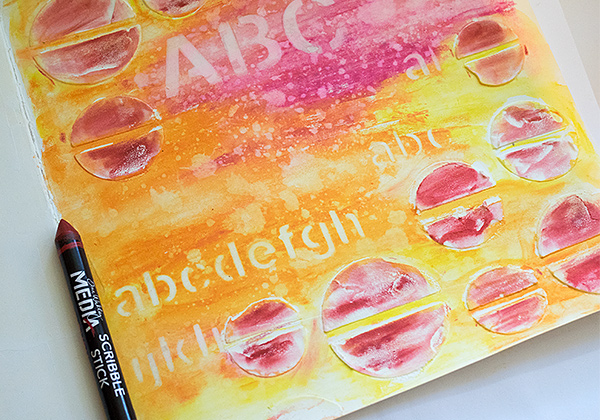
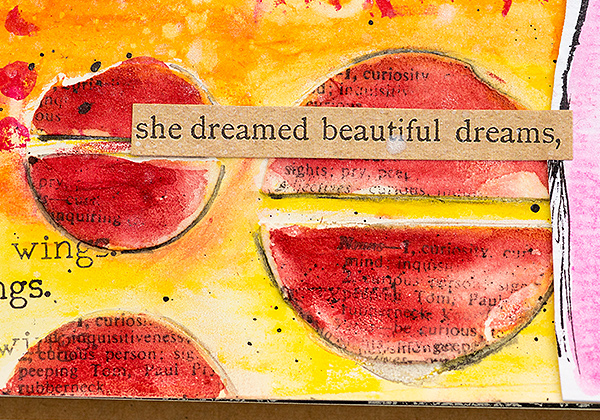
6. I wanted the circles to be mainly red, so I applied the red Scribble Stick over them, varying the pressure, to get different shades.
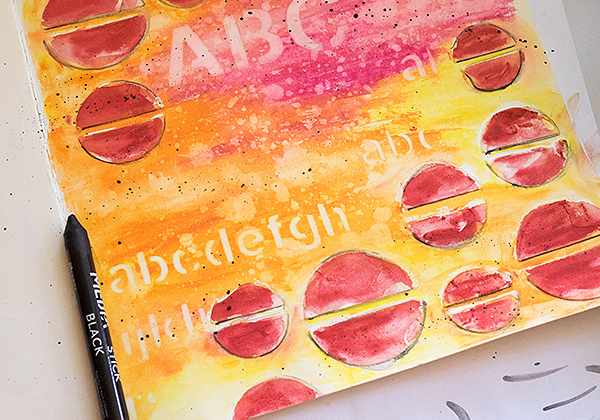
7. Dissolve the red colour with a paint brush and water. If you want a stronger shade of red, you can keep on adding red by picking it up with the paint brush from the tip of the crayon. Pick up pigment from the black crayon with a fine brush and paint a shadow around the circles. You can also flick a paint brush against the tip of the Scribble Stick to make great splatters. Just put some water on the crayon first.
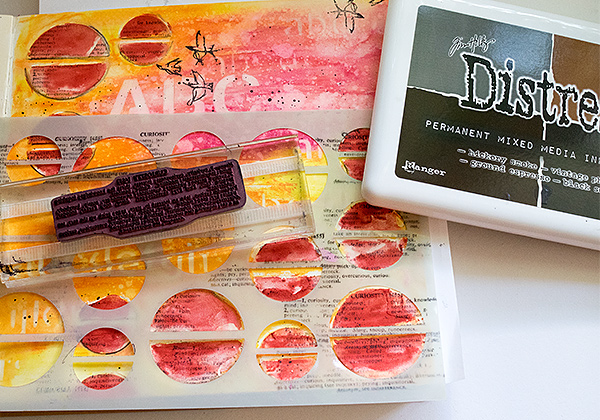
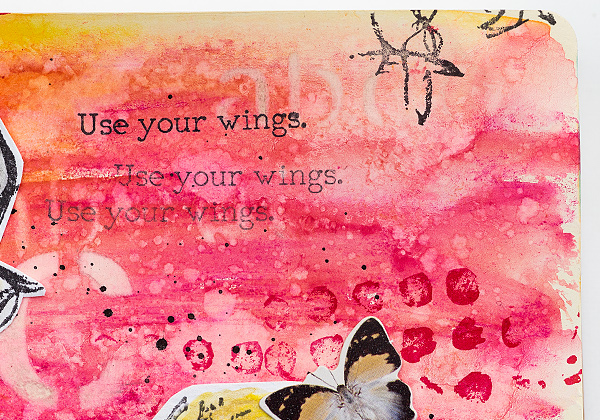
8. When the page is dry, place the stencil back and stamp through it with a text stamp. I used a Tim Holt’s stamp which defines the word ‘curiosity’.
9. Stamp dots here and there with Dina’s Ruby Archival Ink, from her Mixed Media palette.
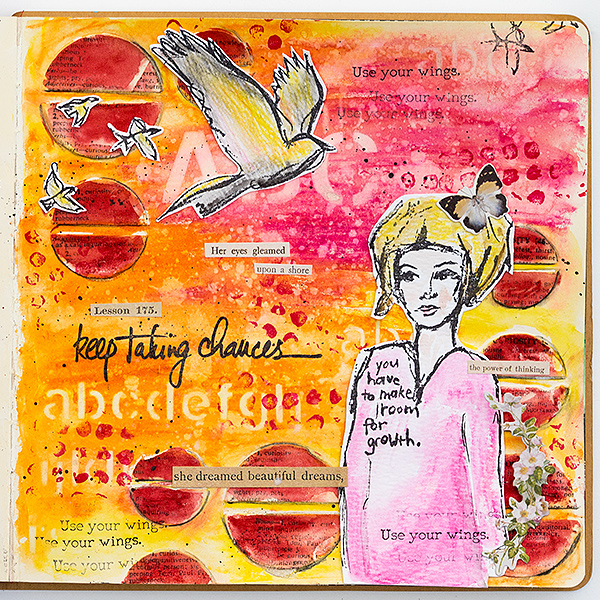
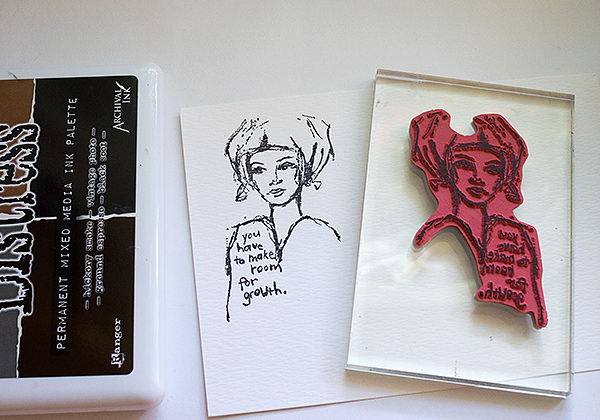
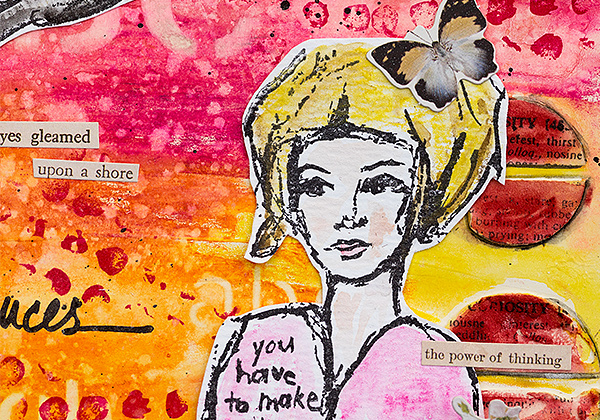
10. Stamp a woman on watercolor paper with Black Soot Archival Ink. You need to use a waterproof ink for this step.
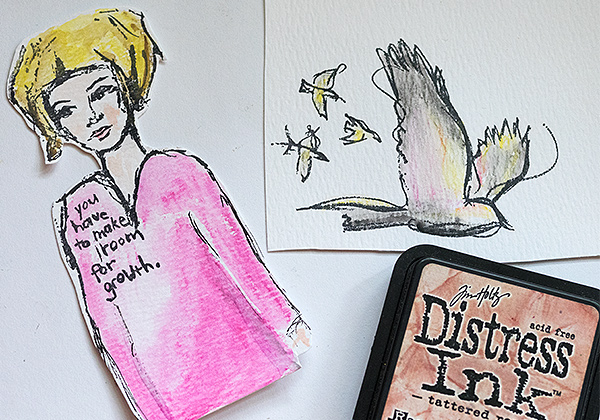
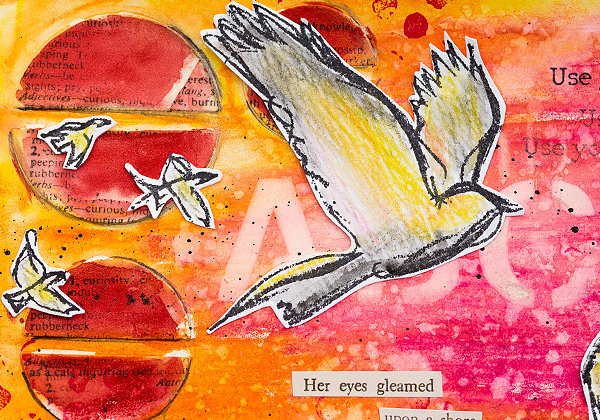
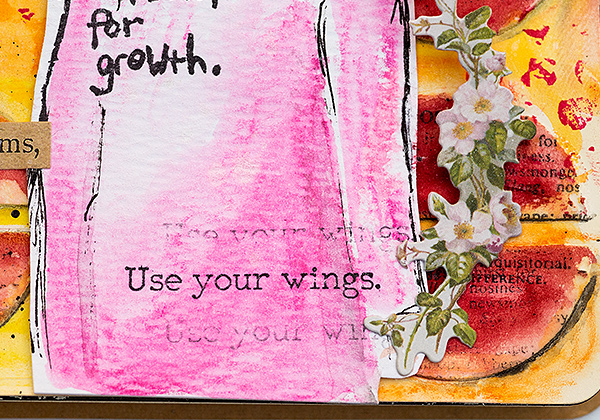
11. Extend her body with a marker and then scribble on color. I avoided the skin areas since I was planning something else for them. I also stamped some Scribbly Birds in Flight and colored them.
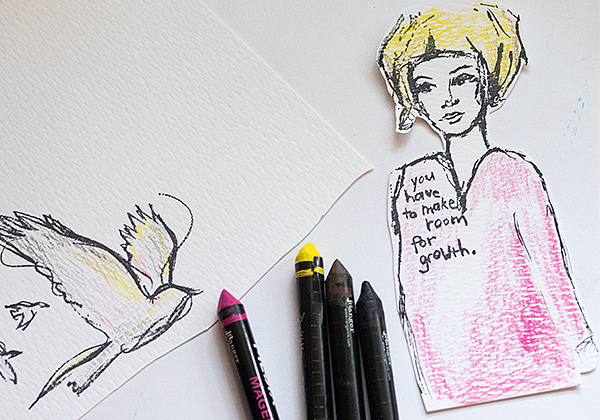
12. Tattered Rose Distress Ink is a great shade for skin color. I pressed it on an acrylic block, misted with water and picked up with a paint brush. Dissolve the Scribble Sticks with water and a paint brush.
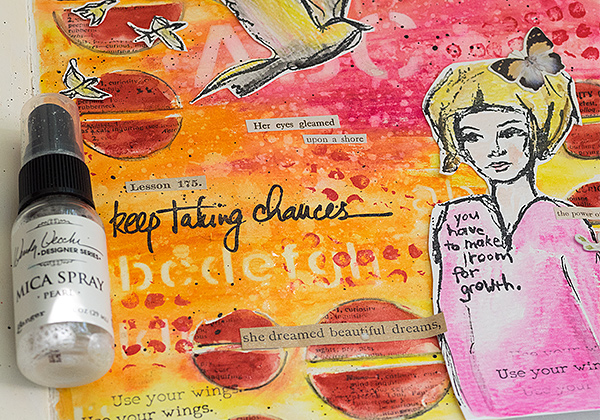
13. Finally, I wanted to add some shine to my page and misted it with Pearl Mica Spray.
14. I thought the birds fit with the theme of the page, and I also really like birds.
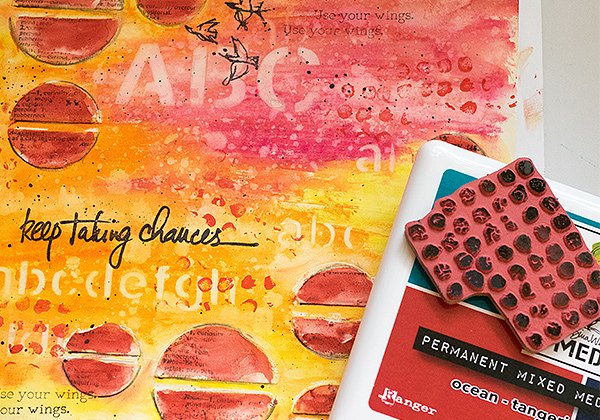
15. For my sentiments, I used Tim Holtz’s Clippings Stickers and had such fun looking for and combining phrases from the sticker sheets.
16. The title comes from Dina’s lovely Handwritten Quotes set.
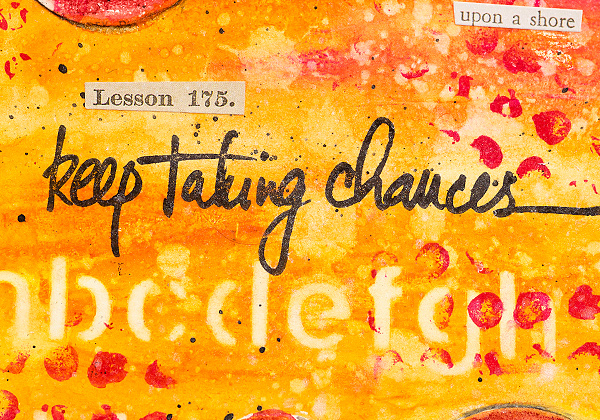
17. I like the look of the partial stamping on the dots and the shadows add dimension to the page.
18. She is holding a flower in her hand from Tim’s Botanical Layers set.
19. I also added a butterfly to her hair, from the same set.
20. Sometimes, I like to stamp a small sentiment more than once without reinking, and this one was stamped on three different places on the page, three times each time. Here you can also see the layers of color, stencilling, splattering and stamping.
I hope you enjoyed this tutorial and that it inspired you to play around with stencils, stamps and background techniques.
Thank you so much for looking!
Happy crafting!
Anna-Karin
Supplies:
 |
 |
 |
 |
 |
 |
 |
 |
 |
 |
 |
 |
 |
 |
 |
 |
 |
 |
 |
 |
 |
 |
Thanks for reading today, and thanks to Anna-Karin for being our guest!


Love that half circle stencil
Like the wonderful artsy look of this creation. Not seen the TH ink pads like used here before.
Melissa
“Sunshine HoneyBee”
I need to make time to get into
mixed media. So free and fun.
thanks for sharing.
I love to see the step by step instructions, awesome art journal page, awesome bright colours!
Beautiful, inspiring page. Love how you use stamps.
Beautiful journal page. I have never used scribble sticks, looks like they are fun to use. Thanks for sharing…
I just love Dinas stamps and stencils. They are so distinctive and fun.
love these reds and oranges – just like a glorious sunset:)
I noticed the multiple stamping right before I read it in the blog. Very nice.
Awww!!! Stunning piece of art!!!
what wonderful layers you have achieved without the bulk-super looking journal spread!!
Wonderfully done. You have a great imagination.
So much texture, depth and interest!
Powerful and inspirational journal page. Awesome colors and awesome use of multiple stamps and mixed media. So very nicely done!
Beautiful design. Love the color palette.
WOW! Absolutely stunning art journal page!
Thanks for the step by step! I have bought an art journal, but have yet to start, not knowing where or ho. This will help guide me! It’s beautiful!
Such a cool creation – thanks so much for sharing!!!
Love this! So artsy and encouraging! Thanks so much for the inspiration!
Pretty colors and textures!
You are truly an artist! Thank you for the great tutorial!
This is so awesome Anna-Karin. I am so inspired to art journal (which 2 years ago, I wouldn’t consider!) but you, Shari C and Vicky P inspire me to just DO IT! I am still nervous about “ruining” a perfectly beautiful book, however, I keep telling myself THAT is precisely why I bought it! LOL Just AWESOME!
Thank you Teresa!! I am happy to hear you want to start art journaling. It is such fun. And of course you won’t ruin the book, it wants to be stamped and painted! And if you don’t like a page, you can always paint over it, or even cut it out. :) Have fun!
This looks really cool, I love the colours!
This is a special page. Thanks for all the tips!
Incredible! Mixed media is an art form I cannot do! I admire those who can!
This is fabulous!
I love the colors & artistic look of this awesome page! Thanks for sharing all the great tips.
Loved to see your process. It is so fun to layer with Dina’s products–I’m a fan! Thanks for sharing your page here!
Thanks for the how to. This is just lovely.
Wow, this works of art is stunning!
Beautiful card!
Colors are so so vibrant!!! Love it!!
Thanks for sharing your journaling page. The colors are so vibrant, the layout so interesting.
Great tutorial! ,hanks for sharing your techniques
That is gorgeous!
Very pretty!
Beautiful journal cover! I love the bright colors! Thanks for the informative tutorial!
Gorgeous project. I love stencils. I have some Scribble Sticks on order and can’t wait to get them!
Wow!! Amazing page!!!
Very cool page. I love the bright colors!
Interesting techniques. Love the girl.
The vivid colors are so beautiful!
Such a nice page of encouragement! Thanks for sharing your tips!
Love the colors and the layers without too much dimension.
I love the colors!Beautiful page!!!
Lovely journal page. Thanks for the step by step.
Incredible dimension and colors! Wow!
Beautiful journal page! Love these gorgeous colours and all the texture!
I have always wondered how Scribble sticks Loki like on a completed project. They look easy to use and similar to Distress crayons. Lovely journal page.
Thanks for sharing!