Studio Monday with Nina-Marie: Faux Letterpress
Hi friends, it’s Nina-Marie here with you today with a brand new video tutorial featuring some of the newest stamps and dies from Hero Art’s Winter collection!
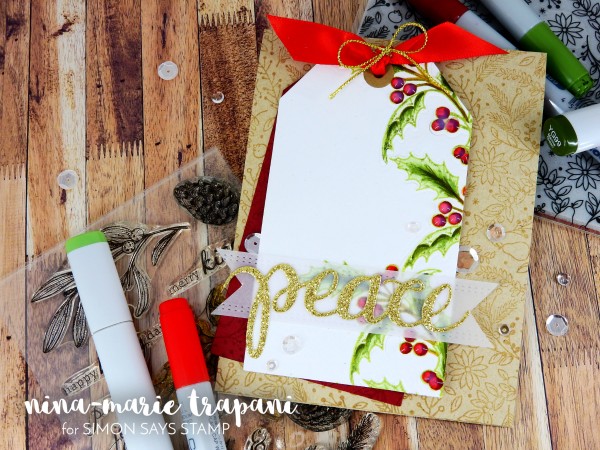
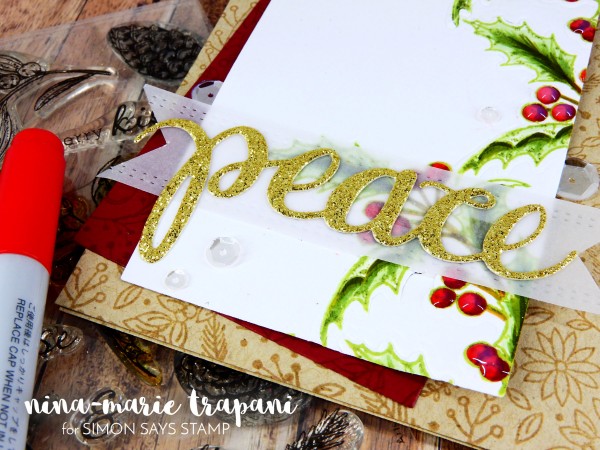
There are SO many fabulous new products from Hero Arts’ newest release; it was so hard to decide what to use! I wanted to share with you a faux letterpress technique and I felt that the Happy Holly Days stamp and die set would be the perfect sets to use for this. I also incorporated a few of my other favorites from the release; Peace stamp and die set, Holiday Florals background and the Nesting Tags die set.

Faux letterpress is a fantastic way to highlight stamped or colored images, as the texture from the letterpress adds relief to the design, helping push the images to the forefront. For this technique, you’ll need to have an embossing mat for your die cutting machine. Depending on the machine you use, you may need to experiment with your sandwich before trying it on your project. I personally use the Big Shot machine, so for my sandwich I used the Sizzix Texturz rubber silicone mat and impressions plate. I placed my platform on tab 1 and laid down the sandwich as follows: Texturz impression plate, rubber silicone mat, paper, die, clear cutting plate. I’ll show you all the steps for this in my video below.
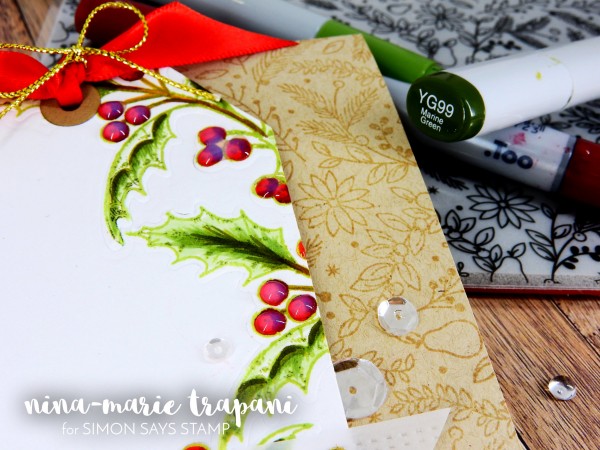
All of the coloring on this card was done with just a handful of Copic markers; I have them listed out for you below as reference:
- holly leaves: YG61, YG63, YG95, YG99
- berries: R46, R59
- branches: E35, E47
I hope you’ll check out the video to see how I created this card from start to finish! And I hope it inspires you to try the faux letterpress technique with your stamps and dies as well!
WATCH THE VIDEO:
SUPPLIES:
 |
 |
 |
 |
 |
 |
 |
 |
 |
 |
 |
 |
|
 |
 |
 |
 |
 |
 |
 |
 |
 |
 |
 |
 |
 |
 |
 |
 |


Beautiful card. Your coloring is amazing.
So very elegant Nina, I have to try this letter press technique. These stamps are all gorgeous!
Love that Christmas card!
I love your card Nina. Beautiful!
Very cool! Great technique, looks like letter press!
OMG I cannot contain myself. I love this.
Beautiful tag/card…..adore that technique….it’s GORGEOUS!!!
I love the Happy Holly Days set. Very classy. It would be great for scrapbooking too!
Beautifully done! Love the textured look that you achieved.
Thank you for such clear descriptions of the faux letterpress technique you used in this card. I have been looking to do something like that with a stamp for which no die is available. Is there a technique for that…perhaps debossing more than faux letterpress though the difference between the two I do not fully understand.
I love making my own tags for Christmas and this one is just gorgeous.
Very pretty card! And I love all of the techniques you shared in this video!! You always inspire me with your videos and cards!! Love the card, very pretty. Love that you did another Letterpress card, I think it reinforces the steps for everyone. Thanks for sharing
Love this card so much I’ve ordered a bunch! I hope you won’t mind if I CASE your card with a few changes.
I like the tag very much. thanks for sharing
stamping sue
http://stampingsueinconnecticut.blogspot.com/
Beautiful! The colouring is absolutely wonderful!
Gorgeous card!
Carla from Utah
Your tag is stunning! I loved everything about it. Your instructions in your video deserve an A! I understood it all and would love to buy everything you used. Your coloring was wonderful and I learned a lot in your explanation. Thanks again for the inspiration. I look forward to your next inspiration.
Beautiful!
I love the effect the faux letterpress gives those holly leaves. I am definitely going to give this a try. Thanks for sharing in this Hero Arts adventure.
This is just beautiful and I love how you added dimension with the faux letterpress technique.
Your coloring is so pretty and I love this beautiful holiday tag!
So elegant, Nina-Marie! I love the holly tag. I was so excited to watch you use the Sizzix silicone mat! I just bought one last week and loved seeing how you used it. It really does add a special touch to your card!
Darling card with tag!!
Love the Faux Letter Press with dies. I’ve never seen it before. Can’t wait to give it a try.
Beautiful card. Thanks for sharing.
Linda D.
Love this card with the pretty tag! Beautiful festive colors!
Love this card. Thanks for sharing the faux letter press technique.
This is so pretty! I always enjoy Nina-Marie’s videos! Thank you!
This is gorgeous, I love the holly & berries and all of the gold touches!
Just gorgeous! My favorite word is “Peace”.
Amazing card! Live this technique and use it very often. It’s always a deal breaker for me when I’m deciding if need coordinating dies. If I see them used to create impression around stamped image – then I definitely pick them up!
Your tag/card turned out fabulous. I love the technique you used to give the faux letterpress look–I will be using that one soon! Thank you so much for sharing!
Great no line coloring!
Love all the layering.
I love that background stamp. Beautiful card.!
Beautiful card! Love the tag ideas and your no line colouring is great!
The colouring of the holly is gorgeous! beautiful.
Lovely layers and the glittered peace really sets it off!
Very lovely. I’m so excited to be seeing Christmas cards!!
I love the gold glitter peace on the card. It makes the card look so stunning.
I love this christmas card! :-)
Fabulous work! Great video.
Wow your tag/card is pretty. Thanks for sharing your video showing us your process.
Love the faux letterpress effect! I don’t have a die cutting machine but it really does seem indispensable!
Love the tag and card background is so pretty! Awesome design!
So pretty, Nina. That’s something I’ll need to try.
The “Happy Holly” stamp set is stunning!! such a gorgeous tag! The colors are so festive :)
I luv the way this technique looks
Gosh, Christmas cards already! Lovely card
Beautiful! Love Nina’s creative style!