Studio Monday with Nina-Marie: 5 Ways to Use Circle Dies
Hello friends! Happy Monday! This week I have a technique overview to share with you, demonstrating 5 different ways to use circle dies.

Many of you have basic shape dies, such as circles. There are a ton of different ways you can use circles dies besides the obvious ways. My hope is that today’s post will give you inspiration for stretching the use of those dies!
RECOMMENDED DIES
For those of you that are new to card making, or are looking for a great circle die set, I thought I would first touch on dies I would recommend. In this video I will be using Simon Says Stamp’s Nested Circle dies. These are my favorite circle dies. There is a large variety of sizes included in the set, which I really like. Nested dies such as these allow you to use them on a wide range of projects.
Similar dies that I would recommend also include:
- Memory Box Circle Basics set
- Lawn Fawn Circle Stackables set
- My Favorite Things Circle Stax 1 and Circle Stax 2
- Hero Arts Nesting Circles set
NOTE: Remember that all of these sets differ in size, so make sure to read the dimensions so you find the one that works best for you.
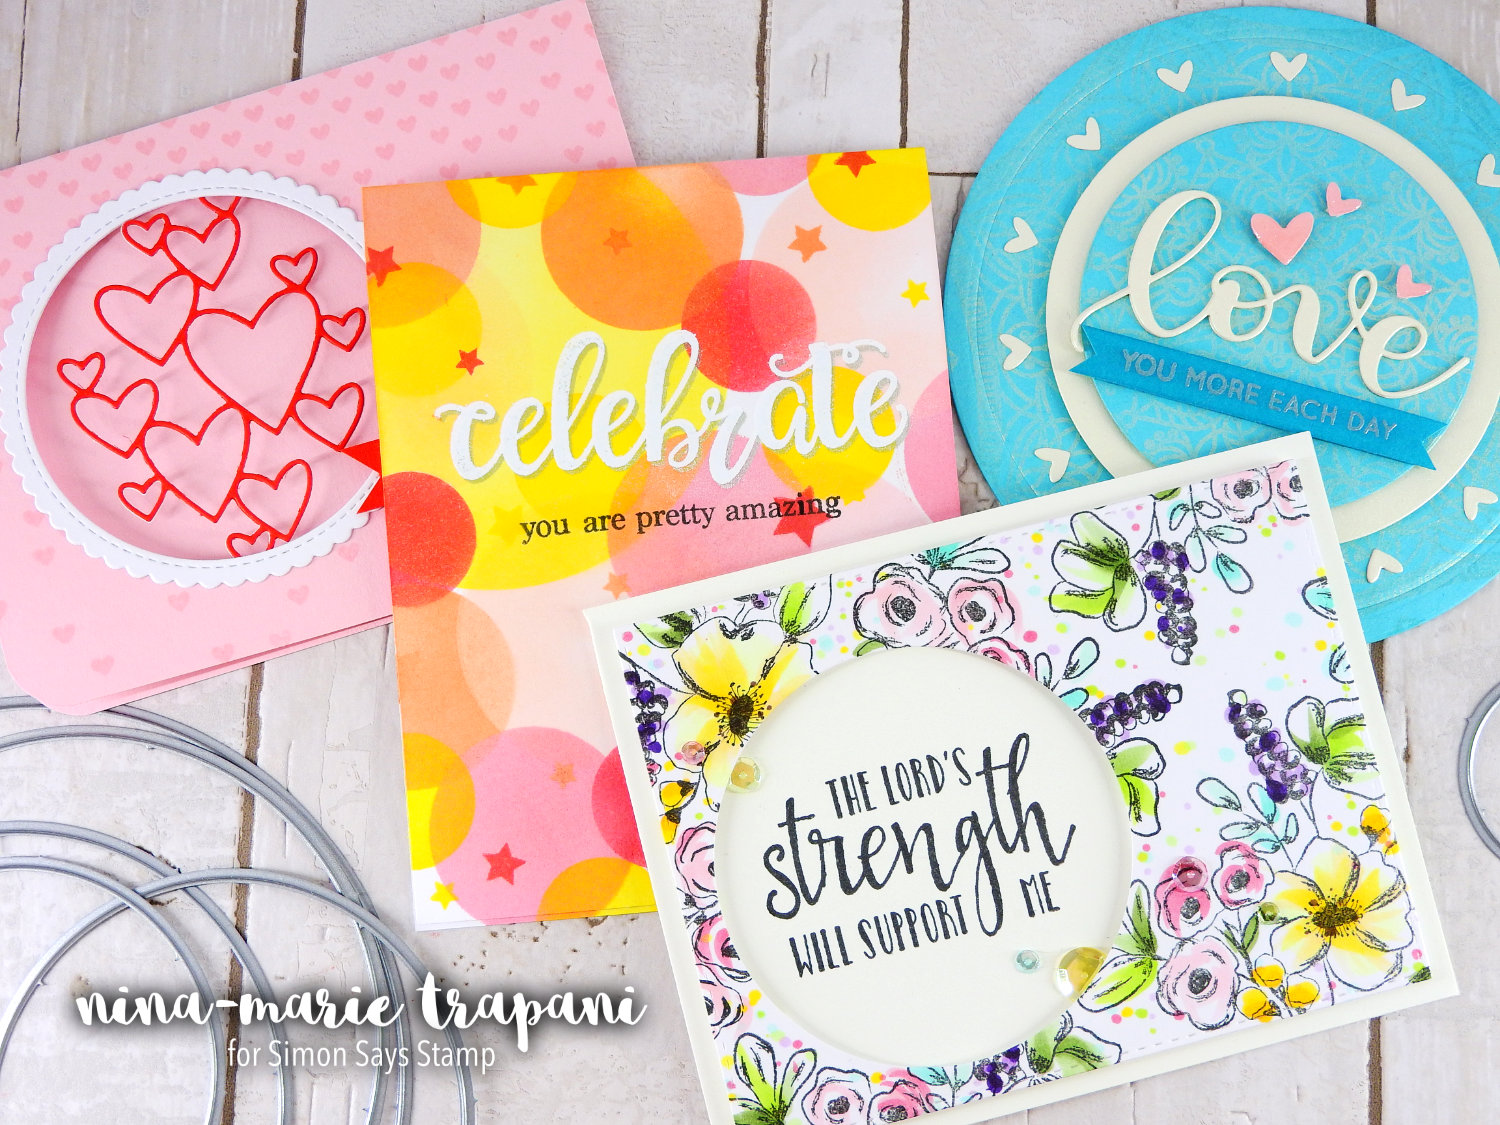
CIRCLE DIE TECHNIQUES 1 & 2: SHAPED CARD + EMBOSSING
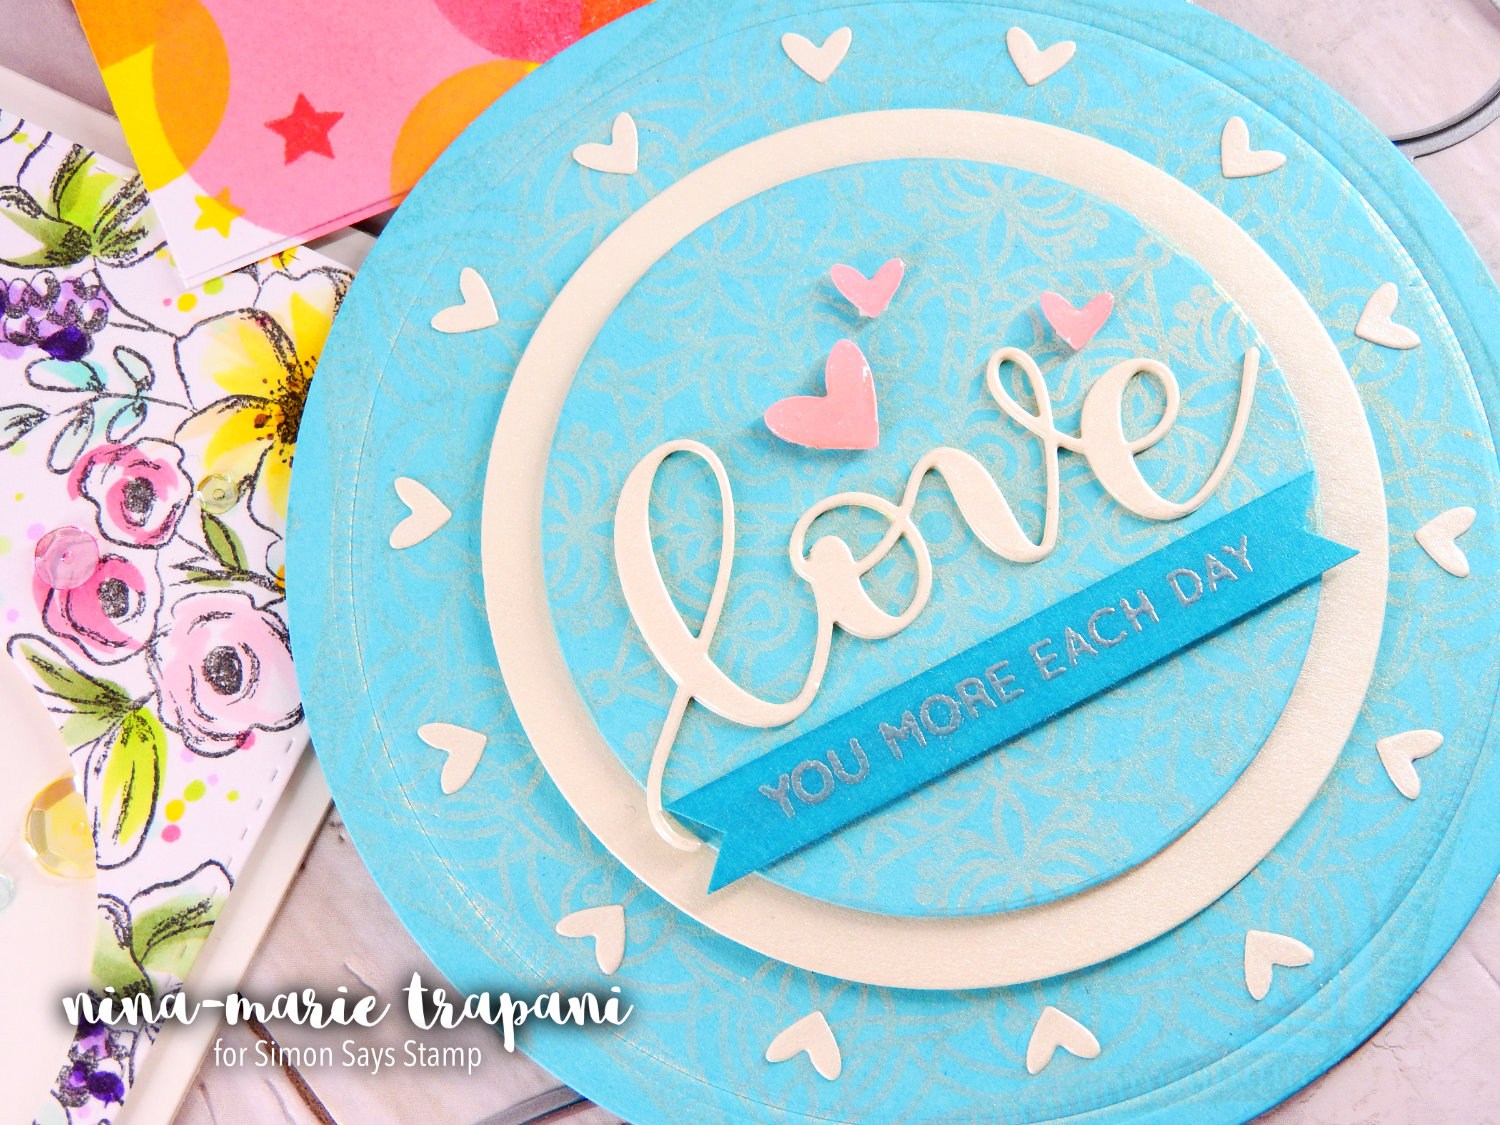
The first techniques featured today are creating a circle shaped card, plus embossing with dies. Both techniques are great by themselves, but also look fabulous when used together! To make the card I cut the card base from Audrey Blue cardstock and stamped the Elinor background on top using embossing ink. Because the embossing ink is sticky, it held the Biscotti Perfect Pearls on nicely and created a shimmery effect to the design.
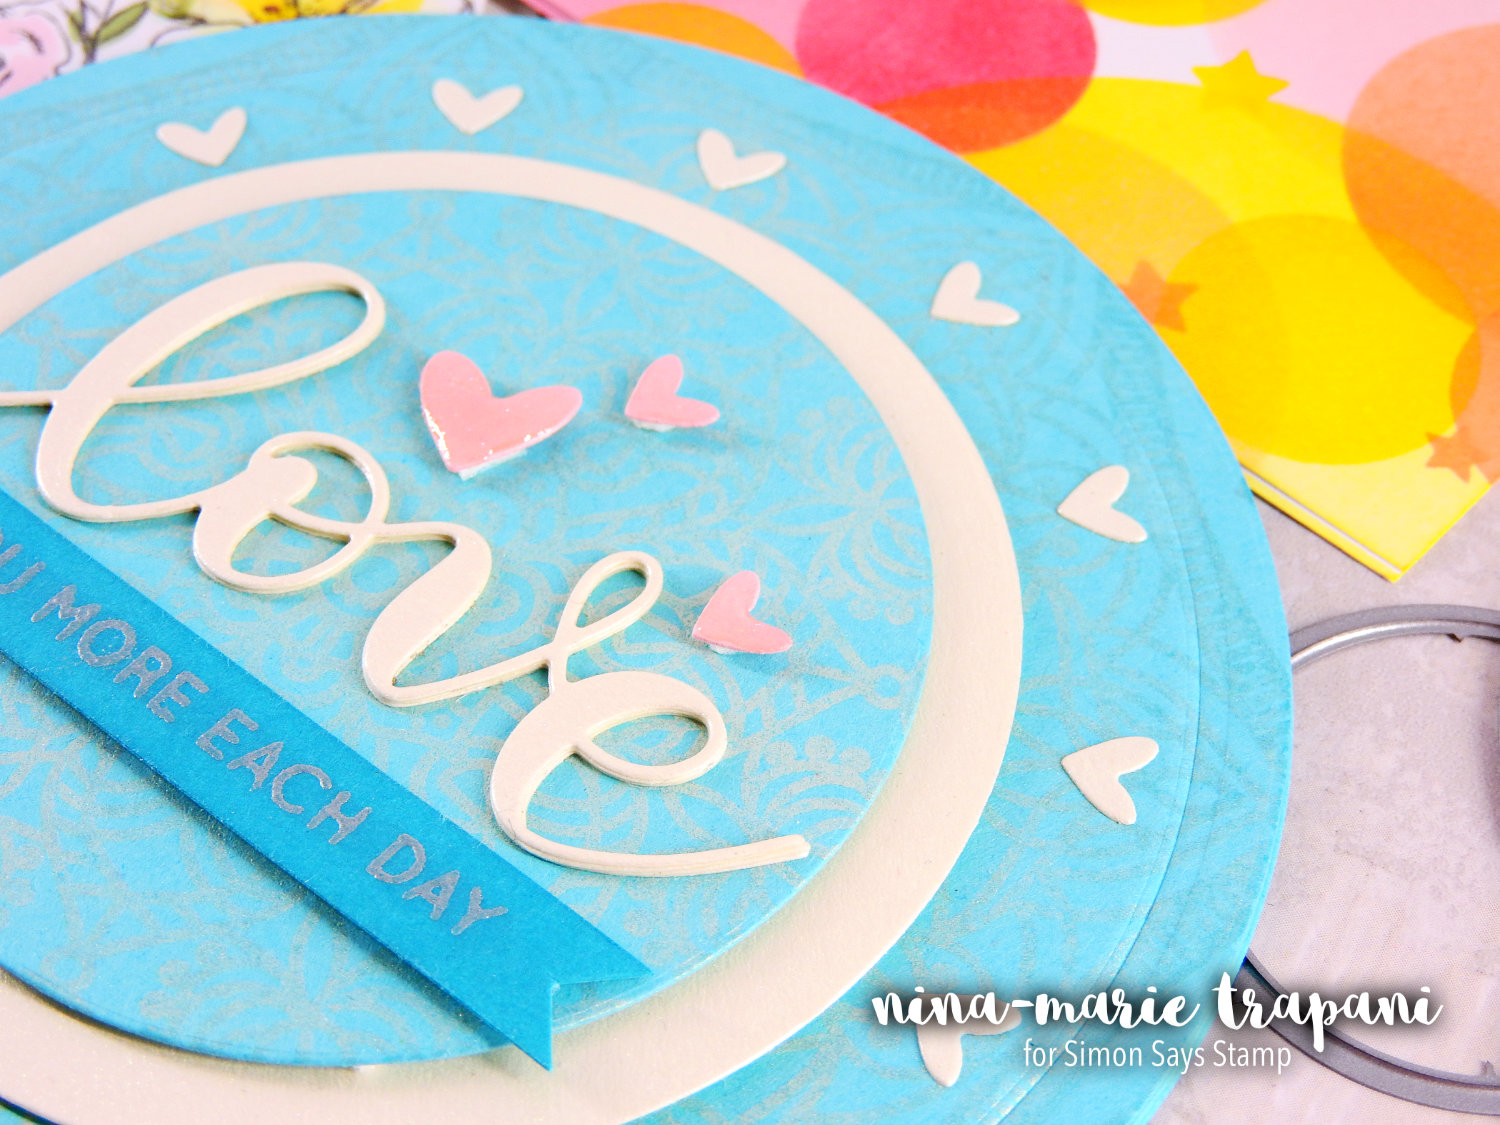
Using sentiments from the Kristina’s Love stamp and die set, along with some die cut hearts from the Clipping Hearts die, I finished off the circle shaped card.
Circle cards are one of my favorite alternatives to the usual A2 size. And the elegance of that doily Elinor pattern is enhanced perfectly by the circle shape!
CIRCLE DIE TECHNIQUE 3: WINDOW CARD
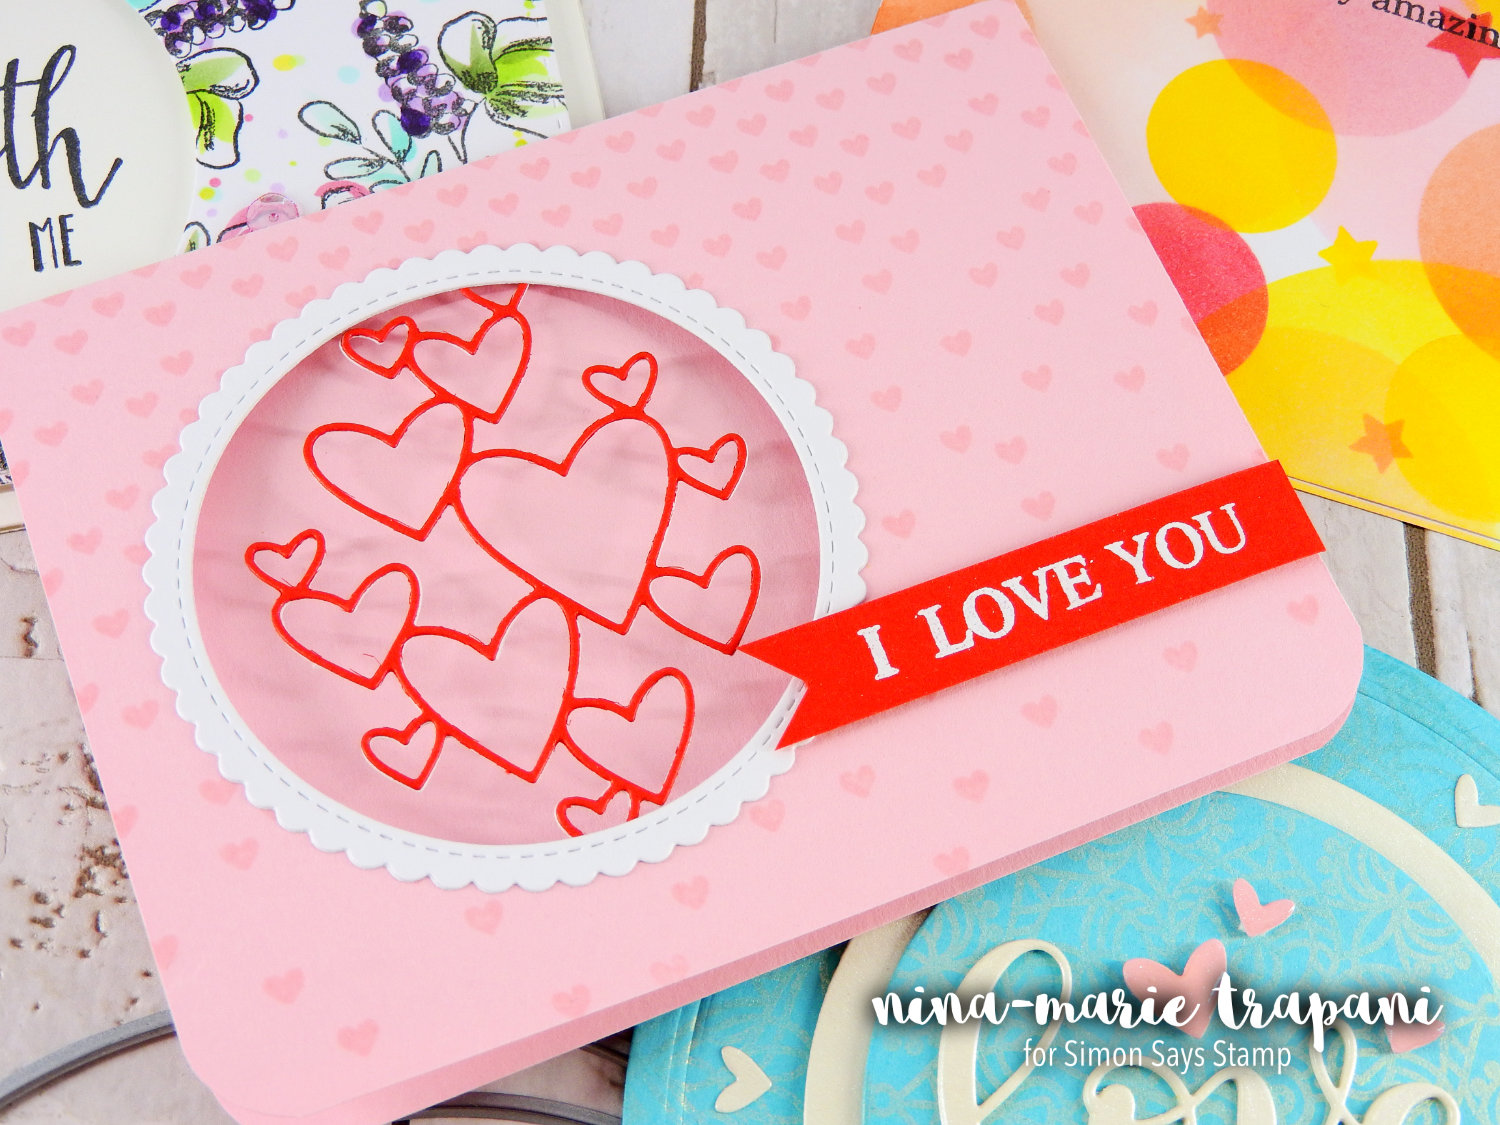
A window card is another fun way to add new life to a card design. Windows allow you to see from the front of the card to the inside, and can be altered in a variety of ways. Here I created a floating die cut shape inside my window, but you could turn the window into other things too, such as:
- a shaker
- have a critter or image peeking out from the inside
- cover the window with acetate and adhere something to the front of the window

With this card, simplicity was key. Because my floating die cut was a special effect that I wanted to make sure stood out, I needed the rest of the card to carry a simple but supporting theme. I cut the window into my A2 side-fold card, which was stamped with a Falling Hearts background.
I attached the Clipping heart die cut to the backside. The die was then sandwiched between a piece of white cardstock that had the same circle window cut out of it; this is so that the heart die cuts were cleanly and securely held in place.

After that I added a scallop circle frame around the outside of the window and popped a sentiment banner up off the right side. The sentiment was stamped using the Laura’s Love stamp set. Be sure to check out the video to see how both the window and floating die cut inside was created!
CIRCLE DIE TECHNIQUES 4: MASKED BACKGROUND
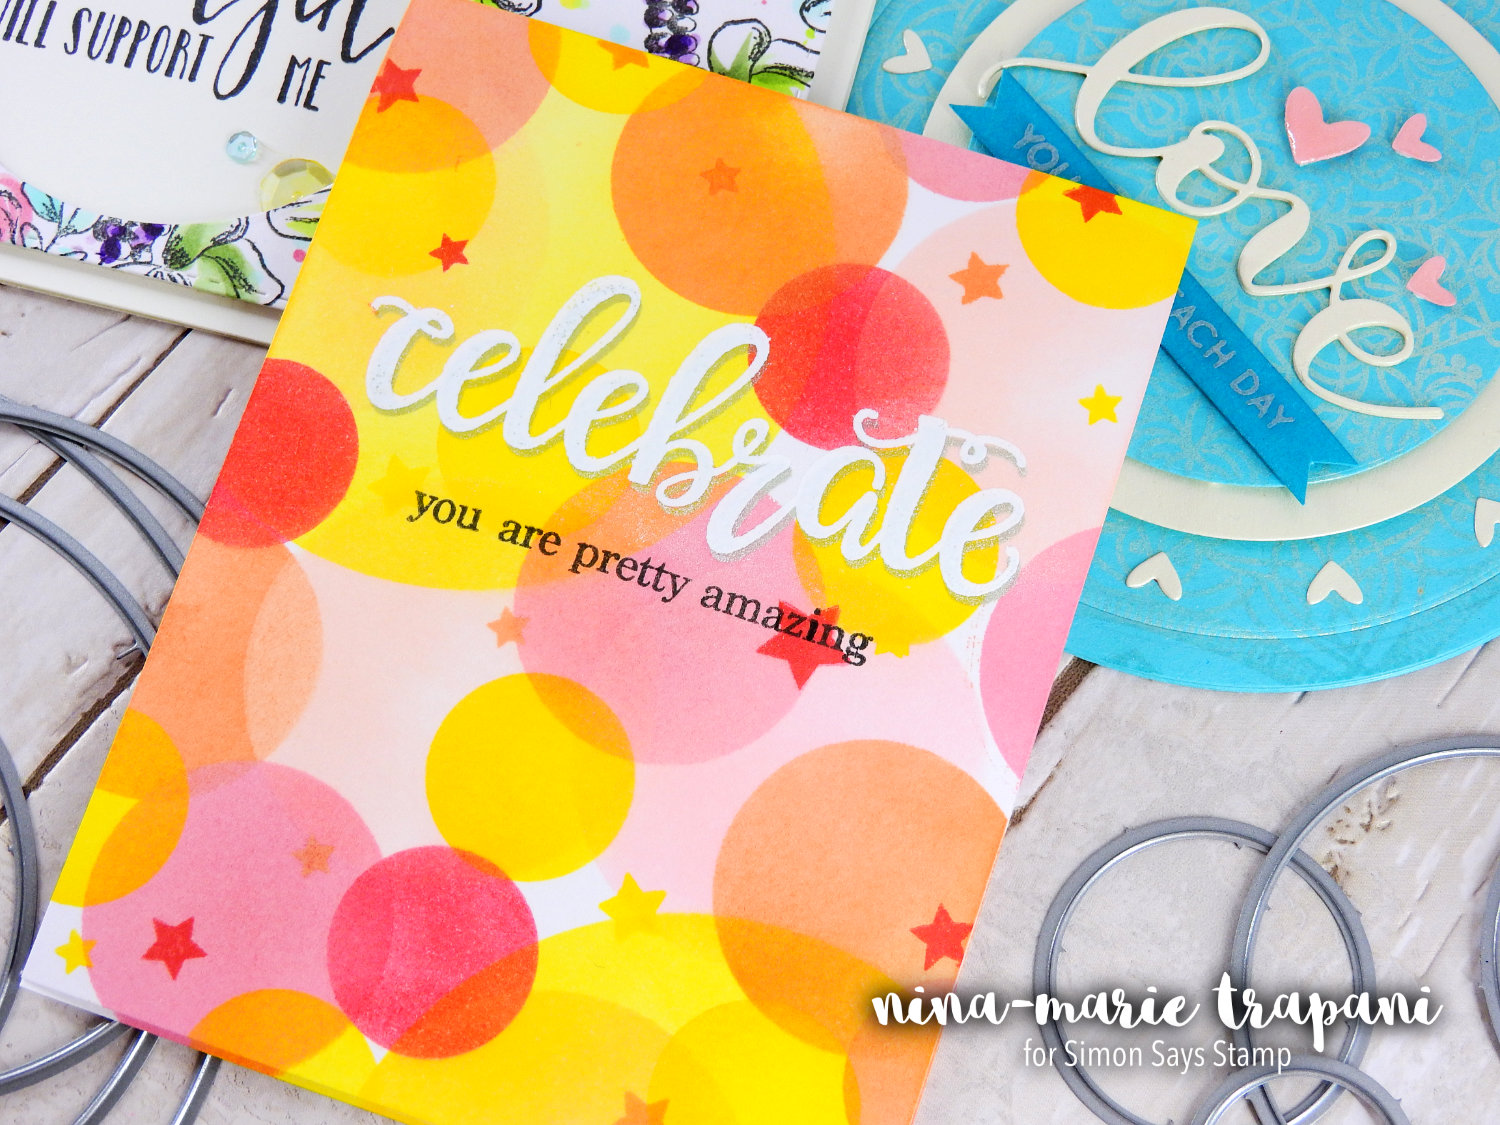
Have you ever tried using circle dies as masks? Its so much fun and another fabulous way to stretch the use of your dies. Plus you get to create your own custom patterns and effects with those masks – and who doesn’t love that??
For this card you won’t need many supplies; some printer paper, your circle dies and ink! Cut squares of printer paper and run them through your die cutting machine with the circle dies you want to use. With this technique you won’t be using the circle you cut, but rather the squares with the circle shape cut into it. These are your masks.
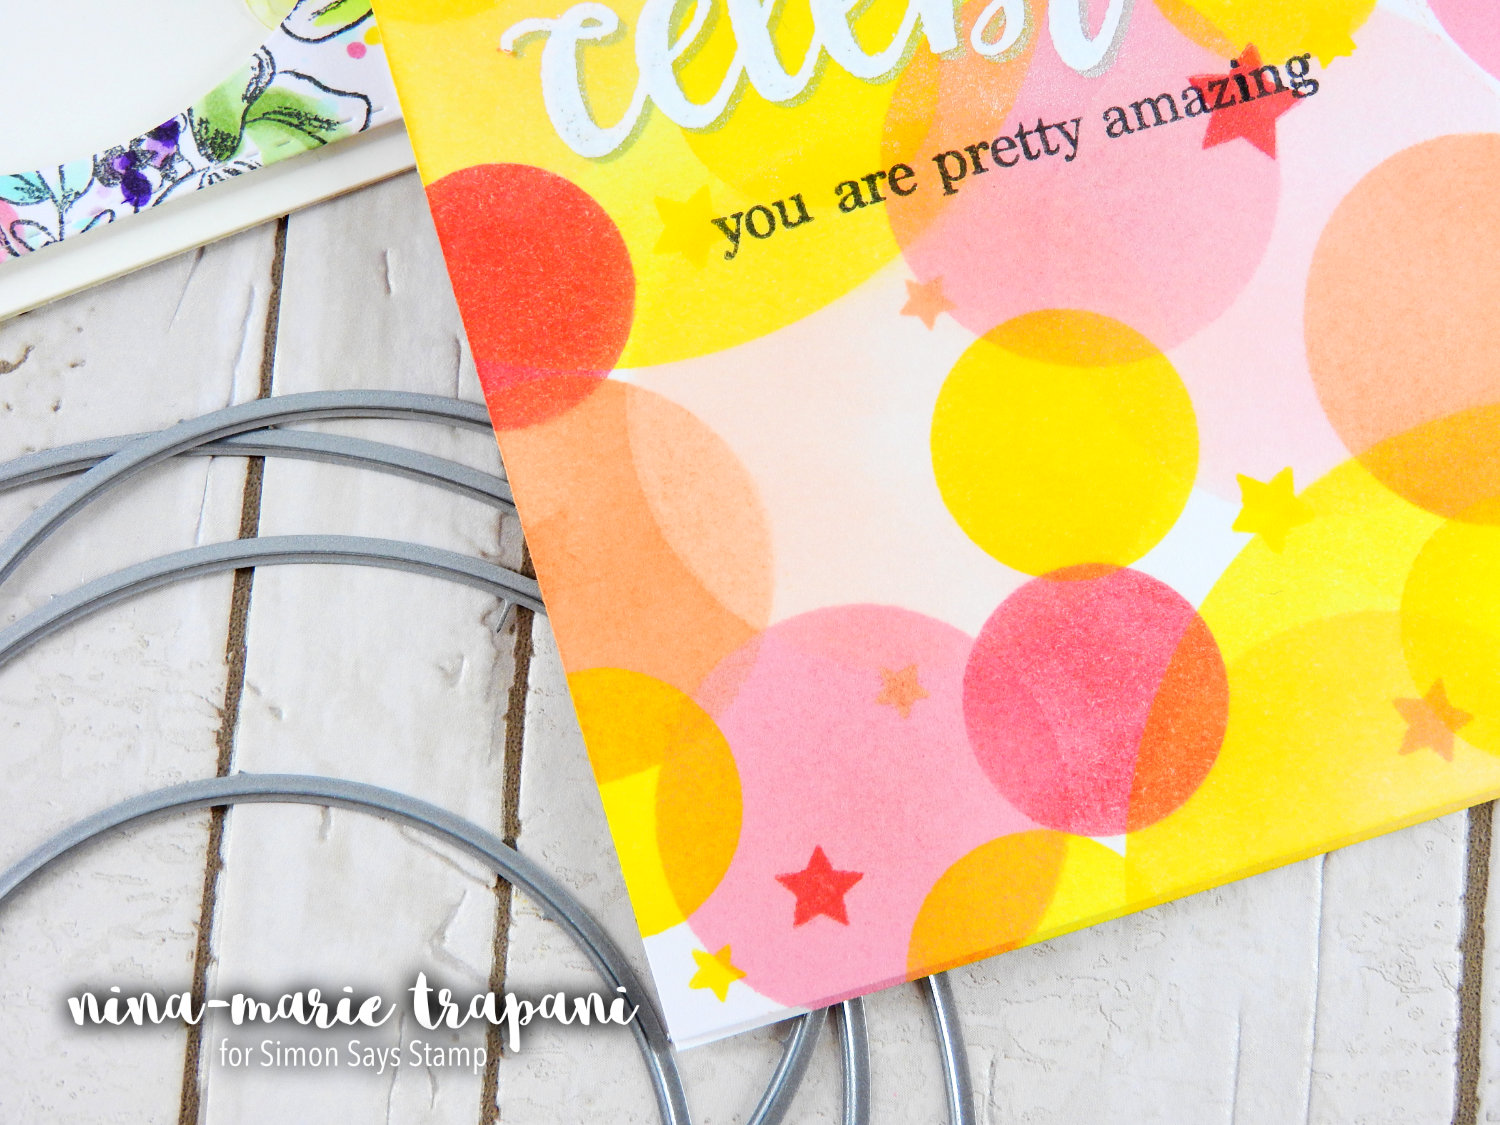
By laying the masks onto your card base, you can then use your ink and some blending foams and create circles anywhere you like! I used the circles to create a layered – almost bokeh-like – background. Very festive and celebratory; I enhanced that feel by stamping some stars in the same ink colors I used to do my ink blending. Inks used: Hollyhock, Strawberry, Lemon Zing, Sunkist, Cotton Candy.
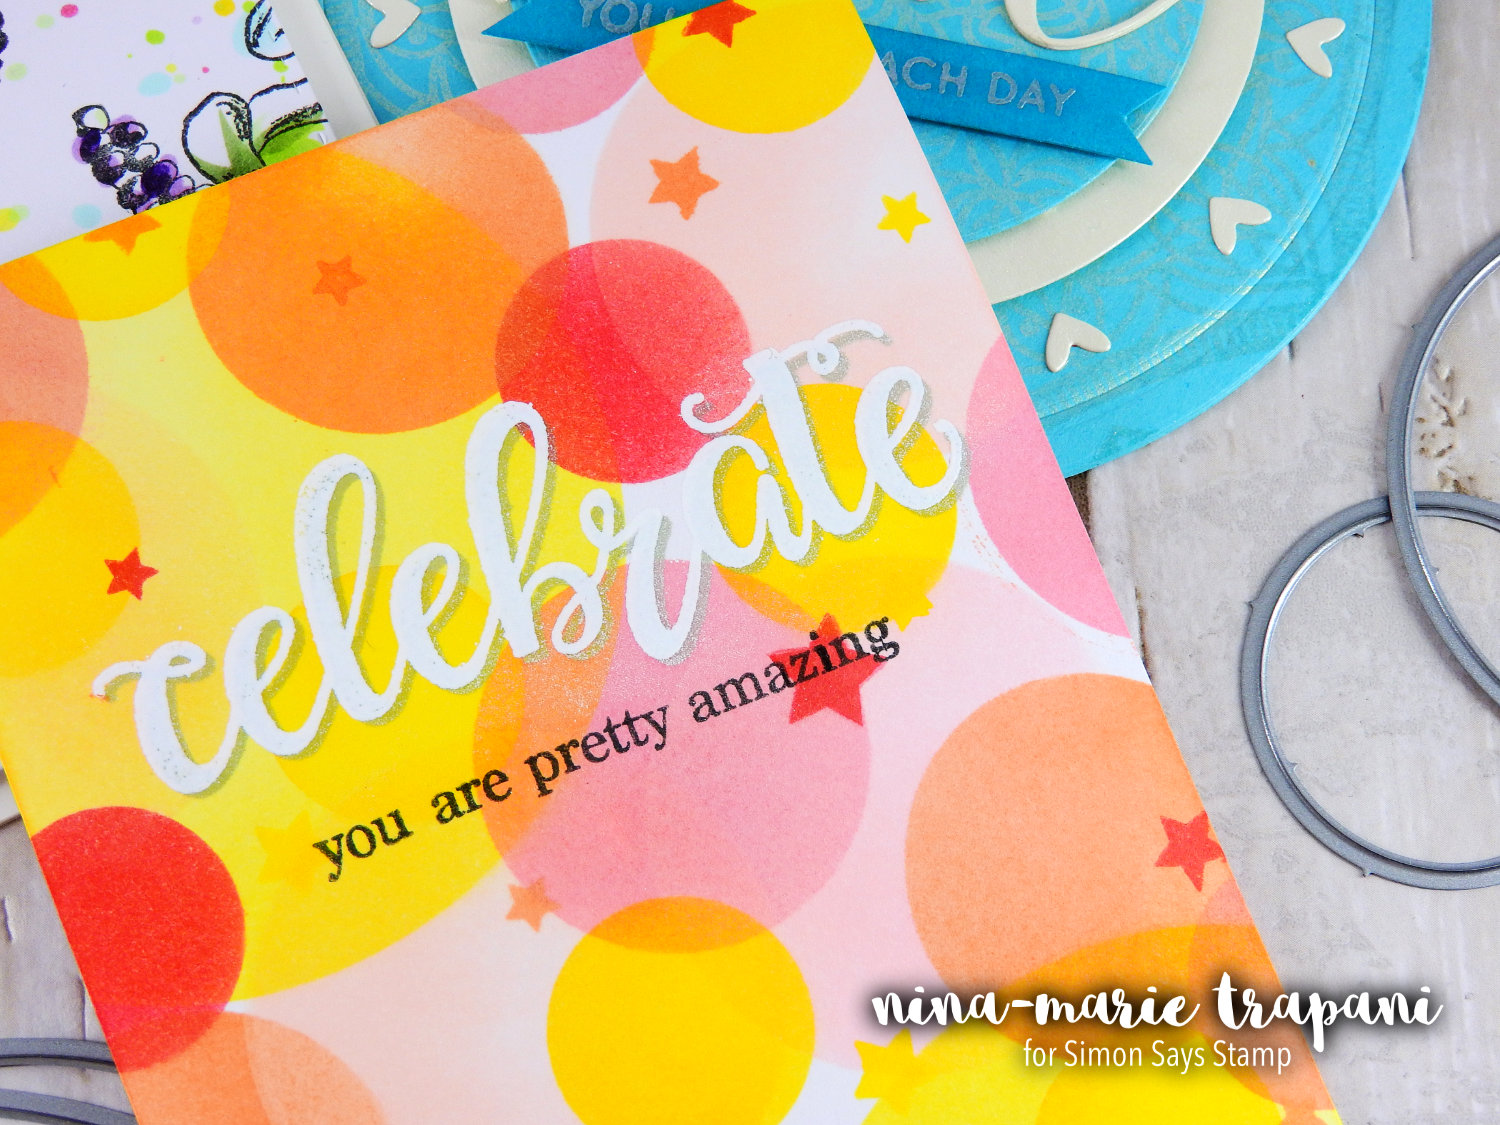
The sentiment also carried the celebration theme, which is from Avery Elle’s Big Greetings set; the supporting sentiment was stamped using the You Matter set from Simon Says Stamp.
Another great thing about this card is that it is one layer, which makes it so easy to mail!
If you want to put a twist on this technique, instead of ink blending into the circles, you could adhere the circle shapes themselves onto cardstock and ink blend over top of them. Then, when you remove the circles from the cardstock, you’ll see the original cardstock color in the circle area while the rest of the card is colored with ink. Lots of ways you can customize this technique!
CIRCLE DIE TECHNIQUES 5: NEGATIVE SPACE
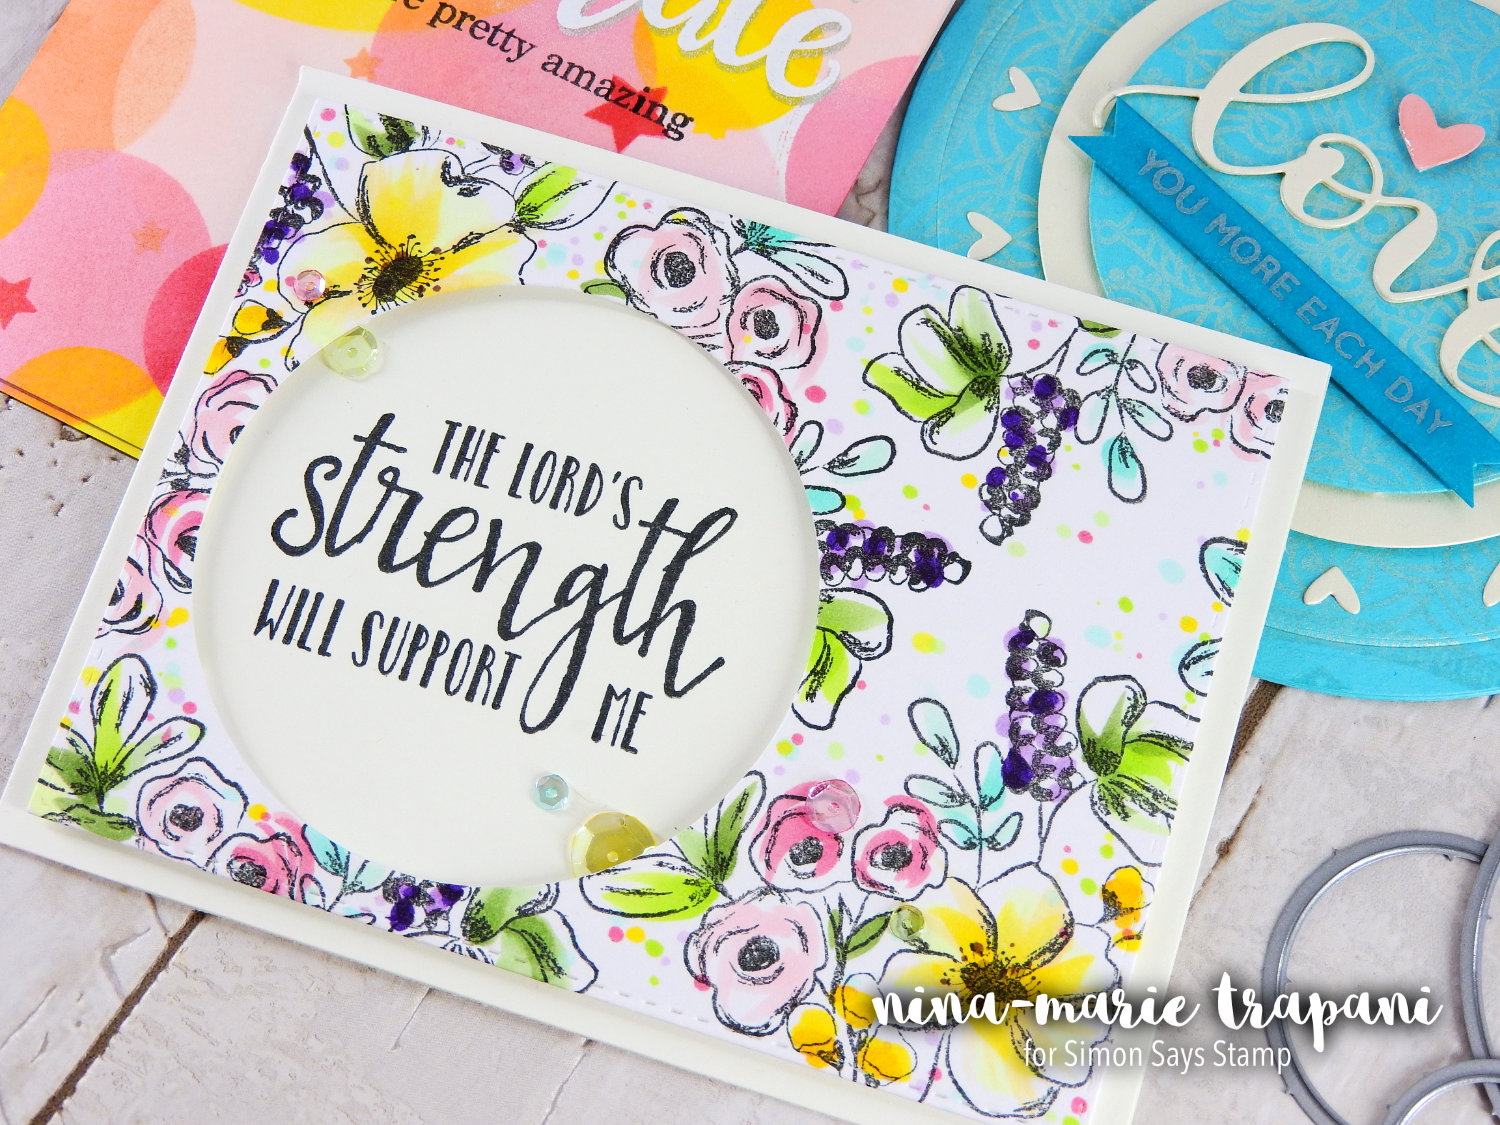
The last circle die technique for today is using negative space. Instead of using the circle shape to pop my sentiment up off of the background, I reversed things. Rather, I popped the background (which has a circle die cut into it) up off of the card base. The card base has the sentiment stamped onto it, which causes the sentiment to be recessed into the design and is framed beautifully by the background panel. The sentiment is from Reverse Confetti’s The Lord’s Strength stamp set.
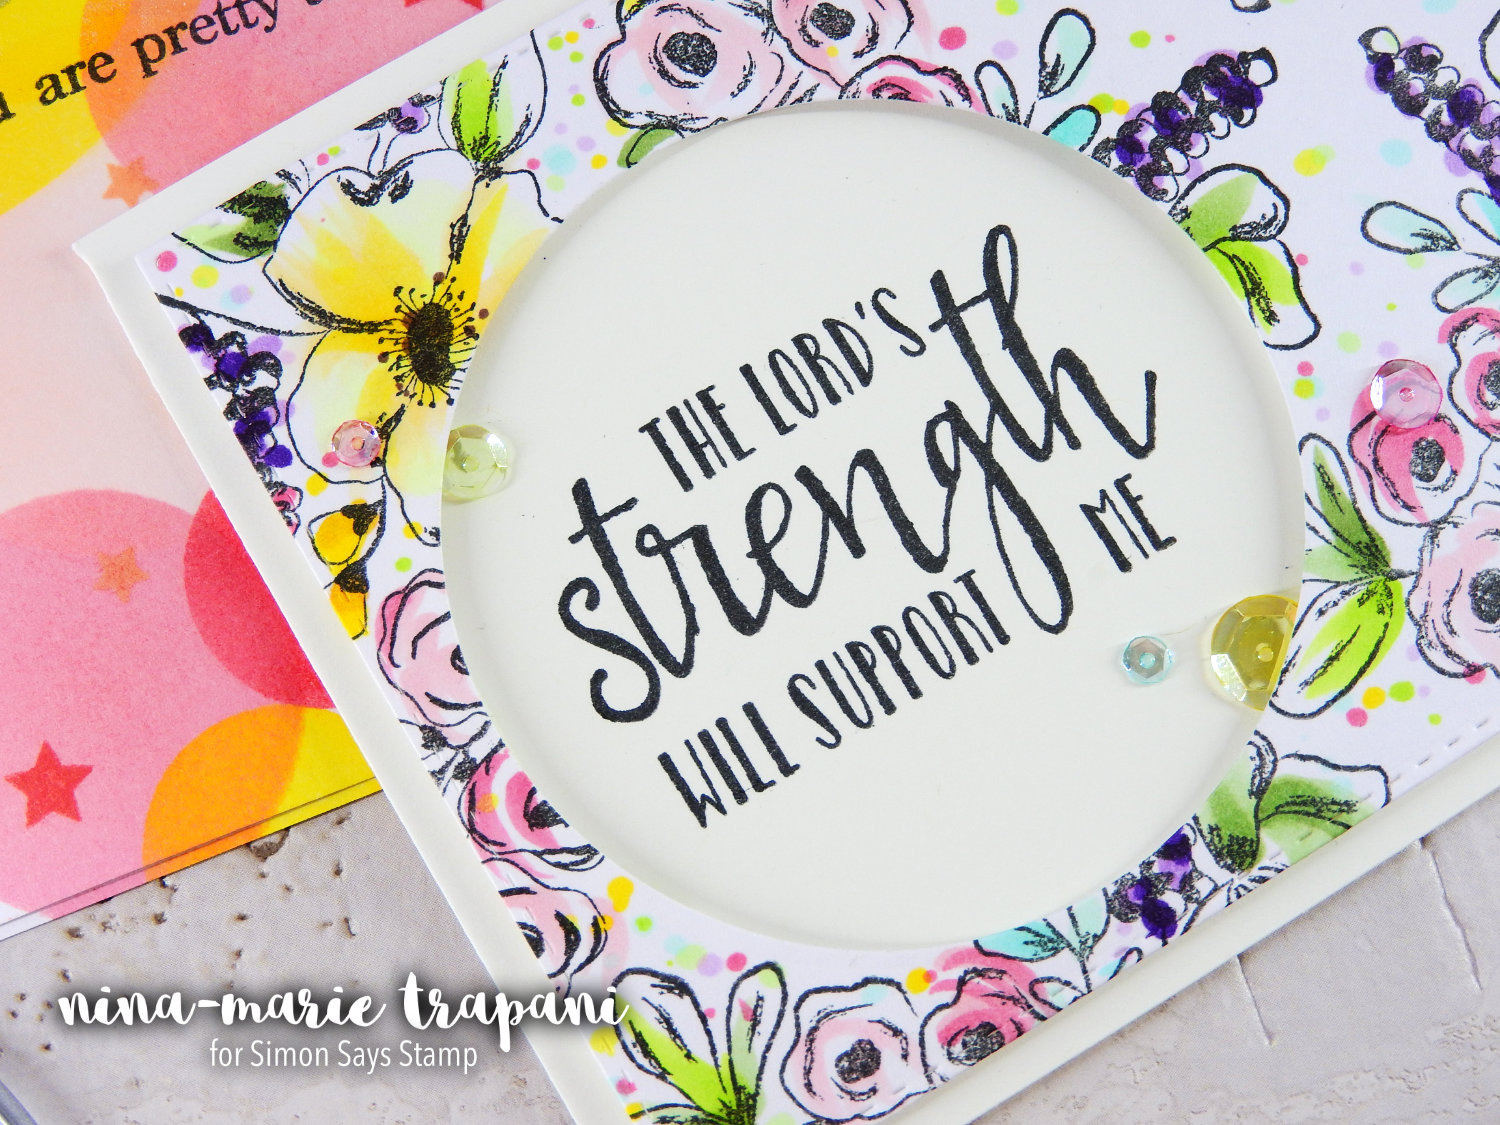
Because we used the negative instead of the “positive” (i.e. the circle die cut), we achieved a totally different look and feel for this card.
The background of this card was created by stamping the Fresh Flowers #1 cling stamp from Prima onto white cardstock. I then colored the images with Copics, but in a very loose, artistic style. The flowers have a very loose, hand drawn look and I wanted to emulate that with the coloring. By using quick flicks, following the general direction and flow of the artist’s illustration, I resulted with a very fun and artsy background. I really love the end result!
I also added some sequins that I colored with Copic markers, so that they matched the colors used in the background. Since the ink in Copics are alcohol based, they can be applied to many different surfaces and will not rub off.
I hope these 5 ways for using circle dies in the video below is inspiring and that you are able to pick up some tips and tricks too! Thanks for visiting me today!
WATCH THE VIDEO
SUPPLIES


Blog Candy Alert!! Follow our blog via email and comment on this post for a chance to win grab bags and blog candy! Remember to tag your awesome projects with #simonsaysstamp on social media so we can see what you are creating!


Great ideas & cards! Thanks for sharing!!
Great ideas using circle dies in new ways. I’d need to buy one of those nesting sets though.
Great ideas! Will give them a try.
Thanks for sharing some fun ideas to use circle dies on cards! Love the variety and great looks you get with different ideas for the circles!!
Thanks for all the inspiration with circle dies!
Such awesome ideas
Eautiful cards, love all the circle ideas and techniques all in one post!
great ideas. . . love those circle dies
I am so happy that you featured circles today. All of my circle dies are at the bottom of my die box. Your cards really inspired me today and I am going to get my circle dies out.
Wonderful cards and techniques. I will be trying these idea. Thanks so much for your video.
Thanks for the ideas to stretch the use of my dies. Very pretty cards.
Great reminders for how versatile circle dies can be! Great card designs.
Fantastic ideas- such a diverse set of cards, but all with circles! I LOVE the love circle card!
As always beautiful cards and great techniques!
Some great ideas for these dies. I have the Spellbinders sets and admit I don’t use them often. Thanks to you, I think I’ll dust them off and try a few of your examples. TFS.
I love your card. Thank you for demonstrate your circle-dies.
Love all the cards. I’m sure most of us have some unused nesting does lying in our stash.
Can;t wait to go back to them and try out some of these techniques :)
Wonderful ideas! Thanks for sharing!
Awesome cards!!!
Great video & great ideas!! Thanks for giving us some new ideas to use our circle dies!!
Awesome cards.
Thank you for the circle card ideas….need to use the circle dies more.
Great cards and ideas!
Love all these great ideas to get more use out of the dies!
This is such a fabulous tutorial! I always learn something from you! tfs
Very nice ideas!Thank you for sharing your tips and techniques!
Great use of these dies!!, all the samples are so beautiful!!
Great ideas! Thanks for sharing.
I love, love, love this video. I really appreciate watching a video that shows me new ways to use old products. Please make more like this.
Love all the ideas of how to stretch my dies. Thanks for sharing.
Love all the ways shown to use our circle dies!
I just love to use my stash in more than 1 way so TFS!
Great ideas, thanks for sharing!
Hі tҺere! This post coulԁn’t be wгitten аny betteг!
Reading thіs post reminds mᥱ of my оld room mate!
He alwɑys kept chatting about tɦiѕ. I will forward thіs post to
ɦim. Pretty sսre he աill hɑѵe a good reaԁ. Thank ʏou foг sharing!
Sistema Fórmula Alpha 3F já ajudou milhares
de homens ao volta do Brasil, desmistificando afirmações como a de
que mulheres são atraídas por homens com quantia, super musculosos ou altos. http://simshospitality.com/index.php/component/k2/item/14-image-gallery/
Thank you for all the great ideas you’ve shared – love all the cards you’ve made to illustrate the versatility of circle dies!
very clever I especially love the one with the suspended hearts but they’re all gorgeous
So many clever ideas. I would love to see more posts like this one.
Nina-Marie, they are so totally amazing ideas! thanks for sharing them.
All fabulous ideas!
wooow so many adorable cards
I really love the one with heart so adorable that heart DIES
love them all!!
So many great ideas and examples! Lovely cards and ways to use circle dies!
8Inyia https://goldentabs.com/