Spring Tim Holtz Thank You Card!
Hi readers! Happy Friday to you! I hope your weekend is starting off wonderfully and the sun is shining wherever you are! We’re beyond pleased to welcome back the magnificent Richele Christensen as a guest on our blog today with this watering can thank you card that is just the perfect combination of clever and beautiful! Check out all the details on how to make this neat card below!
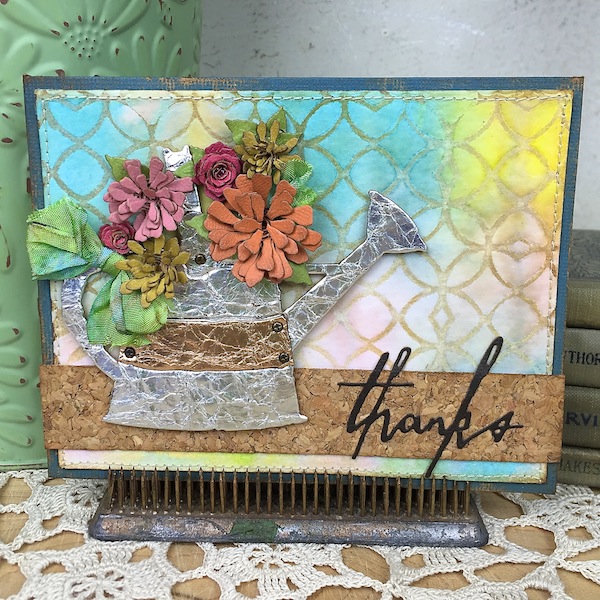
Hello friends! It’s Richele here and I have lots of new products to share with you today! “Kraft-core” cardstocks are a favorite of mine they’re perfect for cards and to distress of course. The new Classic collection is so bright and the Metallics are to die for. Another favorite is the Tiny Tattered Florals die it’s a great set with 15 dies (8 flowers and 7 leaves) and the quilling tool is included with the die set. There are so many beautiful details to love about this card!
Instructions:
-
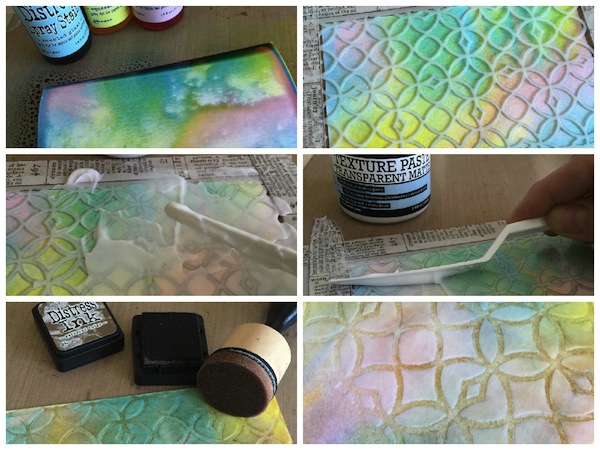
Color a piece of Watercolor Cardstock with Distress Spray Stains and dry with a heat tool.
-
Tape Latticework Layering Stencil over cardstock lining up at the top.
-
Apply a layer of Texture Paste in Transparent Matte with a Palette knife.
-
Holding the Palette knife at an angle scrape off excess paste. Set aside to dry. Once the paste is dry it will dry clear and have a matte finish which is perfect for our project today.
-
Ink over the areas with Distress Ink on a Mini Ink Blending Tool, the paste will act as a resist.
-
Wipe off inked area with a damp cloth to remove the ink over the paste.
-
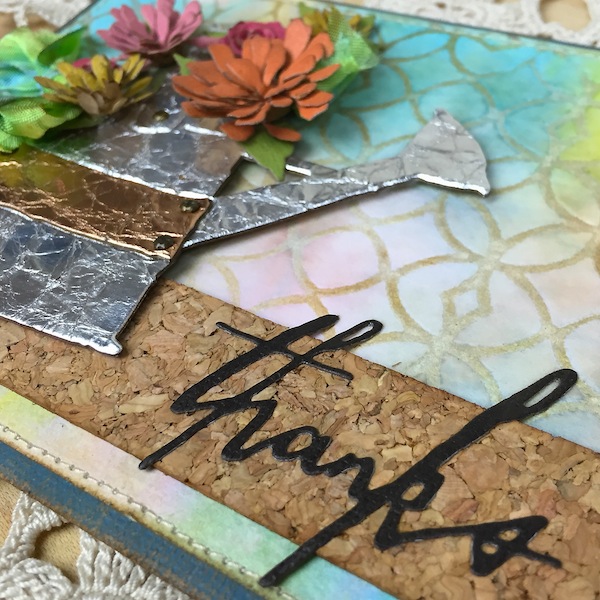
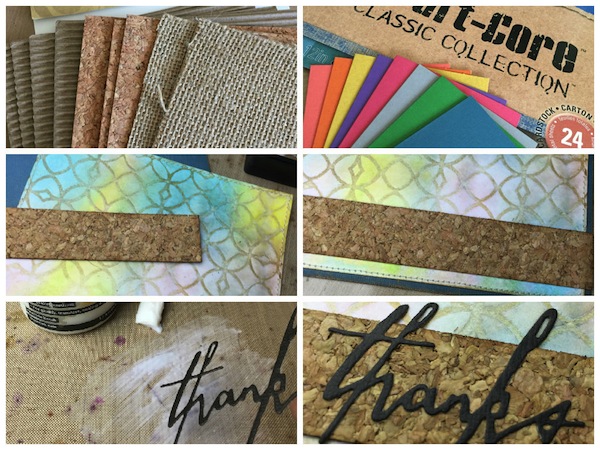
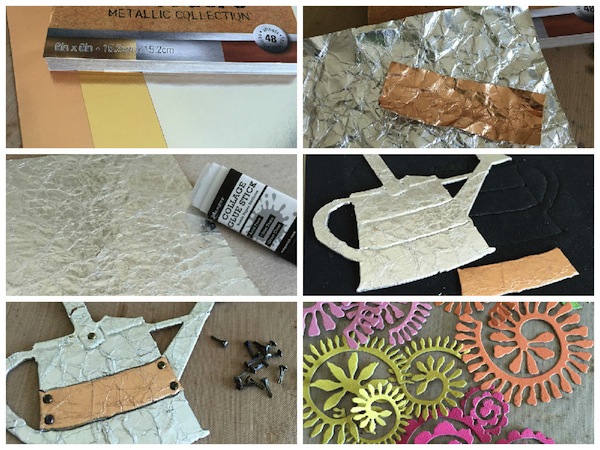
Cut a 1” strip from the Textured Surfaces pack by the width of your card. The Textured Surfaces pack comes with Cork, Burlap and Corrugate. They are sticky backed with a very strong adhesive for easy use.
-
Cut base card from Kraft-Core Cardstock. Score and fold in half. Love the new Classic colors!
-
Ink the edges of with Distress Ink on a Mini Ink Blending Tool. Add stitching if desired.
-
Adhere pieces to the base card.
-
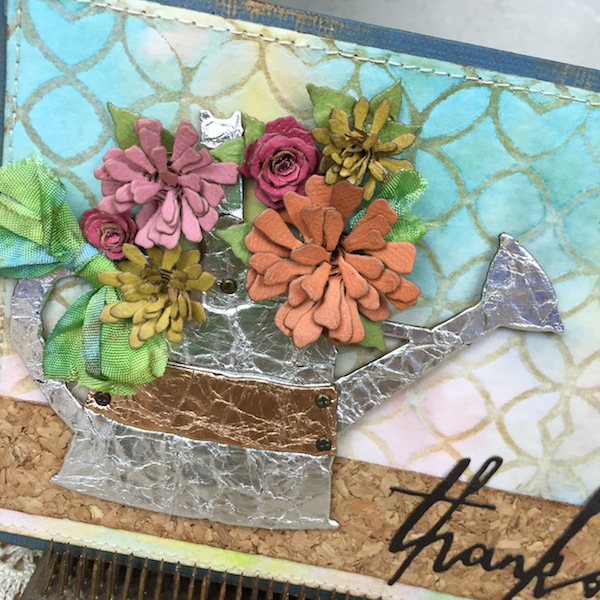
Die cut “thanks” from black cardstock using the Handwritten Celebrate Thinlits Dies. These dies have become a staple for me. They are great for cards, mixed media projects, layouts and more. To adhere apply a thick layer of liquid adhesive to your craft sheet and pounce the word over the adhesive.
-
Position the “thanks” on the cork strip.
-
The new Kraft-Core Metallic Collection comes in 3 colors silver, gold and copper.
-
Crumple up a piece of silver and copper cardstock for the watering can. Tip: Mist the back of the cardstock with water and it will make it easier to crumple up.
-
Adhere the metallic pieces to chip board with glue stick.
-
Die cut the pieces using the Watering Can Bigz die.
-
Add Mini Fasteners at the handle and contrasting center strip.
-
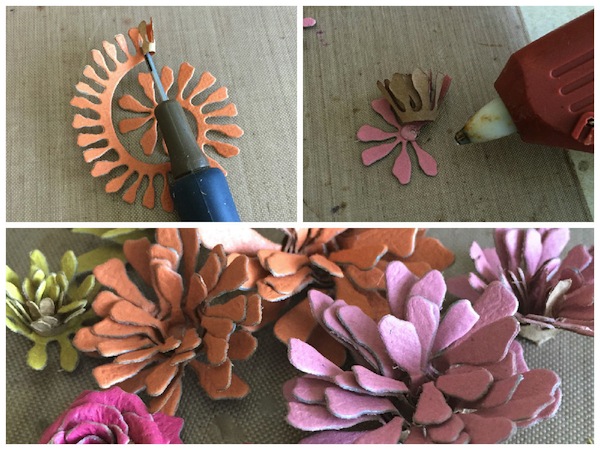
Die cut the flowers form several colors of Classic Kraft-Core using the Tiny Tattered Florals Thinlits die. The set comes with 8 flowers, 7 leaves and the quilling tool is also included. Tip: Use the Precision Base plate with the Magnetic Platform when die cutting intricate dies and it will help cut them every time.
-
Insert the Quilling tool at the small end of the die cut flower. Roll towards the colored side of the cardstock and continue to roll up the flowers to the end. Remove from quilling tool.
-
Apply a little dollop of hot glue at the end and push the rolled petals onto the glue. Spread out the petals to create a beautiful flower.
-
Create several flowers and ink the edges with Distress Ink on a Mini Ink Blending Tool. Don’t forget the leaves.
-
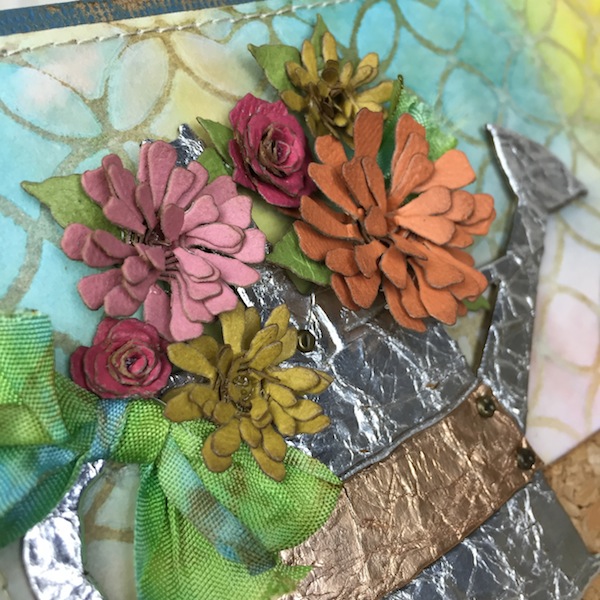
Adhere the Watering Can with foam tape. Arrange flowers and adhere to card with hot glue.
I hope you will try some of the new products and techniques i’ve shared today. I know you will love them as much as I do!!
Thanks so much for stopping in and sharing your time today!
Richele
SUPPLIES:
 |
 |
 |
 |
 |
 |
 |
 |
 |
 |
 |
 |
 |
 |
 |
 |
 |
 |
 |
 |
 |
Thanks for reading today, and thanks to Richele for being our fabulous guest!

Blog Candy Alert!! Follow our blog via email and comment on this post for a chance to win a special blog candy!


I LOVE those flowers! Cute card!
What a bright and colorful card!
Great card, love all the texture and color.
Beautiful card! I can’t wait to get this die and start playing!
Oh I wish I was better at quilling! Those flowers are just gorgeous!
Love that soft background effect.
my goodness, these new dies are amazing! thanks for showing all of the great new products on this wonderful card! :)
Delightful card, I love how you crumpled the card stock for the watering can and the new die set of flowers is fantastic.
Wow! Lots of great techniques and ideas here. Love the watering can.
How pretty! Love the foil watering can and those gorgeous flowers!
Great spring card. Thanks for the tutorial.
Love Tim’s new products–can’t wait to play!
This is one of the prettiest cards I have seen all years.
Oooh beautiful use of colour :)
A very beautiful card! Love the watering can with the metallic papers! The flowers are gorgeous!
I’m wow’d by all the dimension and texture in this card!
I really like those flower dies…will have to put those on my wishlist. Thanks for sharing, it’s a great card! =)
Wow, love this card, those flower dies and the metallic paper watering can, ooohhh so pretty!
Just beautiful!
I love the colors
I haven’t been to keen on getting the distress sprays, but definitely having second thought now. The color combination used has sparked my appetite! Thanks!
Love tim’s stuff!
The flowers are so cool!
Metallic Kraft!!! OMG, what a fab card, so much texture, love everything Tim, thanks so much.
Wonderful card and great tutorial, thank you!
I love the background, and the flowers are pretty!
Just amazing, Richele! The gardener in me adores the watering can and Tattered Florals flowers! The sentiment is so lovely, too! ♡
A fabulous project! Thanks for the tutorial.
The colors, the textures, the layers…oh my! Love it.
What a gorgeous thank you card, love the flowers and the pitcher!
This is amazing! Thanks for all the photo instructions too!
Very creative card. Thanks for sharing.
Wonderful talent, beautiful card!
great tutorial – thanks!
Gorgeous! In love with those flowers and adding to my wish list! ☺
Great layering and textures! Love the metelic watering can!
I definitely need to get distress inks now. Thanks, great tutorial and lovely card.
Lovely card with many techniques. It’s so nice to hear of the sun shine on the other side of the world. We are heading towards winter in Australia, with great autumn colours. Thanks for the inspiration.
Beautiful…I love all the textures!
This card is so fun. Love all the different textures and embellishments you used for it. Thanks for sharing how you put it together.
Wow, that must have taken hours to do! Beautiful!
amazing project — I can’t decide what my favorite element is because there is so much going on here. Wow!
this card is absolutely gorgeous!! i love the blended sky :) x
Such a beautiful card and love all the texture and rainbow of colors.
I love the beautiful textured background and clever metal watering can!
Just absolutely gorgeous!!! The colors and flowers are so beautiful too!! I just love this card!! It makes me want to get all of my supplies out and just get inky and have a blast!!!
Definitely one of my new favorite cards!
Love all the texture!
Gorgeous techniques and ideas!!!
Great tutorial!