Spotlight: Stamping with Gelli Plate
Hi everyone, it’s Shari here with a spotlight on stamping with the GelliArts printing plates.
There a couple great sized printing plates perfect for stamping with. The 5″x7″plate fits an entire card front and is also perfect for creating backgrounds in your art journals. I’ll be using the 3″x5″ plate for my cards where I’ve overlap colors on the paper. These smaller size plates fit inside most stencils for complete coverage and are easy to put onto a block to use with paints and stamp onto card stock.

I’ve tried several types of paints with the plates and have found that the Dina Wakeley line are creamy, well blended, easy to spread and vibrant! My favorite! I’ve kept my colors in groups and overlapped those which match best.
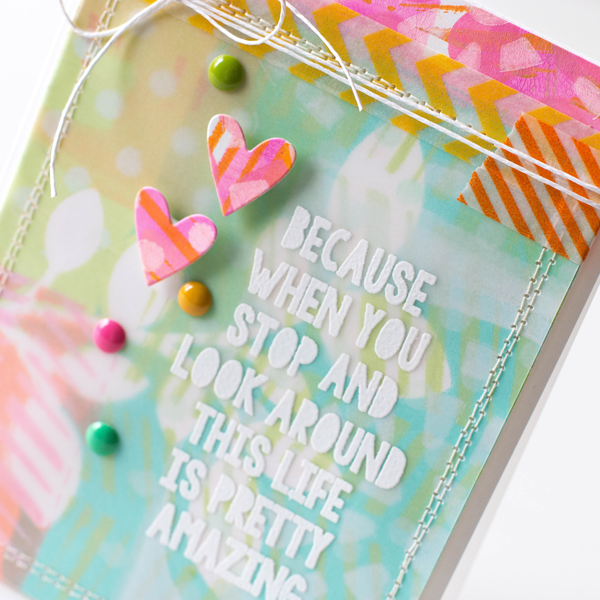
To finish the card up, I’ve sewn around the edges of the vellum, it’s been humid here in the midwest and sewing helped keep the vellum flat and in place. I’ve shot a video of my GelliArts printing plate adventures and card construction. You can view it below or on our YouTube Channel.

Blog Candy Alert!! Follow our blog via email and comment on this post for a chance to win a special blog candy!
Thanks for stopping by today!!!
 |
 |
 |
 |
 |
 |
 |
 |
 |
 |
 |
 |
 |
 |
 |
 |
 |
 |
 |
 |
 |
 |
 |
|
 |


Amazing!!! Is it really watercolor background? Can’t believe! Love this!
Gorgeous! Love the vellum overlay!
This is really cool! I heard something about gelli plates from a friend, but had no clue what they were. So glad I saw this today.
Wow, this is gorgeous! First time I heard about gelli plates. Sounds fun and interesting.
That was amazing. I just learnt so much. I love the great background you made. Gorgeous!
Great card, so light and airy. Thanks for the wonderful video too.
Thanks for the video… I’m still trying this, so all the input is helpful! Love the vellum overlay!!
Beautiful, very cool technique, I’ve never used the gelli plates. Thanks for sharing!
Thanks for this video. I had never seen this used before. Quite interesting. I love the background on the card. It is so colorful and I love this technique. TFS
Wow. This card is gorgeous! Love the white sentiment on the vellum over that awesome background.
Beautiful card, it looked fun to make.
Thanks a bunch! I just got a gelli plate and I have a billionty stencils. :)
Gorgeous! The vellum is just perfect and creates a lovely, soft background. Enjoyed seeing the use of the gelli plates!
Great Technique
Fabulous card and color combo!!Thanks for tips!!
Gorgeous! What a beautiful card and love the layers- I need a Gelli Plate now!
Gorgeous use of color!
oh wow!! That is so cool and fun. Love the finished card!!
adore this card amazing
Simply BEAUTIFUL!!!
Have a wonderful day,
Migdalia
Crafting With Creative M
Thank you for the video tutorial, I love the colors that are used and their combination!
Yes! That did turn out really well.
What a neat look you created with the gelli plate…so creative and unique.
Such a amazing technique. I love the way you layered colours and was really surprised they held their own, especially on those areas that were already nearly solid.
love the gelli plate, haven’t got one, but i want one, ;-)
Great video. Loved how easy it was to create amazing effects. Thank you for sharing:)
I really enjoyed watching this gelli stamping technique on video. Your card is just beautiful.
Very nice crafty card I like all the elements added and well blended. I want to make one.
I’ve seen Gelli plates before but not like this! These card size ones that you can mount to a block are phenomenal! Being able to place things exactly where you want and see what you’re doing at the same time just multiplies the creativity factor. Thanks so much for sharing this video!
Hugs,
Snoopy :D
This card is gorgeous! I love the color combo with the vellum. Thanks for sharing!
Love it, vellum is a great way to do this technique, thanks for sharing
So pretty, love the variety of colors and patterns!
Wow, I love these vibrant colors! I want a gelli plate so bad….
love the beautiful colors!! so soft and beautiful1!
Can’t wait to watch this video! This is such a happy card, Shari’s work is always spectacular!
Great card. That TH stamp set is on the top of my wishlist. This just make me want it even more! I follow the blog by email.
I don’t really know much about the gelli plates. Will be checking them out.
Great card. thanks for sharing.
This is so cool Shari! It is my first time seeing the gelly plate in use, love your choice of colors and stencils. TFS
Great card love the gelli printing!!!
A fabulous additional way to use my gelli plate. What a neat video. Very informative. Thanks so much for sharing.
This is so cool. There are so many techniques. I wish I had more time.
I have a question. Could the gelli plates be used to reverse stamp? Would the image be cear?
I always love your tutorials–thank you, Shari!
Great vide of, thank you
Such a fun card!
Wow! Your background is so creative! I watched video ins thought, what a terrible color combination! But the result so amazing) I understand that we shouldn’t be afraid to play with our supplies)
So gorgeous ! LOVE the colors !
Beautiful colors.
Oh so pretty I love the way you used the vellum and the white lettering. Its gorgeous.
I can’t wait to give this a try! The process looks so enjoyable and the end piece is so versatile.
I love the color combo and the vellum layer, thanks for sharing.