Specimens Vignette Tray by Emma
Hi friends! Happy Thursday! We’re delighted to welcome back very special guest Emma Williams sharing a beautiful Mixed Media project with us today! Be sure to read on for all the details and enjoy!!
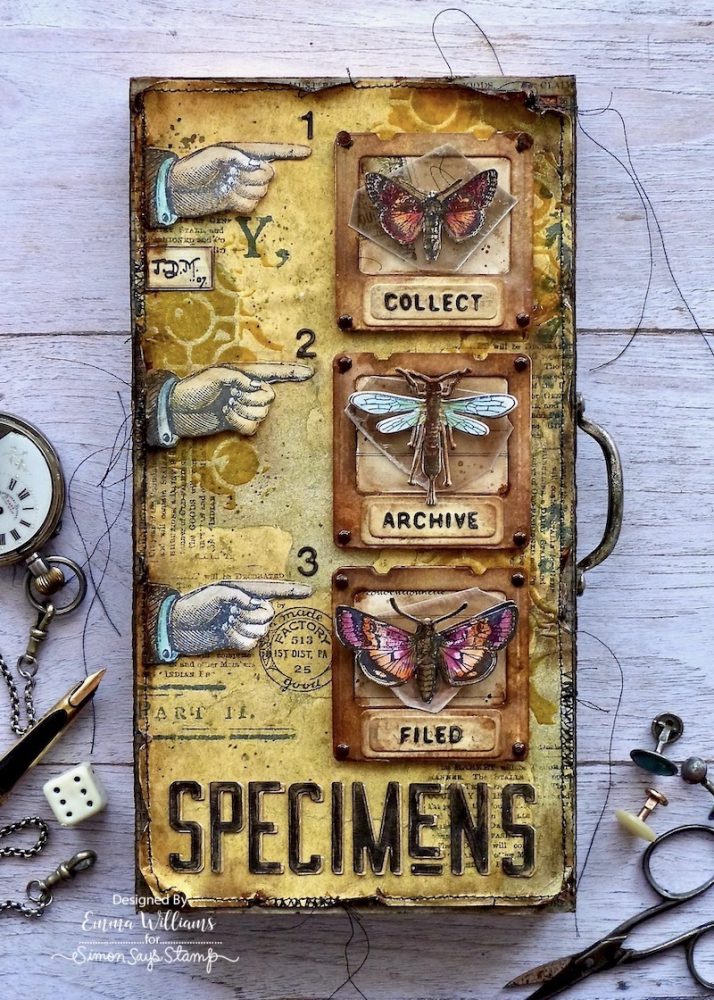
Hello everyone! I’m so happy to be back on the SSS blog today and can’t wait to share all the details of my latest project. This home decor make was inspired by the amazing Sizzix Chapter 3 release from Tim Holtz and I combined the Specimen die set, with idea-ology and Tim’s Entomology stamps by Stampers Anonymous to create a specimens vignette tray.
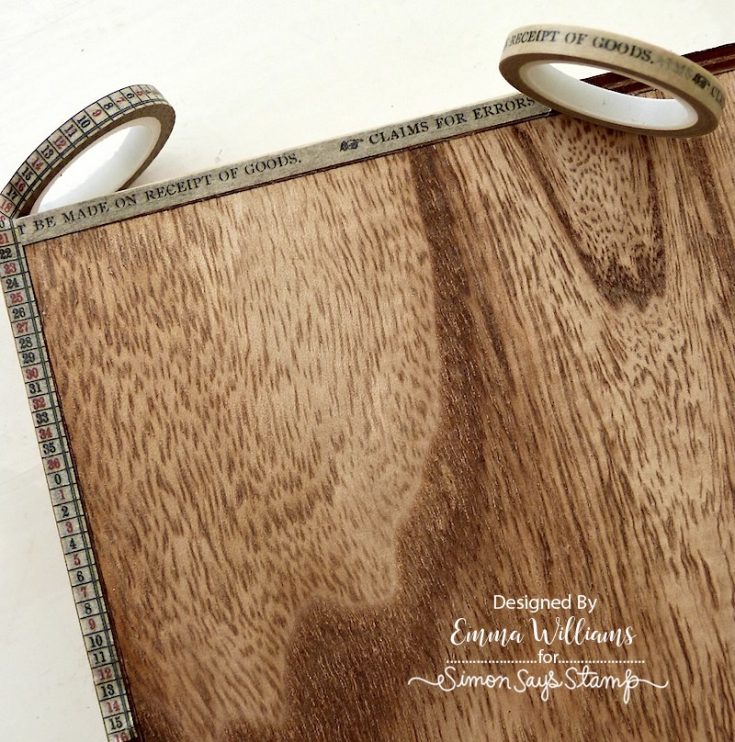
So, let’s get started and for this project I used the tray from the Vignette Set as the base of my make. I flipped the tray to work on the reverse side and applied a border of Design Tape Trim around the edge.
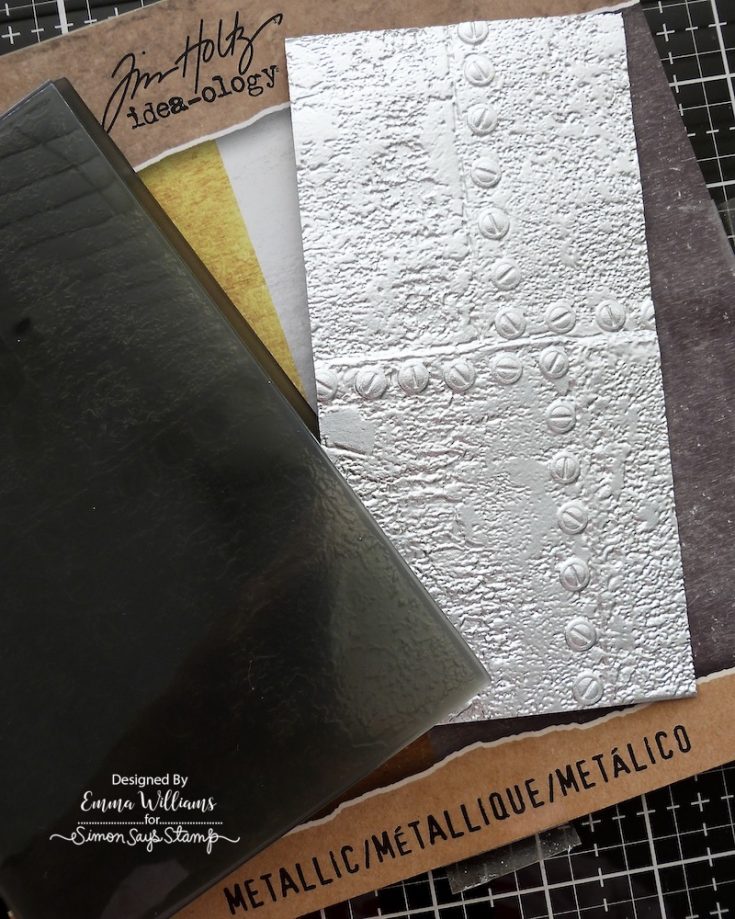
To add some texture to the two sides of the tray, I used the Industrious 3D Texture Fade Embossing Folder and embossed a panel of silver Metallic Kraft Stash card which I ran through my machine.
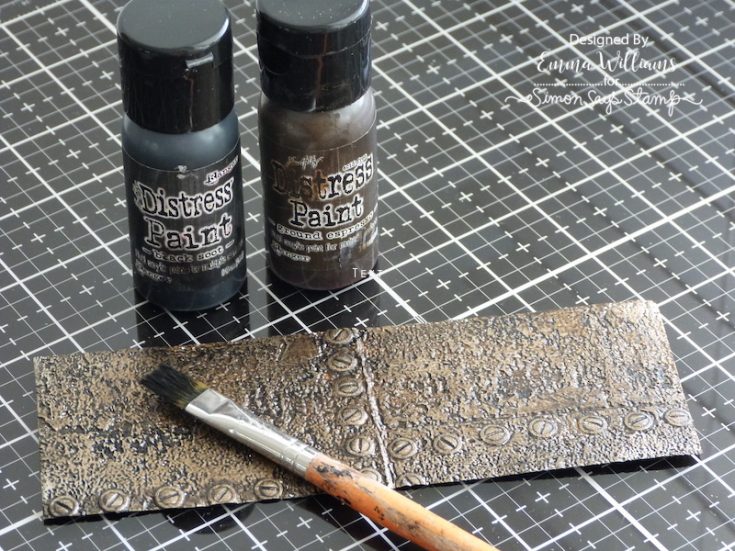
Apply a coat of Ground Espresso Distress Paint over the surface of the cardstock, and wipe away the excess paint using a soft cloth. The remaining paint will cling onto the surface and accentuate the embossed detail. Once this layer is dry, I applied a second layer of Distress Paint, Black Soot and once again, removed the excess paint with a cloth before allowing the surface to dry.
Cut the embossed card into strips to fit down both sides of the tray. I used two strips of the card for each side and adhered these into place using Matte Collage Medium, joining them together to create a continual piece. Trim away the excess cardstock.
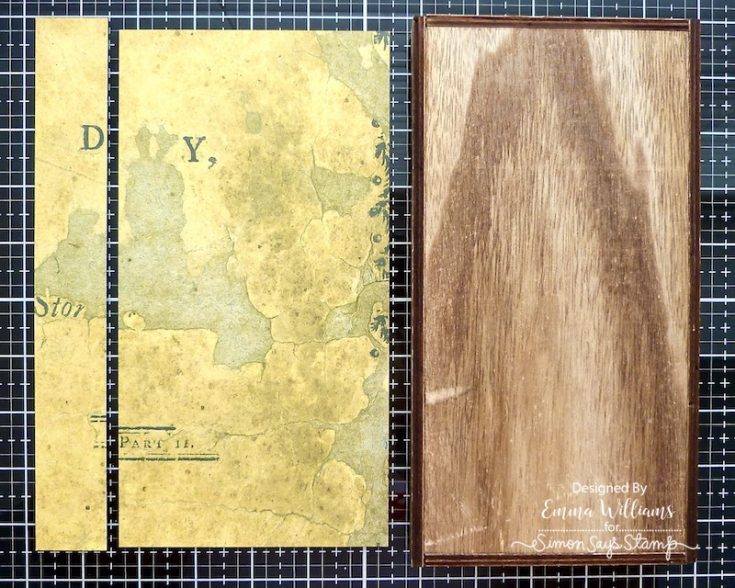
On the front of the tray, I used paper from Backdrops Vol 2 and cut a panel to fit the front of my tray, and the remaining offcut will be adhered to the top and bottom of the tray.
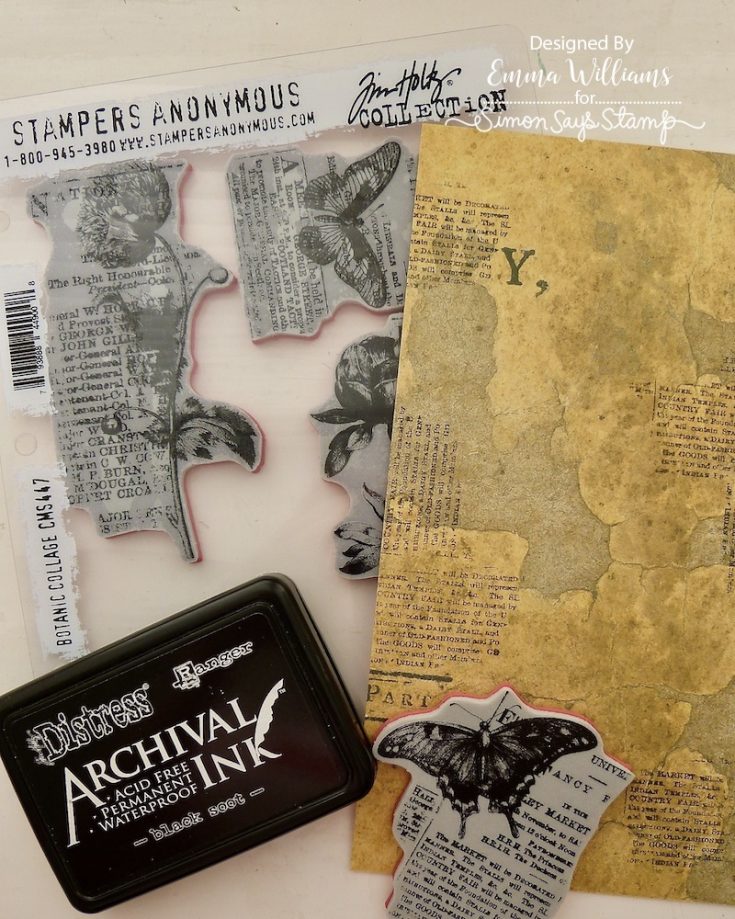
On the larger front section of the backdrops paper, I added some stamped layers and used one of the stamps from the Botanic Collage stamp set and the Factory stamp from the Eccentric stamp set. If you don’t have these stamp sets, then any text stamp will work, I just love this text though. Begin by inking the newsprint section of the butterfly stamp with Black Soot Archival Ink and stamp the text randomly onto the background together with the factory stamp from the Eccentric stamp set.
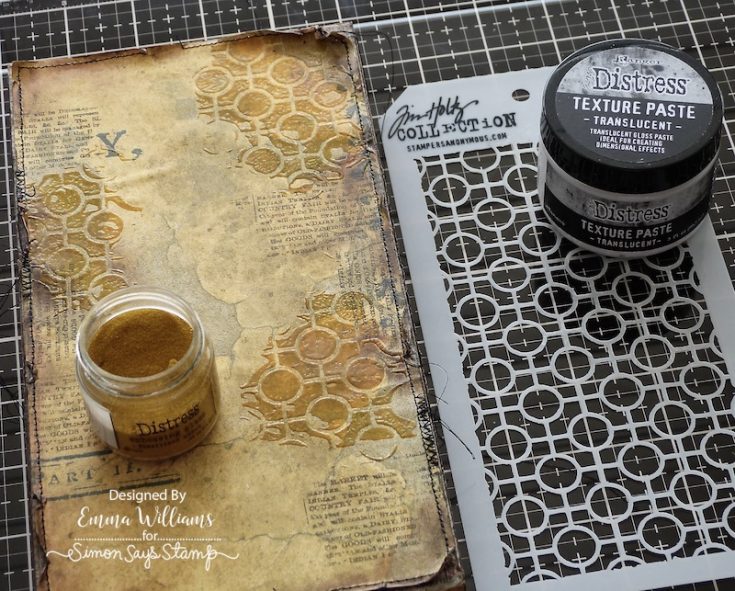
To add more texture to the paper, I used a palette knife to apply Translucent Grit Paste through the Linked Circles Layering Stencil. Whilst the paste is still wet, sprinkle Fossilized Amber Distress Glaze over the top. Tap away the excess and set to one side, for approximately 30 mins. After this time, gently heat emboss the glazed areas until the powder becomes molten and creates an enamelled effect. Distress the edge of the paper, adding rips and tears and then machine stitch a border before inking the edges with Walnut Stain Distress Ink.
Adhere the front panel to the tray with Collage Medium and the remaining pieces to the top and bottom and run the Walnut Stain Distress Crayon around the edge, before blending out the color and any harsh lines.
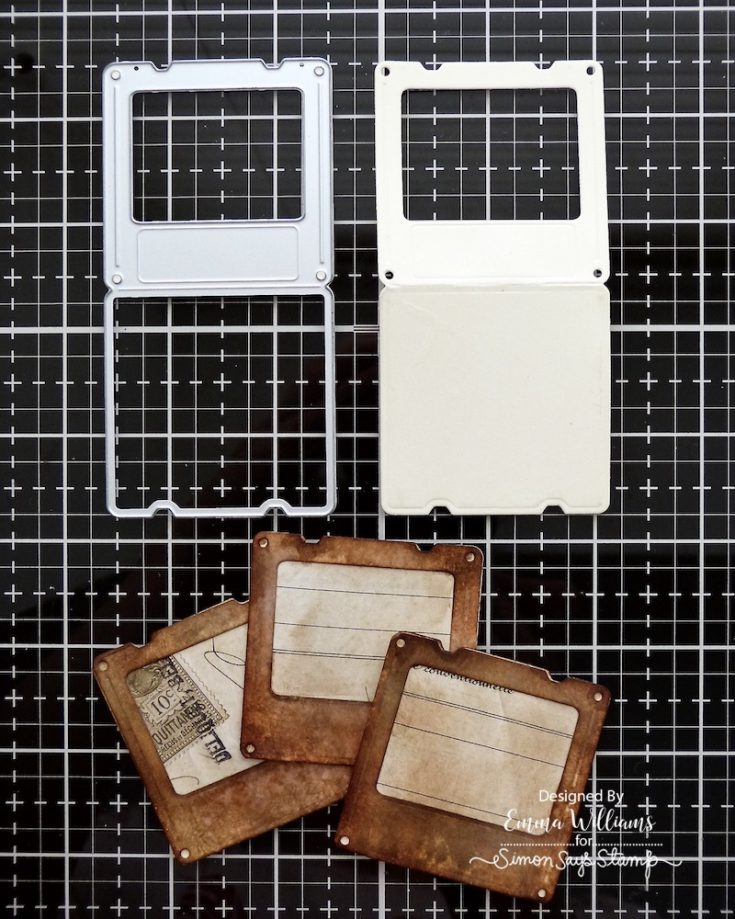
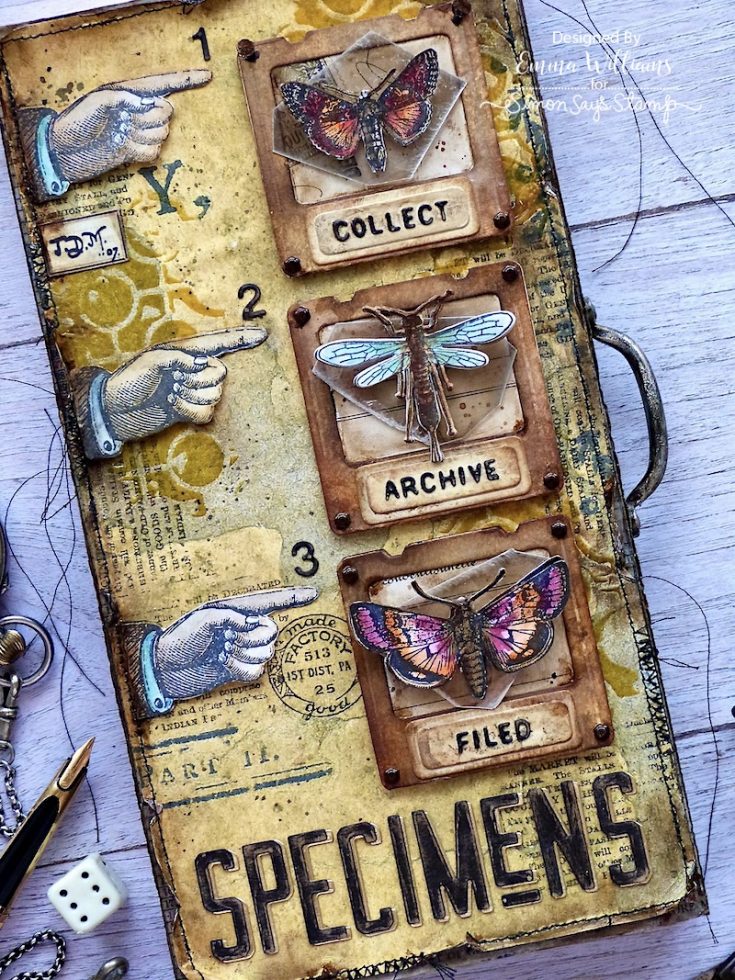
The tray is ready to decorate and to begin with you need to cut 3 of the slides using the die from the Specimen Thinlits Die Set.
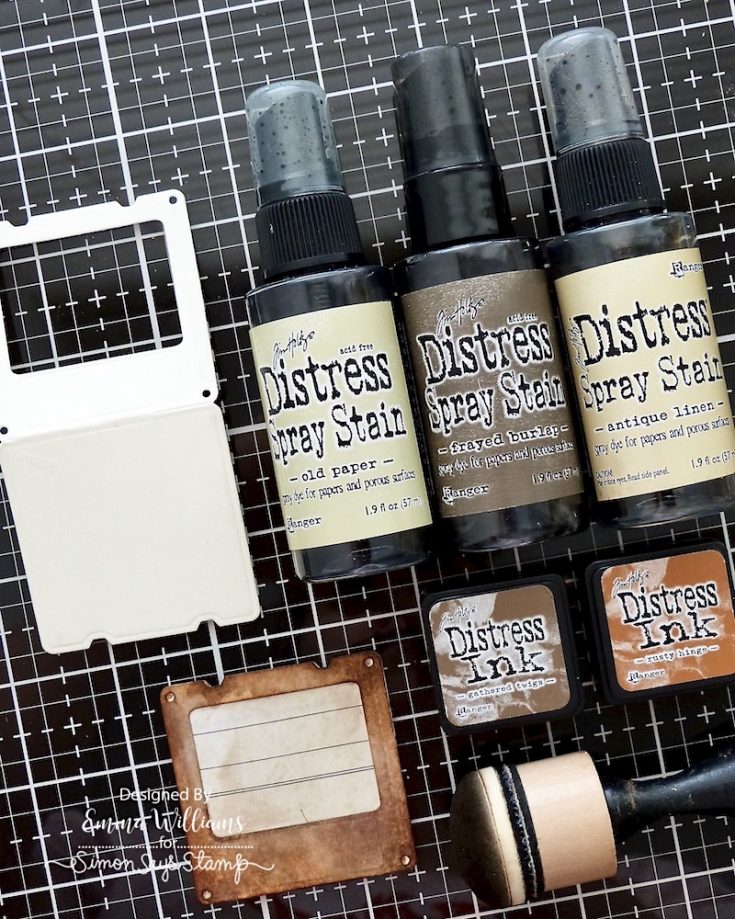
Spritz each of the die cuts with Old Paper, Antique Linen and Frayed Burlap Distress Spray Stains and heat dry. Using a blending tool, ink the surface of each slide using a combination of Gathered Twigs and Rusty Hinge Distress Ink and then mist with water to blend the inks before heat drying.
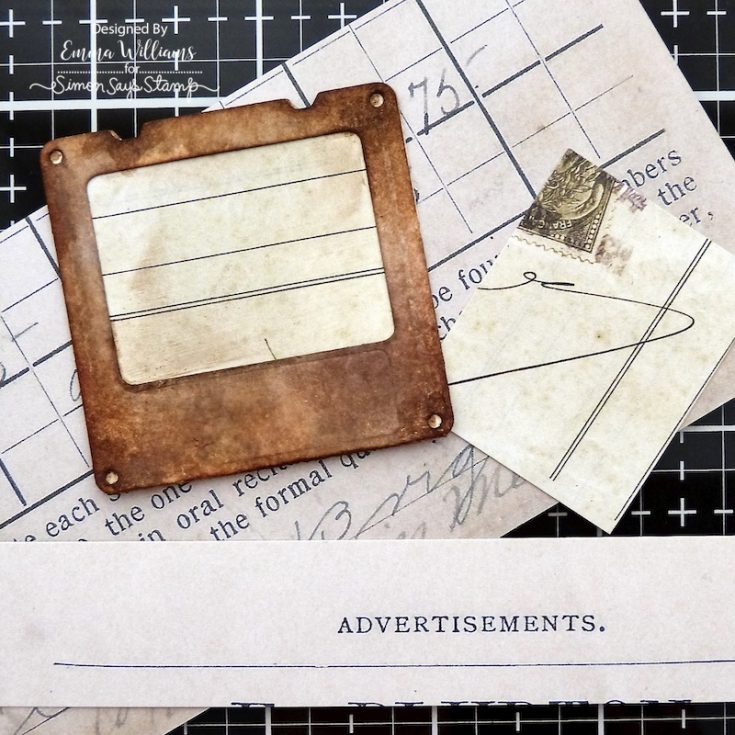
I folded each slide die cut in half and placed offcuts of Backdrops papers behind the aperture. This is where you can use all those bits of paper that we all save ‘just because”, they are perfect to place behind the windows of each slide. Apply a coat of Matte Collage Medium over the top of the backdrops paper and apply Walnut Stain Distress Crayon over the surface of the paper, blending out any harsh lines before sealing the slide shut with a further application of Matte Collage Medium.
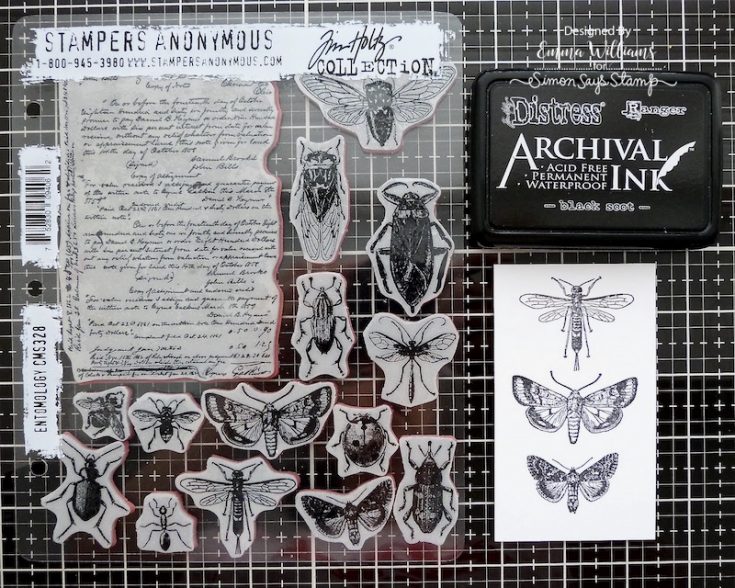
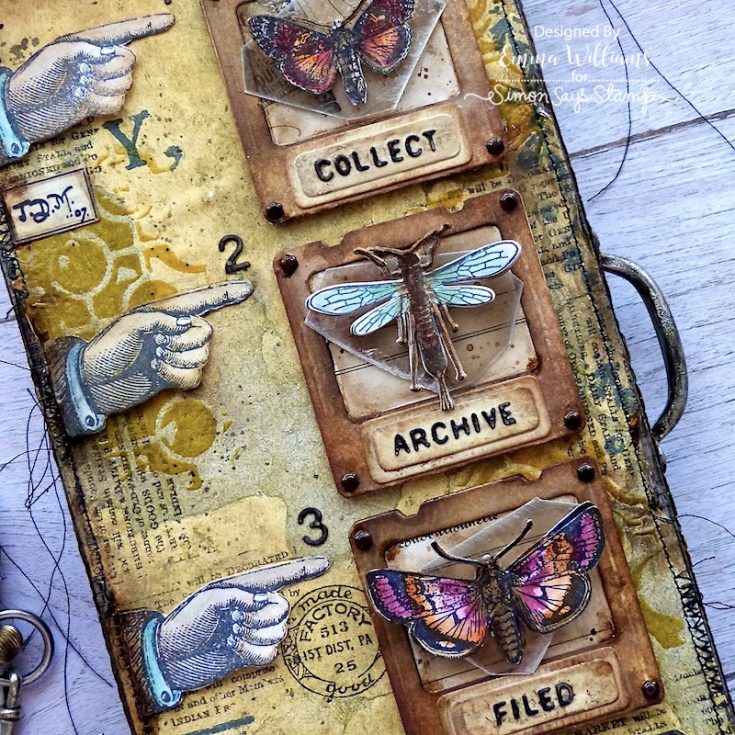
The slides are ready for the insects and for these, I chose three of the stamps from the Entomology stamp set and stamped each image onto Distress Watercolor Card.
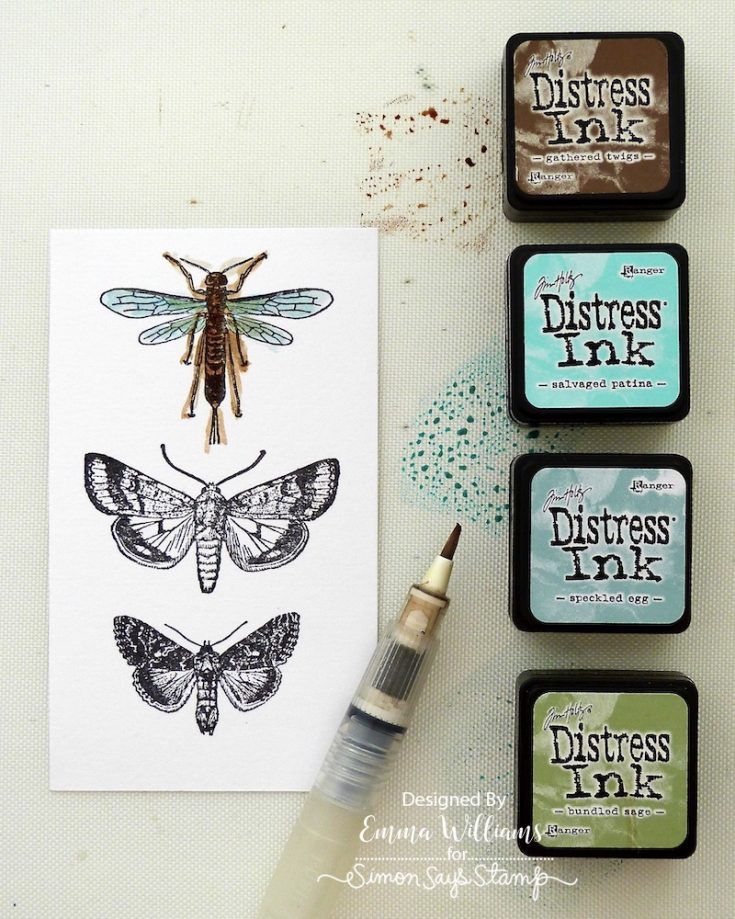
To watercolor the images, I smooshed Distress inks onto my mat, and then applied the color with a water brush, building up the layers to create depth and detail.
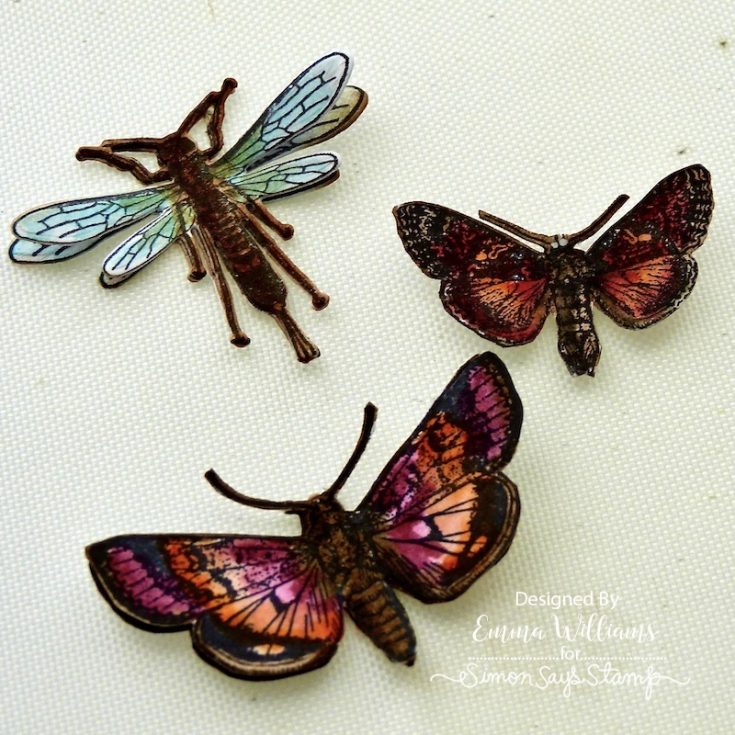
Colors used: For the butterflies, I used Spiced Marmalade, Gathered Twigs, Picked Raspberry, Crackling Campfire and for the third insect, Gathered Twigs, Salvaged Patina, Speckled Egg and Bundled Sage. Fussy cut around the border of each image and then layer them over the top of the second stamped and colored image, lifting and shaping the wings.
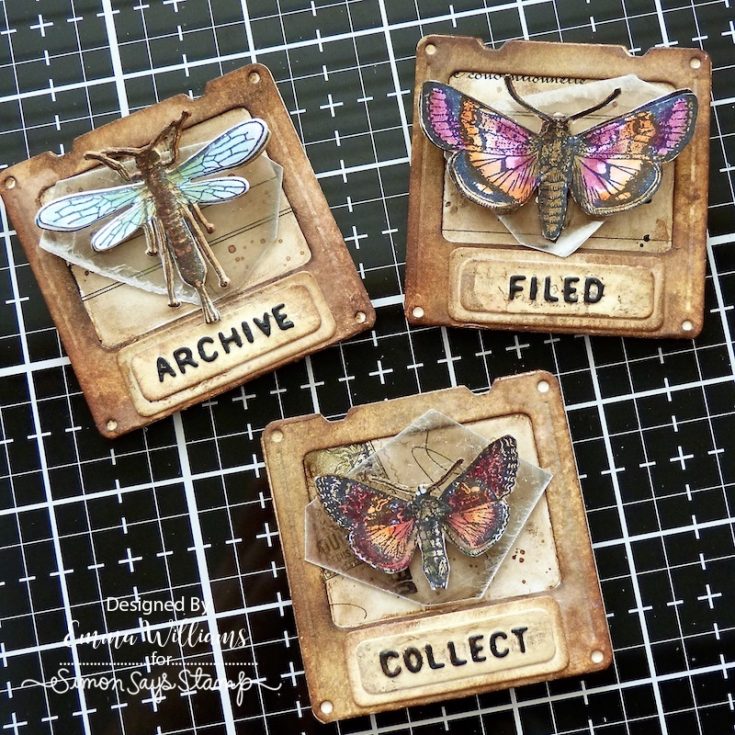
Attach each of the insects onto a panel of mica sheet before attaching them to the slide using foam pads.
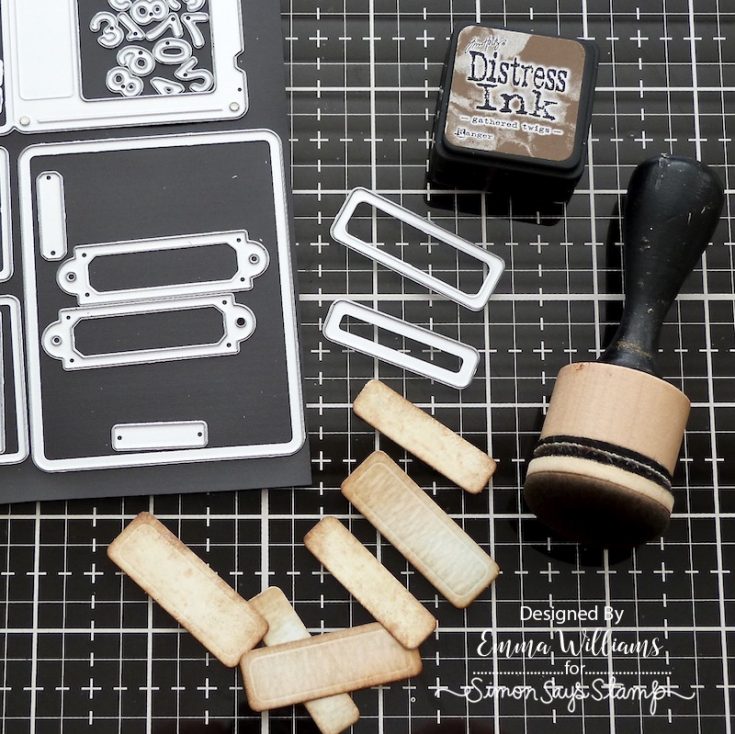
On each of the slides, I added layered labels beneath the insects. Each of the layered labels are die cut from watercolor card using the dies in the Specimen Thinlits Die Set. I inked the surface of the labels with a light coverage of Gathered Twigs and then misted water over the top before heat drying them. Layer the smaller sized label over the top of the larger one and attach to the slide.
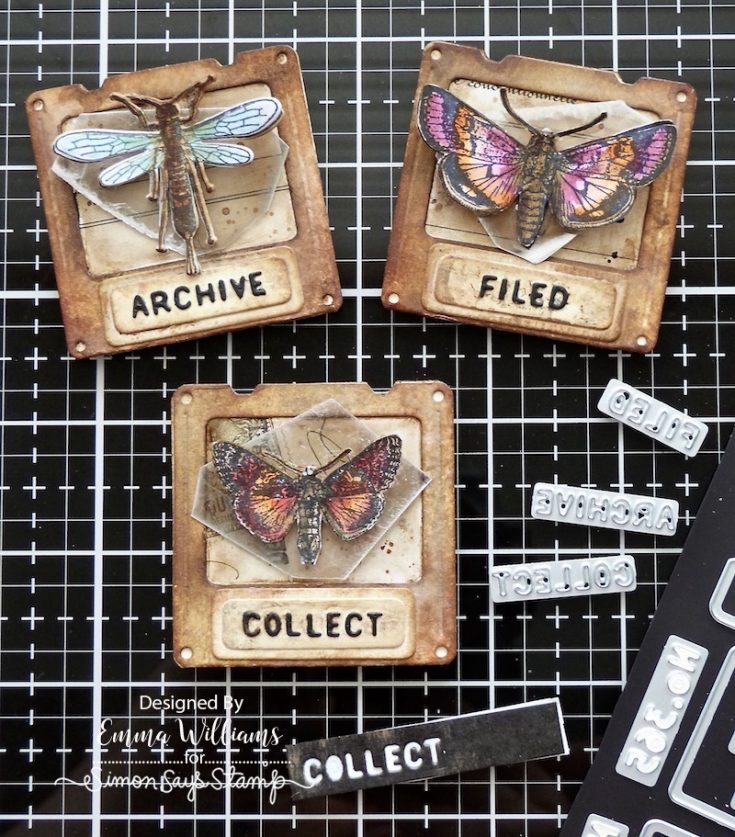
Once again using the Specimen Thinlits Die Set, die cut each of the words, Archive, Filed and Collect from black kraft stash card. Because these words are so small, I would recommend adding Adhesive Sheets to the back of the cardstock before die cutting each word and attaching them to the labels.
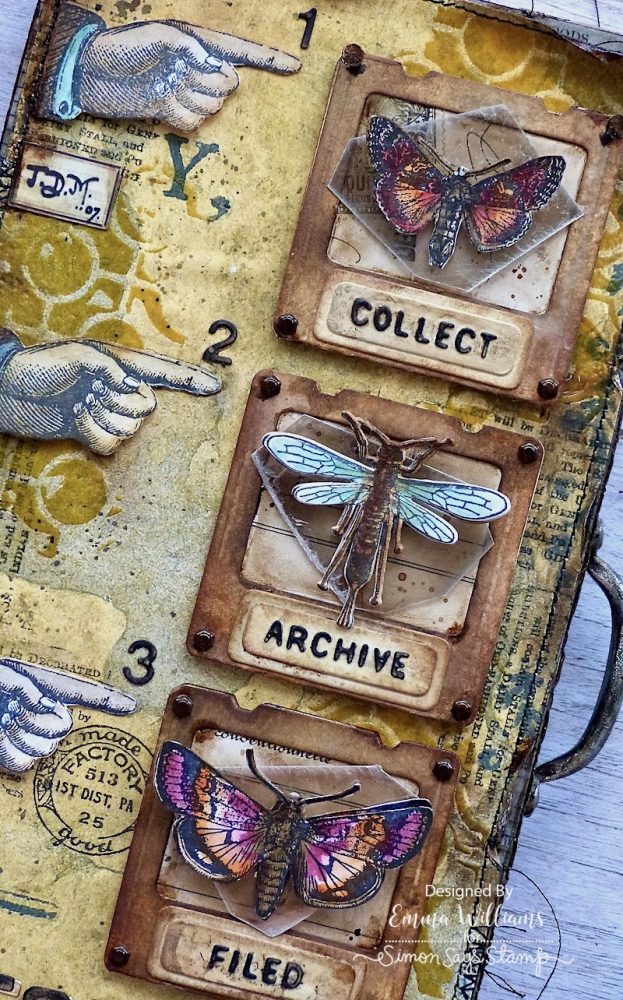
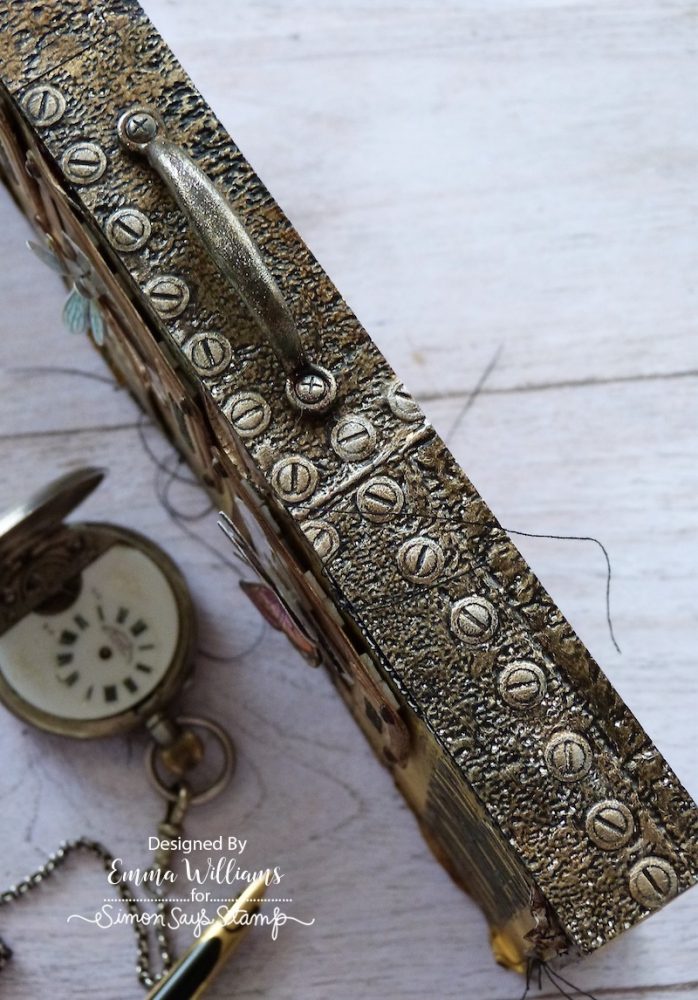
Using foam pads, adhere each slide down the right hand side of the tray. With the slides in place, I attached a combination of the smaller sized Hex Fasteners, (you can also use Hardware Heads or Mini Fasteners) and Tack Nails to each slide. I snipped the wings of the fasteners away, so they are flat backed before adhering them into position using Collage Medium. I then gave them a rusty makeover using Crackling Campfire and Ground Espresso Distress Paint.
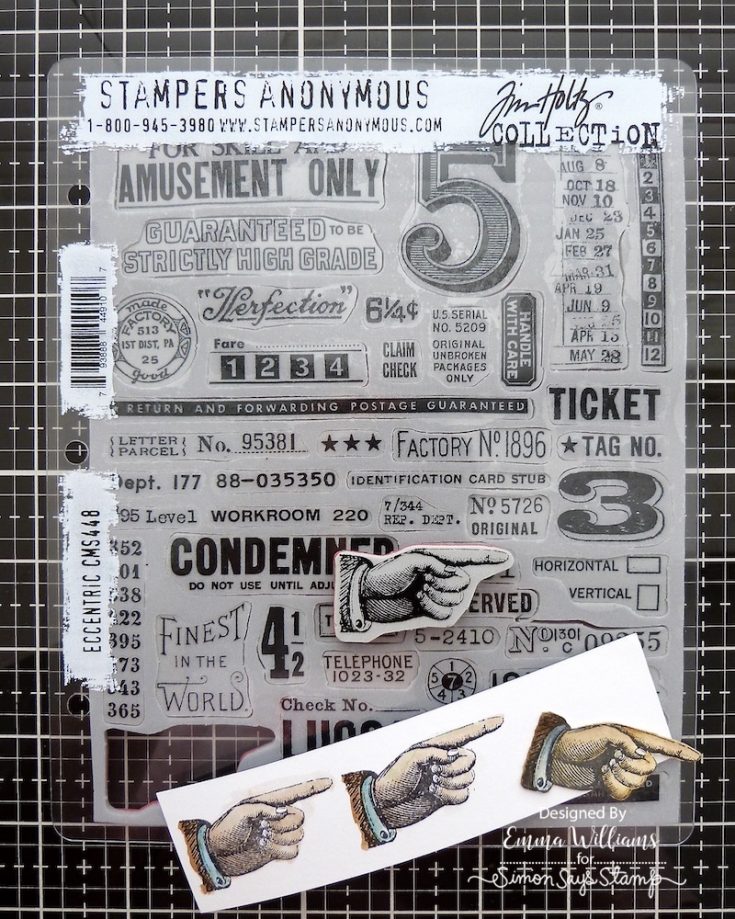
On the left hand side of the tray, I added three pointy fingers. Using the stamp from the Eccentric Stamp Set, I stamped the finger three times before watercoloring the image with Distress Inks; Antique Linen, Gathered Twigs and Broken China. Cut around the outline of each of the pointy fingers.
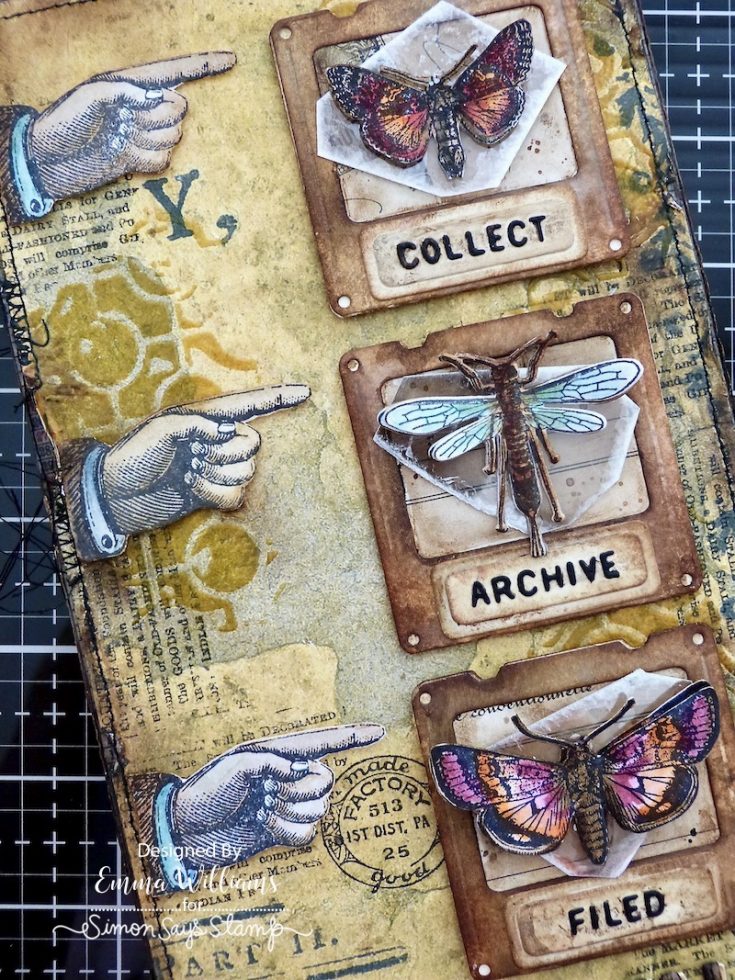
Adhere the fingers to the tray with Matte Collage Medium, placing them down the left hand side. Die cut the numbers 1-3 from black kraft card, using the numbers dies in the Specimen Die Set and attach them above each of the fingers.
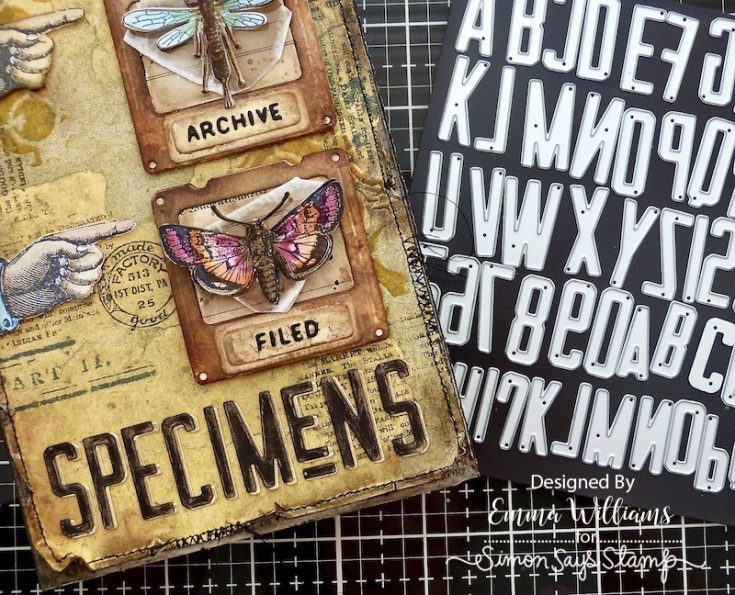
At the bottom of the tray, I added the die cut word “Specimens”. I used the Theory Alphanumeric Die Set to cut each letter, once from gold metallic kraft card, and a second layer from black kraft card. Both card layers has the adhesive sheets adhered to the back. Layer the black layer over the top of the gold, slightly offsetting it to create a drop shadow and then adhere along the bottom of the tray.
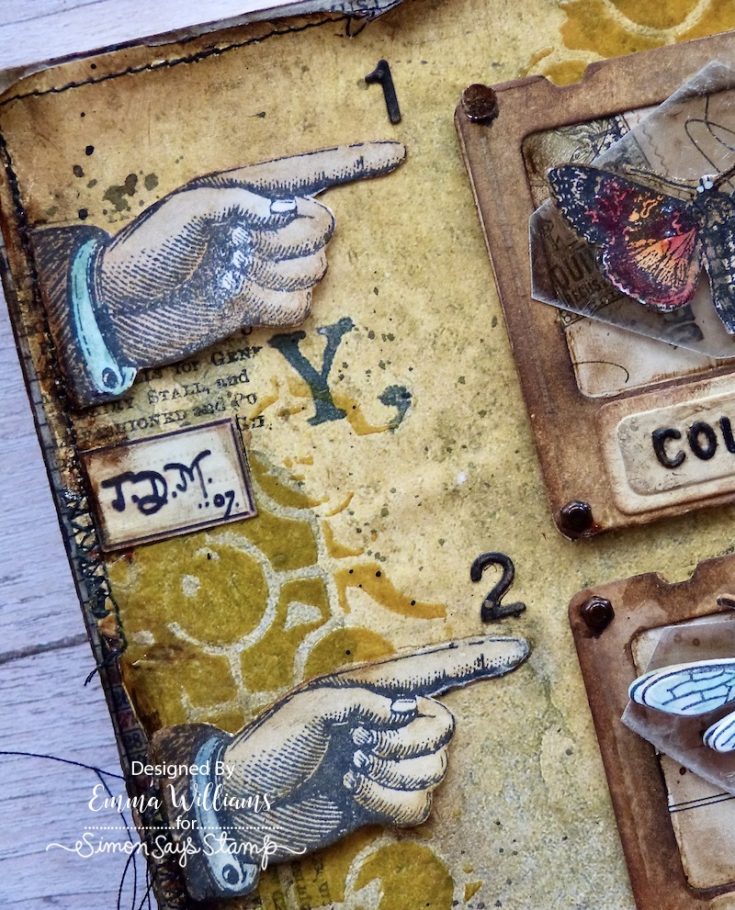
We’re nearly there and all that’s left is to add the finishing touches. I adhered a Curator Snippets Ephemera piece, placing it just below the first pointy finger…
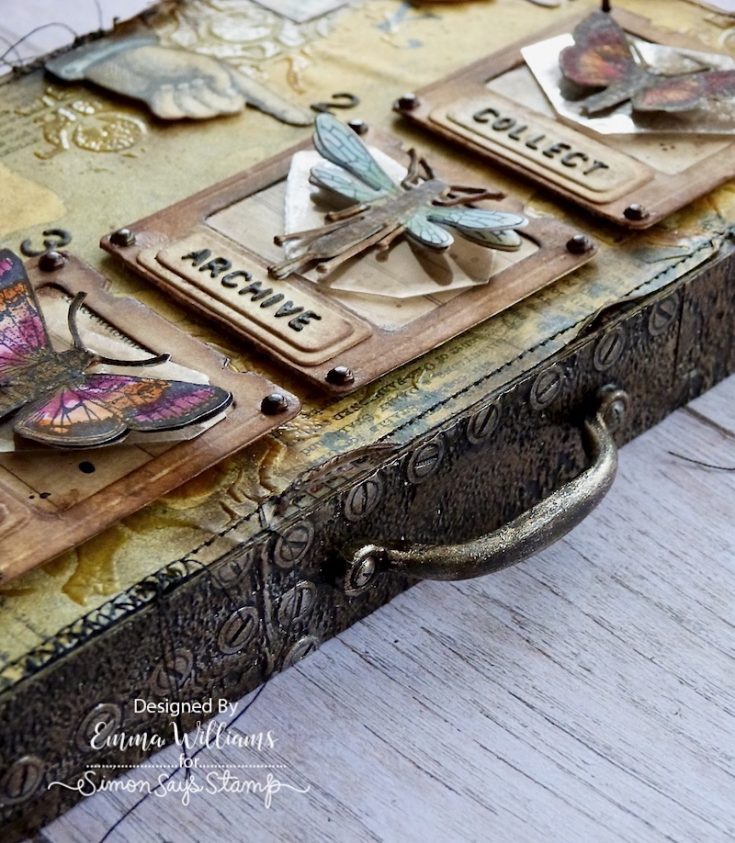
…and completed the tray with a handle that I attached to the right hand side. The handle is one in a set of three pieces in the Mini Hardware Set. It is originally pewter in color, but I altered it to create more of rusty finish, by using Crackling Campfire, Black Soot and Ground Espresso Distress Paint. I layered each color individually until I achieved the rust finish to the metal and attaching it to my tray, placing hardware heads into each of the fixing holes, to create the appearance that the handle is bolted on.
I really hope you enjoyed this tutorial and loved the finished piece I’ve made. I really did have had so much fun creating it and can’t wait to see anything that you make, inspired by this piece.
See you all again very soon and Happy Crafting everyone…Emma x
SUPPLIES:
|


Thanks so much for stopping by, and thanks to Emma for being our guest!


fabulous project Emma!! I love the pointy fingers and the use the the chapter 3 slides!!
Really Amazing vignette tray!!!!!
That is so cool, such great details you have added!!
Fabulous make and fantastic tutorial….Love all the little details….the devil is in the details….
This is so cool
This is simply the ultimate delight for the eyes! I agree with the commenter above, the devil is in the details! Thanks for a great blog.
Superbe travail félicitations
so gorgeous
This is an incredibly cool tutorial. You should definitely try selling these products on marketplaces. I think you can put such a thing into production with a few samples and sell a limited edition. I think many people will be interested in such a product. However, before choosing a marketplace, I advise you to pay attention to the payment systems available on marketplaces https://www.codica.com/blog/best-payment-solutions-for-online-marketplaces/ There are quite a few of them. Therefore, when you understand how they work, you will be able to choose the marketplace that best suits you to promote your products
Thank you for sharing! I think this tutorial is great and useful.I will suggest you to make the web application for selling your amazing products, because today a software and web development becomes a crucial point for any business. Checksloboda-studio.com/ruby-on-rails to find details.
Emma! I have no words! The details are amazing!