Signs of Spring Notebook
Hi friends! Happy Wednesday! I hope your week is going really well so far! If you live in an area with Winter weather, you may feel like me in that you are ready for Spring! That being said, special guest designer Anna-Karin Evaldsson‘s subject of her project really spoke to me! Read on for more imagery and details. Enjoy!
Hi everyone! I am so happy to be here today with a fun and easy tutorial. We have had a usually warm winter so far, and therefore, also dark and grey, which inspired me to do a springtime project for this post. Sometimes, in the middle of winter, you really need some flowers. As I was finishing up my notebook, snow started to fall and now the world is pretty outside my window.
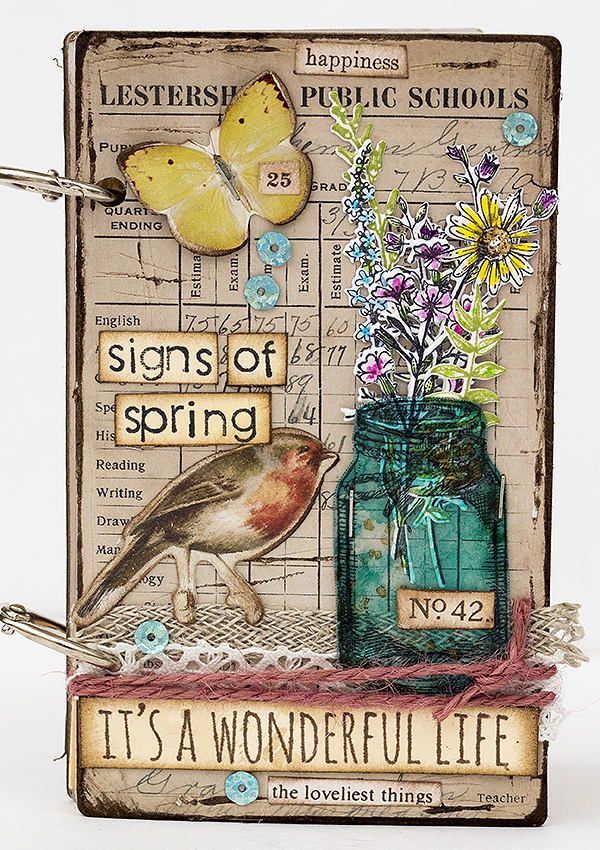
I love to make my own notebooks and journals, and got the idea to make a little book to document signs of spring. It is small (5 x 3 in) and easy to take along. You can make this notebook for any theme, it doesn’t have to be a spring book. Change the sentiments, colors and stamps for a completely different look. For the covers, I used Tim Holtz’s baseboards, which work great for journal covers.
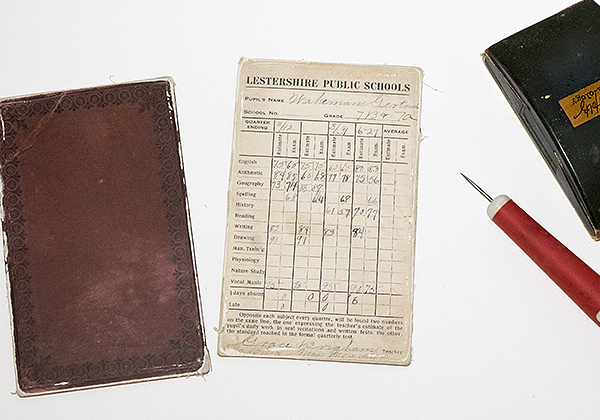
Start by distressing two baseboards with sandpaper and by scratching them with a craft pick. You can also use two of the larger baseboards, if you want to make a larger journal.
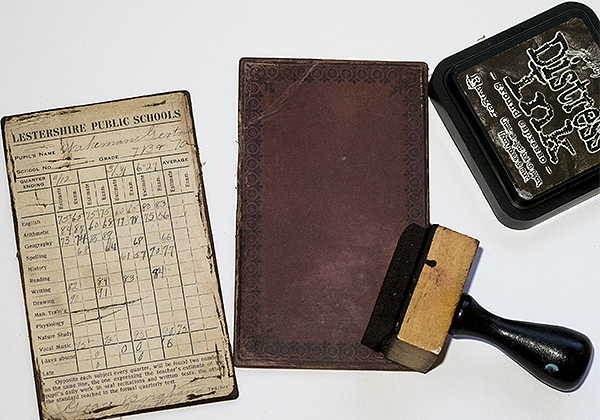
Ink the panels with Ground Espresso and an ink-blending tool. The ink will stick to the areas where the upper layer was sanded or scratched off, creating a distressed effect.
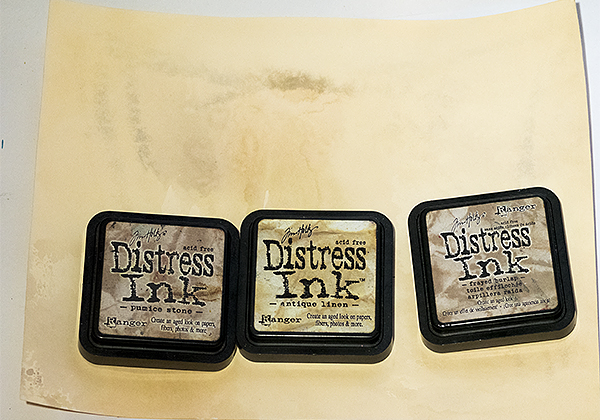
Prepare papers for the inside by smearing Antique Linen, Frayed Burlap and Pumice Stone Distress Ink on a non-stick craft sheet, misting them with water and pressing the paper into the ink. Repeat on the other side of the paper. You can use, for example, Ranger’s Mixed Media, Heavystock or Manila cardstock. I inked three sheets of paper.
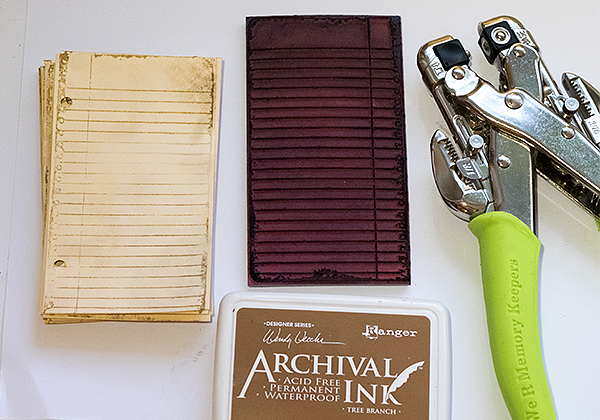
Cut the inside pages slightly smaller than the covers and make as many as you need. Stamp them roughly with the ledger stamp from Tim’s School Desk set and Tree Branch ink. I only stamped one side of each page, since I wanted the other side blank, in case I will add some sketches of flowers and other signs of spring. Punch holes with a Crop-a-dile about 1 inch from the edges.
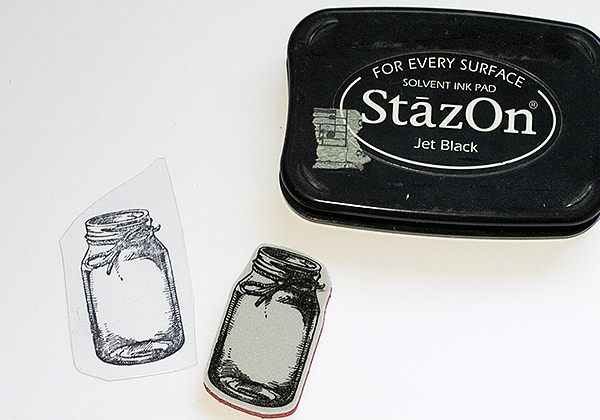
Stamp the larger jar from the Flower Jar set on Clearly For Art Modeling film, or acetate. If you want to, you can carefully heat the Modeling Film with a heat tool and shape it into a dimensional jar. It looks really cool and keeps its shape perfectly. I decided not to do that here, since I wanted my notebook to be relatively flat, but if you want to see a dimensional version, check out my Wildflower Mason Jar Tag.
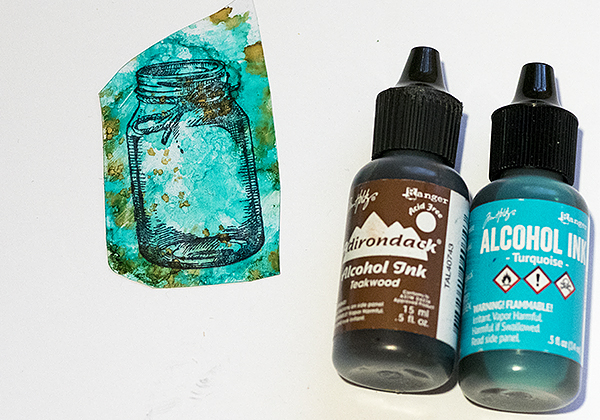
Ink the back of the jar with Turquoise and just a tad of Teakwood alcohol ink. It is important to work on the back, or you will smear the stamping.
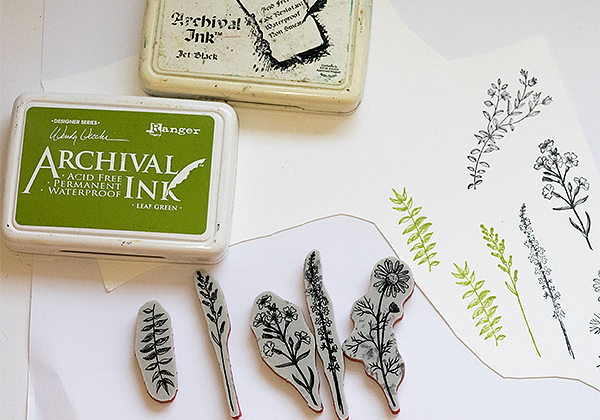
Stamp flowers and leafy branches from the Flower Jar set on the smooth back of Ranger’s watercolor paper. I used Jet Black and Leaf Green Archival Ink. You need to use a waterproof ink.
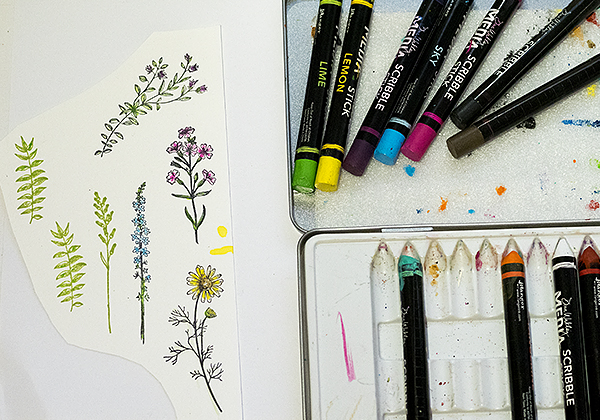
Watercolor the flowers by dipping a fine paint brush in water and picking up color directly from the tip of Dina Wakley’s Scribble Sticks.
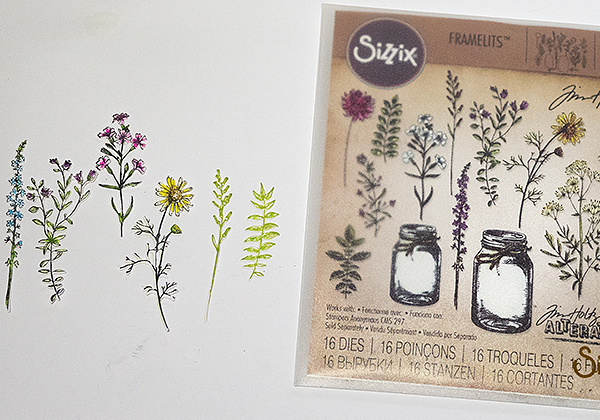
Die cut with the coordinating dies in the Sizzix Flower Jar set. Use this sandwich: Sizzix Magnetic Platform, Cutting Pad, paper, die facing down, second Cutting Pad.
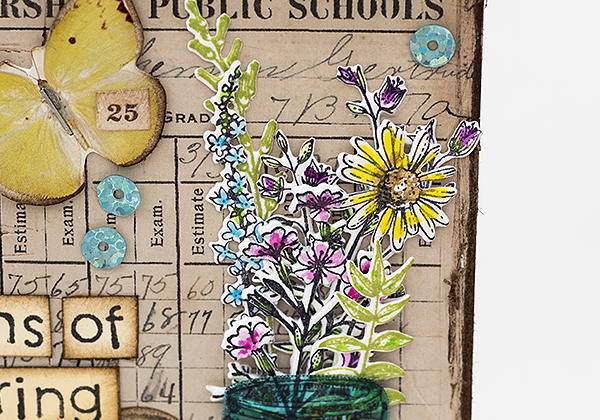
These flowers are very delicate and pretty, especially when die cut with the coordinating dies. Tuck them all into the jar. I attached the jar with two tiny staples.
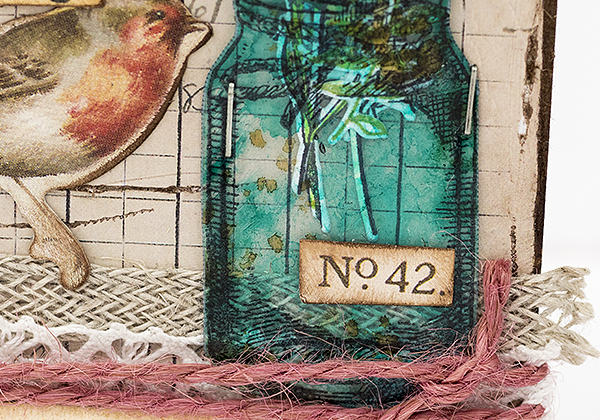
Below the jar, there is a piece of Linen Ribbon, a piece of lace trim and a pink piece of twine, which are meant to look like a table cloth. I also stamped a sentiment on a left-over piece of paper from the inside pages. The sentiment comes from a winter/Christmas set, but works great all year around.
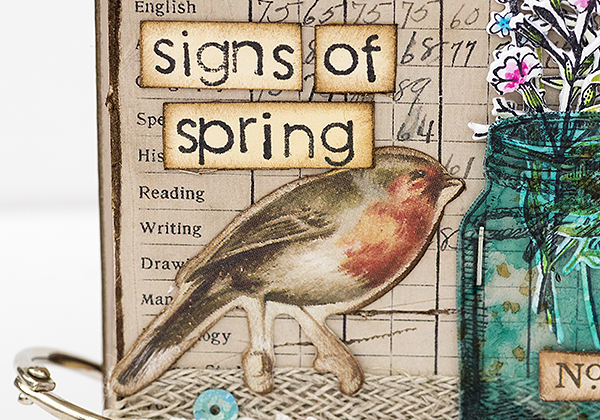
The title of the notebook was stamped on more left-over inked paper, using alphabet stamps. I also used a sweet bird from the Botanical Layers embellishment pack.
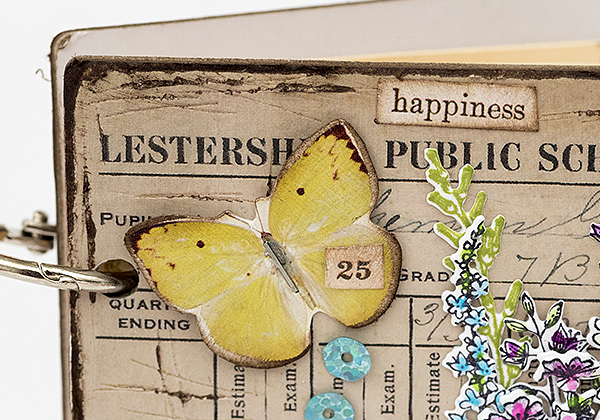
The butterfly also comes from Botanical Layers. I used some words and numbers from the Clippings Stickers set for additional text. For a bit of bling, there are a few sequins from the SSS Frosted set.

The back of the book looks like this. The book was bound with Tim Holtz Mini Book Rings, which also means that I can add and remove pages easily.
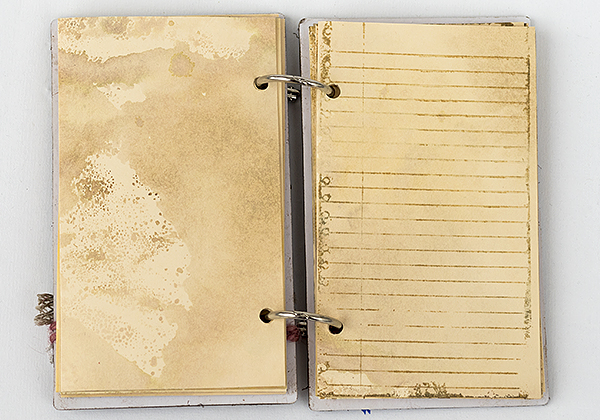
Here’s a look at the inside of the book. You could decorate it with more stamping or maybe by adding Botanical Layers images.
I hope you enjoyed this project and that it inspired you to make some notebooks or journals. Not only are they great fun to make, but they are also fun to use and they make really nice gifts. I am keeping this one for myself though and I will start using it when I spot that first sign of spring.
Thank you so much for looking!
Happy crafting!
Anna-Karin

SUPPLIES:
|


Thanks for reading, and thanks to Anna-Karin for being our guest!


Love the idea of a handmade notebook. Yours turned out great! I love the Tim Holtz products used in making it.
I like the vintage look and feel of the notebook. Thanks for sharing!
Beautiful project! Such a great idea and love the vintage look. Colors are perfect.
This is a lovely notebook. The colors are stunning to me.
GORGEOUS! It does make me yearn for signs of spring here!
Pinned this one for inspiration! Love the details and vision!
Your notebook is the only signs of spring in this neck of the woods. Will you please use those Ranger inks again? I would like a better look before I purchase.
WOW… what an awesome project!
Such an amazing notebook! I especially love that wonderful robin – a true sign of spring!
Wonderful project, Anna! My favorite part is the lovely blue-green color of the mason jar and the genius of stamping on acetate.
Oh, my this is so beautiful!! Love ALL of your many loving details!! And so happy it is a notebook so as to see this beauty every time it’s used!
This is a definite Wow. Love the turquoise jar and how you did it.
Oh Anna-Karin, how I love your beautiful books and ideas. From the supplies you put together, to the details of embellishments and distressing, you always create the most beautiful projects! A spring book is such a great idea and here today in N.S. (Canada), we are having unusual spring-like weather. Mind you it is only single digits but it’s above zero so around here that is like BBQ weather. LOL
Have a wonderful day and keep these ideas coming…
Wow I love your notebook! I think I would use it as a journal or would use the same concept for a mini album. :D
OMG, that is amazing, went to see the other mason jar on your site, stunning!! I collect all masson jar stamps and dies so I loved that. I like your style but when I tried to sign up for your blog but wouldn’t let me, bummer.
Fabulous job on this.
Love the vintage look
and the bottle is so
pretty!
Carla from Utah
The notebook would lift someones day! I like the TH dies that were used!
Very nice and love the old look. Thanks for sharing.
Linda D.
What a fun vintage notebook! TFS!
Your notebook is charming–love the botanical theme. Great job and thanks for sharing.
Love how you made the book from scratch and you can customize it to fit your needs! Love the page you made, it’s beautiful and makes me want to go back to Wilmington, NC where it was 75 degrees!! I just returned from visiting my kids and meeting my granddaughter and the weather was just gorgeous!! Come home and the temperatures are very cold, ugh!! I’m so ready for Spring already!! Thanks for sharing .
Love this. I like the title and the jar of flowers.
Such a stunning project, very inspiring.
So love this style
WOW what a beautiful little notebook!! Love it:)
This is really beautiful!! Love the fresh colors of Spring. I keep meaning to start an art journal, but haven’t yet.
LOVE IT!! Love all the colors as well as the vintage look.
Love the shabby chic feel of this notebook. Thanks for sharing the detailed instructions.
Gorgeous project with such wonderful elements! Always admire your work!
Superfun project, thanks for sharing the steps!
Wonderful Spring creation. Spring is a fav time for me. After the windy cold temps we have had here in Central TX I’m more than ready for Spring.
Melissa
“Sunshine HoneyBee”
Such a fabulous idea to create your own notebook. I love it! The cover is fantastic.
This is a lovely project and, as you said, so adaptable. Your step-by-step tutorial is so helpful for creating a mini-journal. tfs
Really Pretty notebook cover!!!
So pretty!
Very pretty!
I do believe I feel warmer just viewing the details of your project. Great shabby chic look. I am ready for spring too!
Sooo cool!
Wow! This is gorgeous!
Beautiful journal! Definitely gets you in the mood for Spring!
Now I really can’t wait for spring
Love the shabby vintage look. I just don’t have an eye for putting it together. Gorgeous project ♥
Wonderful vintage creation!!
lovely project – so creative and inspiring:)
Beautiful project, notebook looks stunning, love it! Definitely ready for spring!
Very nice!
Wow, so gorgeous. Thanks for this great idea, I think I made some as little pressents!
I love how vintage your note book looks.
I love Anna-Karin’s work! This notebook is awesome!
Love the school desk stamps!!!