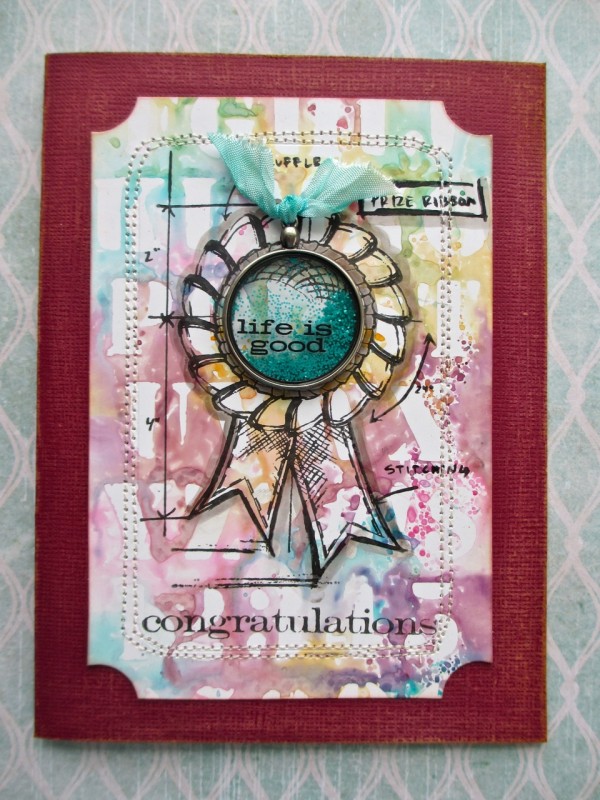
Prize Ribbon
Hi readers! Happy Thursday! We’re getting into the celebrating summer season! To help us kick that off, let’s welcome back guest designer Paula Cheney with a fun card idea to give someone special!
Enjoy!
With graduation season upon us, I already know I need to make a few cards to send out. What better way than a simple idea that looks much more complicated than it is. Especially since depending on the colors of Distress Ink used, could be sent to a male or female! Just follow along and I will show you how I did it.
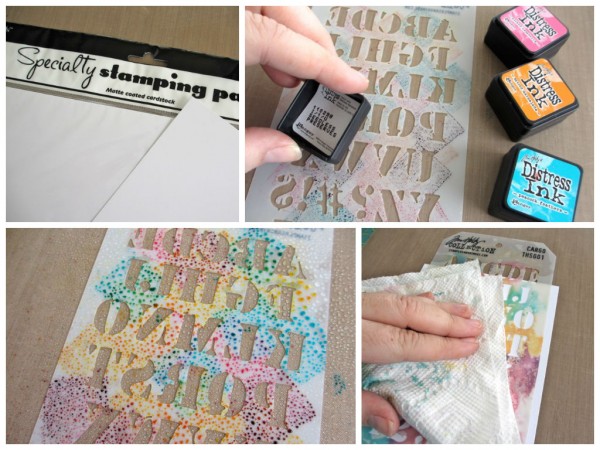
step 1: cut a piece of Ranger Specialty Stamping Paper (4.5 x 6”)
step 2: Pounce each color from the Mini Distress Ink Pads – Set #1 onto Layering Stencil – Cargo, making sure you cover the entire stencil pattern. The Mini’s are the perfects size ink pad to get Distress Ink in small places. This technique is no exception! More color means a better result.
HINT: when using a stencil with numbers, letters or words, remember to ink the backside of the stencil so letters will appear correct when the ink is pressed onto the paper.step 3: Use a Mister Bottle to add a generous amount of water over the Layering Stencil. You should see all the colors of the Mini Distress Ink Pads come to life!
step 4: Flip the stencil over onto the Specialty Stamping Paper and rub with the paper towel. You will notice that the Distress Ink stays under the stencil.
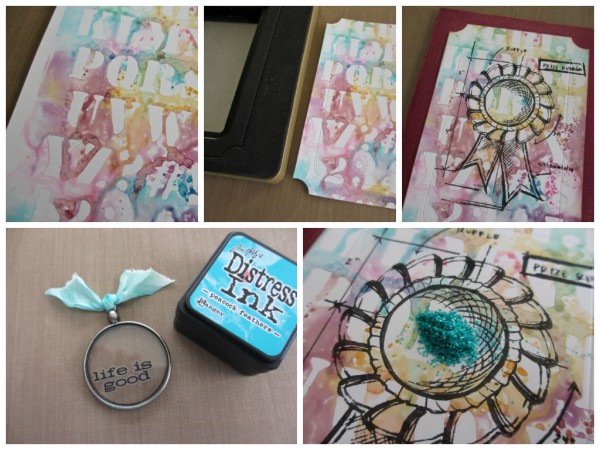
step 5: Slowly peel back the stencil to reveal the monoprint. Dry with a Heat it tool. Blot off any excess ink with a paper towel.
step 6: Cut monoprint paper using the Sizzix Alterations Big Ticket die.step 7: Stamp ticket with prize ribbon image from the High Society Blueprints stamp set and add to a card foundation made from Core’dinations Cardstock.
step 8: Use Mini Distress Ink Peacock Feathers and Mister Bottle to color a small piece of Crinkle Ribbon. Once dry, make a small knot at the top of an Idea-ology Monocle. Add Remnant Rub word onto Monocle (see Hint below).
HINT: The Remnants Rub words must be placed on the side of the glass that is RAISED UP from the table surface. This will create a well for the glitter in step 9.step 9: Place a small amount of Distress Glitter into CENTER of the prize ribbon image. The chunky nature of Distress Glitter is perfect for this technique!
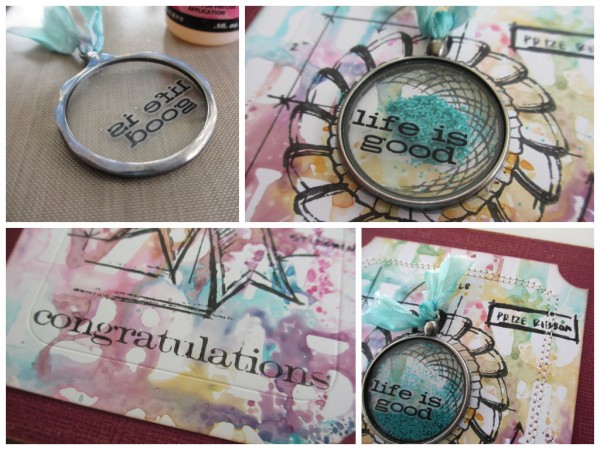
step 10: Turn Monocle over. Add Glossy Accents around the metal ring of the Monocle.
step 11: Add Monocle to prize ribbon image, sealing all edges around the Monocle and therefore, sealing in the Distress Glitter. Once Glossy Accents is dry, you will be free to tap on the card and let the Distress Glitter fall to the bottom of the newly created “shaker box”.
step 12: Stamp card with sentiment using the Stampers Anonymous Simple Sayings stamp set and Archival Ink – Watering Can.
step 13: Use a sewing machine to stitch around the crease line of the Big Ticket die shape.
SUPPLIES:
 |
 |
 |
 |
 |
 |
 |
 |
|
|
 |
 |
 |
 |
 |
 |
Thanks for reading today and a big thanks to Paula for this great example to inspire us!
Blog Candy Alert!! Follow our blog via email and comment on this post for a chance to win a special blog candy!


I think those monocles are now on my shopping list. Love the fun way to ink up the stencils too! Thanks for the tutorial and all the inspiration Paula.
Great technique and fun card!
So super cute! I just love that distressed background!
FABULOUS card Paula!!!
LOVE the stamp, colours & design, especially with the glittered monocle – WOW!!!
THANK YOU for sharing this watercolour stencilling technique and your CREATIVE INSPIRATION :)
… I confess that I only have 2 distress ink pads to my name, so it will be no surprise to find that I have added a bundle of colours to my wish list, along with monocles!!!
I was unaware of the existence of those monacles! And to see one filled with glitter… heavy sigh! LOVE this card! TFS!!!
Great card, love the amazing background. I still need to get some stencils!
What a COOL card, love the grunge factor and watercolor!!
A great background! I love the fact that you can give it a totally different feel by changing up the colours. Thanks!
Love all the different elements of the card. Thanks for the detailed instructions.
Gorgeous card. What a great way to use a stencil. Thank you for showing this fantastic technique.
Love the colors!
What a cool technique. And yeah thanks for the reminder abt stamping on the back of the stencil
this is just amazing!!!
Don’t tell me now I have to buy the mini distress pads??????? YIKES! But, they’re perfect for this technique with the stencil. Great card!
Beautiful!
Love this card – so cool and the tutorial is fantastic, too. Thanks so much.
Great colors! Love the distress background!
Wow! I’m going to give this technique a try! Thanks for the inspiration Paula.
Love that stenciled look and the prize ribbon.
Very creative, and really fun technique with the stencil!
What a neat idea.
So pretty. Love all the soft colors and the prize winning look. I’m off to my craft room to recreate it. Just what I was looking for. Thanks.
Absolutely love your card. The monocle with the glitter is such a great embellishment.
Great card! Lots of texture and color, and love that it can be for male or female.
Love the colors! What a great use for the minis too!
love the card, I have been wanting Tim Holtz blueprints stamps, and your card is just one more reason to get them. Thanks!!!
Great colors
What a great idea for a background…I love it!
Love this card and appreciate the details used for stenciling!
Love this easy watercolor technique! Always looking for fun new ways to use those mini distress ink pads,thanks!
Great card. Love how you did that background.
Just finished my first ever tim holtz class at the SSS Create workshop and you’ve given me even more ideas! Love the card and techniques.
Now I definitely want to play with stencils!
A most unusual card! Fascinating result with the distress inks & water.
Awesome technique, love the out come!
Cool card!! Love the color combo & thanks so much for reminding us to use the back side of alpha stencils!! So easy to forget that!
I absolutely live these ideas! Such a great card to give!
Thanks for the reminder to put the ink on the backside of the letter stencil. I like the idea of using a number stencil for the background. It’s so appropriate for a graduation card.
Oh my goodness, what an awesome tutorial. I know 8 teens graduating this year and need grad card ideas. This is so perfect! Thank you, Paula!
Beautiful graduation card. Love the use of stencils. Very nicely done.
Such a creative card! Love that stencil technique and the monacle is just brilliant.
Love this idea, Beautiful card.
Love how you inked the stencil!
I love the idea of “stamping with stencils”.
Wow! This is gorgeous! Thanks for the tutorial (and all the tips!)
You just made me think stencils are cool! I love how the ink works with them. This looks like fun to play with. Great card. Thanks.
Fun technique!
Oooo…I need to get out my stencils and give this technique a try! Looks so cool!
I love how the card turned out! great technique~!
loving these new th stamp pads and stencils..love this!! TFS