Photography Tips & Tricks
Hi there! Happy Sunday! We get a lot of questions on how our designers get such fabulous photos of their projects, so we thought it might be fun to ask one! The always awesome Debby Hughes graciously agreed to share some tips and tricks with us on our blog!
Enjoy!
Hi there, it’s Debby here and today lets talk about taking pictures of your cards. Whether you take a snap of the cards you’ve made for your own record keeping, for sharing them to online galleries or for publishing them to your blog, chances are that you are taking a picture of the things you’ve made. I often get asked about my card photography and as a result I started a Lime Light series on my blog sharing tips and tricks to getting a good photograph. Let me start off by saying I’m not a professional photographer, just an enthusiast who over time has learnt techniques which have helped me and I’d love to share them and hopefully help you too :D I’m not going to get into the nitty gritty of camera settings, today we are talking simple things that we can all do whether we have a fancy DSLR camera or use the camera on our phone.
Set Up
To start let’s think about what we want to achieve when we take a picture – where do we want to get to in effect. Even if your only aim is to have a form of record keeping a bare minimum should be a picture that is clear, pin-sharp and showing the details of the card. A finishing touch might be that the project is set nicely and engaging to those viewing it. For me, although it is not an essential point, the latter is where I usually start. It stems from the interaction I believe we have when we give a card to a person. They hold it in their hands, look at it, examine the details and hopefully appreciate the care and love with which it has been made. This little bit of card hopefully engages them and connects them with the person who sent it.
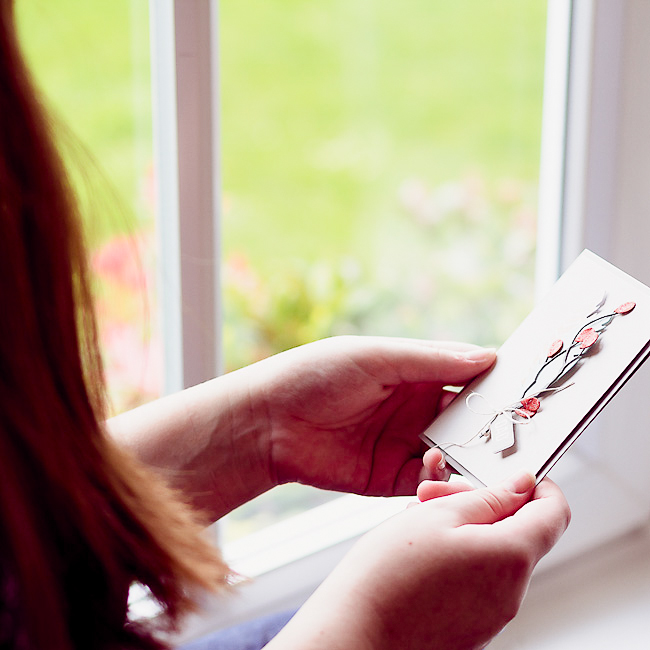
So how do we achieve that? Well, to start with it isn’t essential to have a fancy set up. This is how I take my pictures:

Personally I prefer natural light; well it’s less expensive and easier than the alternatives! You will want something nice for the card to sit on, perhaps some items in the background to add colour and interest and a simple backdrop. More than anything, having a simple backdrop allows the eye to focus on the main event – the card. A lot of people use two pieces of patterned paper – one for the card to sit on and one for the backdrop. It really isn’t fancy, but here’s my first tip – when you take your picture get down low so that your camera is on a level with the card. If you take a picture from too far above, looking down, you loose some of that connection to the person viewing the picture. Get down low so that the card is the focus of the picture, as if the person is holding it in their hands.

Angle of View
My next tip is to find some good light and then have that coming at the card from the side. In the above set up I have a large window by my desk and I place the card so it is at 90 degrees to that – the light coming in from the side. Then I angle the card just slightly back towards the window, this will bring out the dimension of the card. Here’s an example:
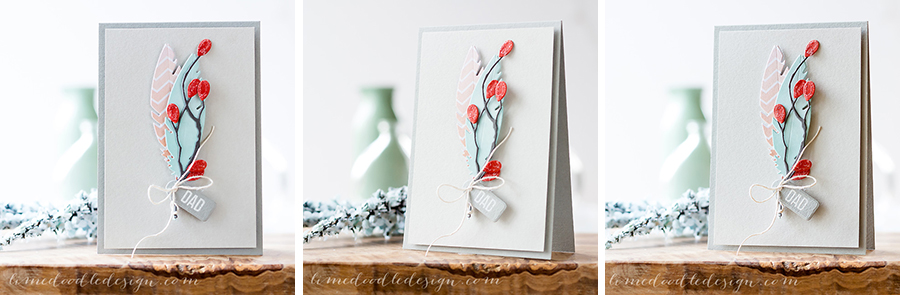
The card on the left is straight on to the camera with the window to the left. The light isn’t catching the elements of the card and it all appears a bit flat. By angling the card towards the window (centre) the light catches the elements and throws soft shadows to show the dimension. However, I’d debate that this card angles away too much, although there is lots of lovely detail, somehow that elusive connection is lost as the card appears to be for the person sat to my left. The final picture on the right is a happy medium – a slight angle to the light allowing the details and dimension to shine but not so much angle that the connection to viewing the card is lost.
Pin Sharp
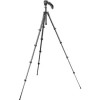
So now we are taking clear, engaging pictures, which allow the light to highlight the details in our cards but what about getting a sharp picture? My best tip here is to stabilise your camera – don’t hand hold it. Unless you live somewhere with lots of lovely light allowing your camera to take a fast picture then the chances are that the natural movement of your hands will cause the camera to shake giving less than sharp pictures. Put your camera on a tripod if you have one (I use this one), or on a stable surface if you don’t. Then having got the camera nice and stable, don’t hit the button causing it to shake again. Instead, use the timer on the camera so that once you’ve pushed the button the camera has a few seconds to stabilise before taking the picture. I have my camera set to a 2 second delay from when the button is pressed to when the picture is taken. I recently shot a little video chatting about this and showing the timer on both a smart phone and my camera. You can see that video here.
Summary
- A simple, clean set up with a perhaps a few items to add interest but not so much as to detract
- Get down low and take the picture with the card as the main focus
- Natural light is lovely and works well when coming from the side
- Angle the card slightly to the light to pick up dimension and details
- Stabilise the camera to get a sharp picture – use a tripod if you have one
- Use the timer button to help keep the camera stable while the picture is taken
I hope you find these simple tips useful. If you would like a slightly more detailed view on the above then please pop over to my Lime Light series where I will be continuing with hints, tips, techniques, editing etc all with a view to getting the best picture :D
My Current Camera Equipment
 |
 |
 |
 |
Blog Candy Alert!! Follow our blog via email and comment on this post for a chance to win a special blog candy!


Great tips! I love the visual of the three examples side by side!
Thank you for all the wonderful tips!!
Great tips. I love looking at Debby’s photos if her cards so it’s wonderful knowing how she achieves such pretty photos.
This is great! I always have issues with light when taking pictures of prepared cards! Wonderful help!! Thanks!!
Thanks for the great tips!
Thanks for the tips. Need to find a window where I can do a set up like this.
These are very helpful tips. I should take my photos in daytime and reap the benefits of natural light. Thank you!
Great tips, thanks Debby … and your card is gorgeous … at every angle! Anita :)
Thank you so much for this quick post, I love it!! These simple tricks are going to help me a lot and I would never have know about the Lime Light series otherwise. Thanks Debby
As always, SSS, you are awesome for posting this!!
Great tips. Thanks
wonderful tips… thanks for sharing!
Fantastic tips and tutorial! This is going to be a big help! Thank you so much!
Thanks for the tips, they are very helpful!
Thanks so much for the great tips. I needed those!
Wow!! These are such great tips!! My husband tried to help me take better photos for my cards but it was a complete and utter fail! Thank you for this wonderful post and for sharing your knowledge!
Thank you so much for all of these fabulous tips!!! I will be putting them to use soon! TFS!
Thanks for the great tips and the visuals for the set-up! Very helpful!
Always appreciate photography tips and tricks from professionals.
Thank you for the great tips and tricks, and for explaining it in such detail, really helpful! Really appreciate this, thanks for the visual examples too. Learned something new!
I’m rarely happy with the pictures I take. I will be now looking for some good window light! Thanks for the tips!
Oh WOW! Love this set up :-D Card is also amazing :-D Thank you for sharing this AWESOME tutorial :-D
Thanks so much for the tips. this is somewhere that I need to fix up, thanks again, Jasmine
You taught, I learned helpful tips that I will follow. Thank you.
I love your well lit and clean craft space. Your photos are as amazing as your cards.
Many thanks. Great tips!
Great tips and ideas. Thank you so much for sharing them with us.
Interesting read — thanks for the info!
These are great tips–love the lighting, angle and tripod tips–I need to start doing this!
Love this blog post! So much, in fact, that I set up my “studio” in the guest bedroom and played a bit this afternoon.
Great information Deb. Thanks
Thanks for the excellent advice.
Debby always give great photography tips, and explains everything so simply … thanks Debby!
Thanks Debby, Awesome as always!!!
Great tips
And happy Sunday!
AWESOME AWESOME AWESOME!! I have been ENJOYING your Photo Tips Posts on your Blog and I LOVE that you are sharing them with us!! =) THANKS and have a FABULOUS WEEK!! =)
These are such helpful tips! Thanks so much!
Debby’s photos are always beautifully done! These are great tips for making our cards look the best. Thanks, Debby!
Thanks for the tips Debby. I struggle with shadow from my phone camera. Any tips on how to avoid that? (I usually take the pic flat on the floor photographing from above – maybe I need to stand the card up like you show here). i follow the blog by email.
Great tips!
The tips you gave were understandable and clear. I can now have confidence when taking project pictures, altho, I don’t take pictures for others, I still found this article extremely interesting. Thank you very much for the share. Blessings……
Thanks for the fabulous tips! Always a bit of a struggle to get that perfect shot so thanks for sharing.
Great post on photographing one’s finished cards! Photos are always a tricky subject… the lighting makes all the difference!
Thanks for the info
and I’ll try it out!
Carla from Utah
Thanks for sharing this info. I struggle with getting good sharp photos of my various projects. I’m looking forward to reading more of your tips – headed over to your blog!
Oh man! I need this! I enjoy your blog series, and if it’s on SS, that is awesome!!
These are great tips! Thanks for sharing.
Brilliant tips, will have a go at this! TFS. x
Great tips!!
great tips…learn alot from you thanks…
Very helpful. Thanks, Debby!