One Stamp, Five Ways: Witch Please

Hi friends! Happy Monday! Can you believe it’s Halloween? The last day of October is here! Where did this month even go? We thought it would be fun to end the month on this Halloween day with a fun holiday edition of Suzy Plantamura’s One Stamp Five Ways with our super popular Witch Please set! Read on for all the details and enjoy!
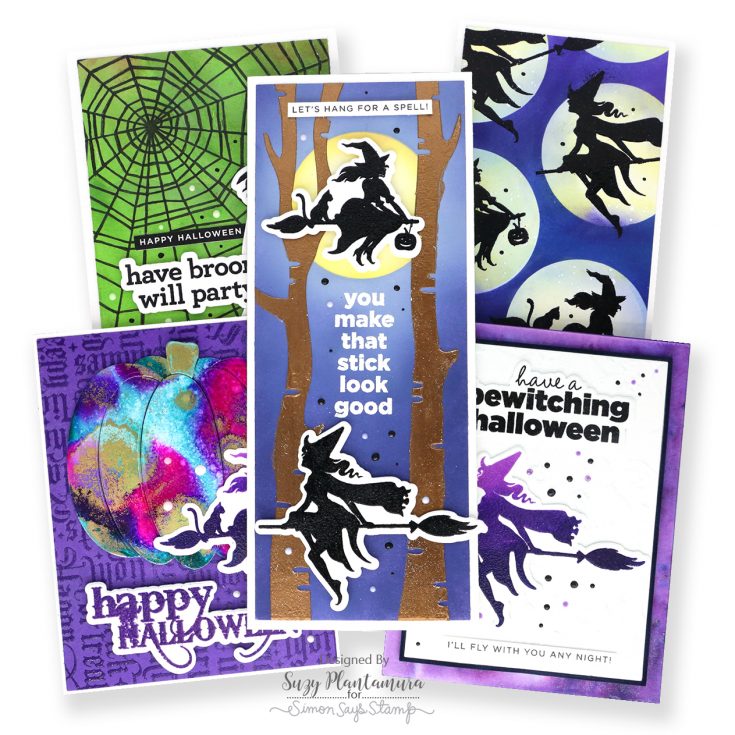
Today is Halloween, so in true spirit, I decided to do my “one stamp, five ways” post with a Halloween stamp set. I picked the new CZ Witch, Please stamp set from the STAMPtember release as who doesn’t love witches?!!!
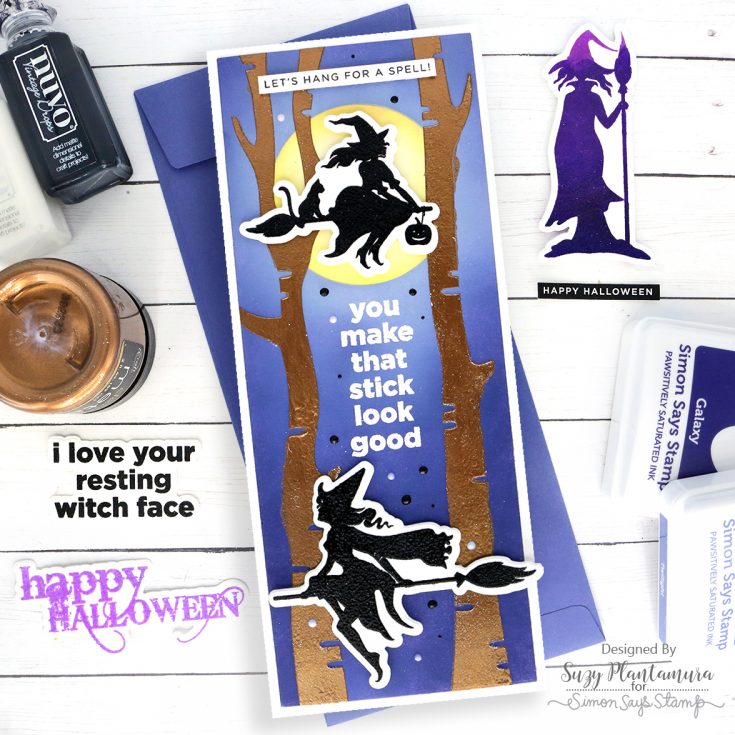
I started this slimline card by die-cutting a rectangle using the Nested Slimline Rectangle dies and white cardstock. I then attached the smallest circle in the Circle Mask Stencils to the top center of the card. I applied two colors of Distress Oxide Ink, Stormy Sky around the circle and Chipped Sapphire on the bottom and around the top edges. I then removed the mask and attached the stencil with the same circle cut out of it and applied Antique Linen and Squeezed Lemonade inks to the edges.
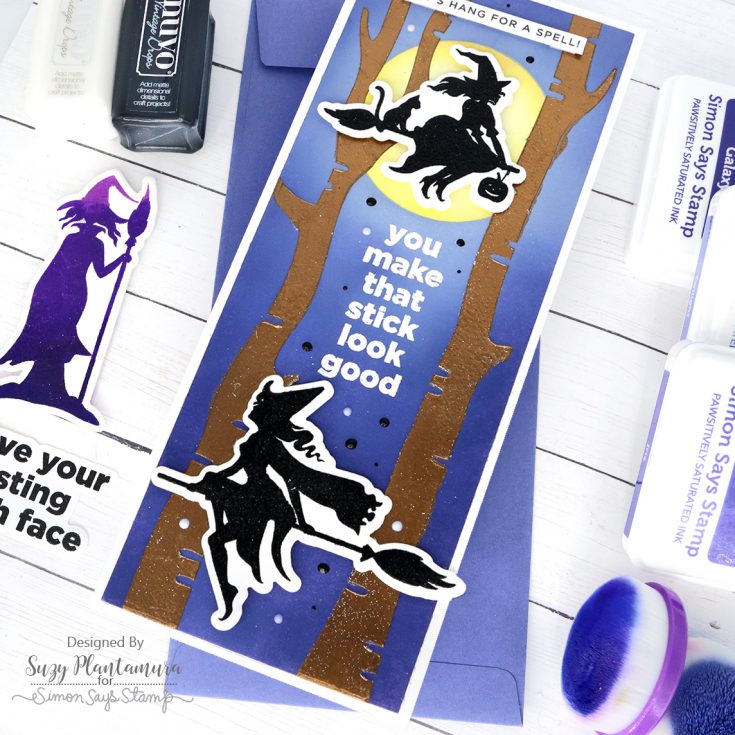
I attached the Birch Trees Stencil over the background and rubbed Aged Copper Deco Foil Gel over it with a palette knife. I let it dry (takes a while) and attached it to a white card base. I embossed the two flying witches with Wow Primary Ebony Embossing Powder and die-cut them out with the matching dies. I embossed the sentiment in the center of the trees using Ranger White Embossing Powder. I attached the two witches with foam tape behind them over the top and the bottom. I stamped the “let’s hang for a spell!” with black ink on a small strip of white cardstock and attached that to the top of the card. Last, I added Vintage Nuvo Drops in Chalk Stick and Black Board around the background.

This was probably my most time consuming card! I die-cut another rectangle with the same Slimline Nested Rectangle Dies. I then used the same Circle Mask Stencil to make several small circles by tracing a few with a pencil and cutting them out of scratch paper. This gave me several small circles so I could block more while inking around them. I used Pawsitively Saturated Inks in 3 colors: Galaxy, Royal, and Amethyst. I applied them around the circles which I placed randomly around the background. I then removed the circles and used the stencil to block the background around each one, applying Lemonade Ink inside each. I then applied a little of the other 3 inks around the outside of each circle to blur the edges of the “moons”.
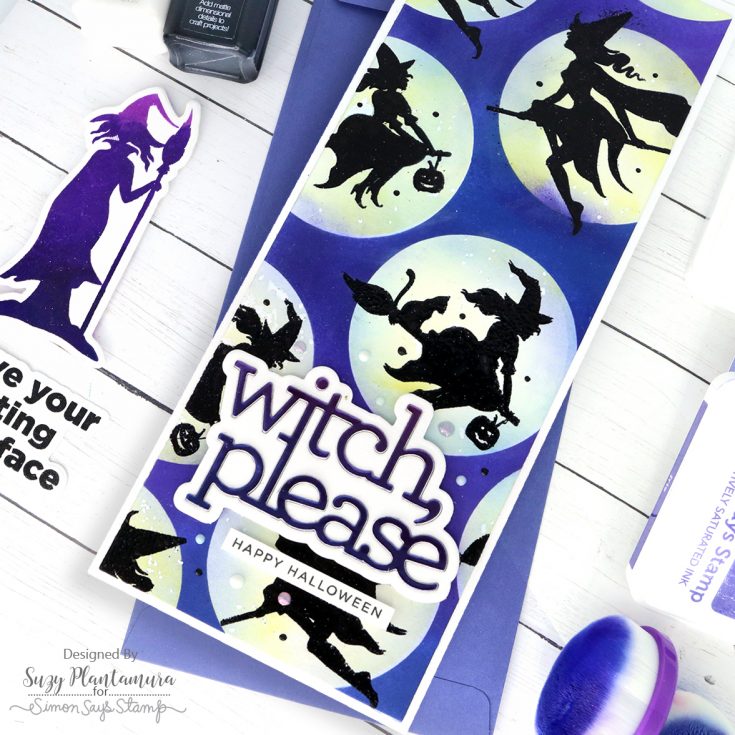
I stamped the two witches in the center of each moon with Intense Black Ink and embossed over them with SSS Clear Embossing Powder. I die-cut the “Witch, Please” die from white cardstock and from Holographic Rainbow Cardstock (where it is blue and purple). I attached them with foam tape behind them to the bottom of the card. I added some Vintage Nuvo Drops around the card in Black Board and Chalk Stick, and Dream Drops in Indigo Eclipse.
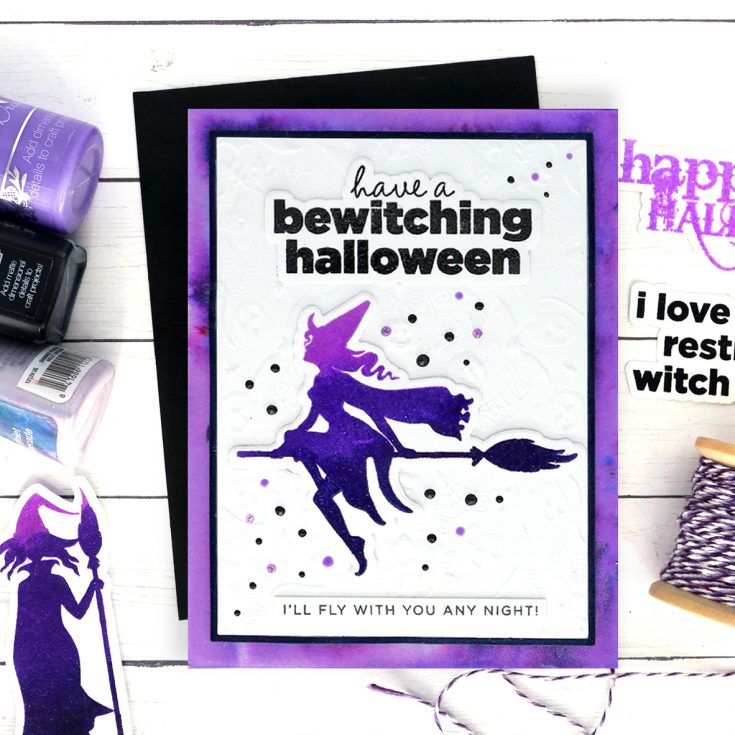
I painted a piece of Ranger Watercolor Paper with Nuvo Shimmer Powders in Lilac Whisper and Violet Brocade. I embossed a piece of white cardstock with the Halloween Mandala Embossing Folder. I die-cut it with the second smallest die in the SSS Thin Frame Dies set. I also die-cut a frame from black cardstock. I attached this piece and the frame to the background with foam tape behind them.
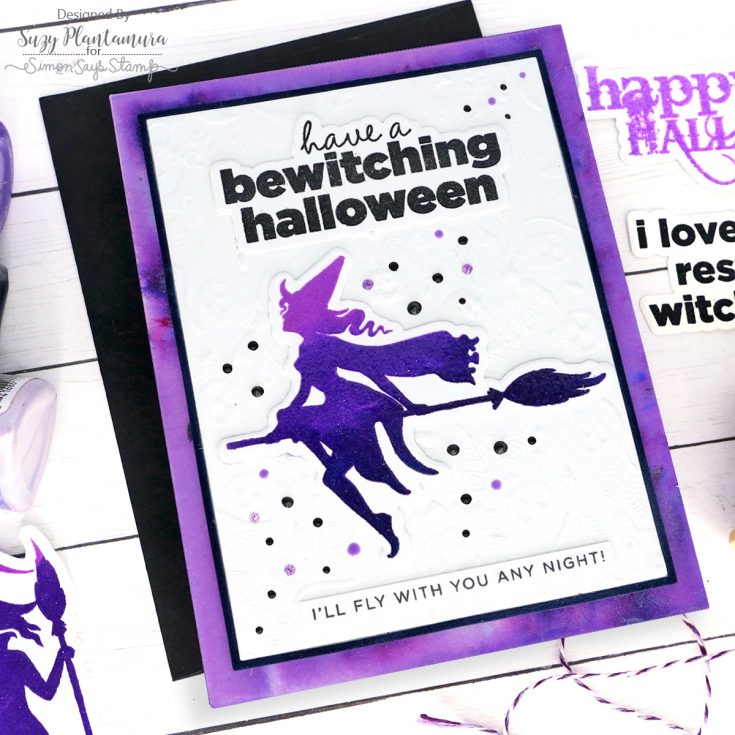
I stamped the witch in 3 colors of Pawsitively Saturated Inks, using the lightest color on the top and the darkest color on the bottom (Orchid, Violet, and Twilight). I embossed over it with clear embossing powder. I die-cut it out and attached it over the center of the background with foam tape behind it. I then stamped the sentiment on white cardstock with Intense Black Ink and embossed over it with clear embossing powder. I attached that to the top of the card. I attached one of the smaller sentiments to the bottom of the card. I used Nuvo Drops around the card background in Black Board, Chalk Stick, Crushed Grapes, and Lilac Whisper Glitter.
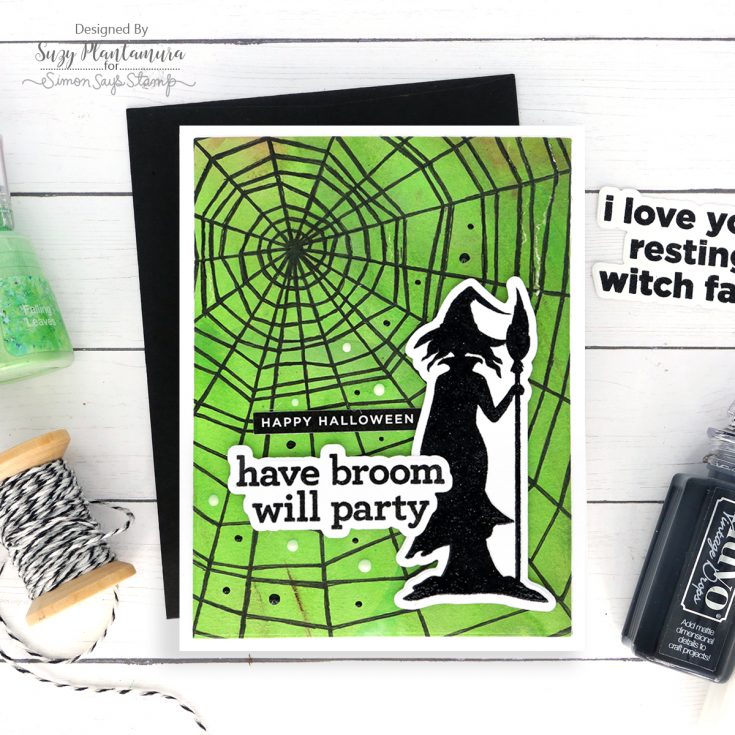
I pulled out the Shimmer Powders again. This time I painted a piece of Ranger Watercolor Paper with Falling Leaves and Green Parade. I then embossed this with the Tangled Web Embossing Folder. I used a black ball point pen to color over the raised web. I thought of rubbing black ink over it, but I was afraid of ruining it, so I used a pen that went on easily without flattening the design. I die-cut this piece down and attached it to a white card base.
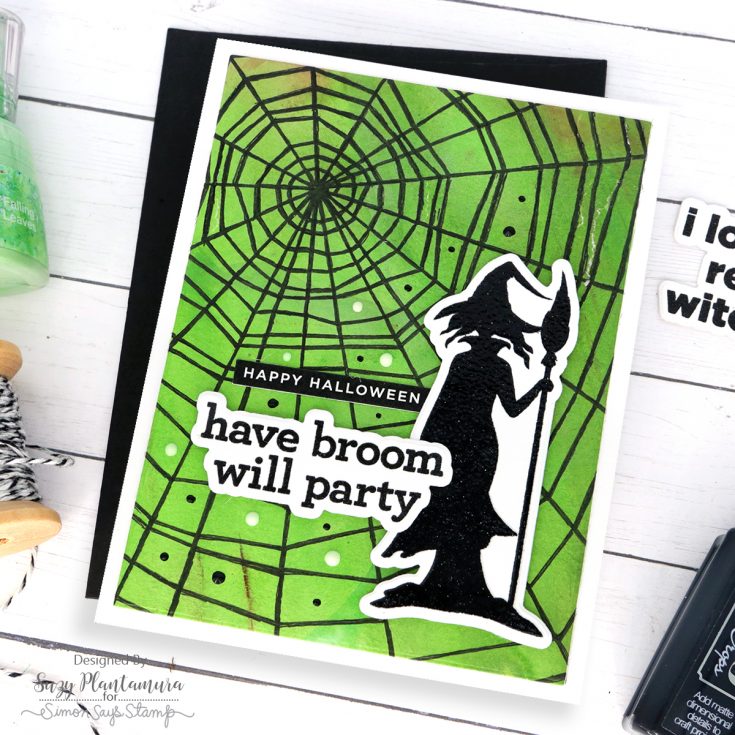
I stamped the witch and the sentiment on white cardstock with black ink and embossed over them with clear embossing powder. I die-cut them both out and attached them to the front of the card with foam tape behind them. I cut out a “Happy Halloween” sentiment from the Reverse T-Day Sassy Sentiment Labels. I attached that above the other sentiment. I used Chalk Stick and Black Board Vintage Nuvo Drops around the background.

This would have been the most time consuming card I made, but sometimes I have things in my craft stash that come in handy when making a card. I had previously made some alcohol ink pieces and this one was so crazy bright with big gold spots on it that I had never found a use for it. I die-cut it with the new Layered Pumpkin Wafer Die. I had stamped and embossed two witches when I did the one for the card above called Have a Bewitching Halloween, so this one was made the same way.
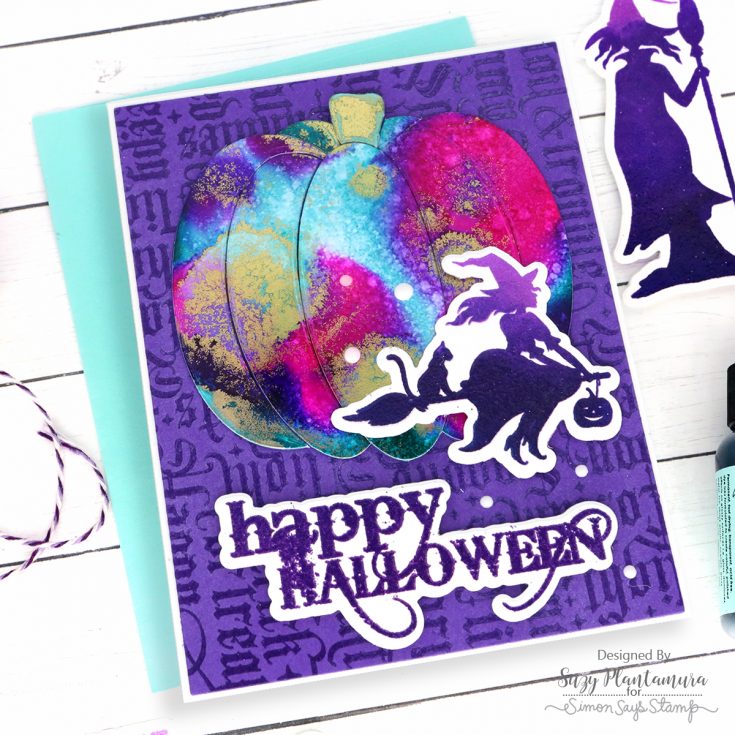
I embossed the Gothic Halloween Cling Stamp with Tim Holtz Wilted Violet Embossing Glaze over purple cardstock. I die-cut this piece with the largest die in the SSS Thin Frame Dies and attached it over a white card base. I attached the pumpkin to the top of the card with foam tape behind the center piece and the outside edges of the two pieces next to the center for dimension (gluing the inside and top and bottom of them down). I added the witch over the pumpkin. I embossed the Happy Halloween sentiment from the stamp set (that matches the background stamp) using Villainous Potion embossing powder. I attached that to the bottom of the card.
I hope this “one stamp, five ways” post has been bewitching enough to catch your attention today! I’m not a big Halloween person, so I love this Witch, Please stamp set with it’s funny sentiments and playful theme. I have a “one stamp, five ways” series on my blog each week, so come visit anytime. Thanks so much for joining us today and I’ll end with HAPPY HALLOWEEN TO ALL!!! Suzy
SUPPLIES:
|


Thanks so much for stopping by, and thanks to Suzy for being our guest!

ENDS TONIGHT!


These are Awesome!!! Super Fun!!!
Love those witches!
They are awsome!
This is precisely why it’s so successful, because it sucks you in with just the right amount of difficulty and makes you want to keep trying it one more time. Flappy Bird currently dominating the mobile gaming market is now available on PC
Really great cards!!
The topics you share are really meaningful to me, I will regularly monitor your website.
I absolutely adore those witches!
Quordle has been available for purchase for a span of five months. Its successful outcome is the result of being released as an incomplete product. The daily game mode presents a fresh set of words for the Quordle puzzle every day at the stroke of midnight.
Quordle Hint
Wow! This blog post is an absolute gem! The content is well-researched and beautifully articulated. futbol libre
fabulous cards
Wow, it’s already Halloween and the end of October? Time really flies! I love the idea of ending the month with a fun holiday edition of Suzy Plantamura’s One Stamp Five Ways. The Witch Please set looks super popular and I’m excited to see all the creative ways people use it. Happy Halloween and happy crafting!
Never pass up the opportunity to seem appropriately fashionable. The Emily Cooper Black Trench Coat seemed to be the greatest choice in this regard. With its unmatched warmth, this layer envelops you in comfort. You will also keep up with the newest styles by wearing this item into your ensemble and succeeding in them.
Our Fauxjacket website offers unbeatable prices on all products, with the added benefit of free worldwide shipping on every purchase! So check our website now and buy the product of your choice. grey faux leather jacket