One Stamp Five Ways: Spring Stems
Hi friends! Happy Saturday?! Are you ready for Spring?! I sure am!! Please join me in welcoming back special guest Suzy Plantamura for this delightful and bright rendition of the latest edition of our monthly series, One Stamp Five Ways! Enjoy!
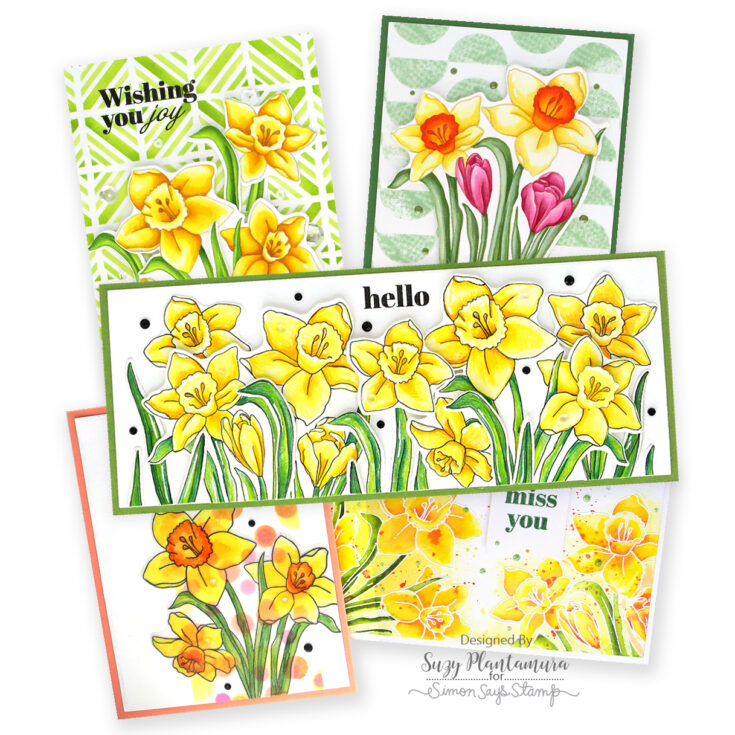
Today we are going to take a foray into Spring, so if your weather is cold and dreary where you live, you are welcome! The Good Luck Charm release included several daffodil products that I was excited to use as I love all flower stamps! I decided to use the Spring Stems stamp set for this “one stamp, five ways” post as it includes lots of flower stamp choices as well as many different greetings. Here are my five cards:

My first card is a slimline design using quite a few of the stamped images grouped together. I started by die-cutting a Nested Slimline Rectangle die out of white cardstock. Note: I use the largest one in this set for almost all my slimline cards because I like to mount them on colored cardstock. I stamped all the images in the stamp set with MFT Natural Ink, stamping the leaves twice. I colored them with colored pencils and used a white Uniball gel pen to put white lines on them for shading. I decided I would prefer them to have outlines since they were such light colors, so I used a fine tip black marker to add them. I recommend just stamping them with black ink! haha
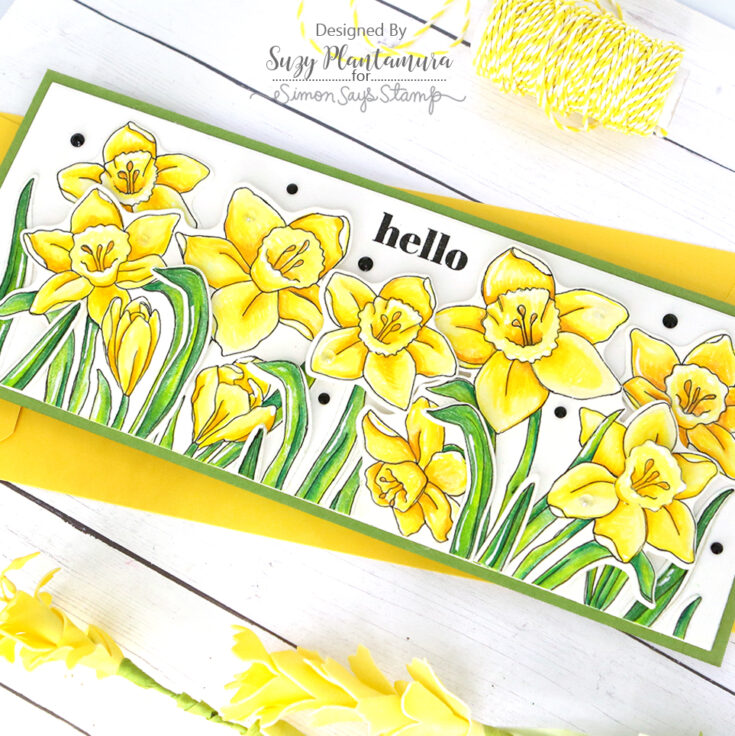
Next, I arranged the flowers over the rectangle using foam tape behind some for dimension. I used the extra leaves I colored twice by cutting them in half and using both sides so some would be shorter. I cut the center out of one of the single flowers and attached it over one of the floral group flowers, gluing the bottom down and using foam tape behind the top so it looked 3-dimensional. I stamped the “hello” greeting from the stamp set with Intense Black Ink above the flowers. I also added some black gems from the Honeybee Back to Basics Gem Stickers. I attached the rectangle to a green card base.
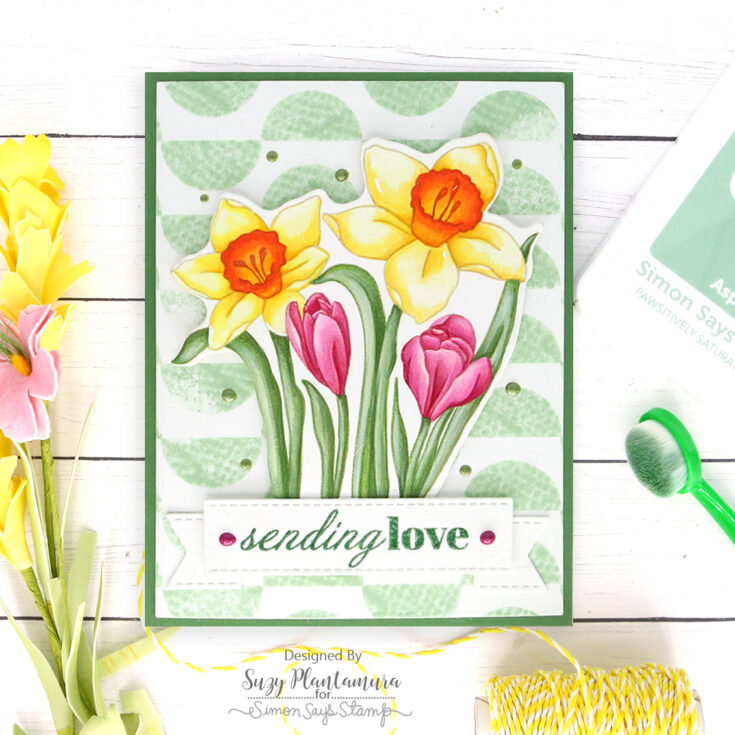
For the background of this card, I used the new Wavy Circles cling stamp. I also used one of the newest colors of Pawsitively Saturated Ink called Aspen. I pressed the ink pad liberally all over the stamp. I then folded some paper towels and laid them over the stamp pressing lightly. My paper towels have a nice pattern to them, so when I stamped the paper, you can see this pattern. This also removed some of the ink so the design was softer and didn’t overwhelm the flowers on the card.
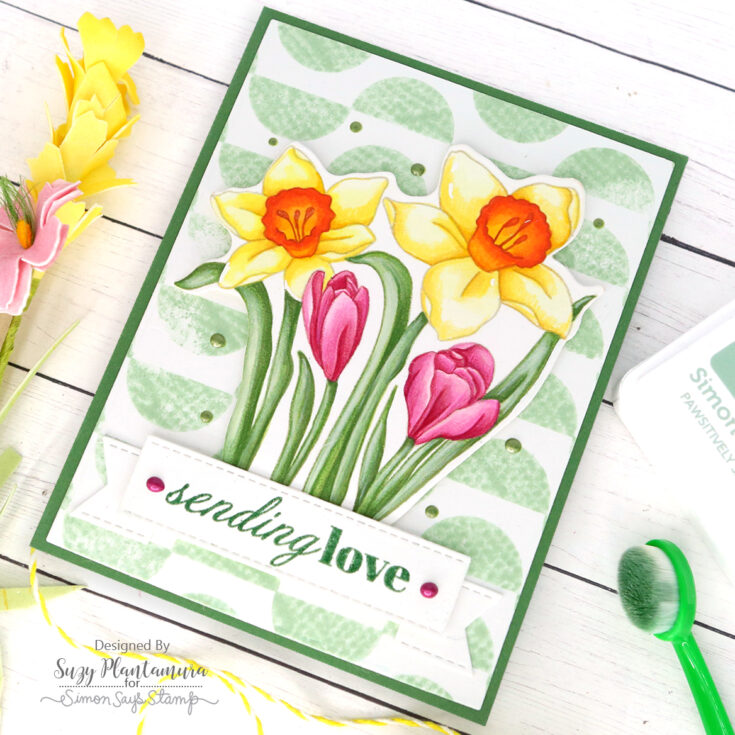
I stamped one of the two floral groupings from the stamp set with MFT natural ink. I colored the images in with Copic markers. I shaded them and added the flower centers with colored pencils. I love using markers first and pencils second to color. I was able to find the perfect color of green cardstock to match the background for my card base. I used Ranger Rustic Wilderness Embossing Glaze for the sentiment on an MFT banner die. I attached the flowers with foam tape behind them and the sentiment banner below them. I used some Nuvo Drops in Rhubarb Crumble next to each side of the sentiment. I used Bottle Green Nuvo drops around the flowers.
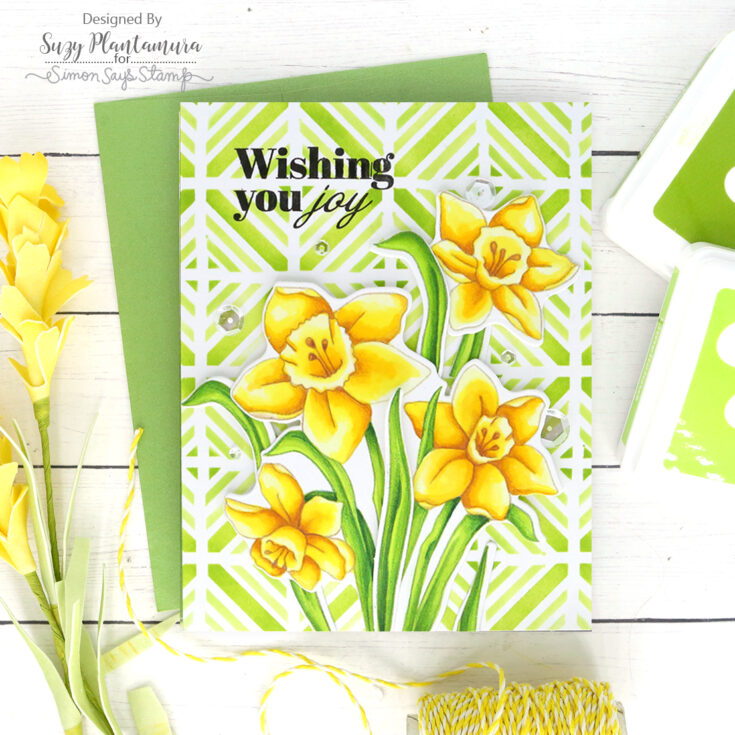
I made the background of this card first with one of the new stencil sets from the Good Luck Charm release called Radiating Squares. I used the Pawsitively Saturated Ink Trio 2 group which includes Celery, Limelicious, and Pearfection inks. I love how it looks like a trellis! I stamped a sentiment from the stamp set on the top of the card with Intense Black Ink.
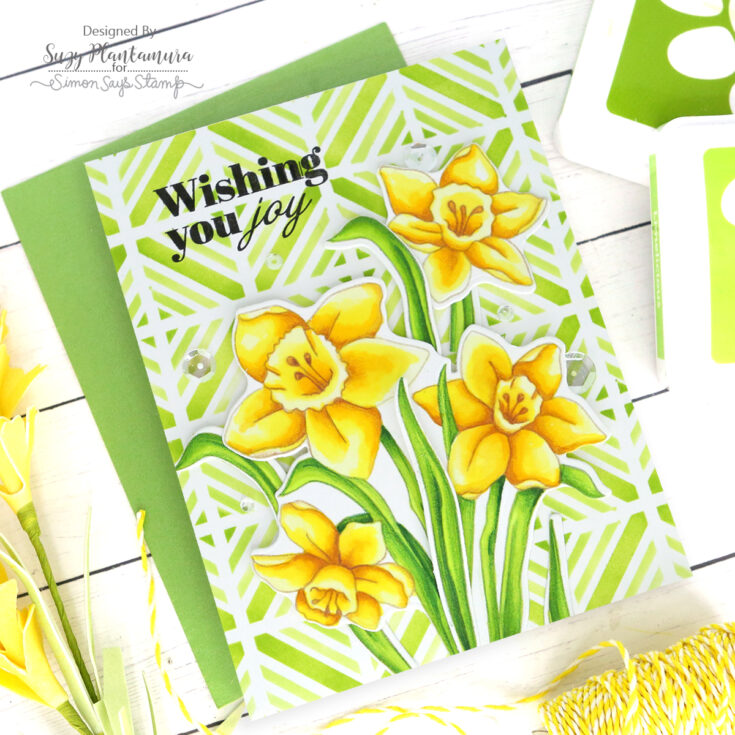
I stamped the flower grouping and one of the single flowers as well as several of the leaves on white cardstock with MFT natural ink. I then colored them in with Copic markers. I used pencils again to add a little shading and the center details of each flower. I die-cut them out and arranged them on the bottom of the card using foam tape behind the top of each flower. I added some sparkling clear sequins by Pretty Pink Posh.
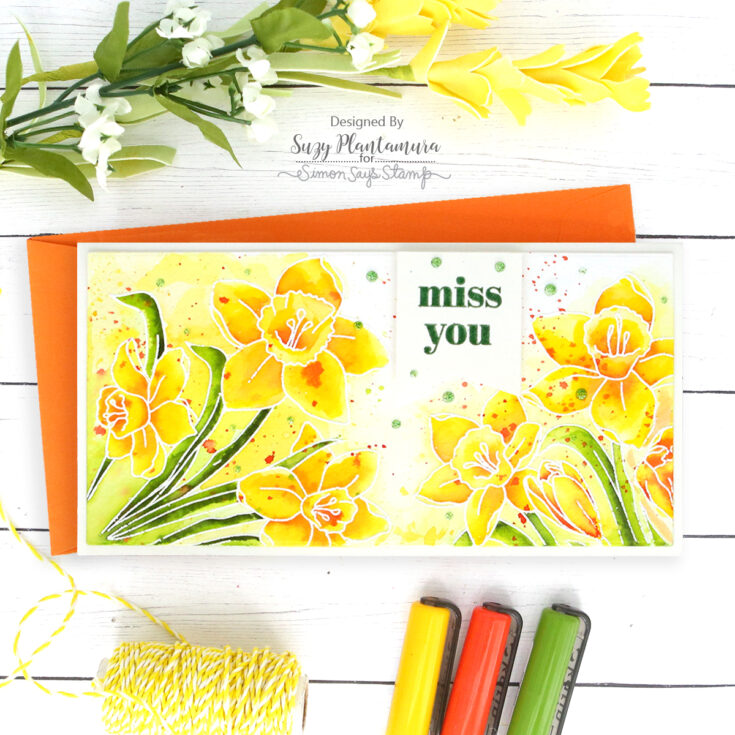
For this mini-slimline card, I used the Mini Slimline Nested Rectangle Dies to die-cut a piece of Arches watercolor paper. I always use the largest die in this set for mini slimline cards. Just like with slim-lines, I like to have them matted by the color of the card base. I embossed some of the flowers on both sides of this piece with Ranger Extra Fine White Embossing Powder. I then painted them with Karin Brushmarkers.
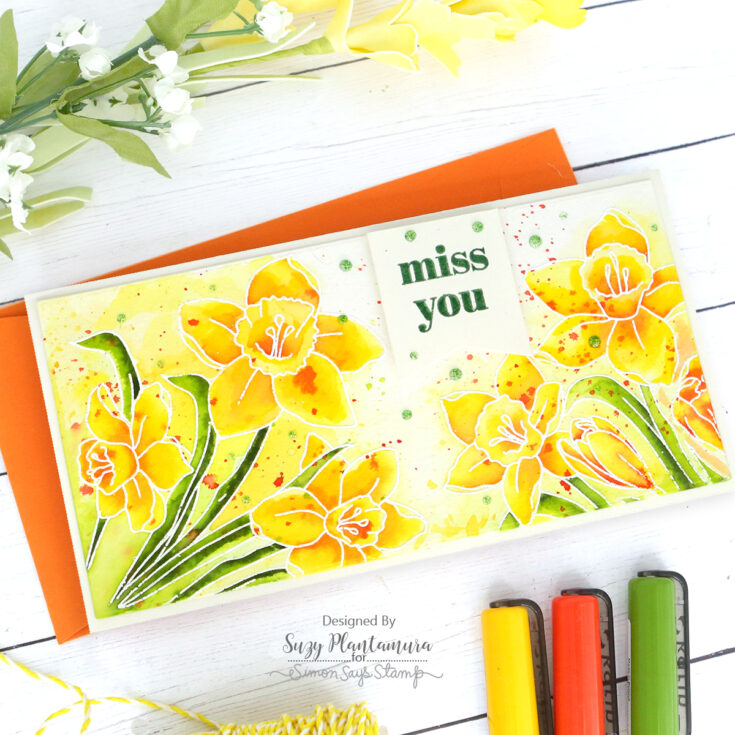
I splattered watercolor in orange over the entire piece. I wasn’t sure I should have done that and there was a lot at the top in the open space. My solution was to put the greeting over this part! I die-cut a banner with the Word Mix 2 Dies and embossed a sentiment from the set on it using Rustic Wilderness Embossing Glaze again. I added some more green with Nuvo Glitter Drops in Sunlit Meadow to balance out all of the orange spots.

I saw a card made by Jennifer McGuire for the Good Luck Charm release blog hop that used this stamp set and I loved it. It was the inspiration for this card. She stamped the floral grouping in black ink over a colored strip on her card. I used the Interlocking Circles stencil with several colors of Pawsitively Saturated Ink in a vertical strip on the card on the right. Then I stamped the flowers in black ink over it. I ended up not liking it as the pattern was too intense for the stamped design which I felt got lost (unlike the way Jennifer had done hers!).

My new version was a similar concept, but this time I used the new Layered Confetti stencil set since it has a more subtle design. I used 3 colors of Pawsitively Saturated Ink (Carnation, Cantaloupe, and Sunbeam) with the small SSS brushes keeping the ink application soft. I again used tape to block off the sides of the card front so it was just stenciled in a vertical strip.
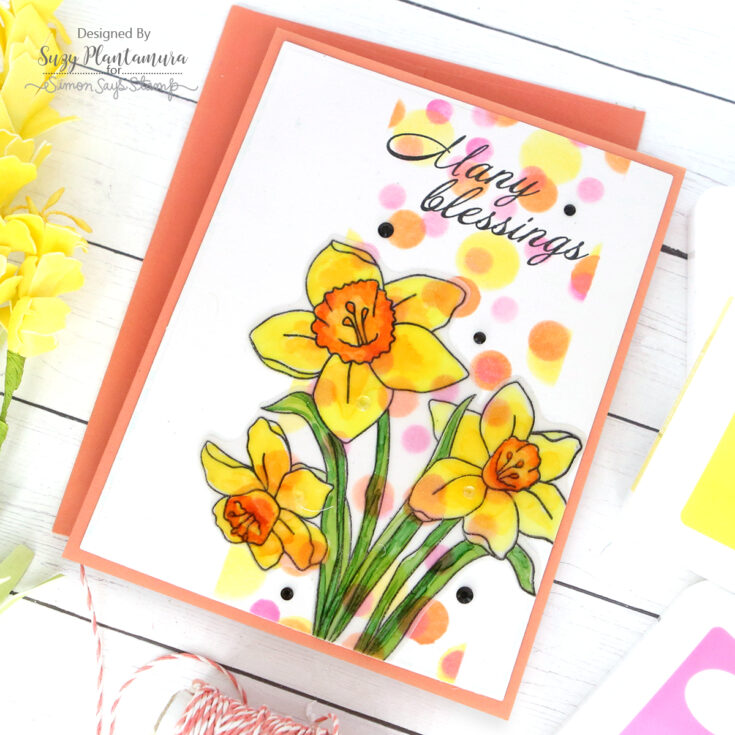
This time I stamped the flowers on vellum with Intense Black Ink thinking they would stand out more this way. I decided I would like it better colored, so I used Copics to color it. I attached it over the background and I love the circles showing through in the same colors I used on the flowers! I stamped a sentiment on the top with black ink and added some Honeybee gems in black.
I hope this post with ALL the details of my 5 cards shows you that I often make mistakes and have to figure out how to alter things as I go. It should also demonstrate that a simple floral set can be used in many different ways to create different looks. Just change up your coloring medium and incorporate other products for fun, unique backgrounds and you won’t run out of ideas! Thanks for visiting today! Suzy
SUPPLIES:
|


Thanks so much for stopping by, and thanks to Suzy for being our guest!


Wonderful variety of Daffodil cards. Placed order & looking fwd to rcving.
Melissa
“Sunshine HoneyBee”
Suzy’s artistic and coloring abilities really high light this daffodil set! Thanks!
Wow!! Really Beautiful cards!!!! I love to see the different coloring mediums and the way it changes the look of the stamp!!! Thanks for the inspiration Suzy!!
Hi, SSS and Suzy –
Suzy, you are such a talented and wonderful artist! Thank you for sharing these absolute GEMS with us. They are gorgeous! Thanks for the text you included so we could follow your artistic journey as you made the cards.
Lori S in PA
Really gorgeous cards
gorgeous cards