One Stamp, Five Ways: Mom’s Spring Flowers

Hi friends! Please join me in welcoming special guest Suzy Plantamura with her monthly installment of our One Stamp Five Ways series! Read on and enjoy!
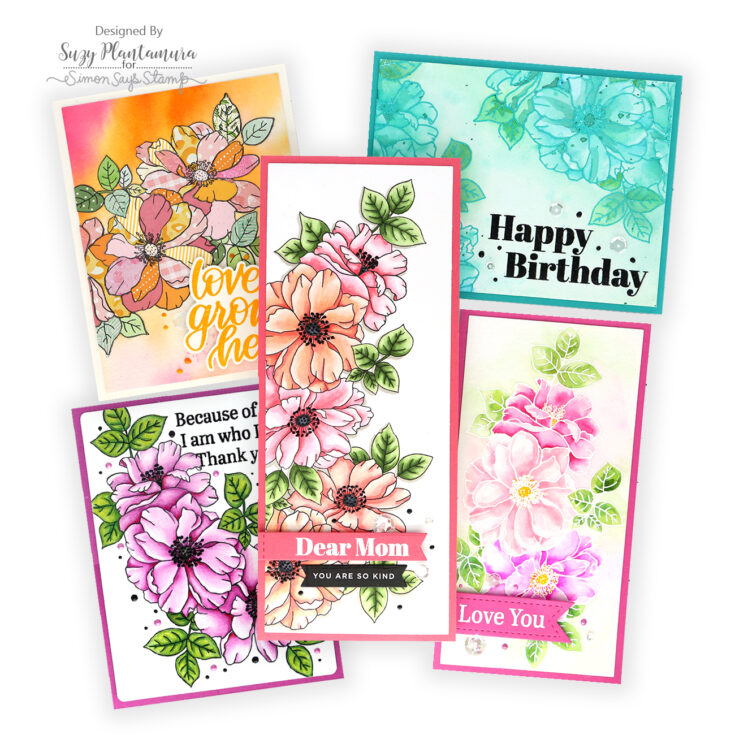
Hello friends! Today I have a “one stamp, five ways” post to share with you using one of the stamp sets from the brand new Hello Gorgeous release. I decided to use my favorite stamp set from the release called Mom’s Spring Flowers. Although the stamp set only has one floral grouping image in it, I felt pretty confident that I could make 5 cards with it because it has so many great sentiments! Plus we all know I love to color flowers!
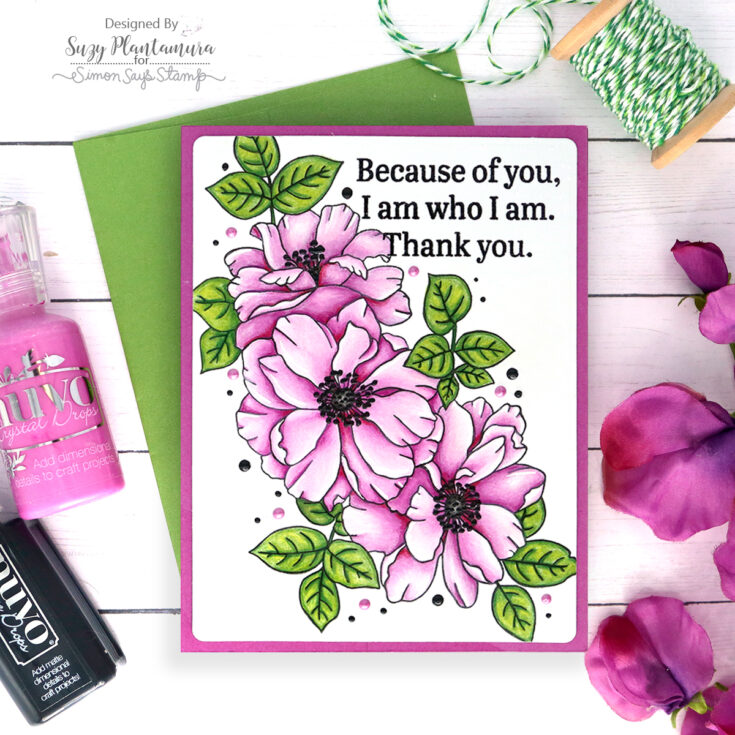
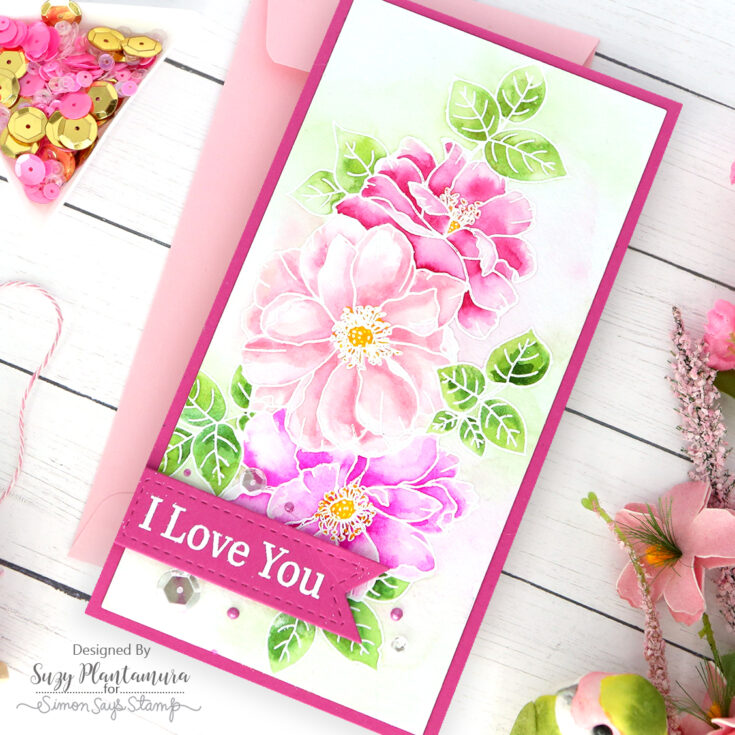
I started by stamping the floral image on white cardstock with black ink. I then colored the flowers in with a mixture of different colored pencils I have including Polychromos, Prismacolors, and Caran d’Ache Luminance. I like using a mixture of pencils since they all have different colors and blend differently. People often ask if I use gamsol to blend and I don’t. I use a blending pencil by Caran d’Ache that works so well – it is like a wax stick and just mixes all the colors together beautifully. I also often use a white Prismacolor to lighten areas (especially around the edges of flower petals) and mix colors as it is the most waxy of all of the brands.
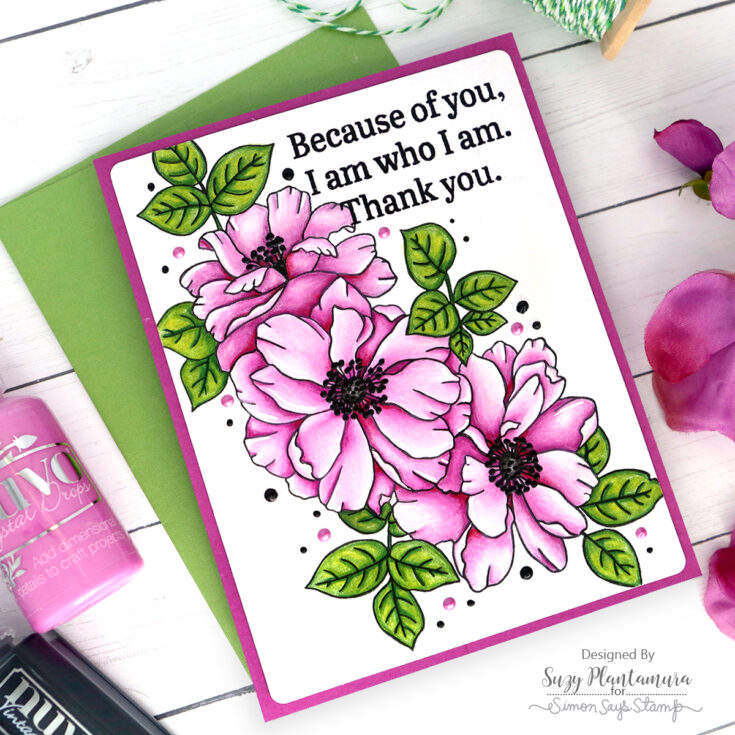
I die-cut this piece and mounted it on a magenta card base. I embossed the sentiment with black embossing powder. I remember years ago when I first started making cards, watching a video by Jennifer McGuire where instead of using black embossing powder, she prefers to use black ink and emboss over it with clear embossing powder. I never really knew why until I embossed the sentiment on this card with black embossing powder. It didn’t cover that well and the letters didn’t look sharp. I learned my lesson when I tried the other way in another card in this post and got much better results! I added some Black Board and Pink Orchid Nuvo drops and a few sparkling clear sequins around the sentiment. I also used the black drops over the all the little dots in the center of the flowers.
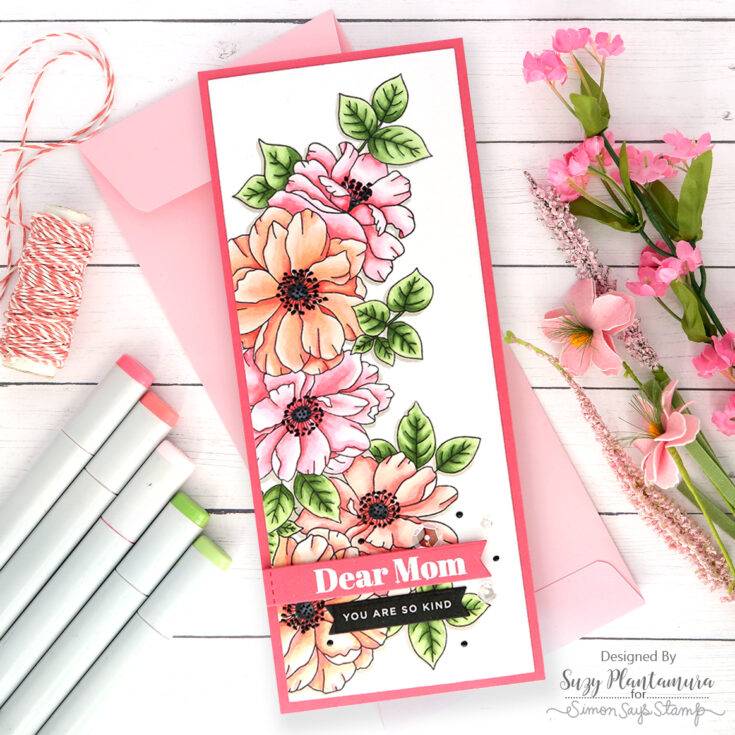
My next card is a slimline design. I start all my slimline cards using the largest rectangle in the SSS Nested Slimline Rectangle dies to die-cut a white cardstock base. I then stamped the floral grouping with black ink on this piece and on a piece of masking paper. I cut the bottom flower out and attached it over the bottom of the grouping. I then stamped the floral group again with just the bottom half of the stamp showing. When I removed the masking paper, it looked perfect as a lengthened design for the slimline. I colored the flowers in with Copic markers. I used a warm gray to add shadows behind the images so they looked more dimensional.
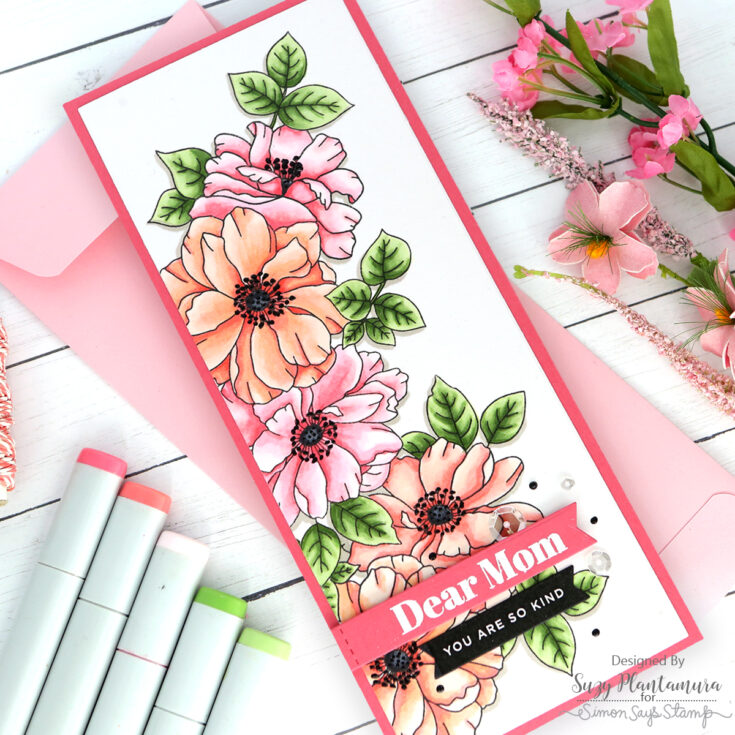
I mounted this piece on Lawn Fawn Guava cardstock (my favorite color of all time as it’s a coral reddish color). I die-cut a banner out of the same cardstock and embossed a sentiment from the stamp set with Ranger white embossing powder. I attached that to the bottom of the card with foam tape beneath it. I used a sentiment from the new Foundations reverse sentiment labels below it. Last I added some sparkling clear sequins and Black Board Nuvo drops around the sentiments and on the center of the flowers.
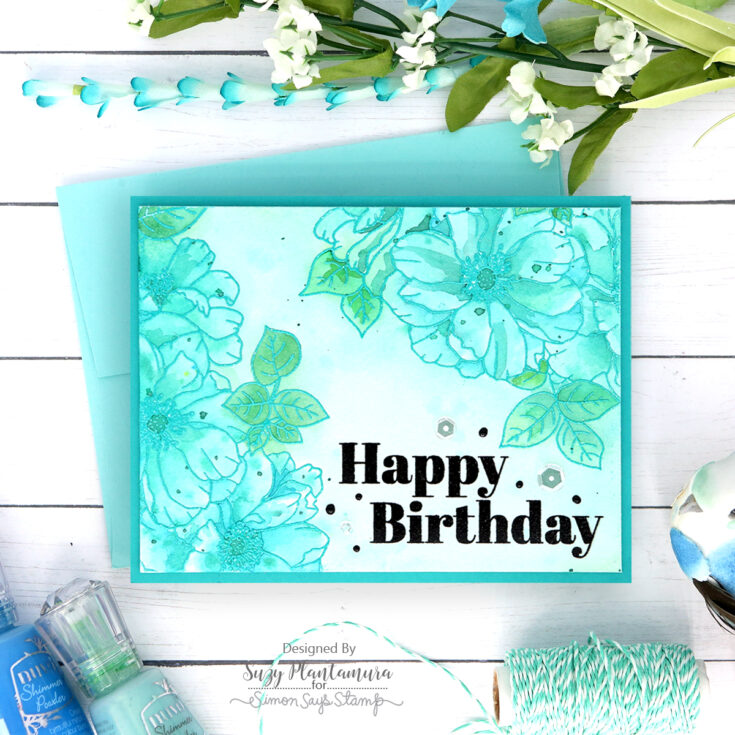
I embossed the floral stamp on the top and the bottom of a piece of Arches cold press watercolor paper using Garden Patina embossing powder. I wanted the card to be all one color, so I painted the inside of the flowers with Tonic Shimmer Powders. I used a mix of colors in blues and greens so there would be a little bit of difference between the flowers and the leaves. I flicked some of the shimmer powder over the design once it was dry.
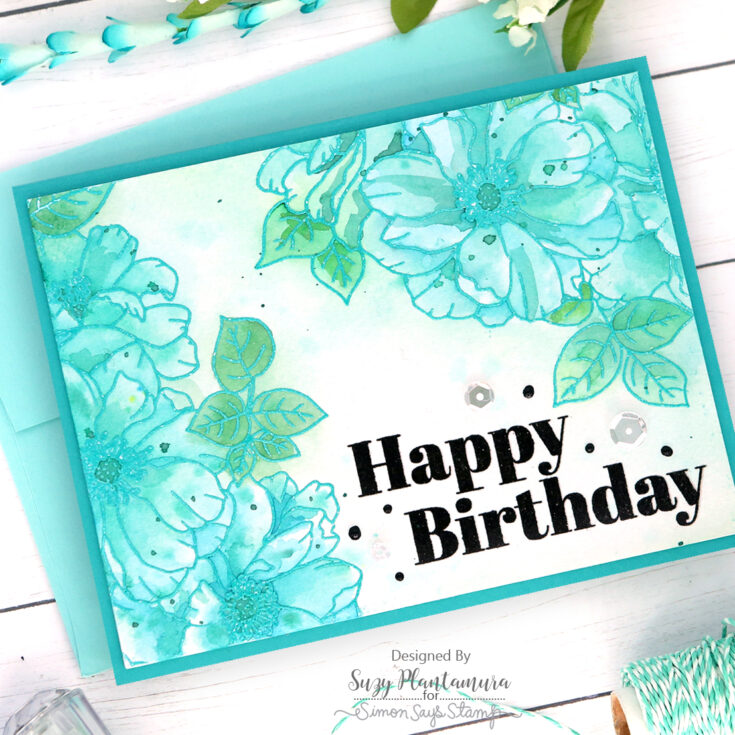
I stamped the sentiment with Intense Black Ink. By using my Misti, I was able to stamp it several times so I got it really black. Sometimes it takes multiple times when you are stamping on cold press watercolor paper. I then embossed over it with SSS clear embossing powder. Jennifer was right as it is a much crisper sentiment when you do it this way instead of using black embossing powder as I did in my first card. I added some Chalk Board Nuvo Drops to tie in the black around the sentiment. I also added some sparkling clear sequins.
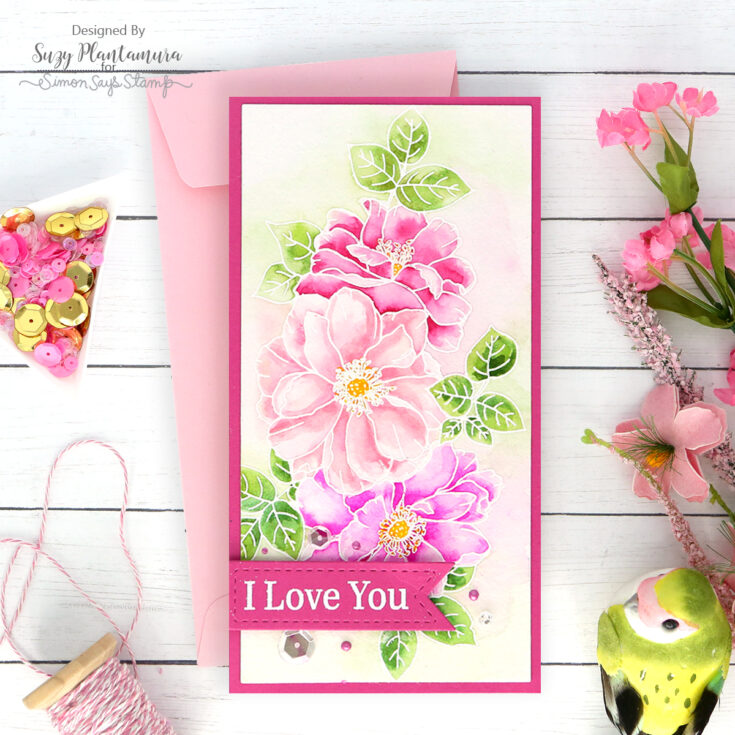
This time I made a mini-slimline card by die-cutting a piece of Arches watercolor paper with the SSS Mini Slimline Rectangle dies. I like starting all my slimline and mini-slimline cards with these Simon dies as then I can mount them on colored cardstock once they are done which frames them. I embossed the floral image over the center with Ranger white embossing powder. It fit perfectly on this size/shape card front.
I painted in the design with Daniel Smith watercolors. I embossed a sentiment on a banner with white embossing powder. I added some sparkling clear sequins and Pink Orchid Nuvo drops around the banner.
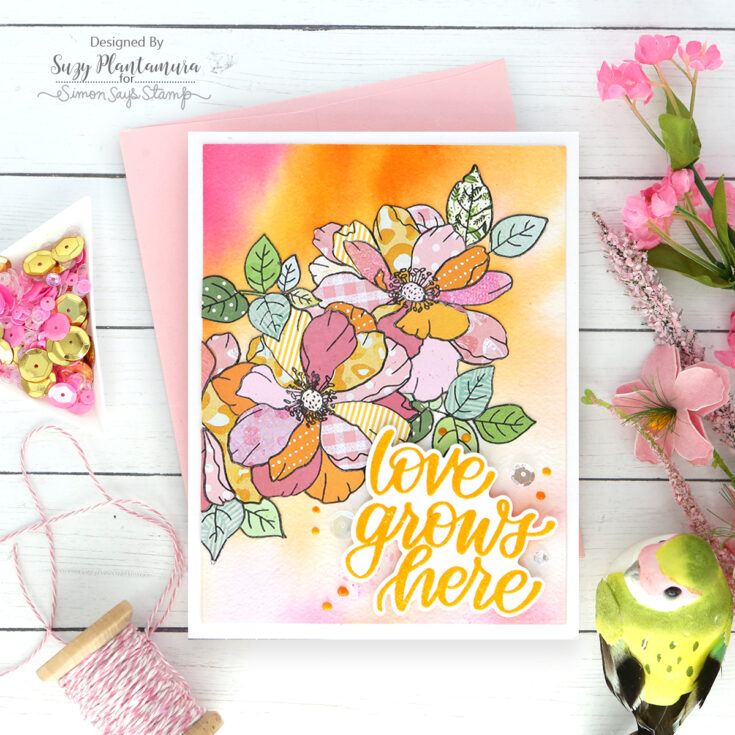
I was trying to think of one more way to color the flowers, but I had already used Copics, colored pencils, watercolors, and shimmer powders! I like to show five different techniques with each stamp, so I had to think out of the box for this one. I decided to paper piece it which ended up rather time consuming, but I loved how it turned out. My advice would be to use this technique with a stamp set that has less petals on it! I started by watercoloring the background with just a wash of oranges and pinks on a piece of Arches watercolor paper. I stamped the floral design on this piece with black ink letting it hang off the edge so I would have room for a big sentiment on the bottom. Lucky for me, this ended up giving me less petals to fill in with paper although that wasn’t planned!

I then stamped the design on a bunch of my paper scraps in greens for the leaves and oranges and pinks for the flowers. I had just organized all my paper scraps from SSS card kits, so this was a perfect way to use some of them! I cut out each petal and glued it to the design in a patchwork fashion. I embossed a sentiment from the new XL Spring Greetings stamp set with Tim Holtz Wild Honey embossing glaze. I attached that to the bottom of the card with foam tape. I used some Nuvo drops in Ripened Pumpkin and English Mustard and some sparkling clear sequins around the sentiment.
I hope you enjoyed this “one stamp, five ways” post today. I do one of these posts on my blog each week. It is ALWAYS a challenge for me to think of 5 ways to use a stamp set, but I love that it stretches my creativity and makes me think of new ways to use my products. I ended up loving the patchwork paper piecing design I used on the last card and I never would have thought of using the stamp set this way if I didn’t challenge myself. Thanks so much for visiting today and enjoy the new Hello Gorgeous release! Suzy
SUPPLIES:
|


Thanks so much for stopping by, and thanks to Suzy for being our guest!


What a wonderful array of cards, Suzy! I’m so glad to took the extra time to paper-piece that last one, as it’s my favorite of them all! Gorgeous work!
Thanks Lin! I’m glad you like it as it sure was a labor of love. Now I just need to decide who to send it to! Thanks for the nice comment! Suzy
Wow, Suzy! This is a bonanza of beauty!! Love all of them. That last one sure is a labor of love. Thanks for mentioning the grey shading on the second card… I will try that to create more dimension.
Lori S in PA
Thank you Lori. I always enjoy your comments! I’m happy I gave you an idea to try!!! Suzy
So much beauty!!!!
Thanks Melissa!
Gorgeous, so many ways you have used this lovely stamp! The colors are amazing.
Thank you so much Sheri! Suzy
Oh so beautiful! I LOVE the patchwork flowers, what a cool idea! My mother in law is a quilter, this would be such a treat for her! xoxo
These are all Gorgeous!!! I love your paper pieced flowers!!!
Just gorgeous
so sweet
One-stamp-five-ways-moms-spring-flowers is a creative idea that shows how a single stamp design can be used to make multiple beautiful spring-themed crafts. In the same way, checking srd sassa status check balance helps ensure you get the most out of your resources with simple and effective steps.
The SASSA Status Check allows beneficiaries to quickly verify the progress of their social grant applications and payments, ensuring they stay informed about their SASSA subsidy.