One Stamp Five Ways: Luck and Hugs
Hi friends! Happy Sunday! As I type, I can hardly believe it’s May 31st! With that in mind, I do look forward to our end of month One Stamp Five Ways posts with Suzy Plantamura to see all of the fun and creative ways she brings a stamp set to life! This month it’s all about Luck and Hugs. Read on and enjoy!
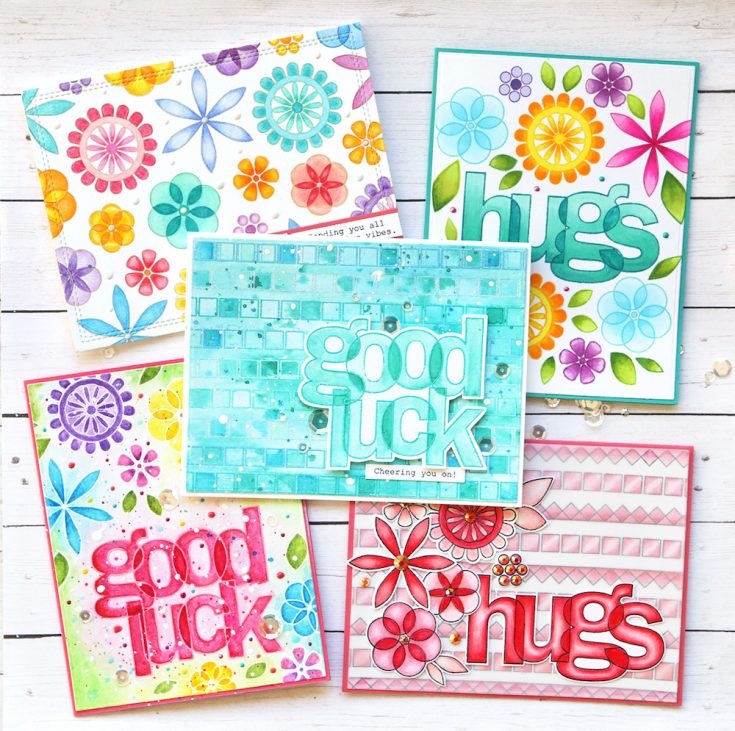
Hello friends! I can’t believe how fast time flies as I feel like I was just typing my last months “one stamp, five ways” post yesterday! It must be being home full time! Today I am using a stamp set from the Sunny Days Ahead release called Luck and Hugs. Here are my five cards:
CARD 1: You’ve Got This
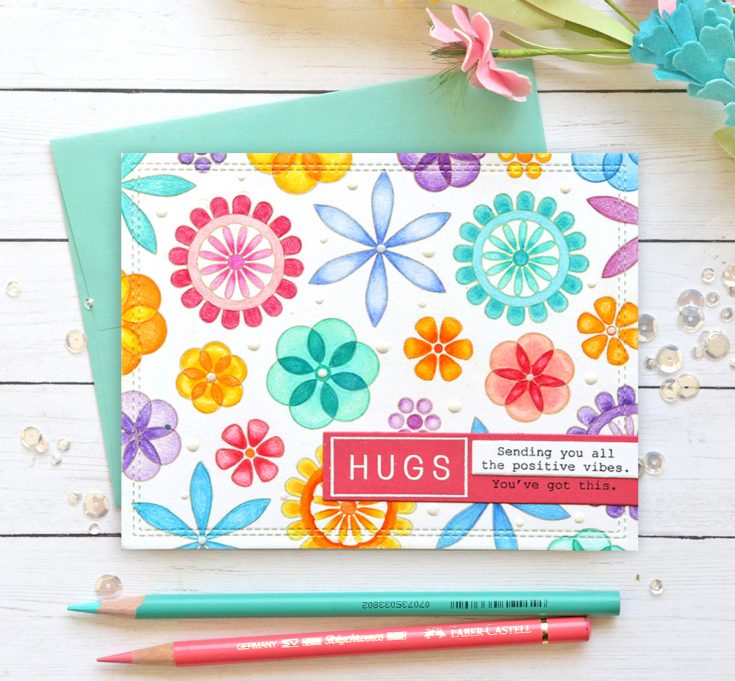
My first card is my “random stamping” background card that I always like to do. These flowers used together make a beautiful pattern and they are so fun to color. First, I stamped them all with MFT Natural Ink (any light color of ink will work) on white cardstock. I colored them all in with colored pencils, but Copics would have worked well also.
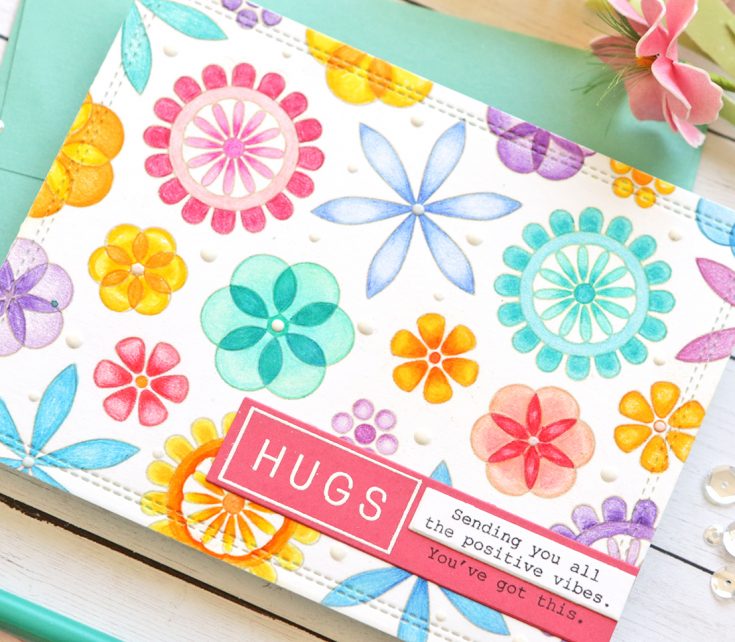
I used a Lawn Fawn die called Just Stitching to add some texture to the outside edges. I die-cut two banners with the SSS Sentiment Label dies (a must have for every card maker as I use them all the time). I stamped the Hugs stamp with white embossing powder and the other sentiments with black ink and layered them on the bottom of the card. I added some Nuvo Glossy White drops around the card at first to cover up a messy spot I had made, but then I kept adding them all over the card!
CARD 2: Good Luck – Cheering You On
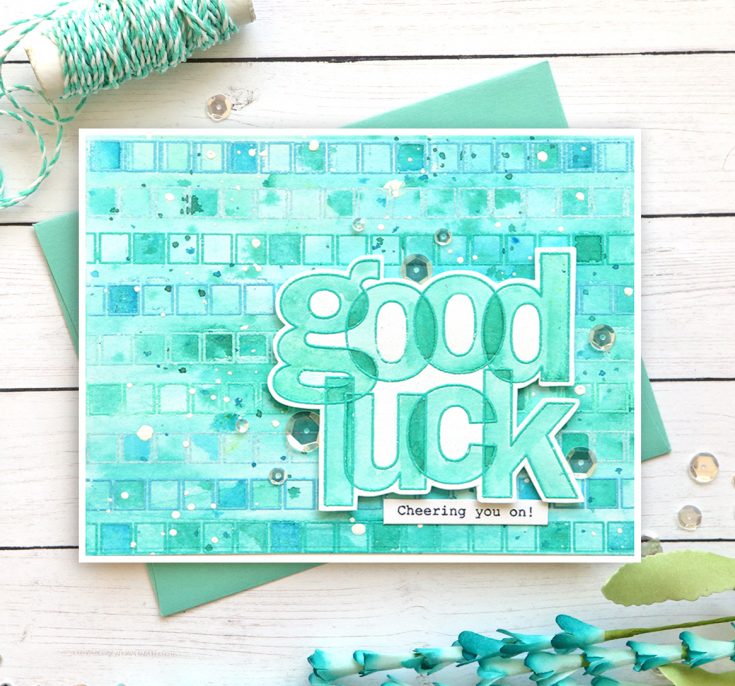
This card is in my favorite teal colors with both the background and the sentiment using stamps from the set. I started by embossing the two strips in the stamp set over and over creating a line pattern. I used different colors of blue and aqua embossing powders, but one color would be fine! I also embossed the sentiment with Ranger Garden Patina embossing powder and cut around it (there are matching dies if you prefer).
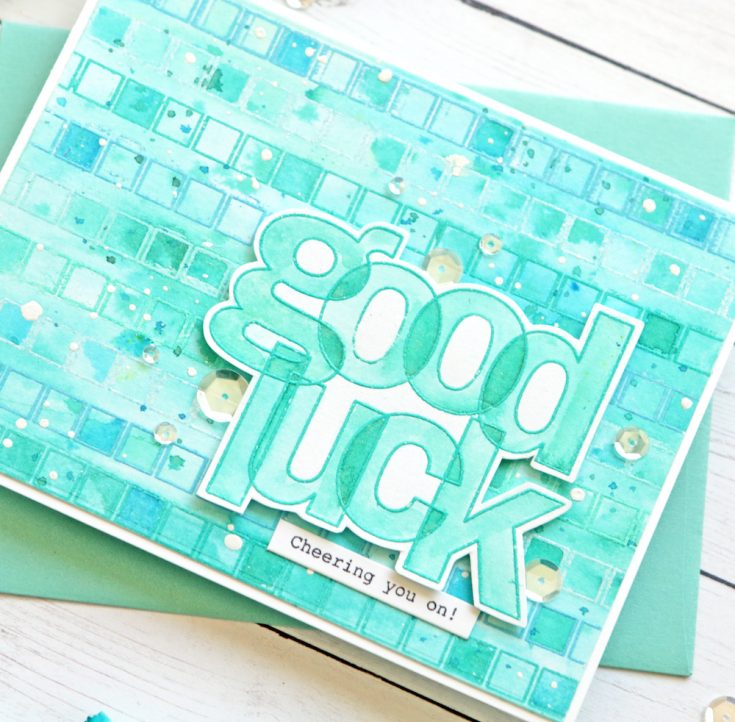
Next, I painted over the embossed designs with Nuvo Shimmer Powder in Atlantis Burst. I also splattered some teal paint and some white paint over the design once it was dry. I painted inside the “good luck” letters with teal watercolor. I attached the sentiment over the background with foam tape. I die-cut the smallest banner from the SSS Sentiment Banners from white cardstock and stamped a small sentiment on it. I tucked that along the bottom and added some Sparkling Clear Sequins.
CARD 3: Good Luck
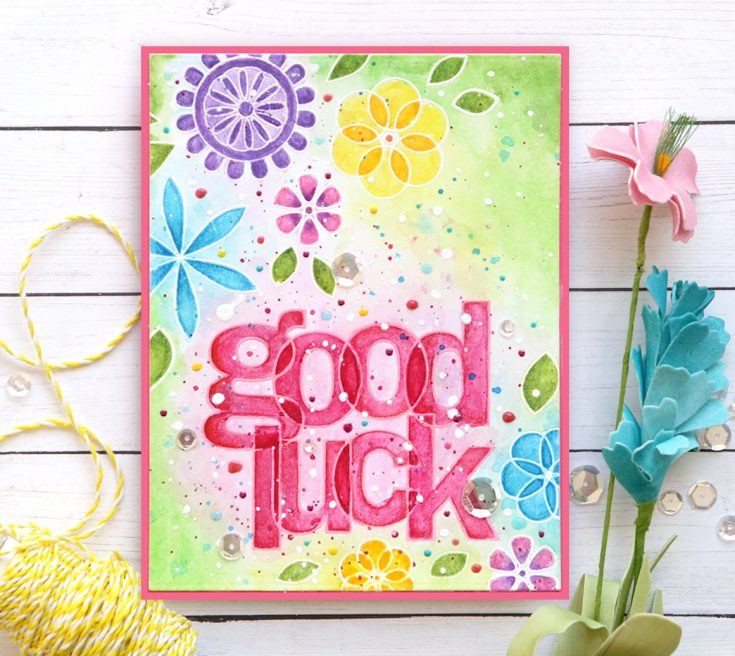
I have to be honest with you about this card. I didn’t like it, but I didn’t want to waste it, so I just kept trying to fix it. I kept it as part of this post to make a point (and show you I make ugly cards too haha). I started by embossing the flowers and the sentiment in one layer on Ranger Watercolor Paper with white embossing powder. I think I should have added more flowers and that would have helped the design flow better. I painted all of it in with watercolors.
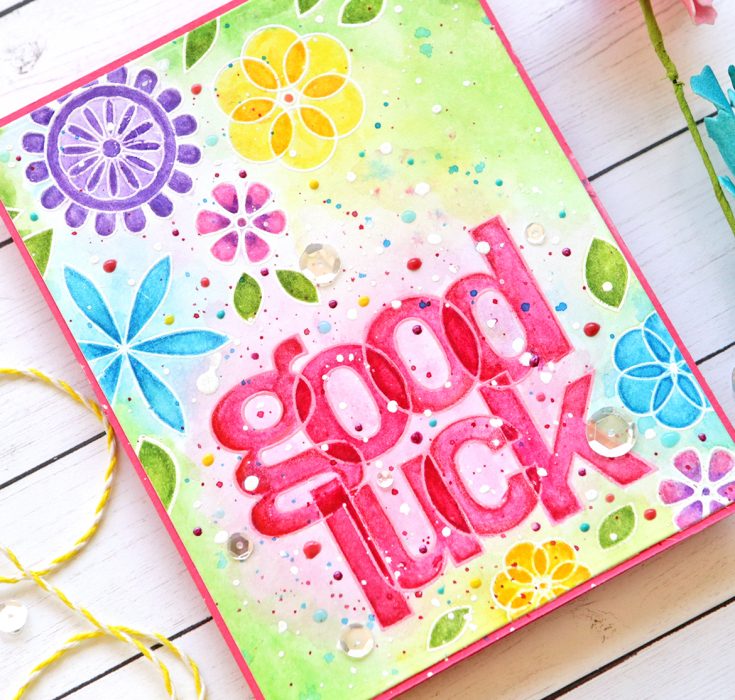
I didn’t like the design at all at this point, so I tried to fix it by adding TONS of splatters in different colors and white. I also darkened my watercolors with watercolor pencils around the edges of each item. I was trying to make the design fill the space better I guess. I still wasn’t crazy about it, so I added a bunch of Tonic Nuvo Drops around the sentiment as well. I think these additional steps helped it look a little better. I don’t like wasting cards (or the time I have spent on them), so I try to always find a way to fix them. I finished the card with some sparkling clear sequins.
CARD 4: Hugs
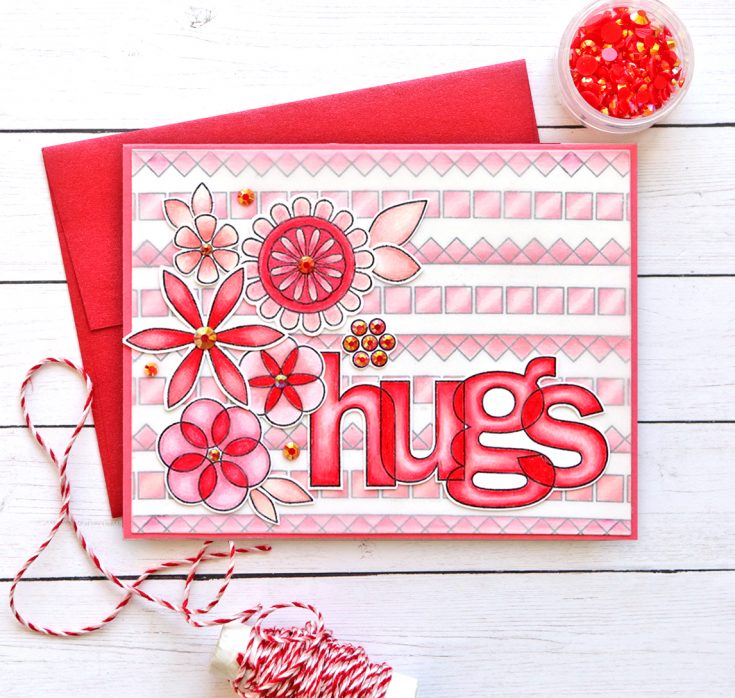
This card ended up being my favorite even though the design didn’t come to me easy. I started by stamping the two strip stamps over and over horizontally with black ink on white cardstock. I also stamped the flowers on white cardstock with black ink. I colored all of them in with coral and red colored pencils. I fussy cut the flowers out although there are matching dies for this stamp set.

I die-cut the background one size smaller than a card base and attached it to a red card. I also die-cut a piece of vellum and attached that over it. I attached the vellum under the word and flowers, but I also added some wet glue to the corners and when it dried it didn’t show at all (maybe because of the pattern beneath it. I felt like the vellum softened the design so it didn’t compete with the elements on top of the card. I arranged the flowers and word “hug” over the vellum. I used some Watermelon Jewels around the flower designs and over their centers.
CARD 5: Hugs
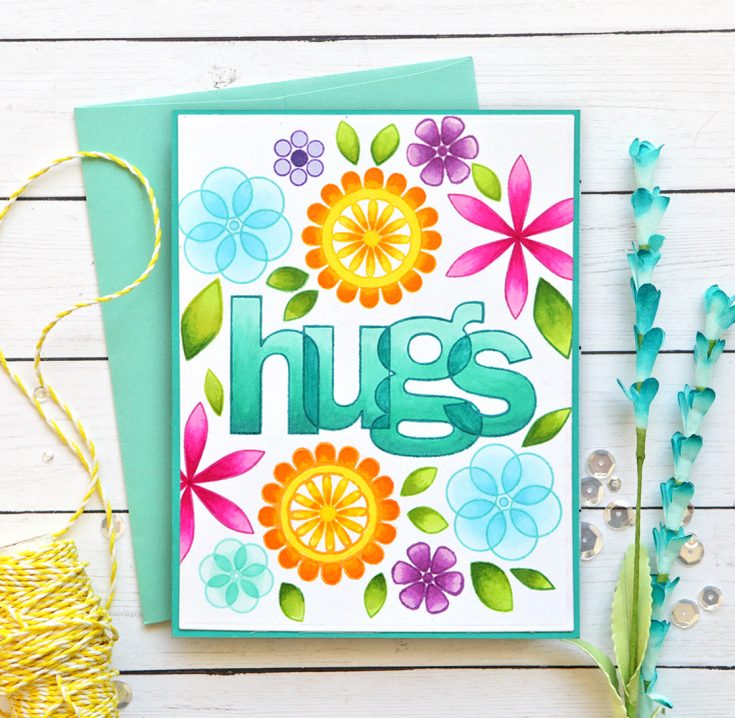
This is a completely one layer card – I even resisted adding any drops or sequins to it to keep it flat. I started by stamping all of the flowers and “hug” with SSS colored inks (colors are listed in the supplies). Sometimes, I used two colors of ink on one flower by stamping it first in the lighter color and then applying a darker ink just to the edges of a stamp and re-stamping over the first one.

I colored all of the flowers in with Copic Markers. I used very bright colors. I die-cut this piece one size smaller than a card base and then attached it to a dark teal cardstock base so it would pop more. I left it just as is (and like I said, this was hard for me!).
Thank you so much for visiting the SSS Blog today and reading my post. I hope you are inspired to think of more ways to use your stamps. By coming up with five unique designs with one stamp set, it gets me to think out of the box and try new things. It also gets me my money’s worth on my stamp sets! Try it yourself as a challenge with the next stamp set you get! I always use the hashtag #onestampfiveways on IG for these cards, so please use it also! Happy crafting! Suzy
SUPPLIES:
|


Thanks so much for stopping by, and thank you Suzy for the gorgeous inspiration!


Ok Simon Says Stamp! I’ve already ordered the June kit and now you come out with this! These make me want absolutely everything! Well done!
Love the new release! I want it all, putting it on my wish list! Love it. Love all the cards! Very pretty! Thanks for doing this for your customers! I love Simon Says Stamp products!
Okay! To be honest, card #3 is my favorite and I’m glad you included it. I think it appeals to me because it’s less structured and the colors in the background are softer. I always enjoy seeing your creations and your beautiful color choices and skill at coloring!
Love the fun designs and cheery colors!
Gorgeous cards Suzy, always a pleasure to see what you do with one stamp.
Thank you so much for sharing your inspiration, stay safe and have a wonderful week.
I love all of the cards, even the one you didn’t like Suzy! Great job.
All of these cards are beautiful! I also love the 1 stamp 5 ways. Too often I think we use a stamp set once or twice and move on. When there could be so much variety and ways to use the set. Thanks for your inspiration!
I love these cards! I love the bright, happy colors! I so appreciate that you shared your struggle to find a way to make the one you weren’t happy with work! I need to work more on that!
Fabulous cards…great way to use these stamps and dies. Thanks! Stay well.
I love these cards!!! Soooo colorful!!! Love the overlapping letters!!!
Seeing all of these colorful love and hugs cards TOTALLY put me in a great mood!
Super cute!Awesome colors!
I look forward to this feature at the end of each month. Suzy’s cards are gorgeous
Oh my! I LOOOOVE these … and especially #3, the one you didn’t like as much. I love the pink and green in that – and the way the flowers move the eye from top left, through the sentiment, down to the bottom right. I love how you have made each of these cards and they are incredibly beautiful. I love bright colors and flowers, and these are amazing! THANK YOU! I am truly inspired! I wanna play and craft!
Okay, stop being so hard on yourself. #3 is a gorgeous card. It’s unique, creative and just makes me smile. With that said, I love every card. This is a great set to have and you showcased it beautifully. Thank you.
Absolutely gorgeous cards!
Beautiful cards Suzy! I love your coloring and fun design! TFS
Awesome encouraging creations!
“One Stamp Five Ways: Luck and Hugs” shows how one simple stamp can create endless charm. From cards to tags, each design spreads a little extra luck and love.
For anyone looking to buy property, transfer ownership or register legal documents in Tamil Nadu, the TNREGINET portal is crucial. It helps reduce risk (by letting you view Encumbrance Certificates and guideline values ahead of time) and it modernises what used to be a heavy physical process.