One Stamp Five Ways: Healing Hugs
Hi friends! Please join me in welcoming back special monthly guest Suzy Plantamura where she showcases a stamp set showing 5 unique card designs made with the same set. We thought this set would be be perfect to showcase to give more uplifting card ideas! Read on to learn more and enjoy!
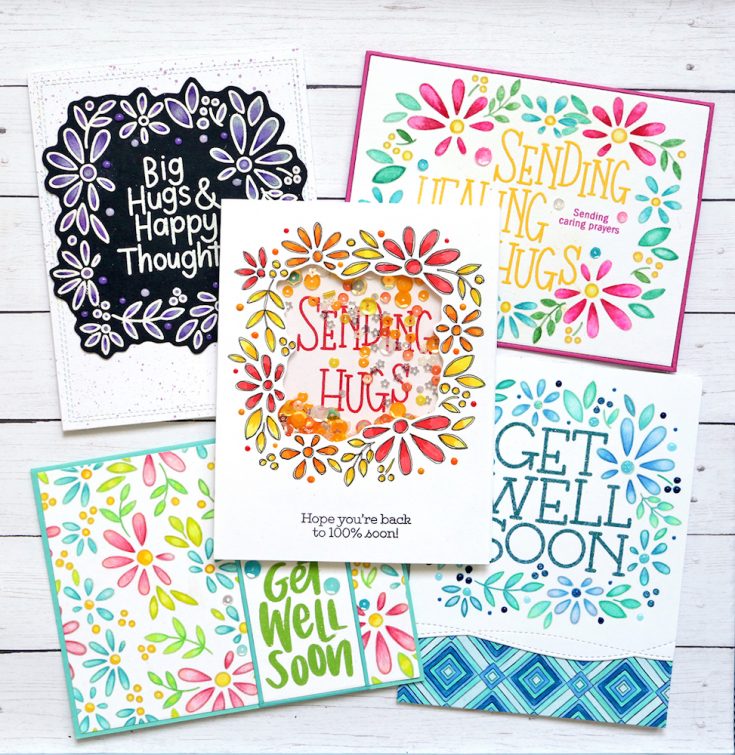
Hello friends. As I contemplated what stamp set to use for this post, I was home during our worldwide pandemic. I wanted to choose a stamp set that reflected the difficult times we are going through, but keep it upbeat as well. I picked the Healing Hugs stamp set for primarily this reason as it has lots of “get well soon” and “sending hugs” types of greetings which could be very useful for many of us today. I also picked this stamp set as it gave me a personal challenge as it has only one stamp design in it – a large square of flowers. I was excited to come up with five unique ways to use this floral stamp set that would demonstrate different techniques and I think I accomplished this task!

For my first card, I wanted to turn the square into a rectangle of flowers while stamping. I used a light color of ink on watercolor paper cut to card size. I stamped the design, using scrap paper to block one side of the flowers. I then stamped the other side of the flowers by blocking off my already stamped portion so the design didn’t overlap. I watercolored the flowers with Daniel Smith watercolors and I used a yellow colored pencil for the small dots. For small designs like these, watercolor pencils or markers would work also work well. After I finished painting it, I die-cut the outside edges with the largest rectangle from the SSS A2 Thin Frames die. I also die-cut a frame using SSS Doll Pink cardstock and attached both to a card base.
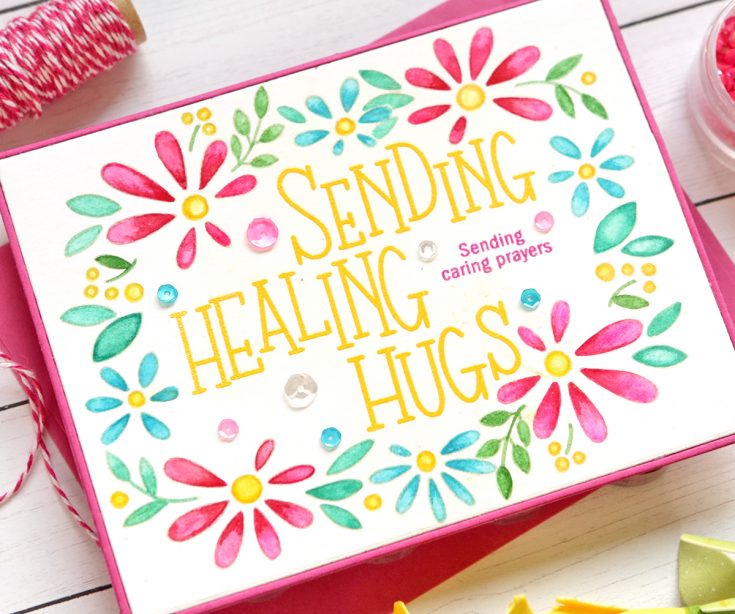
I cut apart the large sentiment “sending healing hugs” and I arranged the 3 words to fit inside my rectangle. I embossed them with Ranger Sunflower embossing powder. I stamped the smaller greeting using SSS Doll Pink ink. I wanted it to also look embossed so I used clear embossing powder over the ink. This is a great way to emboss when you don’t have just the right color of embossing powder! I added some sequins around the sentiments.
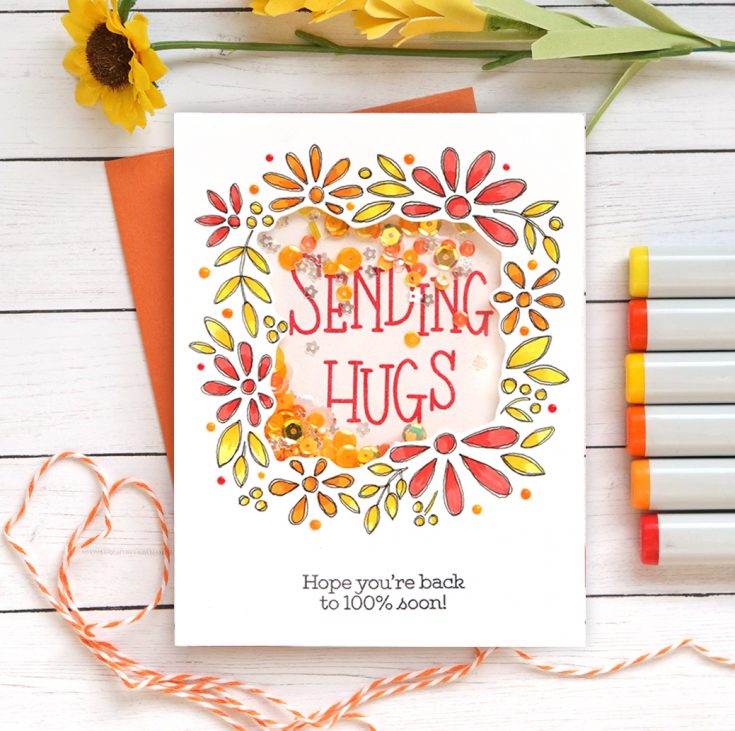
I thought the square design would be perfect for a shaker card. I stamped the floral design on white cardstock with a light color of ink. I then outlined the design with a fine point black marker twice and purposefully made the lines messy so they would look doodled. I used a Micron .25 marker as they don’t smear with either watercolors or Copic markers used over them. I colored the flowers with Copic markers. I stamped the small sentiment under the design with black ink.
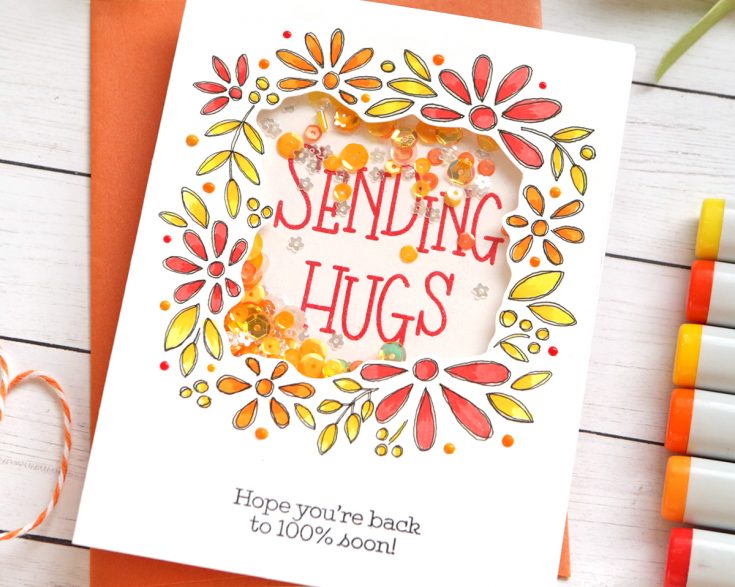
I cut inside the design to create an opening for a shaker window. I stamped the large “sending hugs” greeting on the card front using Ranger Carnation Red embossing powder. I used yellow, orange, and clear sequins inside the shaker window including the small sparkling clear flowers by PPP. I used foam tape around the shaker window and attached the card front over the greeting and sequins. I added some Tonic Nuvo Drops in glossy red, yellow and orange around the flowers.
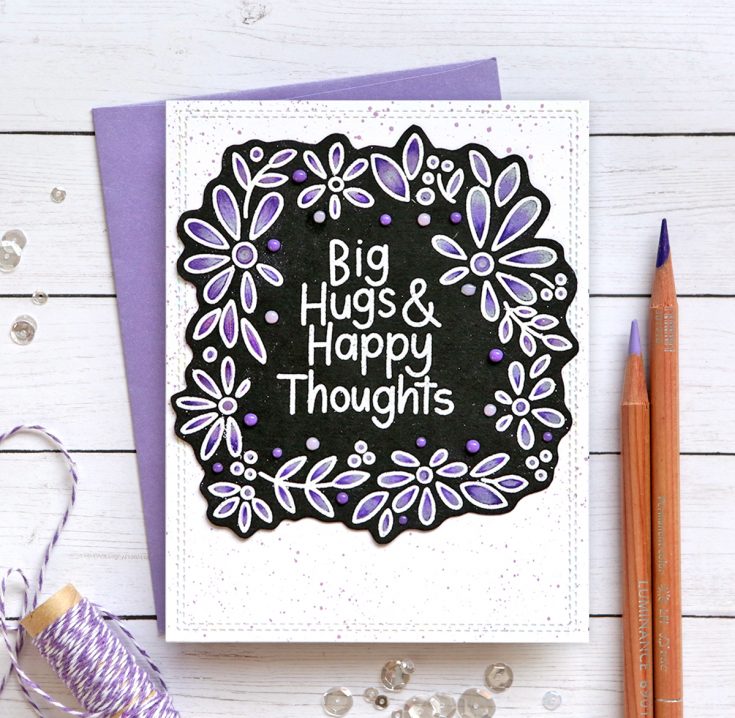
For this card, I stamped the floral design and the sentiment inside it on black cardstock using white embossing powder. I cut around the outside edges of the design, but there are matching dies that go with the set if you don’t like to fussy cut! I colored the flowers in with colored pencils. I used the Caran d’Ache Luminance Pencils and Prismacolor pencils as they are more waxy and opaque than other types of colored pencils. They colored over the black cardstock nicely.
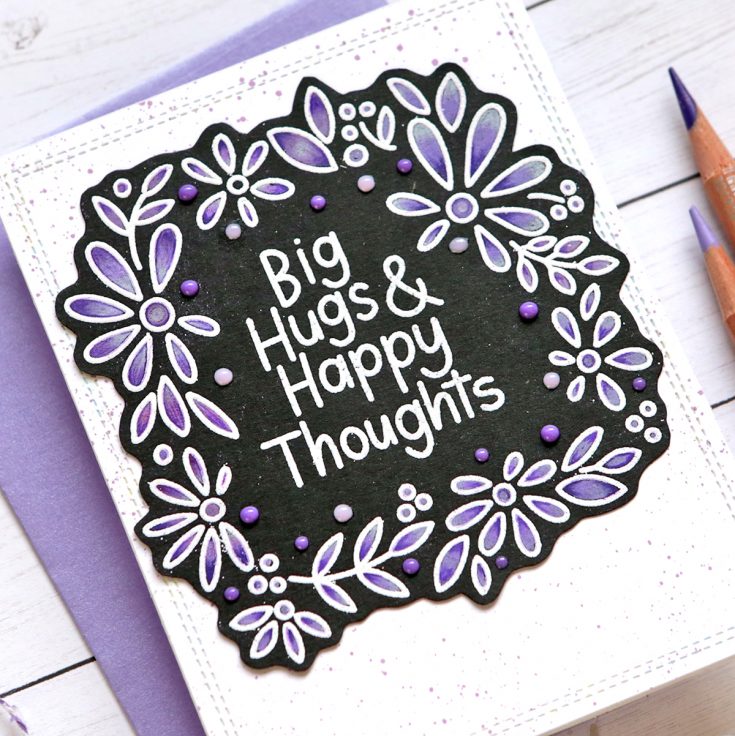
I cut a card size piece of the Lawn Fawn Spiffy Speckles paper that is white with small purple dots on it. I die-cut the Lawn Fawn Just Stitching Double rectangle dies to give it some texture around the edges. I attached my black cardstock piece over the paper. I added some Tonic Nuvo Drops in glossy purples around the design.
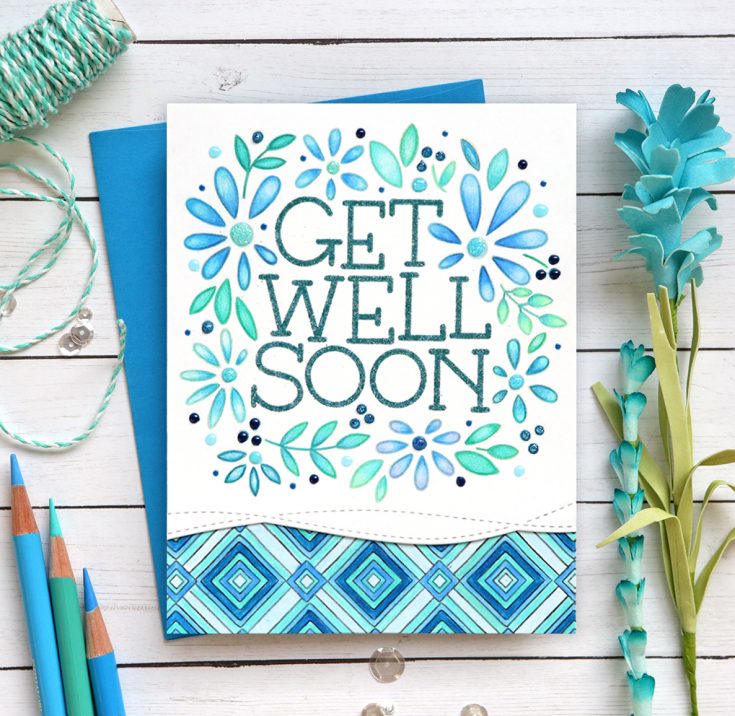
I stamped the floral design on white cardstock with a light colored ink and colored the flowers in with blue and aqua colored pencils. I then embossed the sentiment from the stamp set on the inside of the design using SSS Mermaid Blue embossing powder (this embossing powder was in one of my past SSS card kits and I use it over and over!). I used the SSS Drifting Stitches border dies to cut off the bottom portion of my card front.
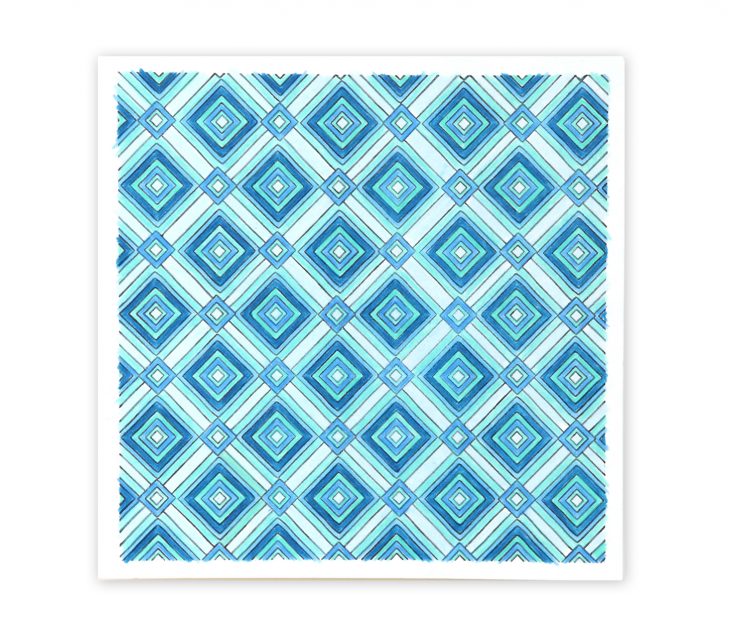
I stamped the SSS Deco Diamonds background stamp using a light color of ink and colored it in with colored pencils. I love coloring the designs of intricate background stamps when I have extra time on my hands (like right now while we are on house arrest in California!). I cut a small strip off of my colored design for the bottom of this card, while also leaving a full card size piece of it for a future card. After all that coloring, I wanted to use it for more than one card!
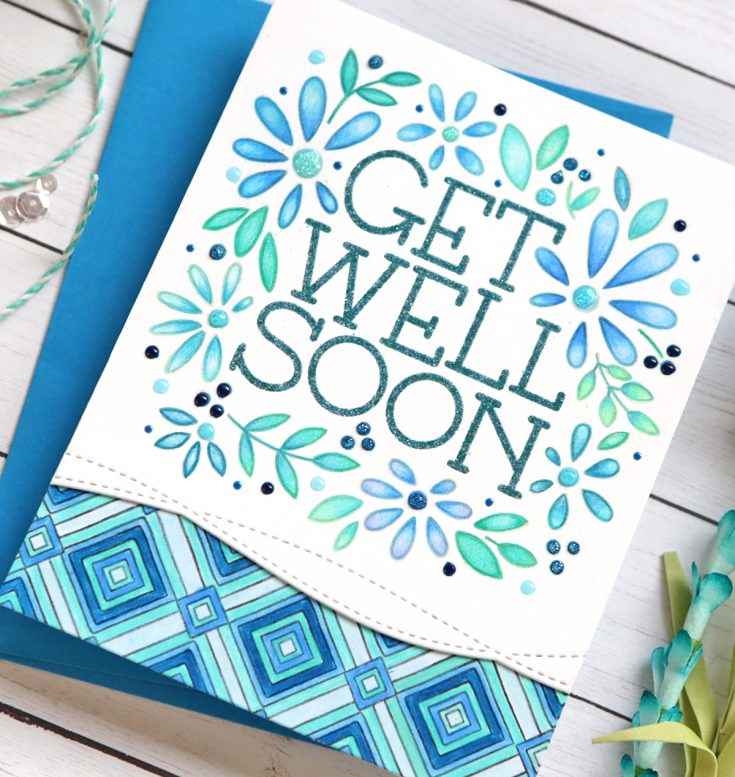
I attached this small strip to the bottom of a card front and used my stamped piece above it. I added some Tonic Nuvo Drops In glossy blues and aquas around my flowers and glitter drops on the inside of my flowers.
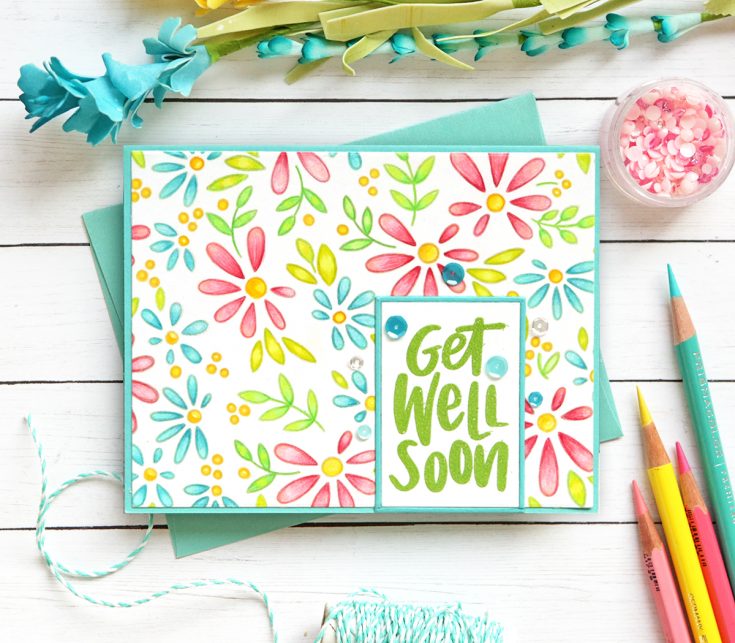
To create my last card, I got a little crazy and some of you might not want to try this technique – haha. I cut my square stamp into about 6 pieces. Now before you freak out on me, just know they fit back together like a puzzle and I was easily able to use them as intended once again! I used these pieces to create what I call a “random stamping” background. I stamped the flowers with a light color of ink on white cardstock fitting them together like puzzle pieces. I overlap the edges when creating this type of design. I colored all of the flowers in with colored pencils.
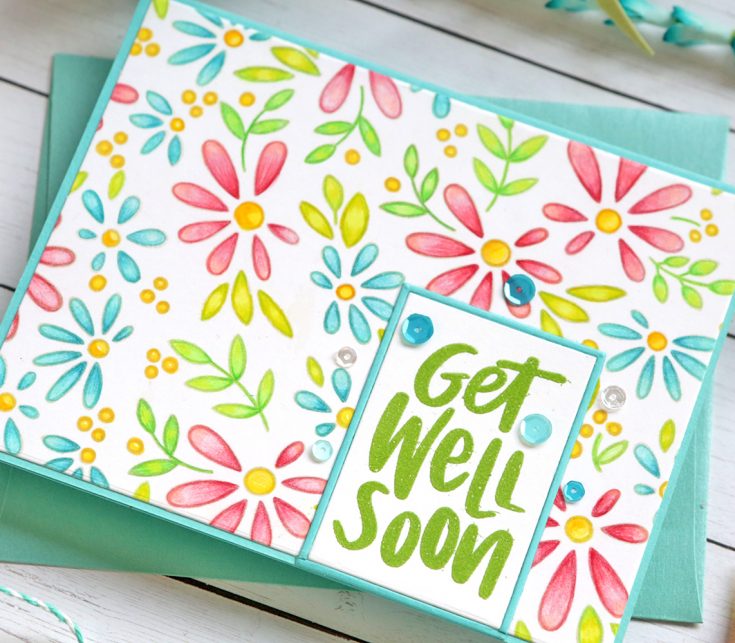
I die-cut a small rectangle from the SSS A2 Thin Frame Dies from white cardstock and SSS Audrey Blue cardstock. I die-cut the colored card front design with the largest of these same frames so it would be slightly smaller than a card base (I used this die all the time for card fronts even when I don’t use the frame!). I attached the card front to a card base using the same Audrey Blue cardstock. I stamped the sentiment using Ranger Leaf Green embossing powder on the white rectangle. I cut off the bottom of the rectangle and attached it to the front of the card. I then cut attached the aqua frame around it and snipped off the bottom edges. I cut the leftover piece to fit on the bottom of the frame (I basically resized this rectangle frame to be shorter). I added some sparkling clear and blue sequins around the sentiment.
Whew, that was a lot of words! But like I said, I have a lot of time on my hands right now. Stay well friends and enjoy your time by doing more crafting if possible! Thanks so much for visiting today! Suzy
SUPPLIES:
|


Thanks so much for stopping by, and thanks to Suzy for being our guest!


WOW… that was so cheerful! I love the designs and colors. Beautiful! Thanks for the inspiration and please stay healthy!
These are beautiful, Suzy! I love seeing so many ways to use the same stamp!
Awesome creations! I love the variety of looks!
I always love seeing lots of cards created from one stamp set. These are awesome!
What a wonderful set of cards. I love them all. So cheerful. Thank you.
What delightful cards. This set is perfect for now and anytime a card is needed to cheer up someone. tfs-stay well.
Wow!! These are sooooo Pretty!!!
wow Suzy, what a stunning set of cards. Each one is beautiful but I have a favorite and that is the one with the awsome Diamond Background Stamp!
Thank you so much for sharing your stunning inspiration, stay safe and have a wonderful day.
Cheery variety!
Really beautiful cards
I have always admired this stamp set and the matching dies. But now I love it since you cut it up and used it. I’d love to see where you cut the pieces. Fantastic cards. I especially love the last one.
Awesome cards made from the same stamp-you’ve inspired me!
Suzy, your creativity knows no bounds!!! These cards are so beautiful and I love every single one. I never use coloured embossing powder for my sentiments and you have truly inspired me to try this. I don’t know if I am brave enough to try cutting my stamps apart, but you showed us the possibilities of doing so. Thank you so much for sharing these cards and for sharing your talent. Wow!! ❤️
That is amazing Suzy, showcases the versatile Healing Hugs stamp set, offering 5 unique card designs. The set, chosen for its timely “get well soon” messages, presents a personal challenge with its single floral stamp. Your creativity shines through various techniques, from watercoloring to shaker elements, demonstrating the set’s adaptability.
t rex game is a fast-paced, captivating game that tests your reflexes and attention to detail despite its seeming simplicity. If you are bored or uninterested, playing it might be a fun distraction.
Wow, Suzy! Each card design is a burst of creativity — I especially loved the shaker card idea! It’s amazing how you used a single floral stamp in five unique ways. Super inspiring for us crafters stuck at home. For those who love creative tools and crafting aids, feel free to check out https://calcoladoraalice.com/ — it might be helpful too! Thanks again for sharing such uplifting inspiration!