One Stamp Five Ways: Halloween Gnomies

Happy Halloween, friends! Welcome to this super sweet edition of One stamp, Five ways with Suzy Plantamura! Read on to learn more and enjoy!
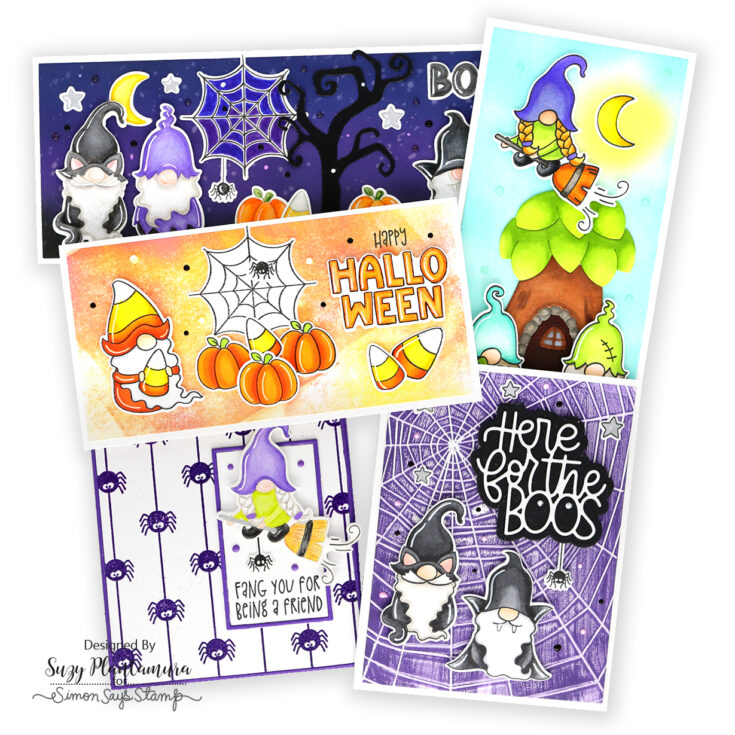
Today is Halloween, so I thought it was appropriate to share a post with Halloween cards. The problem is, I’m not a big Halloween fan! In fact, I rarely make HW cards! But when I saw the Halloween Gnomies stamp set, I knew I would have to make an exception. I absolutely love all things Gnomies and this set is no exception! I made five cards focusing on the stamp set, attempting to use different techniques on each of the cards. I also incorporated a lot of the other SSS Halloween products in these cards (well, the cute ones that weren’t scary anyway!).
The first thing I do when I start a 5 card post is to stamp ALL of the images in the stamp set with both Intense Black Ink and MFT Natural Ink on Neenah 110 lb. cardstock. I then color in the black outlines with Copics and the light outlines with pencils. I die-cut them all out and then I decide how to use them on cards. Another thing to point out up front is I went a little crazy using the new Tim Holtz Distress color called Villainous Potion on most of these cards – I wanted to try it out and it DOES have a HW name! Here are my five cards:
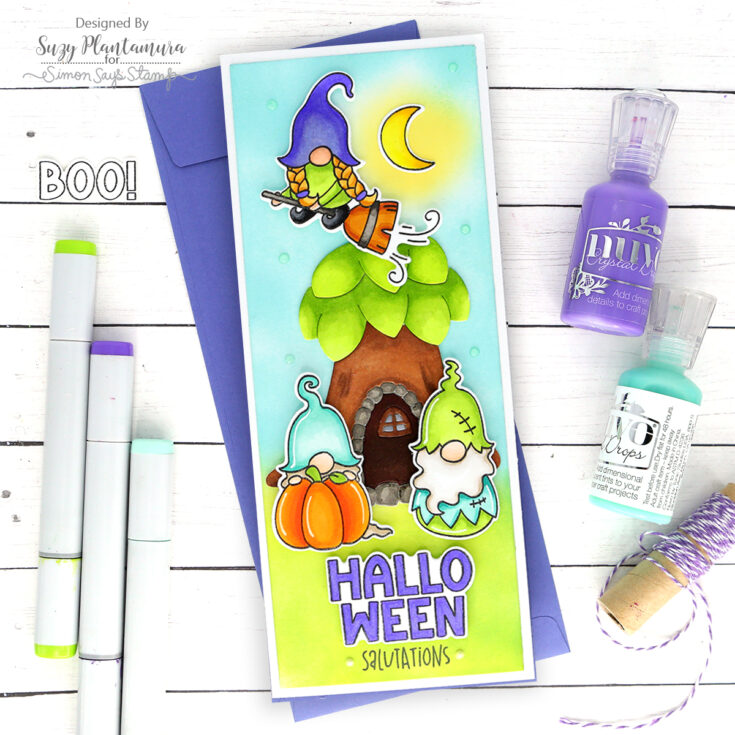
Another product that was also in the STAMPtember release with the Gnome Treehouse Wafer Die, so of course I had to incorporate this into one of my gnome cards! I die-cut it out twice and colored one set with Copic Markers. I glued that set to the top of a plain white one so it was thicker. I made the background of the card next by die-cutting a piece of white cardstock with the largest rectangle die in the SSS Slimline Nested Rectangle Die set. I used SSS Brushes to apply Squeezed Lemonade in a circle on the top first. Then I applied Salvaged Patina to the top of the card bringing it close to the yellow circle. I applied Twisted Citron and Mowed Lawn to the bottom of the card.
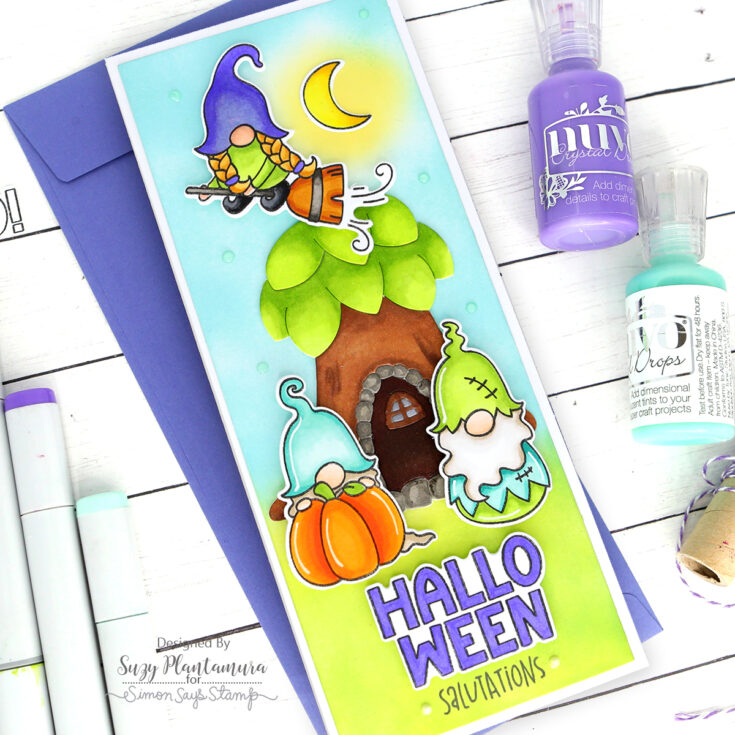
Next, I attached the Ghome Treehouse to the center of the card. I used some of my images that I had stamped in black ink and colored in with Copics. I arranged several of the gnomes around the treehouse and added the moon in the center of the yellow circle. I applied Tonic Crystal Glaze to the top of it. I also colored in the Halloween letter sentiment and attached that as well. I used foam tape beneath most of the images for dimension. I stamped “salutations” on the bottom of the card with black ink. I added some Aqua Plains jewel drops around the sky.
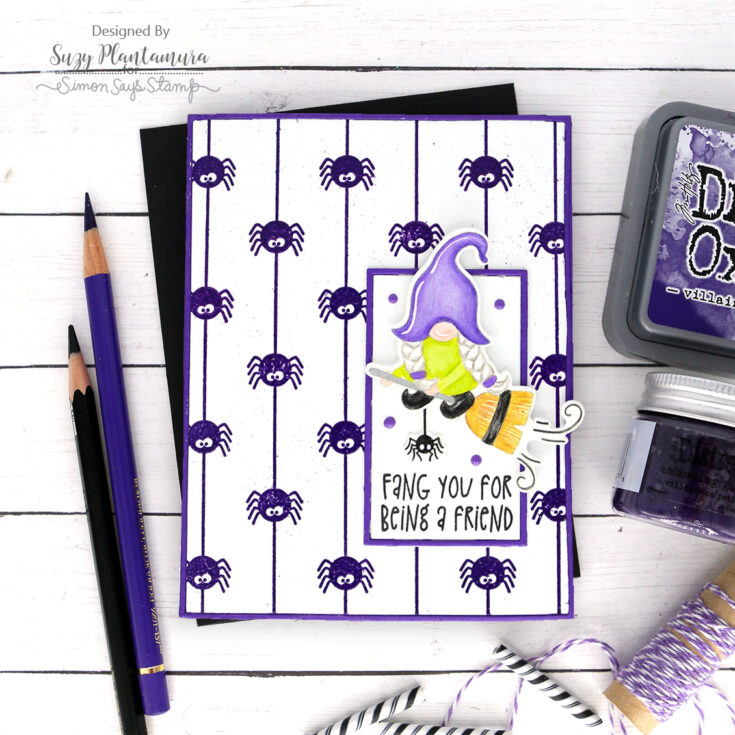
I embossed the Creepy Crawler Cling Stamp using the new Tim Holtz Villainous Potion Distress Embossing Glaze on white cardstock. I die-cut this piece with the largest die from the SSS A2 Thin Frame Rectangle dies. I die-cut a frame using a dark purple cardstock to match the embossing glaze. I also die-cut one of the smaller rectangles with white cardstock and another purple frame and I attached those to the bottom of the card.
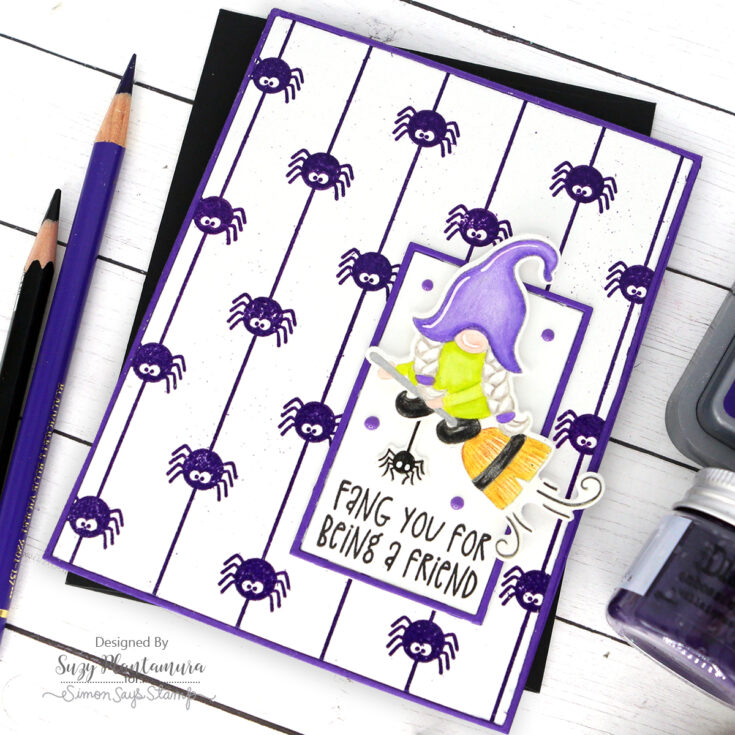
I used one of my images that I had stamped with MFT Natural Ink and colored with colored pencils for this card. I attached it to the top of the small rectangle. I then stamped a sentiment from the stamp set on the bottom of the rectangle using black ink. I attached one of the spiders hanging down from the gnome on the broom. I filled in some of the extra space with Sweet Lilac Nuvo Drops.
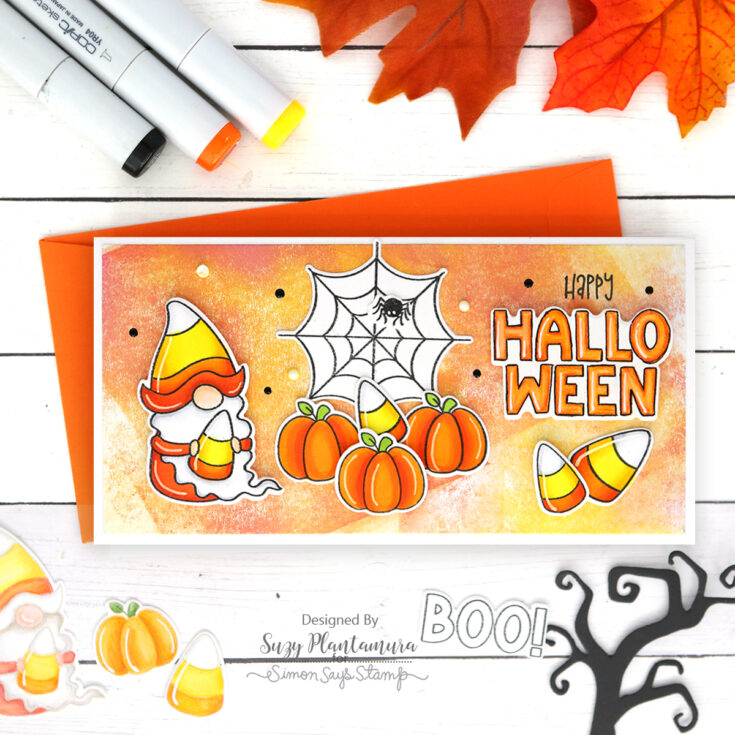
I like to make card backgrounds ahead of time using a Gel Press. I made this background using some Fall colors of Distress Oxide Inks. I applied the inks randomly on the Gel Press by pressing them directly onto it. I then used a brayer to move the colors around and slightly mix them. I applied a piece of 80 lb. Neenah White Cardstock to get a print. I usually get two prints from each ink application and I believe this was my first print since it is fairly dark. I die-cut it down using the SSS Mini-Slimline Rectangle Die and attached it to a white card base.
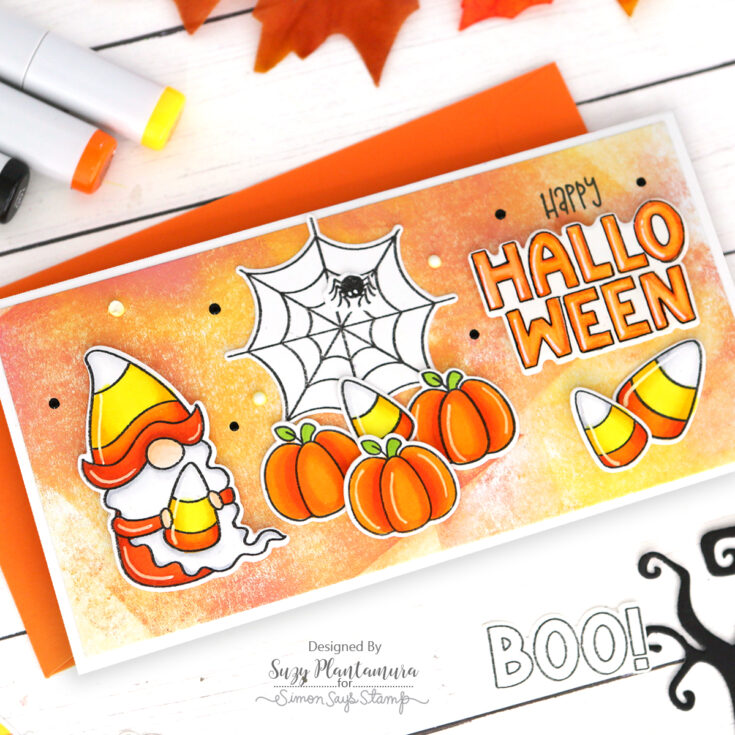
I used some of my images that were stamped with black ink and colored with Copics on this card. I LOVE candy corn. I mean I really love candy corn. I’ve already purchased several bags this season and I didn’t have ANY left to use in this photo! In fact, I just asked my husband if he could go buy me some more haha. Making this card made me desperate. I attached all of the images to the card front using foam tape behind some where they are layered. I outlined the Halloween sentiment with a fine tip black pen since it was one of my no-line coloring images and I wanted it to match. I attached that to the right side of the card and stamped the “happy” stamp above it with black ink. I added some Chalk Stick and Glossy Black Nuvo Drops around the card front.
I used my new TH Villainous Poison ink on this card. I pressed the ink pad all over the flat side of the Tangled Web Embossing Folder. I embossed a piece of white cardstock and the web stayed white and the rest of the image was purple. Some of the web areas didn’t stay white, so I used a White Uniball Gel Pen to “whiten” them. I die-cut this piece down to fit on a white card base.

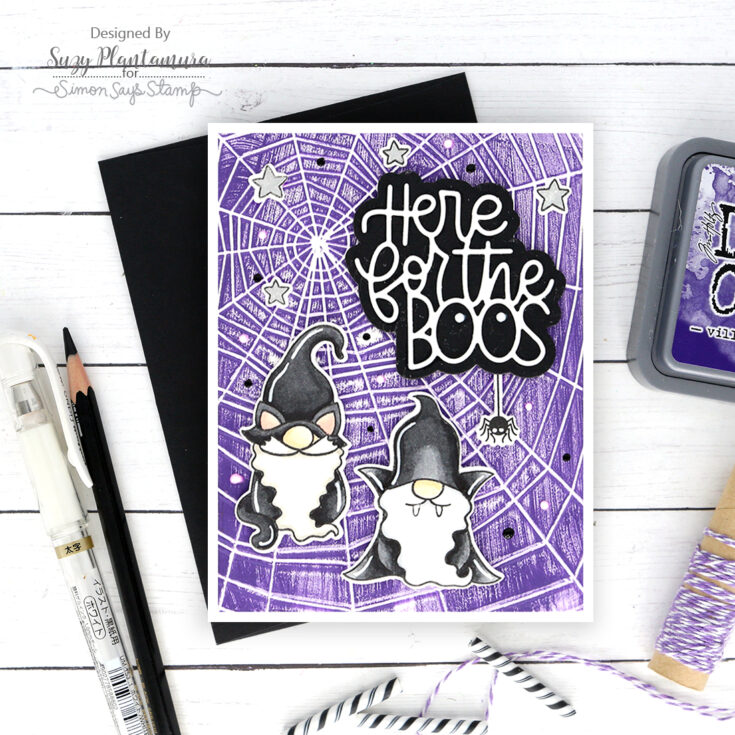
I used the new “Here For The Boos” die for the sentiment using black and white cardstock. I attached some of my black ink/Copic colored images to the top of the card. I used a Silver Uniball Gel Pen on the stars. I added some black and white Nuvo drops around the card front. I realized that the white Nuvo drops take on the color of the Distress Oxide Inks under them which can be good or bad. It could save you money by not needing to buy a lot of colors this way! But I wanted them white, so I added another drop over the first ones that had dried purple. Issue solved.
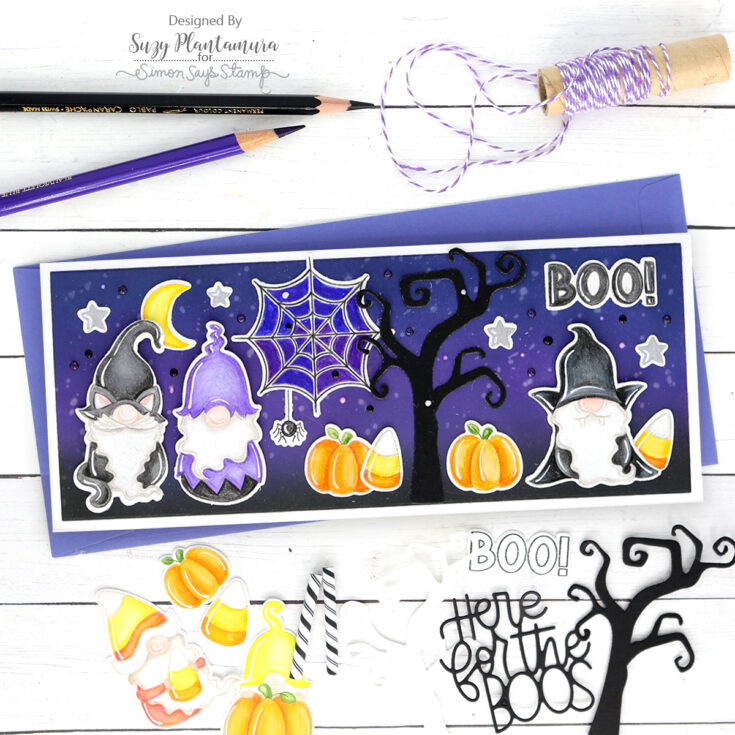
I die-cut a piece of white cardstock with the largest die in the SSS Slim-line Nested Rectangle Dies. I then used my SSS ink brushes to apply Chipped Sapphire ink to the top, Villainous Potion ink to the middle and Black Soot ink to the bottom. I splattered some water on it with a paintbrush just for some texture. I die-cut a tree using the SSS Ghouls and Tree die out of black cardstock and attached that to the center of the card.
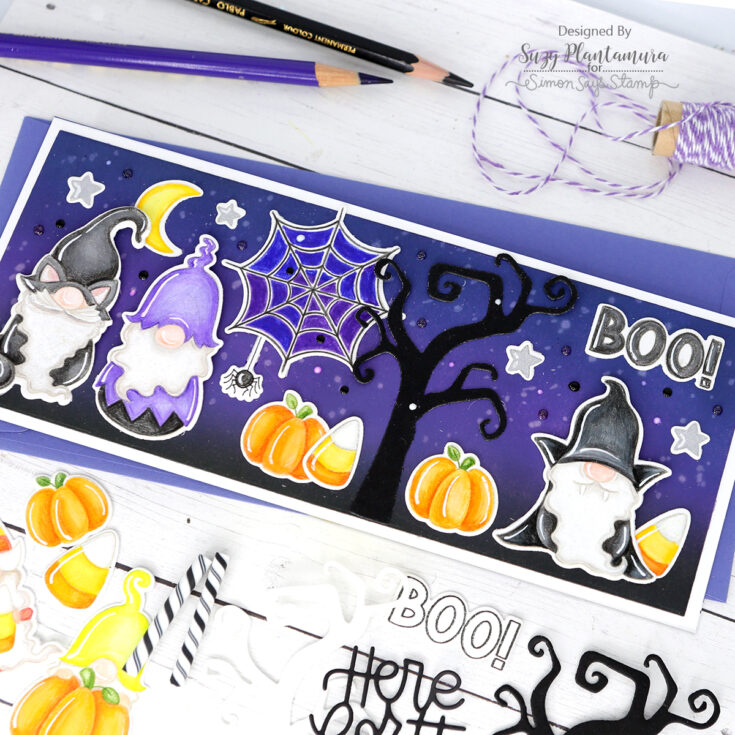
I used some of my images that were colored with colored pencils on this card. I attached them to create a scene around the tree and used foam tape behind some. I didn’t like the spider web having white around it, so I colored between each web area with colored pencils. You can tell I didn’t use the right colors though – I should have used Indigo on the top instead of purple. My perfectionist skills are a little over the top haha. I used a silver Uniball gel pen on the stars. I added some black, white (they turned purple though), and Night Sky glitter drops around the sky.
I think this Halloween Gnomies stamp set has changed my way of feeling about making Halloween cards and dare I say my feelings about HW in general! I actually looked for some cute decorations today since I got myself all in the mood making these cards. Maybe I’ll just post the cards all over my walls instead of mailing them! I really love all of these cute products and I could have made many more cards with this darling stamp set! Thanks for visiting today and I hope this post inspires you to think of at least 5 ways to use each stamps set so you get more mileage out of them! Suzy
SUPPLIES:
|


Thanks so much for stopping by, and thanks to Suzy for being our guest!


Super Cute cards!!!! I love your Gnomies!!!!
Adorable! Love the 5 cards. Happy Halloween!
These are amazing!!
Vos cartes sont adorables.
Amitiés
Rachel
These are SO cute and fun!!!!
so super cute