One Stamp, Five Ways: Floral Garden

Hi friends! Happy Wednesday! Welcome to the latest edition of our One Stamp Five Ways with Suzy Plantamura. Read on to learn about making these 5 gorgeous cards. Enjoy!
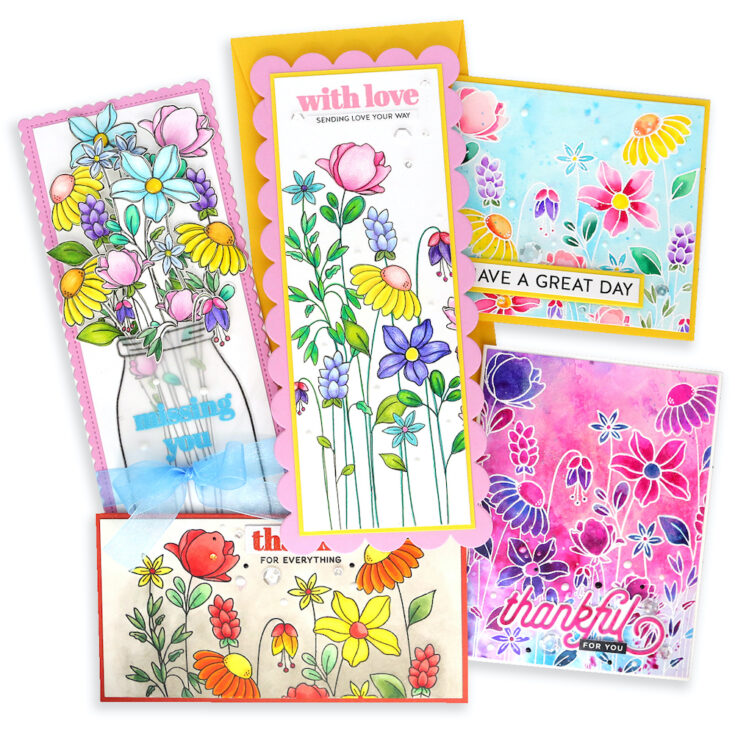
Hello friends! I hope you are enjoying the new All The Feels release with all of it’s gorgeous Spring products! I picked my favorite stamp set in the release for my “one stamp, five ways” post called Floral Garden. Flowers are always my favorite and I love how these have a doodled look to them. Here are my five cards together:
I’ll now be showing each card individually with directions for each. I’ve tried to use this stamp in 5 different ways to inspire you to stretch your stamp sets. This stamp is larger than a standard card size, so I could only use part of it on all of my cards. I colored the stamp with colored pencils and then added doodled black lines around it. My plan was to cut this image apart, but I took a photo of it to show you how it looked colored in full.
I’ll now share my five cards with you.
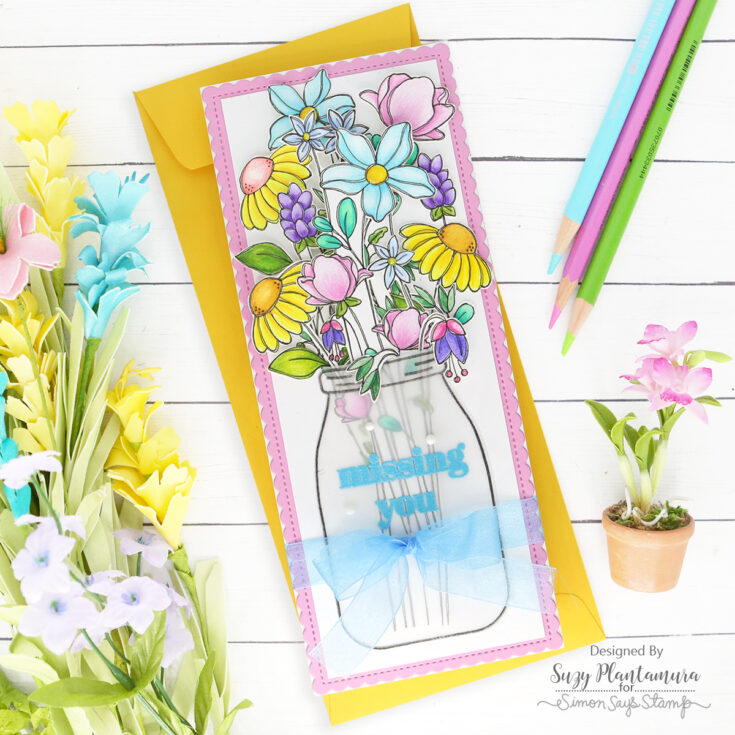
I made 2 slimline cards with this set since the flowers are tall and lend themselves to the vertical slimline design. This card uses the colored flowers I showed you above. I first stamped them with a light color of ink and then I colored them all in with colored pencils. I added black pen outlines around them in a messy two lines fashion for a doodled look. You could just stamp the images with black ink to save that step! I cut around all the flowers as best as I could to use as an arrangement in the mason jar. I extended the stems on some of the flower groupings with a black fine tip pen so they would fill the jar better.
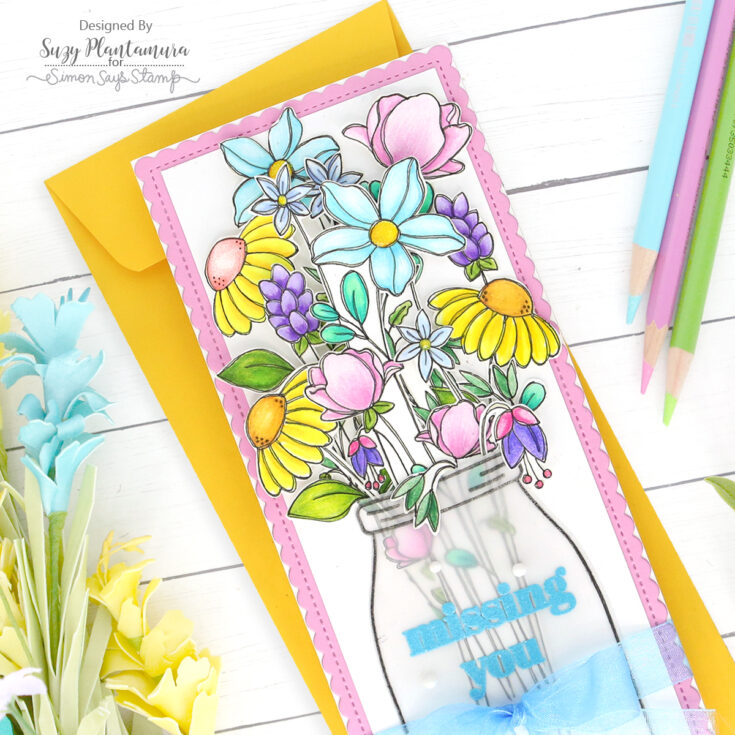
I stamped the mason jar from the CZ Light Me Up stamp set with Intense Black Ink on vellum. I die-cut it out with the matching die. I embossed a sentiment from the stamp set with Ranger Forget-Me-Not embossing powder on the mason jar. I had to cut the “missing you” stamp into two pieces. I die-cut a frame using the Lawn Fawn Portrait Scalloped Slimline Frame die out of pink cardstock. I attached that to a white card base (3.5” x 8.5”). I cut a piece of white cardstock to fit inside the frame die for my background. I glued the mason jar onto the bottom of the white cardstock by applying glue just around the edges and letting it bubble up a bit in the center so I could fit “stems” inside it. I arranged all of the flowers I had cut out inside the jar. I tied a sheer blue ribbon around the card just under the sentiment. I added some Nuvo Chalk Stick drops around the sentiment on the vellum. I also used Nuvo Glitter Drops in Sherbet Shimmer and Yellow Bird inside the flower centers.
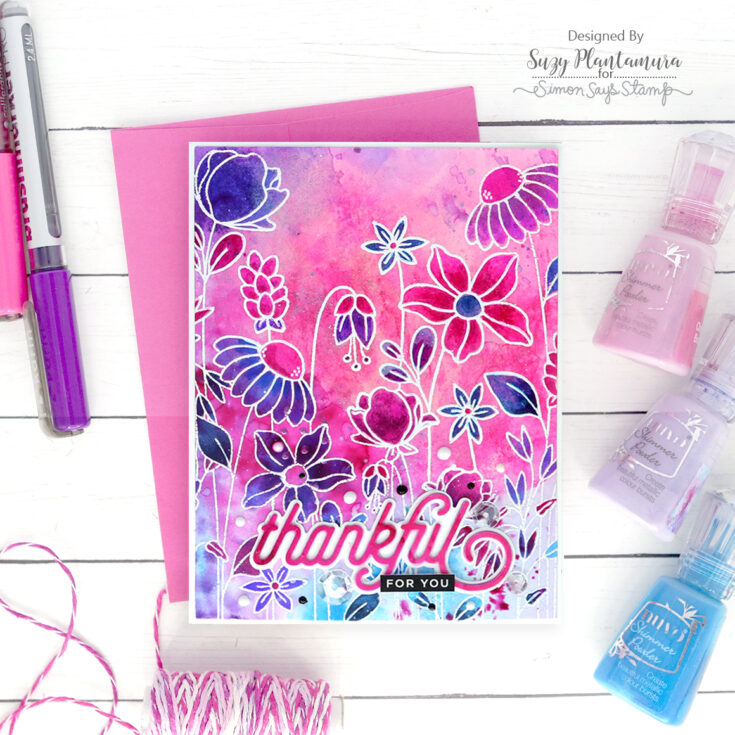
If I haven’t mentioned it yet, I love Nuvo Shimmer Powders. I use them all the time! One of my favorite things to do with them is paint with my grandkids. I have them paint their papers with water and then pour the Shimmer Powders on it to see the “fireworks” of color they create. While they paint with them, I always paint backgrounds to use on future cards. This was one of them made with Cherry Bomb, Blue Blitz, and Violet Brocade. I also pull out my Nuvo drops for the grandkids – on my goodness they LOVE them! I had added some little dots with some of them to this background as well. I embossed the large Flower Garden stamp on this piece with white embossing powder.
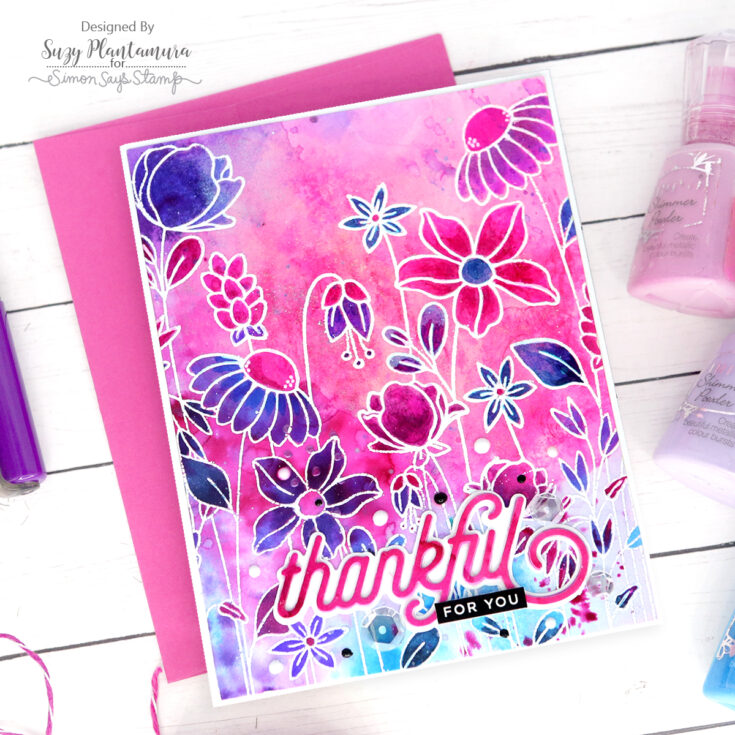
I colored all of the flowers in with Copic Markers in purples and pinks. I realized I could have used Karin Brushmarkers since it was stamped on watercolor paper, but Copics worked well over the intense background. Any time I colored over the white embossing powder, I used a White Uniball gel pen to cover mistakes. I used the CZ Thankful Die for the sentiment. I used a piece of watercolor paper painted with Cherry Bomb Shimmer Powder for the “thankful” word so it would match the background. I added a little “for you” from the preprinted Reverse Love Sentiment Strip sets below thankful. I used Chalk Stick and Black Board Nuvo Drops around the sentiment. I love these new Vintage ones as they have a matte finish instead of glossy. I also added some Sparkling Clear Sequins.
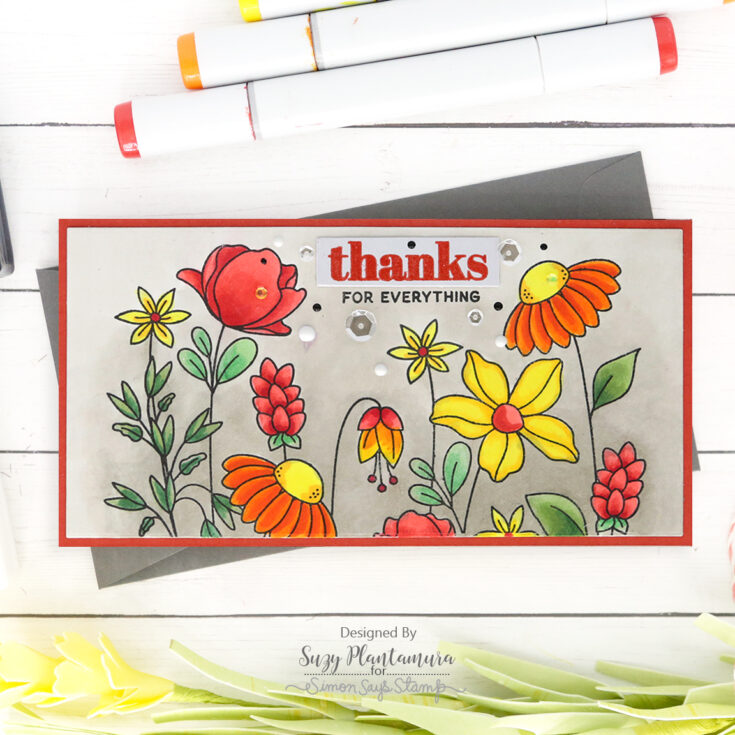
This card is a mini slimline card made to fit inside the new mini slimline envelopes by Simon. I love this size so much! The envelopes are 3.5” x 6.5”, so I make my card bases 3.25” x 6.25”. I used the brand new Mini Slimline Rectangle Dies for my gray piece. I stamped the Flower Garden stamp set with Intense Black Ink and then colored around it with W00, W1, and W3 Copic Markers getting lighter as I moved up. I colored in the flowers with Copics as well in yellows, oranges, and reds. I mounted this on a dark orange card base.
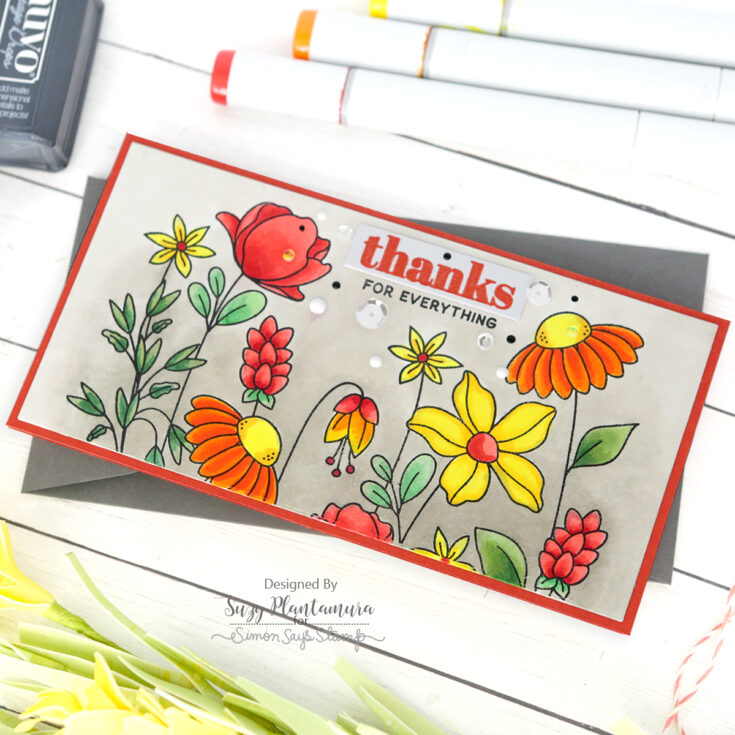
I embossed the “thanks” greeting from the Flower Garden stamp set with Ranger Crackling Campfire Embossing Glaze. I originally embossed it on the card front since this is a one layer card, but I didn’t like the color I used, so I redid it this way. I used the SSS Sentiment Label dies to cut around it. I attached it over my mistake and added another greeting from the new Slimline Florals stamp set. I used the Nuvo Chalk Stick and Black Board drops around the sentiment. I also added some sparkling clear sequins.
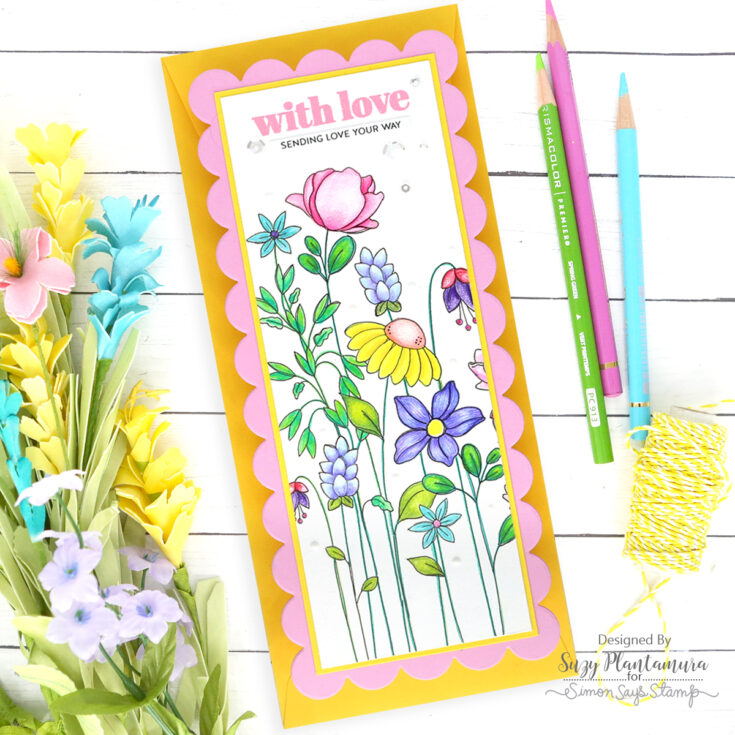
I used the Slimline Scalloped Rectangle Dies for the card base with pink cardstock. I like making my actual card smaller than this base so the scallops are the edges of the card. I cut a piece of white cardstock to use for the card base and framed that with a piece of yellow cardstock. I stamped a portion of the Flower Garden stamp set running vertically on the white cardstock with MFT Natural Ink. I colored the flowers in with colored pencils. I ended up adding black doodled lines around the flowers again. I attached this piece to the front of the card.
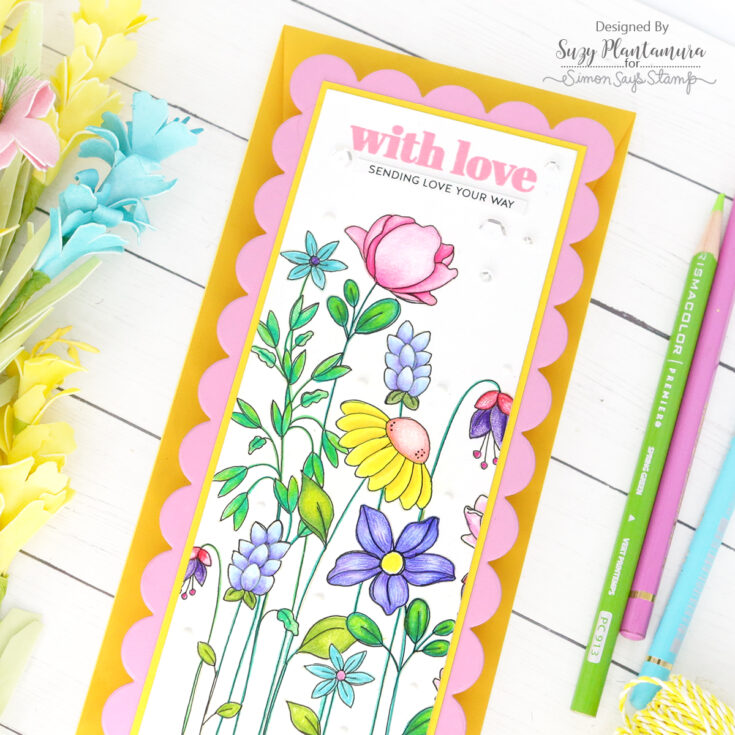
I embossed a sentiment from the Flower Garden stamp set “with love” using Ranger Pink Peony embossing powder. I then cut a small sentiment strip saying “sending love your way” from the new white Mom Sentiment Strip set. I attached that below the stamped sentiment. I added some sparkling clear sequins around the sentiments and some Chalk Stick Nuvo Drops around the flowers.
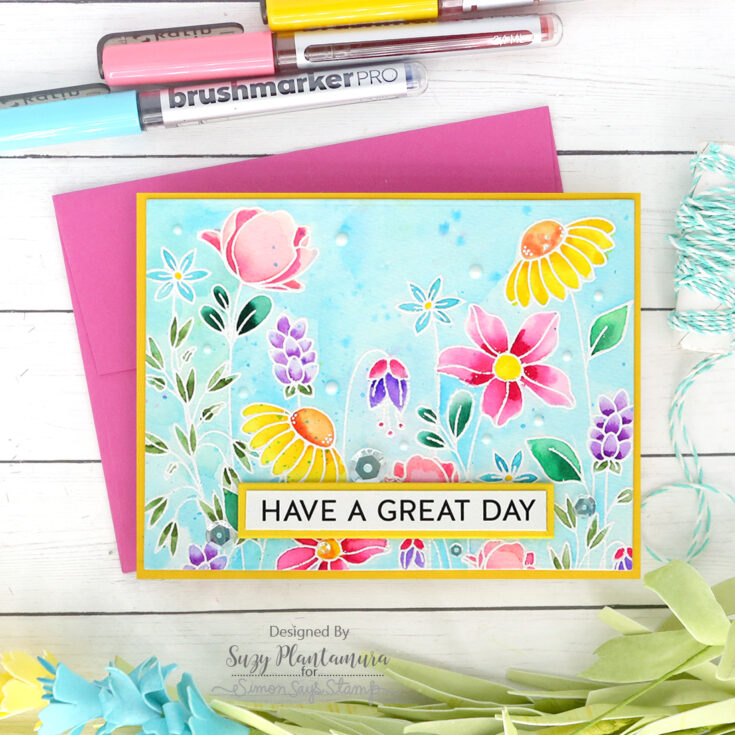
This time I embossed the Flower Garden stamp on Arches Watercolor Paper in a standard card size. I had already done this vertically, so this time I did it horizontally. I used white embossing powder and then my Karin Brushmarkers to paint the flowers. I like using these markers with embossing powder so the colors stay in their place. Otherwise they easily run if you touch a color with water or another color (they reactivate and don’t “set” like more expensive watercolors do). I love the vibrancy of these markers though, so I use them all the time!
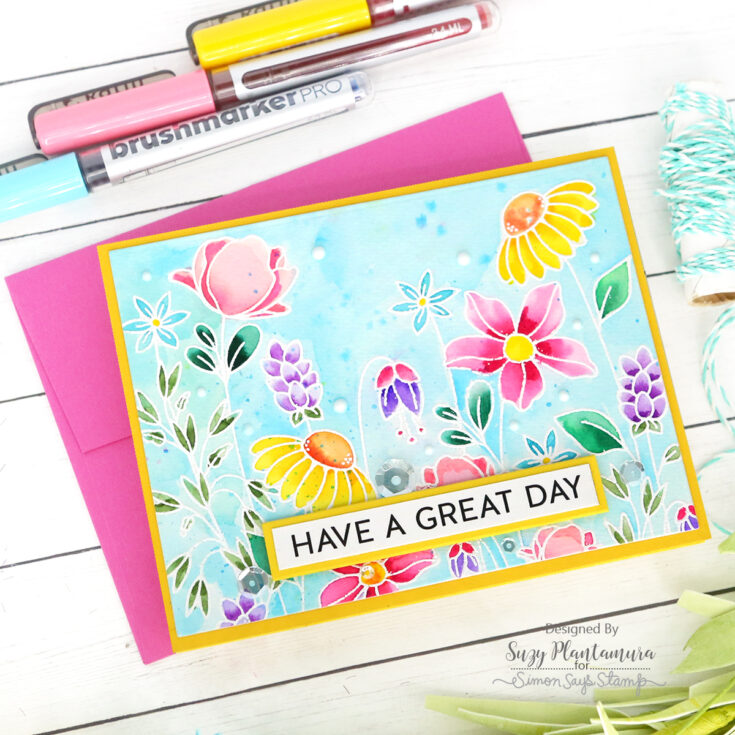
I die-cut this piece with the largest A2 Thin Rectangle Frame Die and mounted it on a yellow card base. I used a preprinted sentiment strip from the new Family set that says “have a great day”. I mounted that on a yellow cardstock strip that was die-cut with the SSS Sentiment Label dies. I added some sparkling clear sequins again because that is just what I seem to do! That was followed by my usual Chalk Stick white Nuvo drops.
Whew! My directions are always so long, but I hope you find them helpful. Because this Floral Garden stamp is bigger than a standard card base, there are so many ways to use it on standard size cards and slimline cards. Try challenging yourself to make 5 cards with any of your stamp sets and use some new techniques or products. I always have so much fun creating these posts and I love that they allow me to get more use out of my stamps! Have a great week friends – I can’t believe April is already here tomorrow! Happy Spring! Suzy
SUPPLIES:
|


Thanks so much for stopping by, and thanks to Suzy for being our guest!


Wow!!! Sooooo many Beautiful cards!!!!
Love all these cards, Stephanie. That is a great stamp set and you’ve made well use of it’s versatility. Thank you for the inspiration!
I love all these beautiful cards from Suzy created from this Floral Garden stamp set. It was my favorite from this new release.
This is my favorite from the new release. Now I see how versatile it can be, too. GORGEOUS!!!
Glad to see them close up. Thank you!
Suzy has a way of filling a card so wonderfully… beautiful, all!
Such an amazing collection of cards…the stamp is so versatile and the card coloring so beautifully done. tfs-stay well.
Each card is more delightful than the one before it! Great collection!
These are amazing. This stamp set is gorgeous
so very pretty
Love how this post shows one stamp turning into so many creative looks. It reminds me how small design tweaks can completely change the feel of a project. I often play with decorative text styles for cards or digital captions, and tools like https://stylishnamees.com/ make it easy to experiment with symbols and fonts when adding names or titles to handmade pieces. Creative details like these really make designs feel more personal and memorable for readers.