One EMBOSSING FOLDER, Five Ways: Fantasy Butterflies

Hi friends! Happy Friday, and (can you believe it?!) happy last day of June! As always, I’m delighted to welcome back special monthly guest Suzy Plantamura! She’s got her creative cap on, and is showcasing 5 unique cards you can make utilizing our new and super cool Fantasy Butterflies embossing folder and die set! Read on and enjoy!
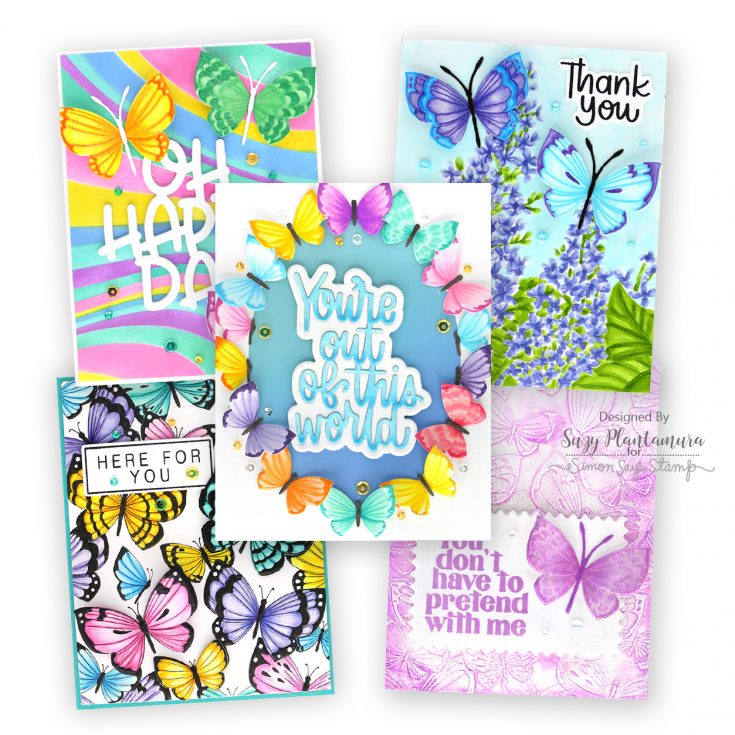
It’s finally summer and the butterflies have come out in full swing! My “one stamp, five ways” post today uses the brand new Fantasy Butterflies Embossing Folder and Cutting Dies. Now I know this isn’t an actual stamp this time, but when you see all the ways to use this set, I think you will agree it was worthy of the 5 card title! I’ve also incorporated many more of the products from the Out of This World release to inspire you to try out these newest Simon Says Stamp products!

I really wish the photos showed the depth on this card. Several of the butterflies on the embossing folder have the die-cut butterflies over them with foam tape behind their wings for depth which you can’t see in the photos. I started by embossing the Fantasy Butterflies Embossing Folder with white cardstock. I then colored the entire thing with Copic Markers and added shading with colored pencils. I then outlined them and colored in the black areas with Black Micron Markers. I added dots to the wings with a white Uniball gel pen. Yes, I like to color!!! I then die-cut a few of the matching butterfly dies, embossed them, and colored them. I hadn’t planned on adding them to the original-colored embossing folder at first or I wouldn’t have colored the ones under them!
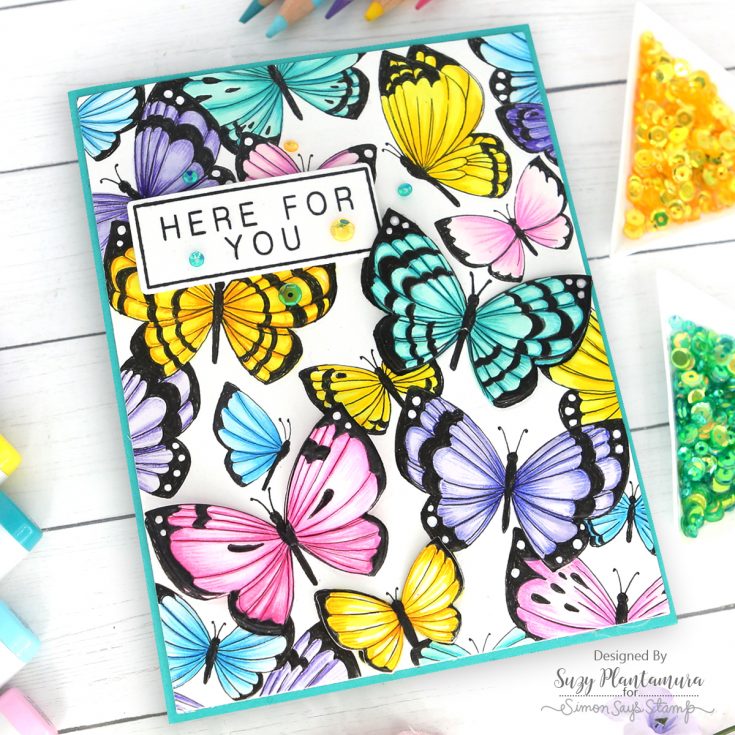
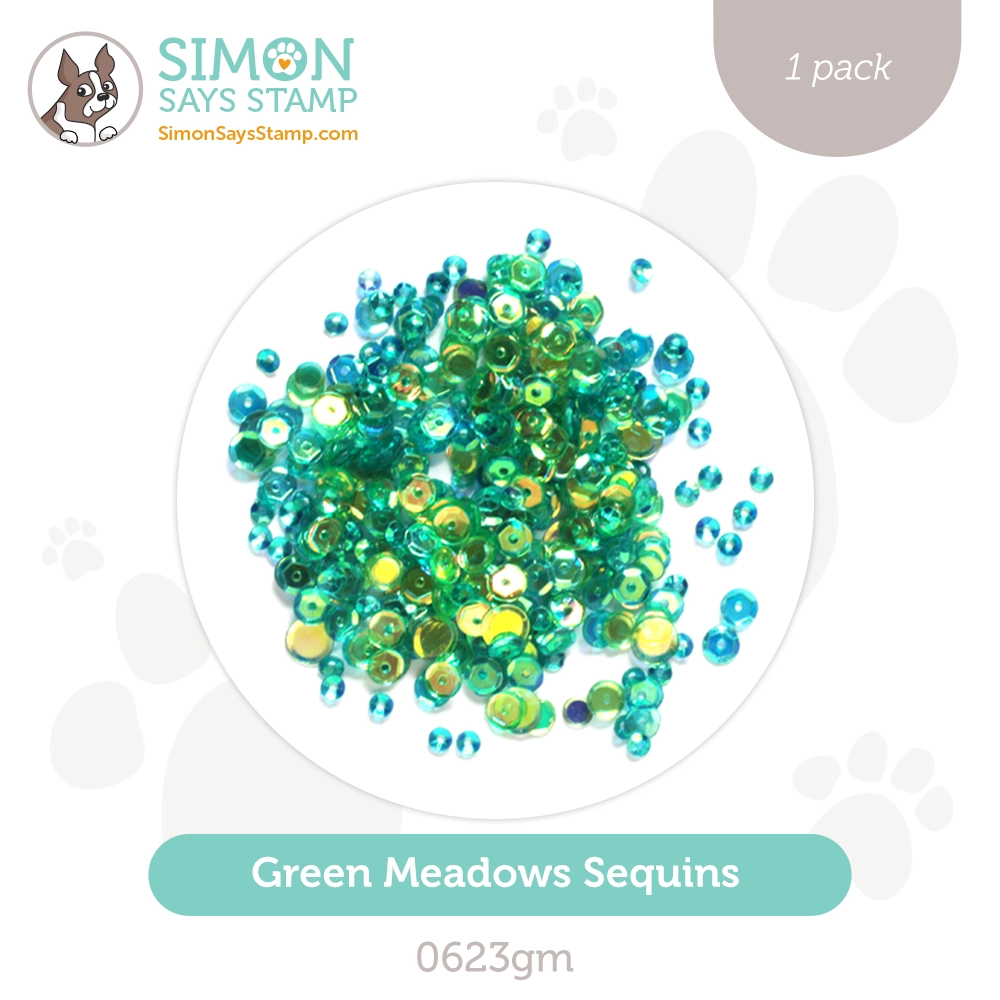
I stamped a sentiment from the Here For You stamp set with Intense Black Ink and die-cut it with the matching Here For You die. I attached that to the top of the card with foam tape behind it. I tucked it under one of the dimensional butterfly’s wings. I added some sequins from the two new sequin mixes in the Out of This World release called Green Meadows and Yellow Sunsets. The Green Meadows mix has both light green, a mid-green and aqua sequins and the aqua are a color I will use ALL the time! Both sets have the little 3mm size sequins in them which really makes me happy! I attached my finished card front to an aqua cardstock card base.
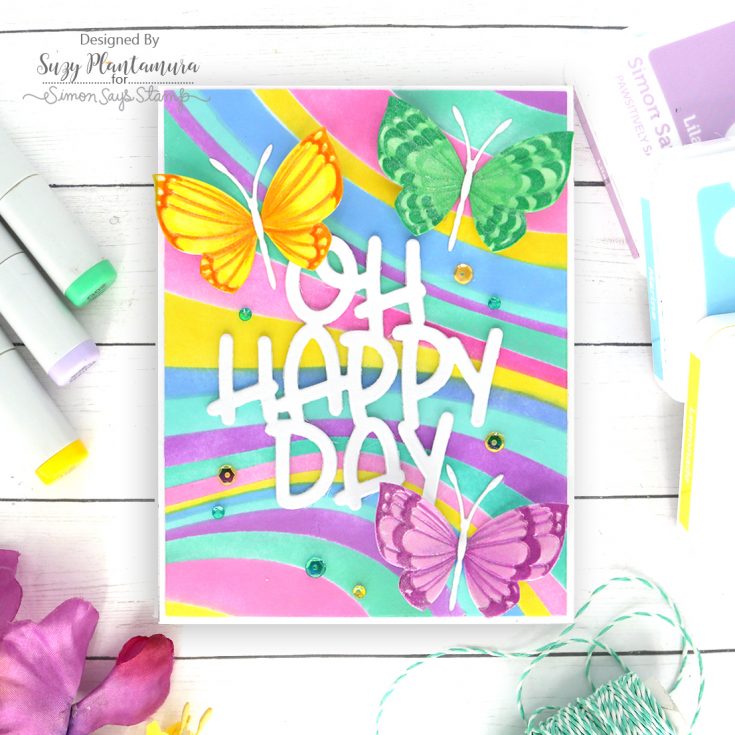
If this card doesn’t make you happy, nothing will haha. I started with the new Lava Lamp stencil which has 6 different layers allowing you to use a lot of different colors. I applied Pawsitively Saturated Inks (in the lightest shade in each Trio) with the SSS small blending brushes. I die-cut this piece with an A2 Thin Frame die giving me a tiny border when attached to a white cardstock card base.
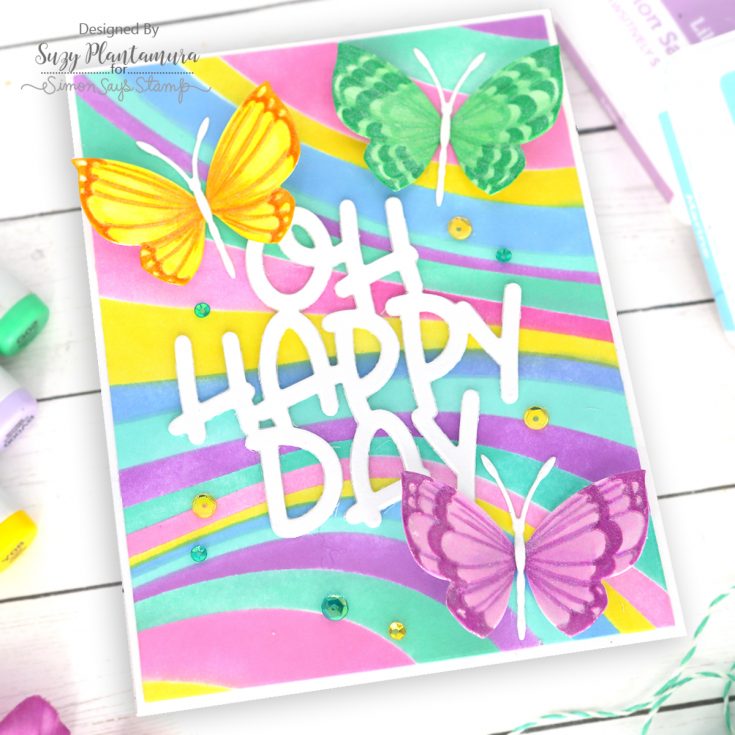
I die-cut three large butterflies and the butterfly bodies (also in the die set with the embossing folder) from white cardstock and then embossed them. I colored all of them with Copic markers. I then rubbed some Picket Fence Paper Glitz Sparkle to each one with my finger (best tool for this type of thing!) and let them dry. I glued the bodies to the center of each butterfly. I die-cut the “Oh Happy Day” wafer die three times from white cardstock and glued them together for depth. I attached that to the center of the card and added the butterflies around it. I only glued down their bodies so I could bend the wings up. I added sequins from both two new mixes, Summer Sunset and Green Meadows.
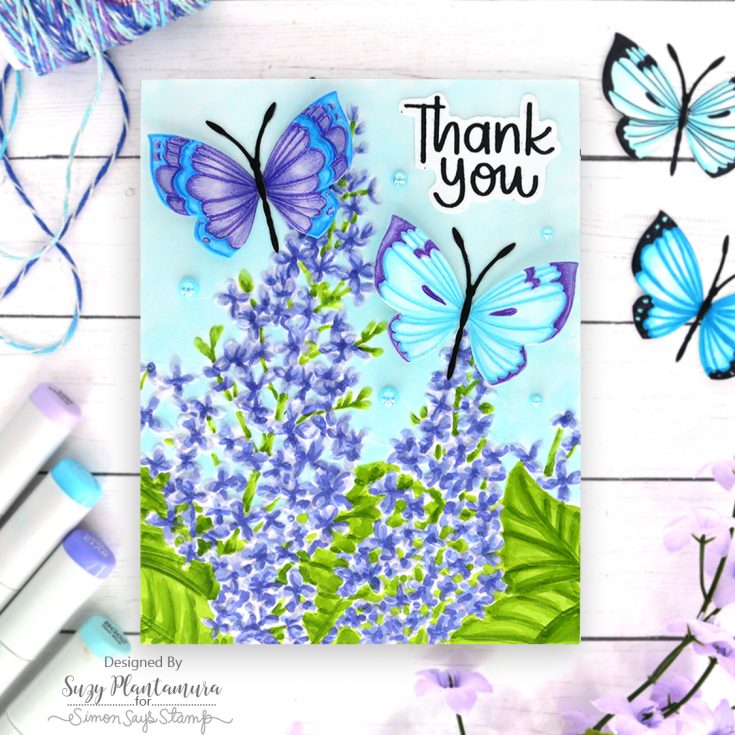
I embossed the new Lilac Clusters embossing folder with white cardstock. I colored it with Copic Markers. I love coloring embossing folders with Copics as they are just so easy to apply to the raised portions. I added a light blue sky with Copics as well. I attached this piece to a white cardstock card base.
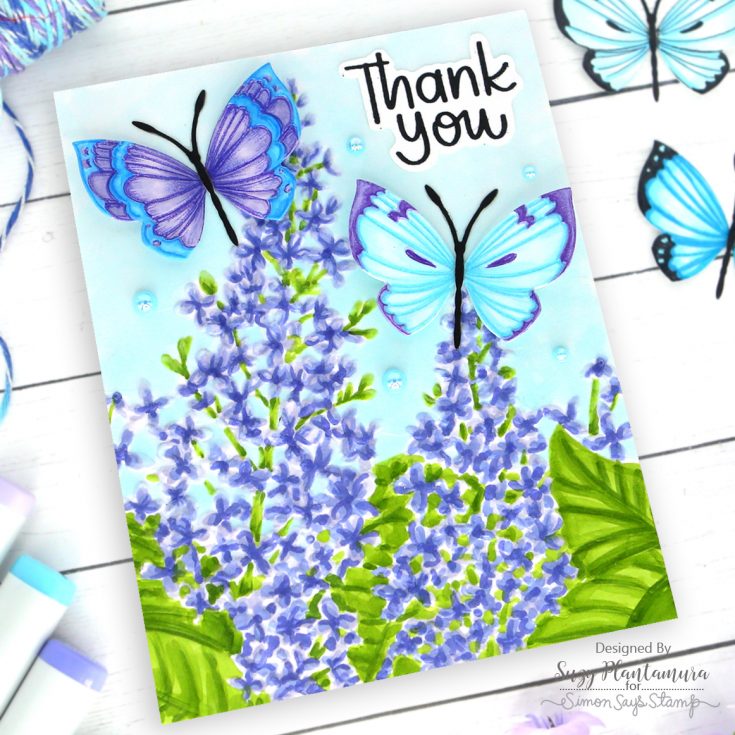
I colored two large embossed butterflies with Copic markers as well and used colored pencils to shade them. I used a black Copic over the bodies and attached them to the center of both. I glued them over the background. I stamped a “thank you” sentiment from the stamp set that was in the July card kit called Flower Happy with black ink and cut it out (there are matching dies, but I didn’t have them). I glued that to the top right side of the card. I added some small blue pearls from the Little Things From Lucy’s Crystal Collection Party Girl mix around the flowers.
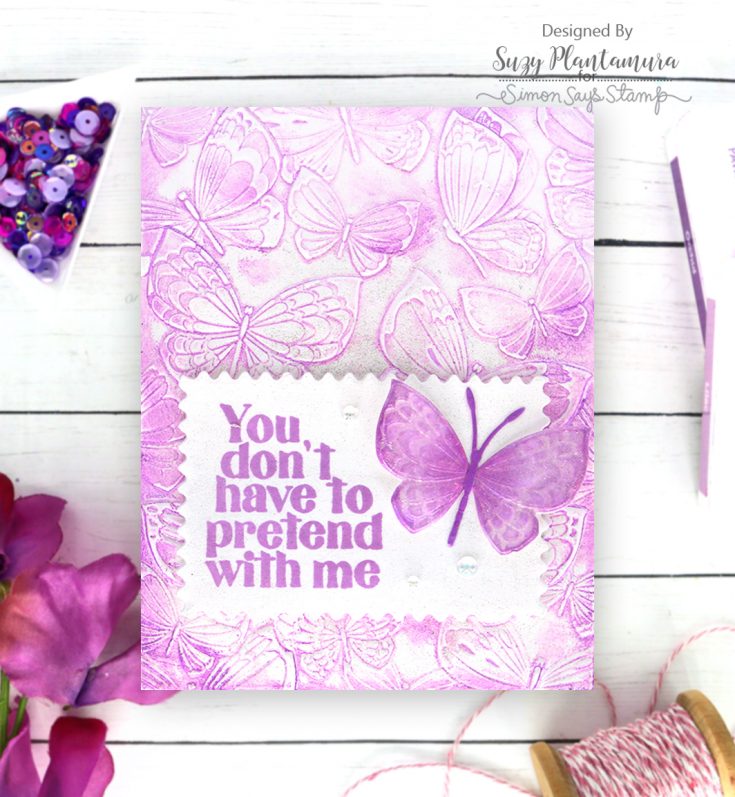
I rubbed Lilac Pawsitively Saturated Ink over the flat part of the Fantasy Butterflies embossing folder and embossed white cardstock. It gave me some ink on the images and around the background, but just sparsely because I don’t really know what I’m doing with ink and embossing folders. I then rubbed some Picket Fence Paper Glitz Sparkle over this background. Someone recently introduced this product to me, and I pretty much want to rub it on everything including my skin haha.
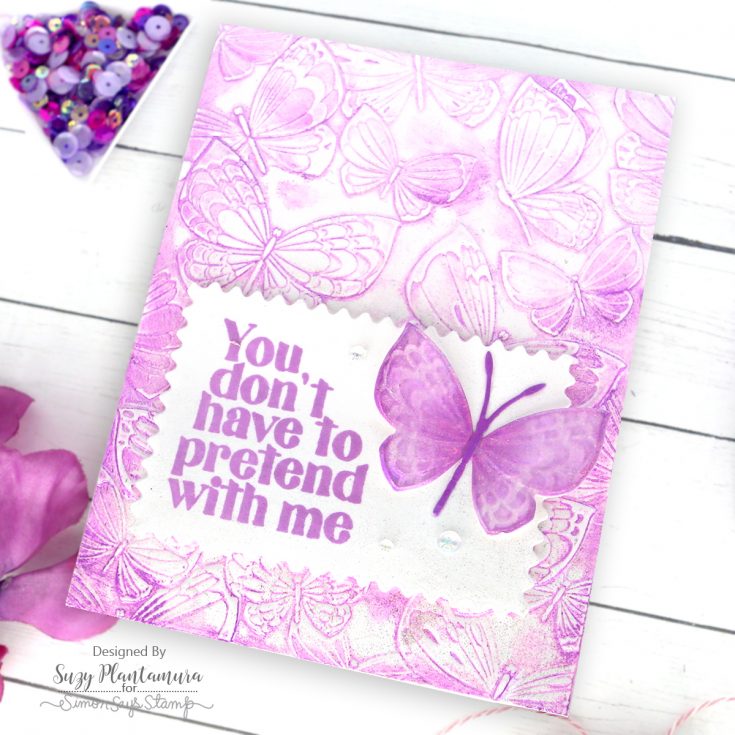
I die-cut and embossed a large butterfly. I applied Lilac Pawsitively Saturated Ink to ink and then a nice dose of the Paper Glitz Sparkle again. I used Orchid ink on the body and glued that to the center. I die-cut a Modern Postage Stamp die from white cardstock and stamped a sentiment from the Here For You stamp set with Lilac ink on the left side. And then, yep, you guessed it, I gave it a nice rub down with more Paper Glitz Sparkle so the whole card would sparkle (actually because it lighted the ink and I wanted the sentiment to match the rest of the card!). I attached that to the bottom of the card with foam tape and glued the butterfly body next to the sentiment. I added three small clear pearls from the same Little Things From Lucy’s Party Girl mix around the butterfly. I bent his wings up.
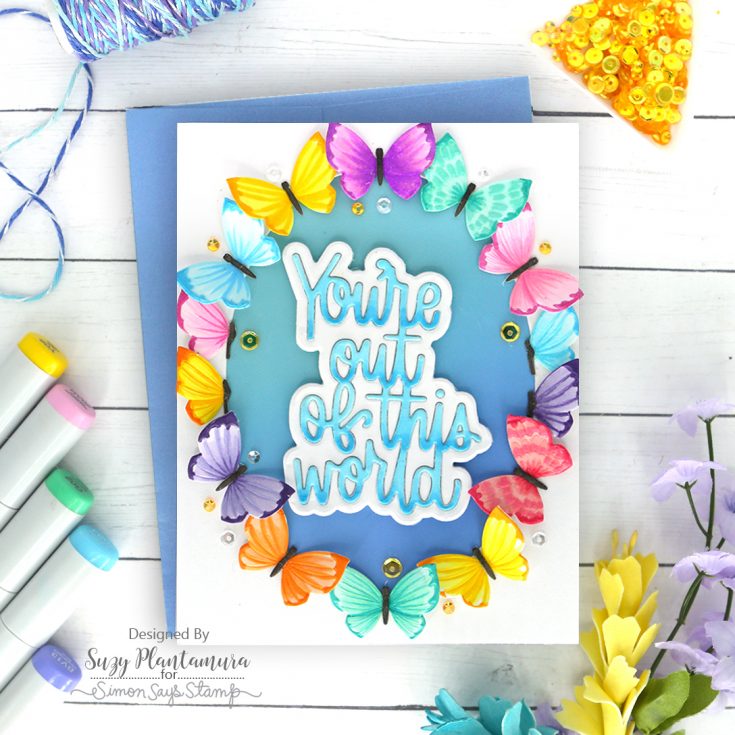
I die-cut and embossed a bunch of the small butterflies. There are three spots in the embossing folder for the small one, so I used all of the possible designs. I broke a couple apart so I could use just half of their bodies. I colored all of them with Copic markers – this goes really quick with just two colors used on each. I colored a bunch of the small bodies and a few side bodies from the die set with a warm grey Copic and glued them to the butterflies.
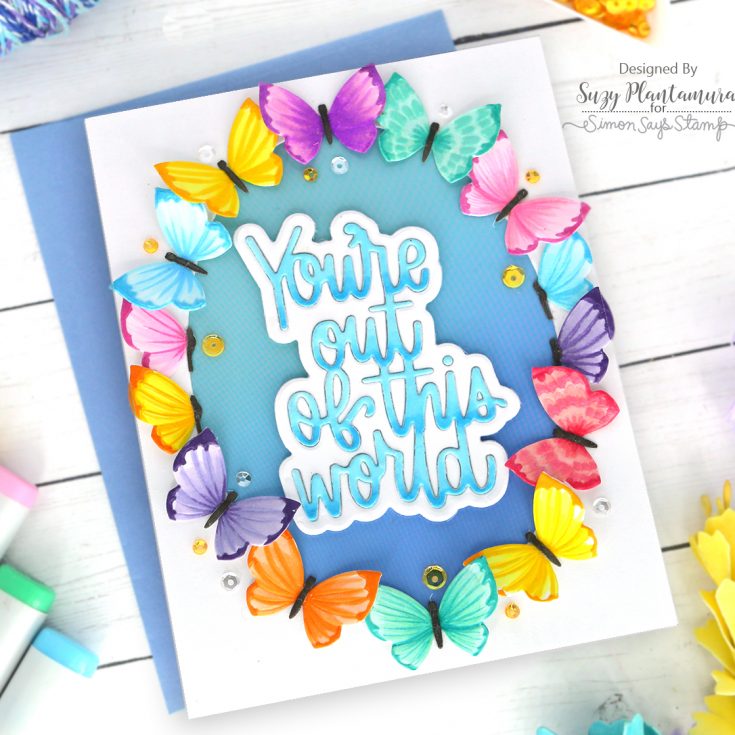
I die-cut an oval from the center of an A2 piece of white cardstock using the SSS Nested Oval dies. I backed it with a piece of the Color Blend Pastel Cardstock in teal and blue. I then glued all the butterflies around it using the half ones on the sides of the oval. I only glued their bodies down and attached them closely together so I could lift all their wings a little. I die-cut the new Out of This World die from white cardstock twice. I colored one set of the letters with blue Copics using a darker blue on the bottom of the letters and a lighter blue on the tops and then glued them over the other set. I attached that inside the oval with foam tape behind it. I added some Summer Sunset sequins and sparkling clear sequins around the butterflies.
Now there is some summer sunshine for all of you! I love ALL of the new embossing folders in the Out of This World release, but this Fantasy Butterfly Embossing Folder and Cutting Dies is definitely my favorite. I think I have about 5 more butterflies left over, so today I should have a post on my blog with one more bonus card using this set! Thanks so much for visiting today! suzy
SUPPLIES:
|


Thanks so much for stopping by, and thanks to Suzy for being our guest!


Thanks for the beautiful card ideas! This is a must have (for me) embossing folder and dies and I just ordered it!
Gorgeous cards!! Sooo many different looks!!!
Love all your inspiration, but the last card is my favorite! Definitely want to try something on that order!
Lovely cards–love the bright colors and all of the inspiration!
These are just lovely
super sweet cards