New Tim Holtz Mixed Media Project!
Hi friends! TGIF! We’re so happy to welcome back the fabulous Paula Cheney to our blog as a guest today! She’s made this gorgeous clipboard mixed media piece to share with us! Want to know how she made it? Read on!
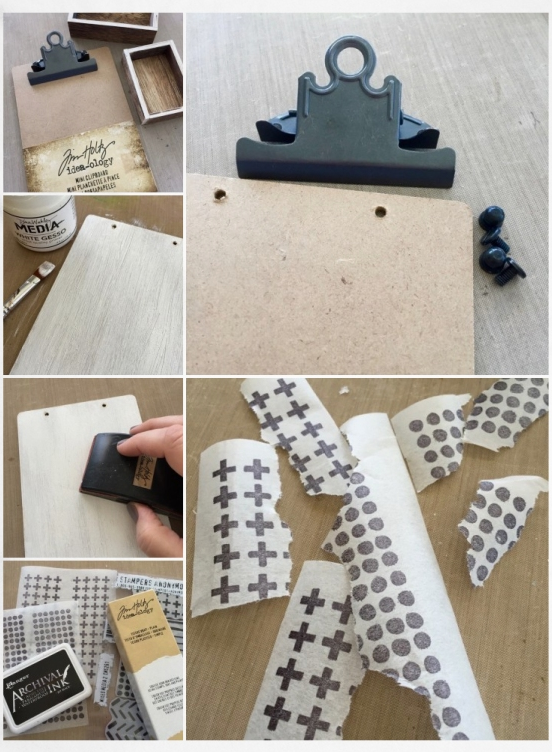
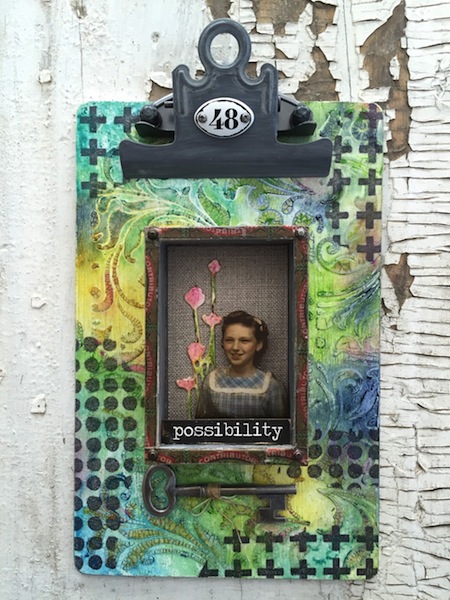
- Hi everyone! Glad to be back here on the Simon Says Blog today sharing a project using the new idea-ology Mini Clipboard today. I like the idea of making the final piece a bit more 3-d so I grabbed the smallest size from the stack of Vignette boxes.
- Remove the large clip from the Mini Clipboard. I love that the large clip is removable, leaving a hard, flat surface to work on.
- Paint a layer of Media White Gesso onto the face of the Mini Clipboard to cover the brown and give a great base to work from. Let Dry. Once the gesso is dry, lightly sand the surface with a Sanding Grip to remove any roughness.
- Plain Tissue Wrap is a product that may seem a bit daunting at first. In reality it’s easy to use and strong enough to withstand stamping, laser printing, and multiple layers of wet medium. I rolled out about 8” of Tissue Wrap and cut the length from the roll. I taped the Tissue Wrap to my craft sheet to have a flat surface for stamping then used the Mixed Media 2 stamp set and Jet Black Archival Ink to stamp directly on the surface.
- Once I created the pattern on the Tissue Wrap I ripped it into small pieces that will be used to collage onto the surface of the clipboard.
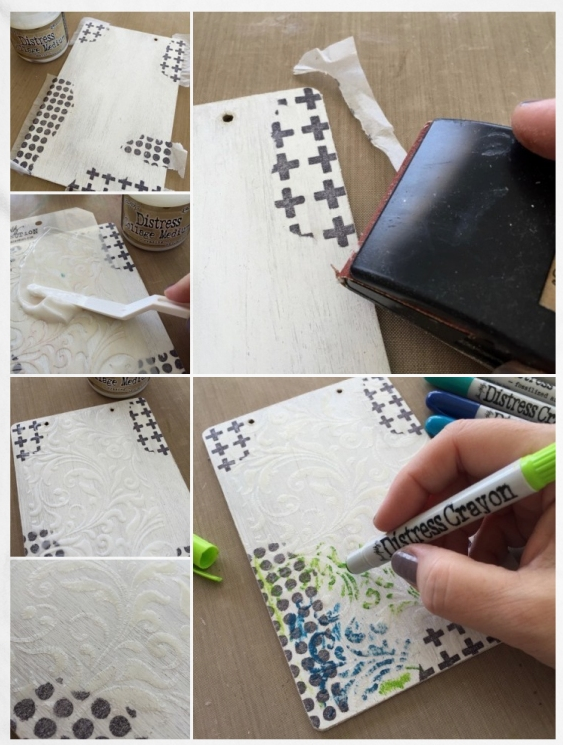
- I used Collage Medium Matte to adhere the Tissue Wrap pieces to the Mini Clipboard. The Collage Medium dries quickly so work fast once you start the collage process. Once all the pieces were adhered I added a thin layer of Collage Medium over the entire surface to seal.
- Once dry, use the Sanding Grip to remove the excess Tissue Wrap.
Lay the Tim Holtz Flourish stencil over the Clipboard. Using a Pallet Knife, drag Distress Collage Medium Crazing over the stencil. Once you have a nice even surface, remove the stencil. The thin plastic of the stencil allows you to add the perfect amount of Crazing Medium. Wash stencil immediately.- The Layering Stencil will cover a portion of the surface. If you want to add the pattern over the entire surface you will need to wait till the first stenciling is dry to the touch before repeating the technique.
- The hardest part of the project is waiting for the crazing to dry. I’ve found that it’s best for me to work on another project or do some laundry while it dries because I’m just not that patient! I like to set a timer for 1 hour and just walk away. When the Crazing is done drying it will leave tiny little cracks in the pattern reminiscent of old china.
- Once the surface is completely dry it’s easy to add color color using Distress Crayons. I’m working with blues and greens today but you can create whatever color combination you like. Start by scribbling in a small portion of the surface. Remember a little goes a long way.
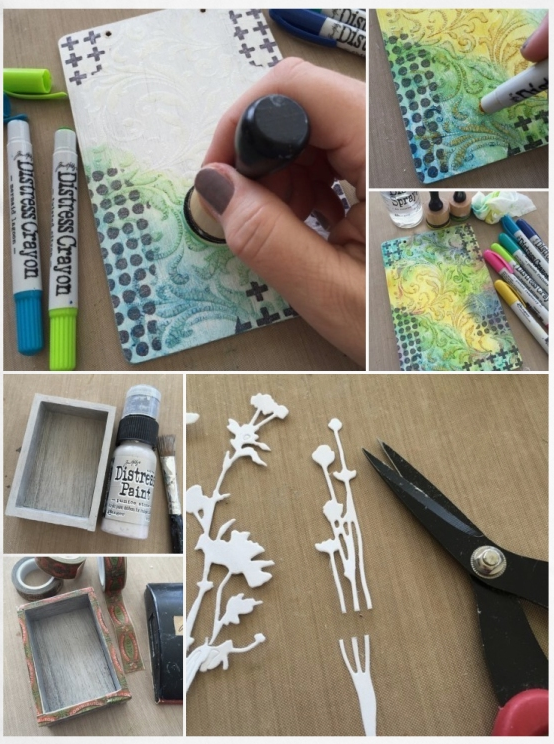
- Use a Mini Blending Tool with a clean foam pad and just a bit of water to blend the Crayon color together. The Blending Tool helps to work the Crayon into the crazing. NOTE: If the color washes away, your foam pad is too wet. Pounce off on a paper towel and start again. It’s just that easy.
- Add additional layers of Crayon to achieve a richer tone. Don’t forget that you can go back and add color directly to the crazed portion.
- The beauty of the Distress Crayons is that if you don’t like a portion or you get too heavy handed, you can just wipe it away and start over.
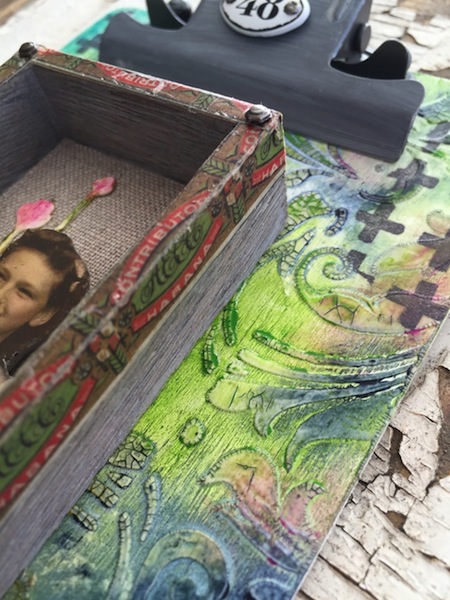
- Use Pumice Stone Distress Paint to paint the inside and outside of the smallest Vignette Box. Let Dry.
- I’ve added Dapper – Design Tape to the edge of the Vignette Box. Just run the tape along side the box and fold over the outside. I added a coat of Collage Medium Matte over the tape edges to secure. Once dry, I sanded the tape to make it look like a “not so perfect” old cigar box.
- I cut a few Sizzix Wildflower Thinlits in to see which might work best in the back of the little box. In the end it was the smallest of the flowers that fit. I just had to clip off the end to make them the right size.
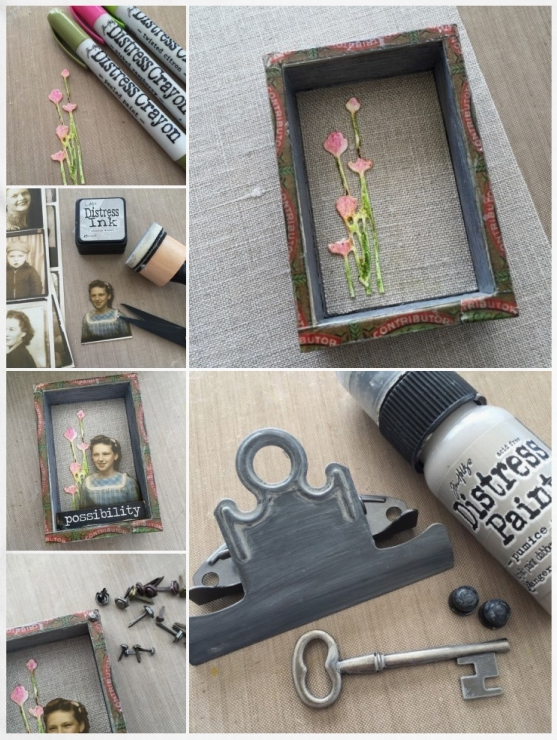
- Again, I went back to the Distress Crayons to add color to the Wildflowers.
- I cut a piece of linen from the Textured Surfaces pack for the back of the Vignette Box. I love the rough texture of the linen inside the box juxtaposed with the delicate Wildflowers.
- Cut out a photobooth picture. I chose one that was already tinted but you can tint any of the pictures with Distress Markers. Use Pumice Stone Distress Ink and a Mini Blending Tool to ink the cut edges of the picture. Pumice stone is the perfect ink color to disguise the cut edges without coloring the image. Works like magic!
- To create depth, double a thick foam square to raise the photobooth picture from the back of the box. Add a word from the Big Chat sticker book. The word “possibility” fits perfectly in the box.
- Hex Fasteners are brads that come in two sizes. I used the smallest size (clipping the legs off with my Tonic scissors) to add interest to each corner of the Vignette Box. A very small drop of Glossy Accents holds them in place.
- Add Pumice Stone Distress Paint to the large clip, its fasteners and a large Adornment Key. Once dry, add the large clip back in place and add the key below the Vignette Box. To finish it off I added a Mini Plaquette to the large clip with a foam dot.
SUPPLIES:
 |
 |
 |
 |
 |
 |
 |
 |
 |
 |
 |
 |
 |
 |
 |
 |
 |
 |
 |
 |
 |
 |
 |
 |
 |
 |
Thanks for reading today, and a big thanks to Paula for being our guest!

Blog Candy Alert!! Follow our blog via email and comment on this post for a chance to win a special blog candy!


Wonderful Tim Holtz creation. I have the flower stamps & dies and have not used yet. You’ve inspired me to get them out & use them. Have e Bee-utiful day!
Melissa
“Sunshine HoneyBee”
Absolutely beautiful! These mini clipboards seem to be all the rage right now. Thanks for the inspiration to jump on that bandwagon! :-)
Fabulous project! All the work and effort was well worth it – I love the embellishments as well – thanks for showing us your talented work – have a blessed week!
LOVE the colors and thank you so much for the tutorial … you make it look so easy!! And the project is so lovely!
This is right up my alley. Got to apply these principles to something I try
Beautiful mixed media piece Paula, love it!! Thanks for sharing tutorial.
So pretty Paula!! TFS!
This is beautiful! I want to try that tissue tape to stamp on and make a collage. Neat idea and the colors are gorgeous!
Gorgeous projects. I love all things Tim Holtz for this reason.
Love this gorgeous mixed media project!!!
Perfect vintage style!
What a fun project.
Good use of a recycled clipboard. Hardly see them used
anymore and they are left untouched.
thanks for sharing
Paula makes the most intriguing projects! Love this one.
Wow that a time consuming and stunning project! Love the colours you used! Gorgeous outcome!
HOW PRETTY!!! THANK YOU for showing us the process! TOO FUN!!!! ;)
Great combination of mixed media for this project! Thanks for the how-to!
Wow – love seeing all of Tim’s new things! This is wonderful! I need to learn how to do this!
Paula, it’s amazing to see the transformation from a stack of materials to the finished project. Gorgeous! Happy weekend!
Mixed media isn’t a trend it’s here to stay. The first time I heard of it was when they called it altered books. Lol
Wow!! This is Beautiful!! I have a pic of my grandma that would look perfect in this!
Fabulous project, Paula!
So beautiful!
Lovely project. I adore mixed media, and I’ve seen a lot of fantastic clipboard art using Tim Holtz products. The one thing I’m a little vague on, is how are they used after they’re done. Is is a decorative piece? Does it hang on the wall, on a shelf? Has anyone used them as gifts? Would love to hear what others do with these fabulous boards once they’re complete.
Love playing with mixed media! All the textures and techniques to experiment with. Thanks so much for sharing your project!
It is so beautiful! Love this piece!
Such a cool project!
Love the background !
Gorgeous project! Thanks for the details on everything you used!
Great project today!!! Love the embellishments:)
Love the projects ! thanks!
Wow…what an amazing and intense project! Love all the cool details.
Thanks for sharing with us!
Cool textures
Great tutorial – love the finished project !!!
What a fun project. And so nice to see I’ not the only person who has a problem waiting for things to dry!
I love your project! Thanks for the detailed instructions!
Interesting project.
I like the key and the clipboard
I love seeing artistic projects like this–just beautiful!
Great mixed media project!
This is awesome!!! Thank you so much for the ‘how to create’ something so beautiful!
Fabulous project!
Lovely project:-)
Wow, this is fabulous. I’ve always been intimidated by mix media projects, your work is spectacular!
Truly beautiful. You make the color blending look so seamless. Thanks for inspiring.
Wow, quite a project! Love Tim Holtz!
Oh my goodness, this is a fabulous project. Thank you so much for the inspiring design ideas. It’s really so amazing. Thanks.
Beautiful! This would make a wonderful grad gift.
Great project! :)
Such a beautiful work.
Very nice project.