To the Moon and Back Mixed Media Canvas
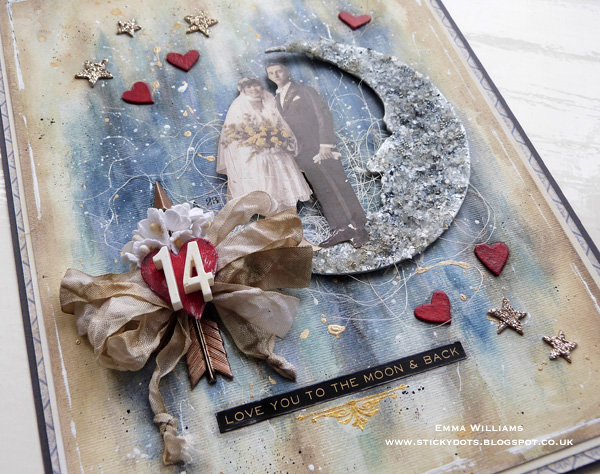
Hi readers! Thanks for stopping by today! Please welcome special guest Emma Williams! She made this truly gorgeous mixed media canvas with the theme of Valentine’s Day and love in mind, and I can’t stop staring at that GORGEOUS moon! Be sure to read on for more information, and enjoy!
Hi everyone!
I’m so excited to be back on the Simon Says Stamp Blog today and can’t wait to share my mixed media canvas panel which uses some of the latest releases from Tim Holtz, combined with a few of his older products.
It can’t escape your notice that February is the month of love and love is most definitely in the air with my romantic project, full of vintage nostalgia! The panel itself, has many techniques and ideas that can also be used on extra special Valentine’s or wedding cards, home decor pieces or even scrapbook layouts ~ so, the possibilities are really endless and I hope you enjoy how I created this!
- I started by creating my background by cutting down a Dina Wakley Media Board to measure 7” x 9.5”. The board is already pre-gessoed, so there is no need to prime it.
- I then added a layer of Antique Linen Distress Paint over the entire surface of the canvas and heat dried the paint before adding my next layer.
- Taking small amounts of gesso and using either a palette knife (Tip: If you don’t have a palette knife, then you can use an old expired credit card which works just as well), scrape the gesso onto the central area of the canvas in a fairly free and loose style. Heat dry the surface thoroughly.
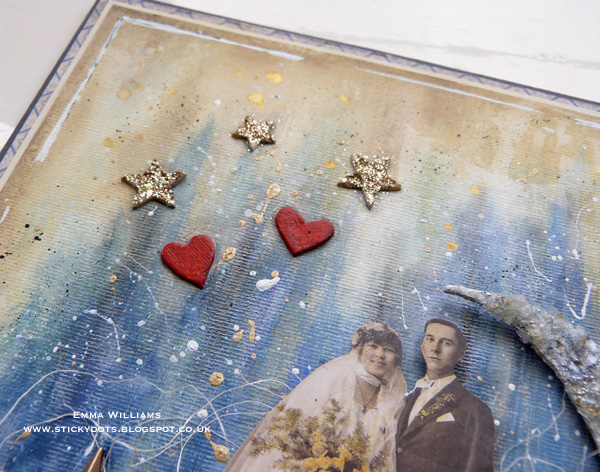
- To add the colour onto my background, I used Distress Crayons and began by scribbling the Stormy Sky Crayon directly onto the central gessoed section of my background before blending it out with a semi dry baby wipe ~ this creates a base layer of colour for me to work with. To start adding more depth of colour and more layers, I used Chipped Sapphire which I lightly scribbled over the top of the previous layers adding it to random areas and then blending out the colour with my fingers. I continued to build up the background by using the Black Soot and Pumice Stone Crayons, together with more Chipped Sapphire and just continued adding the crayons to build up the intensity. You can also see from the photos that I kept the look of paint strokes around the outside of that blue central section.
- To create the vintage, distressed looking border around the outside of the canvas, I applied Frayed Burlap and Walnut Stain Distress Crayons in exactly the same way as before, blending the colour over the surface with the wipe and then adding more intensity by using my fingers to create the darker areas.
- Once happy with the background, I added splatters of Black Soot Distress Paint, gold paint (from the Gold Metallic Paint Dabber) and gesso, picking up the paint with a paint brush and just flicking it across the surface. I also added gesso paint scratches around the edges of the canvas to create a border. Give the canvas a blast of heat to ensure everything is dry.
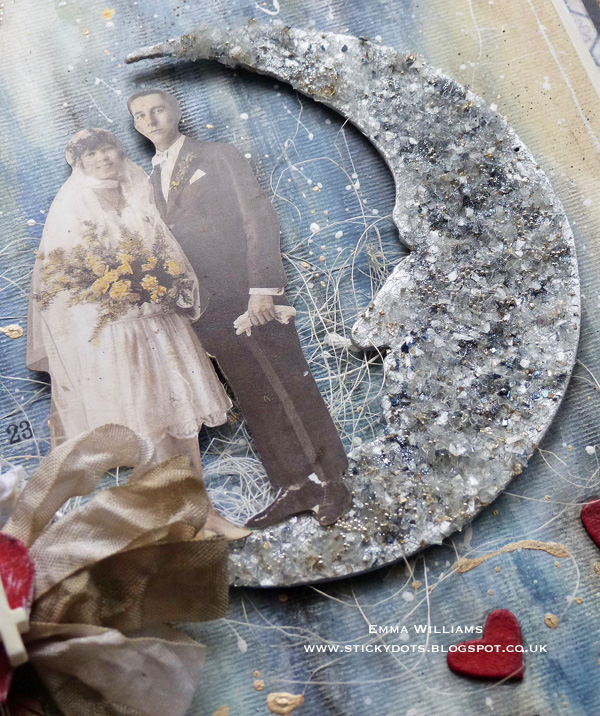
- Now comes the fun part of creating the magic of the focal point and that textured crescent moon.
- Using the Tim Holtz Crescent Moon and Stars die, die cut the moon and some of the smaller stars from Sizzles Mat Board. Apply Glossy Accents to the stars and then sprinkle with Vintage Platinum Distress Glitter. Set the stars to one side until later.
- To create the textured moon, apply a layer of Dina Wakley Sterling Acrylic Paint over the top of the die cut. Once the paint is dry, using a palette knife, add a good amount of Prima 3D Matte Gel to the surface and sprinkle Pearl Glass Glitter, Gold Rush Glass Glitter, Sterling Glass Glitter and Silver Micro Beads over the top. Tap away the excess and set aside to dry.
- Once dry, it will leave you with the most gorgeous textured moon surface, which I then attached to my background using foam pads and placing it over a small amount of natural coloured floristry sisal. (You can also use thread if you don’t have the sisal).
- For the photographic image, you can either use an image of your choice or…if like me, you’ve fallen madly in love with the new Tim Holtz Paper Dolls collection you can use the wedding couple from this pack! I lightly colour tinted the couple using Distress Marker Pens, adding Mustard Yellow and Shabby Shutters to the bouquet and Antique Linen onto the skin areas. Using foam pads, attach the image onto the background, placing it so they appear to be standing on the moon.
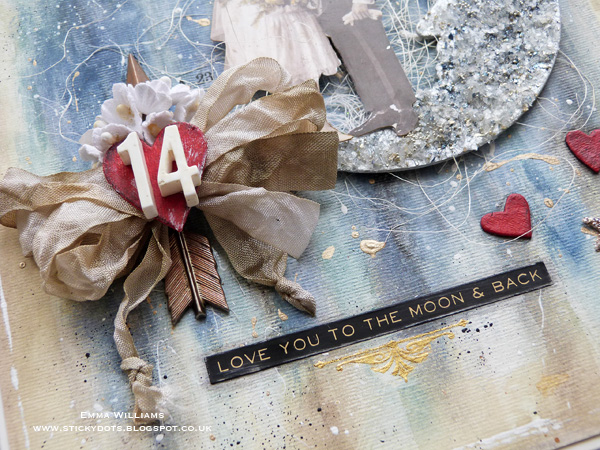
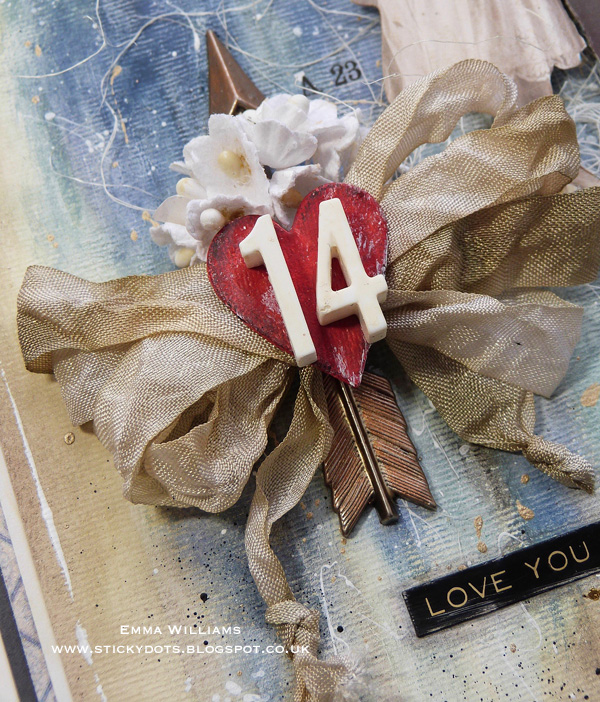
- Antique one of the large silver Arrow Adornments by applying Treasure Gold Rose Quartz Gilding Wax directly onto the metal and then buffing the metal with a soft cloth to create a shine. Attach the arrow to the left of the moon using Glossy Accents to secure it into place.
- Cut a strip of crinkle ribbon and place the ribbon onto a craft sheet. Mist the ribbon with Pumice Stone and Antique Linen Distress Spray Stain. Scrunch up the stained ribbon and either heat dry for quickness or allow to dry naturally.
- Wrap the ribbon around the four fingers of your hand. Remove the loops from your fingers, pinching them together in the centre and tie a further piece of ribbon around the centre to create your bow. Fluff out the loops of the bow and tie knots into the ends of the ties.
- Separate one of the Bouquet Findings flowers to give you two separate stems and using a paint brush, apply small amounts of watered down Mustard Seed Distress ink directly into the centre of the flowers.
- Using a hot glue gun, attach the flowers and the bow over the top of the arrow.
- Using the Heartfelt Die, die cut five smaller hearts and one medium sized heart from the Sizzles Mat Board. Paint the hearts using Candied Apple Distress Paint and allow to dry. Use Collage Medium to attach the five small hearts onto the background, together with the small glittered stars, placing them around the outside of the moon and bow arrangement. Run a Black Soot Distress Marker Pen around the outline of the heart and blend out the colour with your finger.
- Place the remaining, medium sized die cut heart over the top of the knot of the bow and then add the number ’14’ using numbers from the Typography pack. I added a light wash of Antique Linen Distress Paint over the top of the numbers.
- Finally add a Quotation Sticker with the quote “Love You To The Moon & Back” and attach it directly onto the canvas, applying a Gilded Accent Remnant Rub beneath it.
- To create a frame around my canvas, I matted the finished project board onto ivory card, followed by a layer of regular white card which had Butterfly Designer Tape attached around the edges, each time leaving a border around the outside. I then mounted the entire project onto a layer of black mountboard to add stability.
I hope you love this project as much as I loved creating it and thanks so much for stopping by today ~ I’ll see you again very soon!
Emma

SUPPLIES:
 |
 |
 |
 |
 |
 |
 |
 |
 |
 |
 |
 |
 |
 |
 |
 |
 |
 |
 |
 |
 |
 |
 |
 |
 |
 |
 |
 |
 |
 |
 |
 |
 |
 |
 |
 |
 |
 |
 |
 |
 |
 |
Thanks for reading, and thanks to Emma for being our guest!

Blog Candy Alert!! Follow our blog via email and comment on this post for a chance to win a special blog candy!


That is so beautiful! What a way to honor the people in the photo. That photo reminds me of the wedding photo of my mom’s parents we have hanging on our wall. My grandmom died in the early 60’s and my granddad died in the 80’s and I still miss them. Thanks for sharing this card with us.
Such a EAUTIFUL Piece!! THANKS for sharing and have a FABULOUS WEEK!! =)
Gorgeous project!
WOW!! This is so beautiful and loving all that glittery texture!
No surprise you Rocked this … I love the moon… stunning texture and your heart/flower/arrow cluster is such a romantic touch <3
Wow! What an amazing keepsake! There are so many gorgeous details to admire!
Absolutely gorgeous, and what amazing attention to detail.
I’ve never worked with much mixed media, but your project makes me want to! Lovely!
Stunning, just stunning!
Wow, this is beautiful!! I haven’t done any mixed media projects as they kind of scare me but this one of yours really inspires me to give it a shot. I know it will be nothing like this as this is absolutely gorgeous but you gotta start somewhere, right. Thanks for the inspiration!!
Gorgeous …
Absolutely stunning artwork by Emma whose work and style I just love! Thanks Emma for terrific step x step. Nicola x
What an awesome canvas you have made Emma! Really nice!
Oh my! Breathtaking!
Adorable idea!!!!
Cristina
thehouseoftheblackbirds.blogspot.it
Gorgeous!!
Very pretty. Thanks for sharing.
What a stunner! It is truly a magical piece and will make a wonderful keepsake.
What a GORGEOUS canvas! Thanks for all the details!
pretty!
woooooow,this is great! LOVE the colors and the material mix – wonderful mood!
best wishes, Irmgard
wow, so much detail.
This is just gorgeous!! Can’t get over that moon… ❤
Thank you for sharing all the details of the process, certainly learned a lot!
What an absolutely gorgeous piece.
Such a beautiful creation!! Love that Tim Holtz’s Wedding couple image! I initially thought it was a real life photograph! Beautiful embellishments!
This is so beautiful. I love the sky behind the moon and the vintage couple. A gorgeous piece. Hugz
Jaw dropping beautiful Emma. A definite work of art. Can’t wait for the Tim Holtz paper dolls to be available.
Wow! What gorgeous work. Love all the texture.
Wow, this is a work of art! I love the textured moon you created and the blended night sky – amazing that was created using a baby wipe!
Beautiful project! Great moon and stars!
Such a beautiful piece! Love all the texture!
How beautiful. Absolutely stunning.
Awesome! The texture on your moon is so cool!
Awesome techniques!! Love it!
I just love the mixed media pieces the design team puts together! Some day I will try it myself! Thanks for sharing so many wonderful ideas!
This is so gorgeous!!
Wow! So many different techniques to produce this beautiful piece. If I could manage to learn just one of them, I’d be happy!