Mixed Media Burlap Panels Featuring Tim Holtz Products
Hi readers!! TGIF! I’m so pleased to welcome very recent mother of two Anna-Karin Evaldsson back to our blog as a guest designer! Congrats to her and her family! Anna-Karin has created these very fun Mixed Media Burlap Panels featuring Tim Holtz products for a very special Friday feature! Read on and enjoy!
Hello everyone!
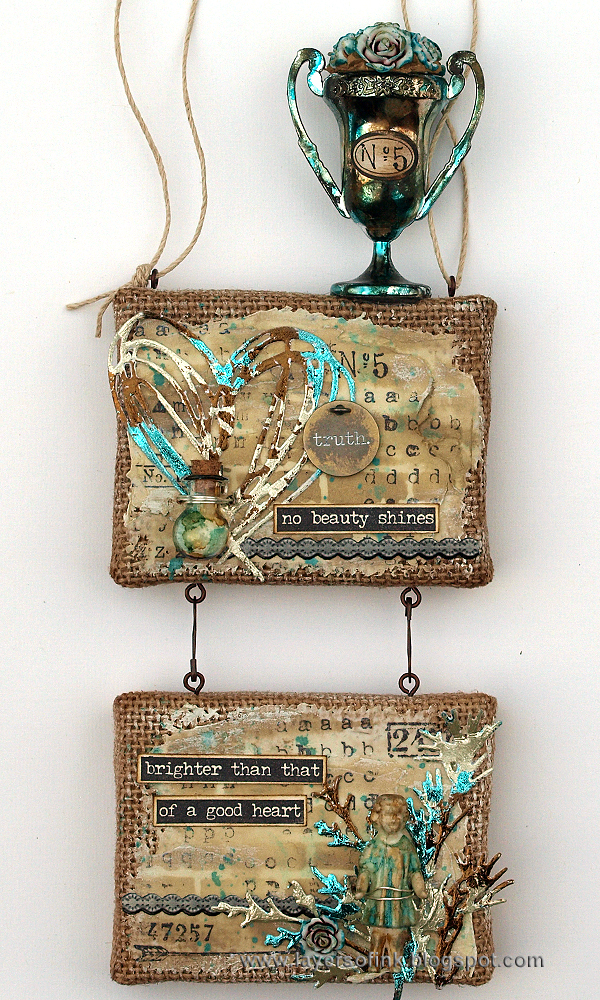
I am happy so happy to be here at the Simon Says Stamp blog today, with a mixed media burlap panel. The project was made mainly with products by Tim Holtz and Ranger. You can easily use the same techniques for cardmaking, art journaling, scrapbooking and more.
-
The Mini Burlap Panels are so cute and I thought it would be a fun idea to attach two of them together for a wall-hanging – and to give me more space to decorate. Since the panels are made of wood, they are sturdy and you can screw things into them, and the top forms a great shelf for more embellishments. I took some step photos along the way.
-
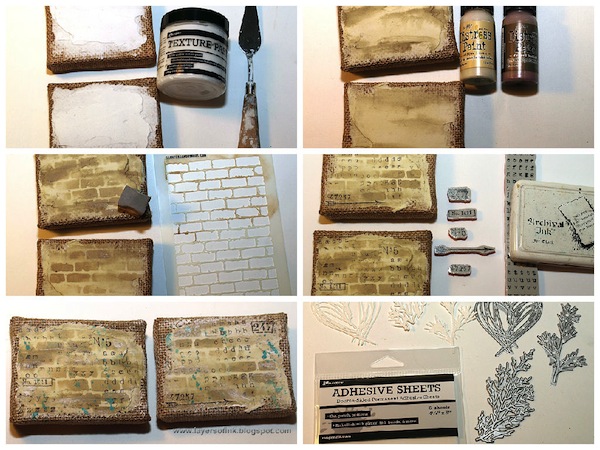
Start by smearing Ranger’s Texture Paste on the burlap panels with a palette knife. Try to give them a medium thick smooth layer, but don’t cover them all the way to the edge. Let some of the burlap show. Leave to dry.
-
Paint with Antique Linen and Frayed Burlap Distress Paint, adding a little bit of water to the paint.
-
Sponge Frayed Burlap through the Bricked stencil. I used a small piece of Cut-n-Dry foam for this.
-
To add more detail and texture, stamp the panels with various stamps from the Correspondence set and with the alphabet background from Documented. I love this alphabet stamp, it is certainly going to be well-used.
-
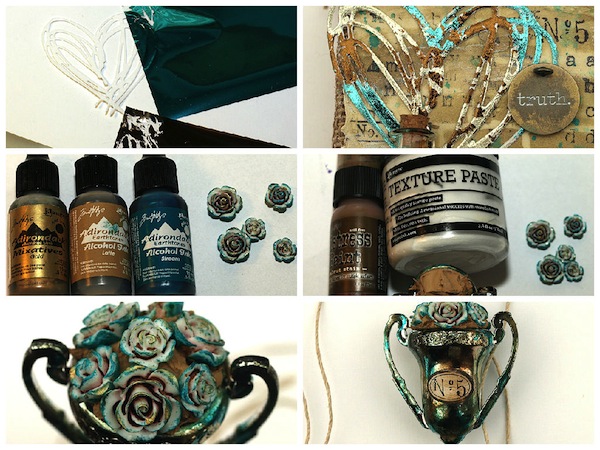
Splatter a little bit of Peacock Feathers Distress Paint on the panels, by picking the paint up with a paint brush and tapping the handle. You might need to add a little water to the paint.
-
I wanted shiny metallic pieces and decided to use Ranger’s Foil Sheets. First, apply an Adhesive Sheet to cardstock and die cut a heart and foliage using the Scribbles and Splat and Holiday Greens dies. These dies work great together with the Sizzix Magnetic Platform. Use this sandwich: Magnetic Platform, Cutting Pad, paper, die facing down, second Cutting Pad. You might need to run the dies through the machine twice, since they are detailed.
-
Remove the back liner of the adhesive sheet and press the grey side of the foil sheets onto the adhesive. Vary the colours for a fun look.
-
The effect is really cool and I love the multi-coloured metallic shine.
-
Colour Heirloom Roses, a Trophy Cup and a Salvaged Doll with alcohol inks, using an ink-blending tool and felt applicator.
-
Fill the Trophy Cup with crumbled up pieces of paper. Mix a little Walnut Stain paint into Texture Paste and apply at the top of the cup.
-
Press the roses into the paste, which acts both as soil and as an adhesive.
-
Sand a Vial Label slightly and stamp it with a stamp from the Correspondence set. Glue the trophy on top of the top panel using a strong adhesive.
-
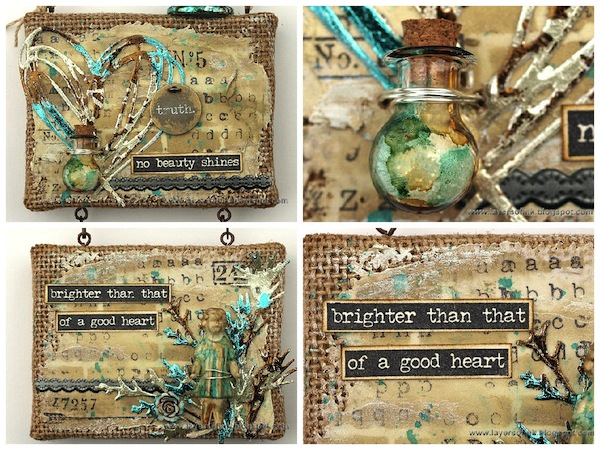
The panels were embellished with a Typed Token, Gallery Industrious Stickers, and a stamped sentiment.
-
I love the shapes of the new Tiny Vials. This one was altered with alcohol ink and I filled it with Rock Candy Distress Glitter, before drilling two holes in the panel and attaching it with a piece of wire.
-
To attach the two panels to each other I screwed in Screw Eyes and simply attached them with two Loop Pins. Very easy. The Salvaged Doll was attached the same way as the vial bottle, by drilling two holes and threading a wire through them. The paste is a great surface to stencil and stamp on, while still keeping the rough texture of the burlap around the edges.
I hope you enjoyed this tutorial. Thank you so much for looking!
Happy crafting!
Anna-Karin
SUPPLIES:
 |
 |
 |
 |
 |
 |
 |
 |
 |
 |
 |
 |
 |
 |
 |
 |
 |
 |
 |
 |
 |
 |
 |
 |
 |
 |
 |
 |
 |
 |
 |
 |
 |
 |
 |

Blog Candy Alert!! Follow our blog via email and comment on this post for a chance to win a special blog candy!


This is an incredible project! Thanks for sharing and congratulations!
Amazing project and so meaningful quote! Thank you for the great tutorial and for the inspiration!
How creative! Beautiful project. Thanks for sharing!
Gorgeous!!!
Wow, love all the details! ;-)
Very creative! Love it!
Beautiful project. Love working with burlap.
Fantastic project, so beautifully crafted!!!
What I wouldn’t give to have this stunner hanging in my house….
Awesome MM Project !
So creative!
stamping sue
http://stampingsueinconnecticut.blogspot.com/
Gorgeous
This is a beautiful color palette. Tim Holtz always releases original products.
Such a cool project!! Beautiful vintage look!!!
Fabulous TH fun!!! Gorgeous layering and fun with vintage and burlap!!
Such a cool project. I love the look of the burlap!
Wow! Absolutely stunning! x
These colors just make my creative heart swoon … what a lovely project!!!
LOVING all of the different textures and element used on this lovely piece!! Those dolls are divine!! TFS!
wow! beautiful design and an amazing way to use so many products!
Just BEAUTIFUL!! :-) I LOVE the colors and the different designs you used!! THANKS for sharing and have a Fabulous Week!!! :-)
Anna-Karin’s work is always soooo AMAZING!!!
Very Pretty!
Congrats on your new addition to your family. This is a great piece! TFS Anna-Karin!
Love to have that hanging on my wall.
Grungy goodness :)
Very creative and I like the texture.
lovely
Love the way the trophy cup is tainted!
Wow–I’m in awe! Gorgeous creation!
This is a fantastic project – thanks so much for explaining all the details and techniques!!
This canvas is awesome, thanks for the amazing tutorial!
beautiful! makes me want to skip my spring cleaning and craft instead!!!
WOW what an amazing project!!! Thanks for the inspiration:)
Wow………this is amazing love all of the details.
These little burlap panels look like they would be so much fun to decorate. Maybe, a perfect little project for craft day with friends. Thanks for sharing and for the ideas.
Gorgeous project! Tim Holtz products are awesome to use for anything. If money were no object, I’d have loads of his things. Thanks for sharing with us.
Amazing project! Thanks so much for sharing the process.
Stunning project!!! Amazing use of different elements.
Wow, these are fabulous! Thanks for sharing.
These are beautiful!! Thanks for the details on how to make them.
love mixed media!
What an original idea!
What a gorgeous project!
Great instructions too.
Carla from Utah
Lovely project!!! Great way to use Tim Holtz products!
Super!
Wowee, what a fabulous creation!
great project, I love it
The panels look great hooked together!
Wow! Stunning project!