Master Ink Blending & Stenciling for Gorgeous Cards: Yippee for Yana

Hi friends! Please join me in welcoming back the oh-so-talented and amazing Yana Smakula! (Please note: our dear friend Yana is Ukrainian. To show support to our brothers and sisters in Ukraine, please see Yana’s post HERE.)
Hello, crafters, this is Yana Smakula for Simon Says Stamp! Welcome back for another Yippee For Yana video! I’m excited to share a fun and elegant technique using Simon Says Stamp’s beautiful stencils, including the stunning White Fusion stencil set from their latest release. This set features four stencils that, when layered and ink blended, create a gorgeous leaf design that’s perfect for any cardmaking project.
Let’s dive into the details and see how we can create a beautiful thank you card with this stunning stencil set, along with some other techniques that will elevate your designs!
Step 1: The Stencil Setup
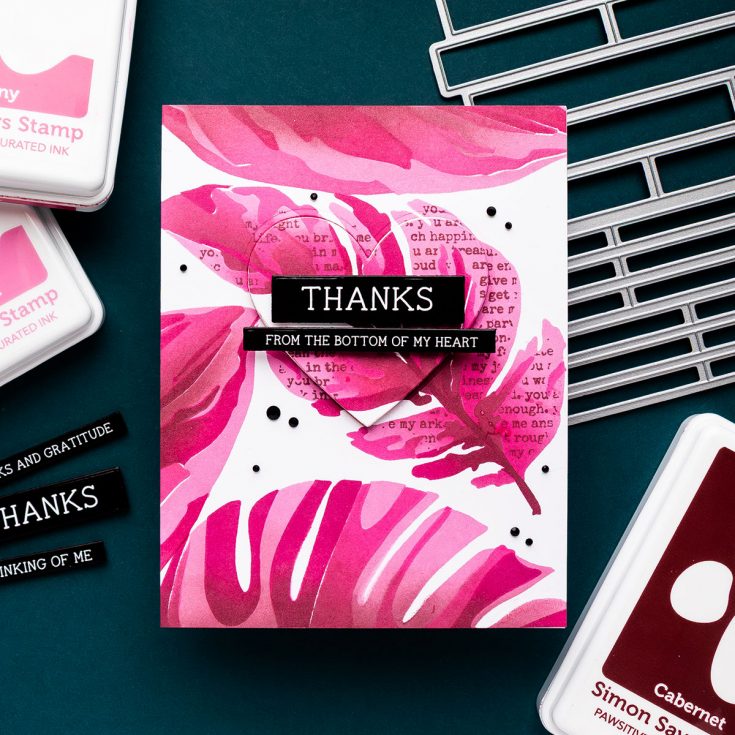
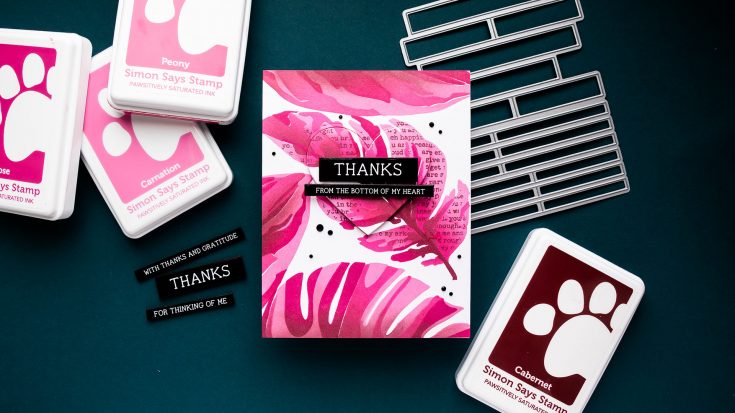
To begin, I’m using the White Fusion stencil set, which is perfect for creating an intricate leaf design. I adore the size of this stencil – it’s bold and makes a statement on any card. For this project, I’ll be using four colors of ink from Simon Says Stamp: Carnation, Peony, Rose, and Cabernet.
I used a Pawsitively Perfect Craft Tacky Mat to keep my panel in place as I ink blended. I’m working with Neenah Solar White 80 lb cardstock, cut to 4.25” x 5.5” to fit the front of an A2 card.
Step 2: Ink Blending the First Layer
Using a large blending brush, I applied a solid layer of Carnation ink to the stencil. For each subsequent layer, I added a darker shade to create depth and shading, starting with Peony and Rose inks. I focused the darker shades on the center of the leaf, where natural shading would occur.
Step 3: Adding the Second and Third Layers
Next, I continued adding layers, using Peony for the second layer and Cabernet for shading. The beauty of this stencil set is how it builds upon each layer, with each color adding depth to the design. Once the third layer was inked, I removed the stencil and was in love with the vibrant contrast and how the leaf really popped against the white paper.
Step 4: Stamping the Text Background
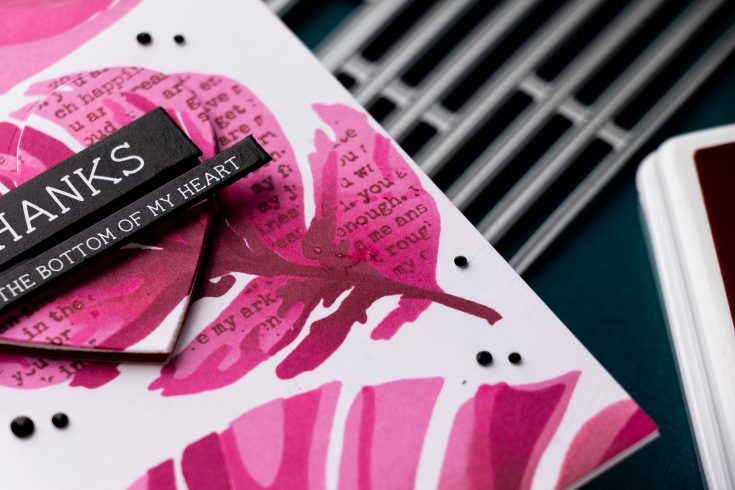
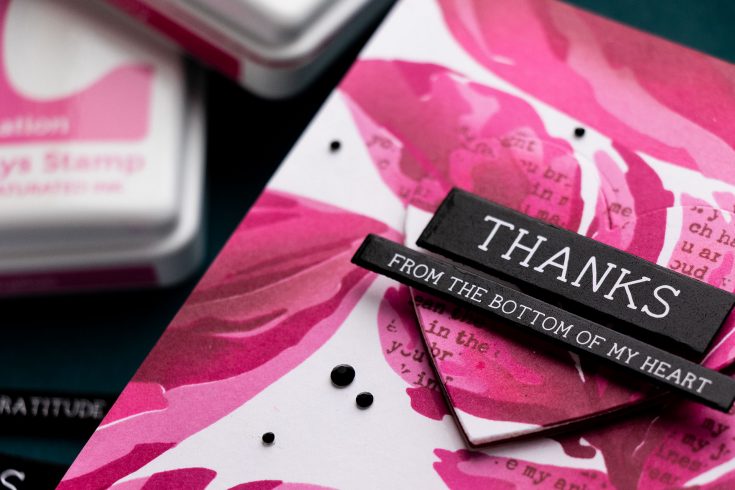
For a little extra dimension, I decided to add a text background using Simon Says Stamp’s You Are background cling stamp. I positioned the stamp over the leaf and stencil, and with the help of my MISTI, I stamped the image with Cabernet ink. I debated using black ink for more contrast, but the Cabernet gave it a softer, more cohesive look that blended beautifully with the rest of the design.
Step 5: Final Touches
Once I was happy with the ink blending and stamping, I went ahead and removed the pencil lines I had used for alignment. Now, it was time to add some additional ink blending to the background to fill in the empty space. I used the Monstera and Stromathne stencils to add more leaves in the same colors for a monochromatic effect.
Step 6: Die-Cutting the Heart
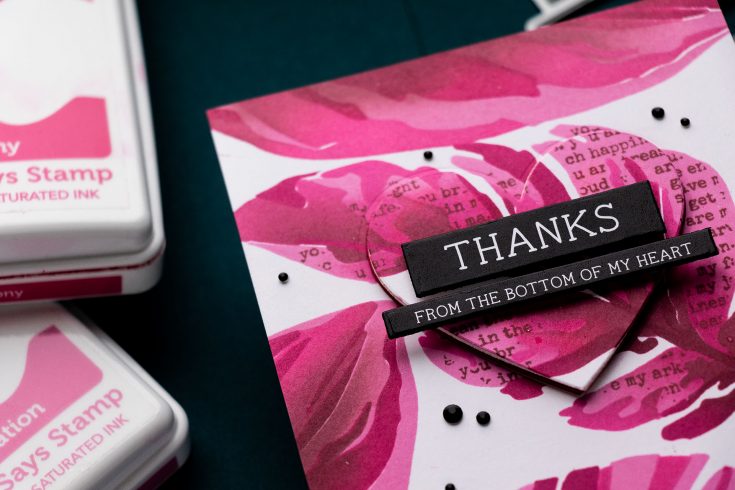
For a playful and heartwarming sentiment, I used a heart die from my stash to cut out a portion of the central leaf. I wanted to create a “heartfelt” design, so this die cut was perfect for the sentiment I chose, which reads “Thanks from the bottom of my heart.” I used Simon Says Stamp’s EZ Strips & Dies – Thank You set to cut out the sentiment from their preprinted sentiment strips – this makes cardmaking so much quicker and easier!
Step 7: Assembling the Card
I adhered my inked panel onto an A2 top-folding card base, then foam-mounted the heart and sentiment onto the center. I added a few black gems to tie everything together and add a little sparkle.
And just like that, the card was complete! I love how it turned out – so vibrant, full of dimension, and the perfect thank you card for any occasion.
I encourage you to give this technique a try. Whether you stick with the monochromatic look or go for something more colorful, the possibilities are endless. Thanks so much for joining me today, and I’ll see you next time with more fun ideas for your crafting!
Happy stamping!
WATCH THE VIDEO:

SUPPLIES:
|


Ways to support Ukraine:
If you are looking for ways to support Ukraine, we encourage you to visit this page on Yana’s blog:

Thanks so much for stopping by, and thanks to Yana for being our guest!
Mark your calendar!
Join us live MONDAY April 21st at 12 PM ET! Click or tap the bell by ‘Notify Me’ to be notified when we begin on MONDAY April 21st at 12 PM ET!


It’s so cool to see how just four ink colors can create such a layered and dimensional look! I’m inspired to be more deliberate with my color choices when blending now—your breakdown really made the technique feel approachable.
This is stunning – what great colours
Wow, who knew blending ink could be a workout for your wrist? Bet my muscles will be bulging after a few of these cards. ?
If I had a nickel for every ‘oops’ moment during crafting, I’d be rich. Can’t wait to see if this stencil hides my mistakes as well as I hope! ?
This looks gorgeous, but my crafting space is a disaster zone. I might just end up using these techniques to blend my snack stash instead. ?♀️