Make a Card Full of Texture and Color! Crafty with Caly

Hi friends! Happy Saturday! I hope your weekend is starting off wonderfully! Please join me in welcoming back special guest Caly Person to the blog today with a super gorgeous and textured Support card idea, but really, you could swap this card easily for a Thank you, Birthday, Wedding, or MORE! Read on and be sure to watch the video for all the details! Enjoy!
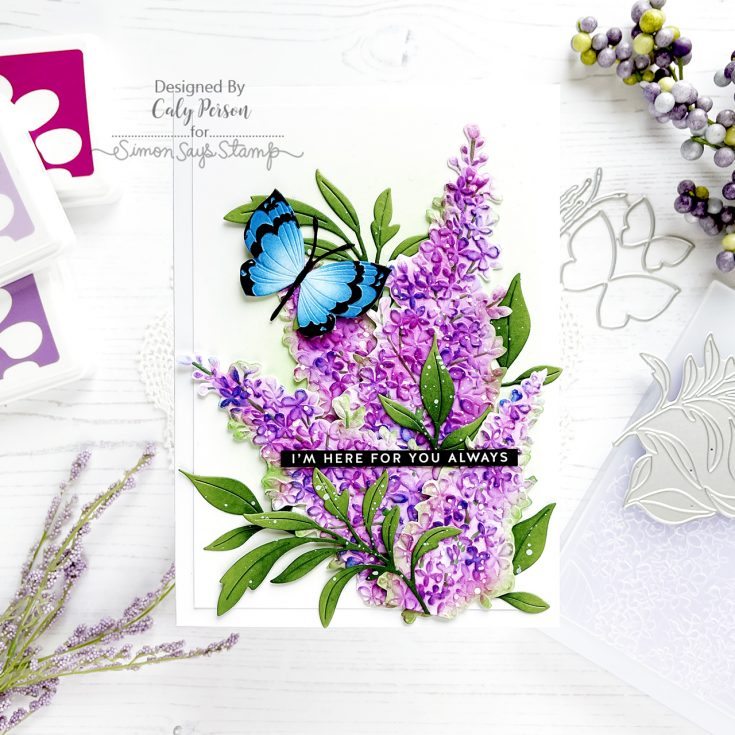
Hello! Thanks so much for joining me today! I’m using embossing folders today to create a card that’s full of texture and color. The latest Simon Says Stamp release brings new embossing folders that are beautiful and I wanted to combine the Lilac Clusters with the Fantasy Butterflies for today’s card.
Be sure to check out the video to see how I used these embossing folders to add color and bring these images to life!
WATCH THE VIDEO:
I began by embossing the Lilac Clusters on two panels and ink-blended them with purple ink. I wanted to add some depth too, so I added some pink and blue ink as well. I had ink-blended the foliage at the bottom of the panel with green ink, but decided to fussy-cut around all the lilac clusters to get individual clusters for my card.

My card is 5” x 7” to accommodate the 4 large lilac clusters. To add foliage, I die-cut some Windswept Leaves with green cardstock and ink-blended them with dark green ink to give them some shading. I also prepared a single butterfly from the Fantasy Butterflies embossing folder and coordinating die set.
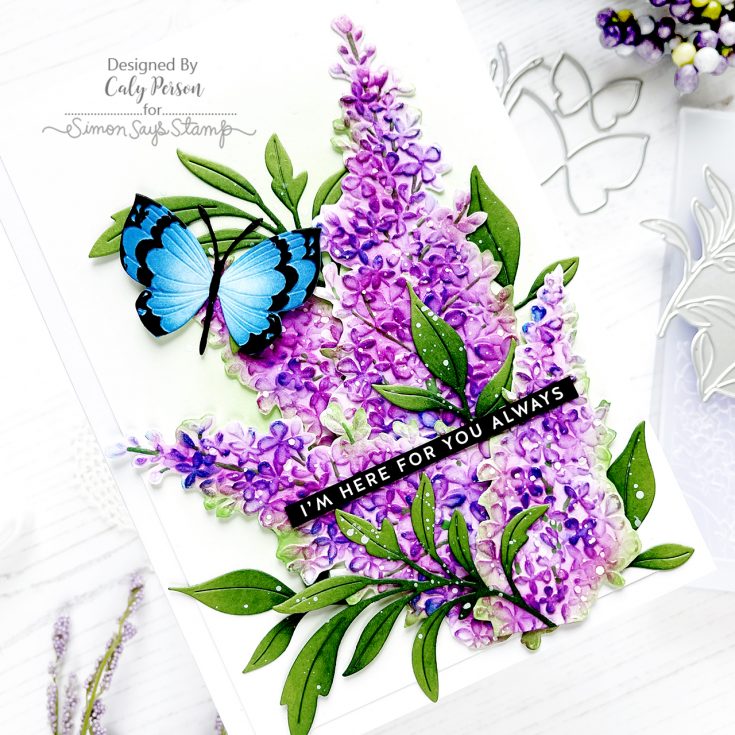
On the background, I ink-blended some green to add a soft glow. Once I arranged and adhered my lilac clusters and leaves, I splattered the panel with white paint to give it additional texture. I then finished with a simple sentiment strip from the Thinking of You Sentiment Strip set.
I hope you enjoyed this project! Thanks so much for being here today! ~Caly
SUPPLIES:
|


Thanks so much for stopping by, and thanks to Caly for being our guest!


This card is so beautiful. I can’t stop looking at it!!!
Really Beautiful!!!! Thanks for the video, I love watching your process.
This card is beautiful!!! Thank you for sharing your tips for creating it!!
Oh wow this is just gorgeous
Hi, Caly – Still working backwards since I was busy with other things and planting lots of flowers. This is STUNNING! Great job, Caly!
Lori S in PA
So gorgeous!